26 June 2024

Colour Creations Blog Hop - Basic Gray


Hello and welcome my friends,

My name is Vicki Boucher and I'm from Melbourne, Australia. Today, I'll be sharing with you another colour for Colour Creations blog hop and we are now at week 9 with the Art With Heart Team in Australia. 

The next colour is Basic Gray which is part of the Neutrals range and it's a colour I don't normally use that often, but I'm happy on how this colour palette works so well together in my project. Basic Gray comes in Cardstock, Classic Ink Pad, Ink Refill, Embellishments and Designer Series Paper. 


Today's card I went with the Layers of Beauty bundle (163519) and the coordinating Layers of Beauty Decorative Masks (163517). I used the large size floral image, stamped in Basic Gray ink onto Basic White Cardstock and then I stamped the same image again twice in Melon Mambo ink onto Basic White Cardstock.


Layers of Beauty bundle and Decorative Masks 


The Layers of Beauty Decorative Masks makes colouring easy when using Blending Brushes and ink. The set includes 5 masks that are meant to be layered, one by one, to create pretty coloured roses. The masks are numbered 1-5 so you know which layer comes next. There are also notches in the masks to help with perfect alignment. I only used the first three masks to colour in the flowers and I didn't colour in the leaves. Using the masks gives you variation in colour and depth. 

Exciting news is that this bundle plus many more are all on sale with an extra 10% off the bundle from 5th June - 30th June 2024, so take advantage of the sale and add some new bundles to your collection. 


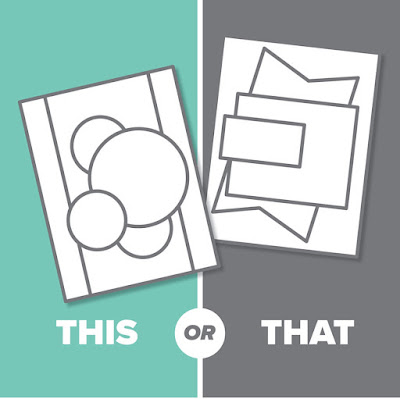
Last week I went with a sketch challenge called THIS or THAT for the month of June and it's located over on Stampin' Up! Official Instagram page. You can also find lots of helpful sketches on page 22 of the Stampin' Up! Annual Catalogue. So, this week I decided to use the other sketch and go with THIS.


I used the second largest circle die from the Spotlight on Nature Dies (163580) and die-cut out part of the Basic Gray Layers of Beauty stamped image. I used the Layers of Beauty large die to die-cut out a section of Melon Mambo floral stamped image and layered them together under the Basic Gray floral image. I also die-cut out a few of the detailed leaves in Basic White Cardstock and placed them under the stamped floral images.


I used the Distressed Tile 3D Embossing Fold (162189) and embossed a panel in Basic White Cardstock. I'm loving white on white detail at the moment when it comes to card making.


I heat embossed the sentiment which is from the Something Fancy Stamp Set (160416) onto Basic Gray Cardstock and die-cut the sentiment out using the second smallest circle die from the Spotlight on Nature Dies. To finish off the card I added a few of the Basic Gray Pearls to the card.


Thank you for visiting my blog today, I would so love to hear your thoughts on my project by leaving a comment below.


Now for the next blog please visit the very talented Catherine Proctor click on the link below.


If the next button link is not working or you'd like to see the entire list of participants go to Catherine Proctor's blog.


Please email me if you would like a copy of the 2024-2025 Stampin' Up! Annual Catalogue send an email to me here

If you live in Australia and don't have a demonstrator, you can purchase any of the Stampin' Up! products by shopping with me at my Stampin' Up! online store here.

Make sure you follow me on social media via Facebook, Instagram and Pinterest.


Happy Stamping

Vicki Boucher


19 June 2024

Colour Creations Blog Hop - Balmy Blue


Hello and welcome my friends,

My name is Vicki Boucher and I'm from Melbourne, Australia. Today, I'll be sharing with you another colour for Colour Creations blog hop and we are now at week 8 with the Art With Heart Team in Australia. 

The next colour is Balmy Blue which is part of the Subtles range and it's a lovely blue to use in your projects. It comes in Cardstock, Classic Ink Pad, Ink Refill, Embellishments, Designer Series Paper and many more Stampin' Up! products.

I have to tell you a secret this is not the card I was going to be presenting to you tonight in fact I had actually used another colour altogether and it was Boho Blue. Silly me used the wrong blue! Has this ever happened to you? I've saved the card for when Boho Blue comes along which will be week 13 and the good thing is I'm already for Boho Blue.


Well, here's my very quick card using Boho Blue and it's a masculine card as I needed a birthday card for my dad which is coming up soon. As this card was made very last minute, I decided to go with a sketch challenge which is called THIS or THAT for the month of June and it's located over on Stampin' Up! Official Instagram page. You can also find lots of helpful sketches on page 22 of the Stampin' Up! Annual Catalogue. I went with THAT for the challenge.


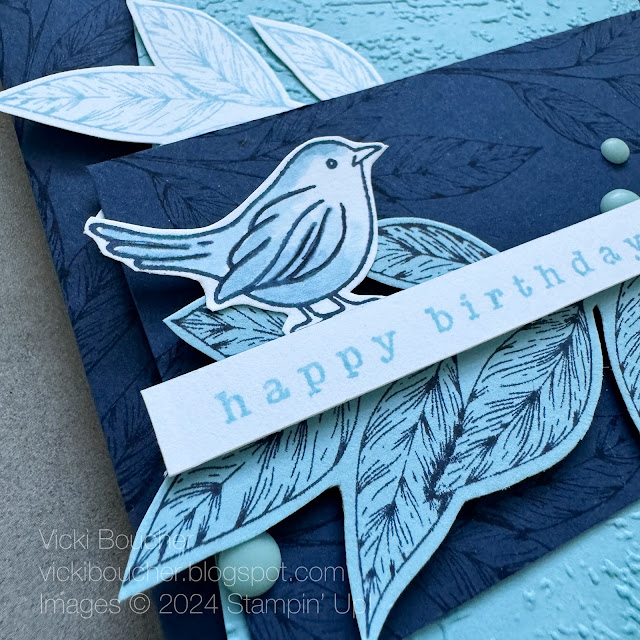
I've used the Spotlight on Nature and Country Birdhouse stamp sets for the birthday card. I love all of the images from the Spotlight on Nature stamp set especially the sprig of leaves stamp and I have stamped it a number of times throughout the card. 


I went with a tone-on-tone look using Night of Navy cardstock and ink. I also stamped the same image using Night of Navy ink onto Balmy Blue cardstock and also Balmy Blue ink stamped onto Basic White cardstock, then I've fussy cut out the images to add to my layers.


As I needed a birthday stamp for the card, I went through my stamp sets and then I found Country Birdhouse Stamp Set and used the happy birthday greeting. I also used the bird image and stamped the bird in Night of Navy and coloured the bird in with Balmy Blue Stampin' Blends. To finish off the card I added Balmy Blue embellishments. 


Thank you for visiting my blog today, I would so love to hear your thoughts on my project by leaving a comment below.


Now for the next blog please visit the very talented Theresa Gerrard click on the link below.


If the next button link is not working or you'd like to see the entire list of participants go to Catherine Proctor's blog.


Please email me if you would like a copy of the 2024-2025 Stampin' Up! Annual Catalogue send an email to me here

If you live in Australia and don't have a demonstrator, you can purchase any of the Stampin' Up! products by shopping with me at my Stampin' Up! online store here.

Make sure you follow me on social media via Facebook, Instagram and Pinterest.


Happy Stamping

Vicki Boucher

16 June 2024

Stamping Sunday Blog Hop - CASE the Catalogue


Hello and welcome,

My name is Vicki Boucher and I'm from Melbourne, Australia. Today is Stamping Sunday blog hop for the month of March and for this month's theme is "CASE the Catalogue" for our projects. It's the 3rd Sunday of the month and it's great to back after being away on holidays for the last couple of months. I'm looking forward to seeing everyone's projects and you'll be able to see them by clicking on their names at the end of my blog.


The page I've chosen for my CASE (copy and share everything) is located on page 29 and I've chosen the two gift tags at the bottom of the page. They are from the Frames & Flowers 12 x 12 Specialty Designer Series Paper and it has three sheets of double-sided designs with floral and greenery designs one side and all-purpose patterns on the other. It also has three sheets of die-cut greenery elements that you can use on card fronts or to frame photos on scrapbook pages. 


Frames & Flowers 12 x 12 Specialty Designer Series Paper


The Stampin' Up! products I've used for my projects is Thoughtful Journey Suite Collection (163320) which is located on page 46 - 47 of the catalogue. Included in the suite is Thoughtful Wishes Stamp Set and Dies Bundle (163314), Adhesive Backed Pearl Trio (163319), Thoughtful Designs 12 x 12 Specialty Designer Series Paper (163317) and Thoughtful Journey 6 x 6 Designer Series Paper (163303).


Thoughtful Journey Suite Collection 


Thinking of You Card


The first card I made is all about the wreath using the circle die from the Spotlight in Nature Dies used as a focal point and I used Misty Moonlight ink for the sentiment. Next, I added lots of elements layered under the circle by die-cutting lots of detailed images using the Thoughtful Journey 6 x 6 Designer Series Paper and Thoughtful Wishes Dies. 


The colour palette is Misty Moonlight, Boho Blue, Blackberry Bliss and Petunia Pop. I also added Petunia Pop Glimmer Specialty Paper (163771) and die-cut out using the detailed die, adding a little bit of sparkle to your projects is always fun!


I just love the Thoughtful Journey DSP so much and you have a beautiful background already made for your card making and one of my favourite pieces would have to be the Misty Moonlight sheet. It's so pretty and I layered it over the Petunia Pop and Blackberry Bliss sheet for my base layer. 


To finish off my card I used the Petunia Pop Bordered Ribbon and made it into a bow. To do this I use the Paper Snips and cut along the center of the ribbon until there's enough length to tie a bow. Losen the strands by gently pulling the strands away and then carefully tie into a bow. Tip, make sure you don't have any glue on your fingers or else the threads will stick to your fingers.


Missing You Card


Next, is my other card I made using the both the Thoughtful Wishes Stamp Set and Dies. This time the colour palette is Pretty Peacock, Lost Lagoon, Mossy Meadow and Wild Wheat. Starting with the sentiment stamped in Pretty Peacock onto Basic White and die-cut out using the Nested Essentials Dies.


The Thoughtful Journey DSP has been used again with the different detailed dies from the Thoughtful Wishes Dies then layered over the Pretty Peacock DSP panel, which I've stamped the leaf image a few times onto the DSP. I also stamped the same image in Pretty Peacock onto Lost Lagoon Thoughtful Journey DSP and then die-cut out the image and layered under the sentiment.


To finish off the card I added a bow in Basic Beige Bordered Ribbon by making fine strands as I did with the above Petunia Pop bow. I also added a few of the Lost Lagoon Tinsel Gems to the card.


Thank you for visiting my blog today, I would so love to hear your thoughts on my project by leaving a comment below.


Please email me if you would like a copy of the 2024-2025 Stampin' Up! Annual Catalogue send an email to me here


If you live in Australia and don't have a demonstrator, you can purchase any of the Stampin' Up! products by shopping with me at my Stampin' Up! online store here.

Make sure you follow me on social media via Facebook, Instagram and Pinterest.


Happy Stamping

Vicki Boucher


To see all of the amazing projects by the Stamping Sunday Design Team please click on their names below. 


12 June 2024

Colour Creations Blog Hop - Azure Afternoon


 Hello and welcome my friends,

My name is Vicki Boucher and I'm from Melbourne, Australia. Today, I'll be sharing with you another colour for Colour Creations blog hop and we are now at week 7 with the Art With Heart Team in Australia. 

The next colour is Azure Afternoon which is part of the Brights range and it's so pretty. I need to use this colour more often in my projects. It comes in Cardstock, Classic Ink Pad, Ink Refill, Embellishments, Designer Series Paper and more Stampin' Up! products.


Today's project I created a blue and white theme card using the Country Flowers bundle (163411) which includes the stamp set and dies. As this week's colour is blue I used the teapot image and stamped it in Night of Navy ink. I colured the teapot in with the Stampin' Blends in the following colours Azure Afternoon, Blueberry Bushell, Balmy Blue, Pecan Pie and the Colour Lifter to blend in the colours together. 


I also went over the coloured teapot with Watercolour Pencils using Blue, Balmy Blue and Night of Navy. I find the pencils give you more control when colouring in and they make the colours seem brighter.


I also used the arrangement of flowers for the teapot and coloured them in with the Stampin' Blends in Azure Afternoon and Old Olive. Again, I use the Watercolour Pencils using Blue, Old Olive and Granny Apple Green.

The additional flower on the left is from the Country Birdhouse stamp set and die-cut with the coordinating dies. I used the same colours and techniques as above.


I wanted to have the teapot sitting on something different and not from the Country Flowers stamp set, so I had a light bulb moment and went with the pile of books stamp which is from the Bird's Eye View stamp set. I used the Stampin' Blends and Watercolour Pencils in similar as the teapot, I also used Crushed Curry and White in the pencils. The sentiment is from Country Flowers Stamp Set and is stamped using Night of Navy ink with each word on each of the books.


I wanted to try out one of the templates which is in the Stampin' Up! Annual Catalogue and you can find them on page 22 of the catalogue. I do like to challenge myself and my creativity. 

The teapot is layered over a blended inked up panel using Balmy Blue, Azure Afternoon and Pecan Pie inks and applied with the Blending Brush. Then layered over Azure Afternoon cardstock panel.


Next, I created three strips of Azure Afternoon Designer Series Paper which is from the Bright & Beautiful 6 x 6 Designer Series Paper cut at 3cm x 14cm. I used the Distressed Tile 3D Embossing Folder and dry embossed the strips. 


To show through some of the white from the DSP I used a nail file to remove some of the Azure Afternoon from the paper. You can see more embossed detail by doing this technique.


Thank you for visiting my blog today, I would so love to hear your thoughts on my project by leaving a comment below.


Now for the next blog please visit the very talented Theresa Gerrard click on the link below.


If the next button link is not working or you'd like to see the entire list of participants go to Catherine Proctor's blog.


Please email me if you would like a copy of the 2024-2025 Stampin' Up! Annual Catalogue send an email to me here

If you live in Australia and don't have a demonstrator, you can purchase any of the Stampin' Up! products by shopping with me at my Stampin' Up! online store here.

Make sure you follow me on social media via Facebook, Instagram and Pinterest.


Happy Stamping

Vicki Boucher


Colour INKspiration Challenge #CI167


 Hello and welcome, 

My name is Vicki Boucher, and I am from Melbourne, Australia. Tonight, is the latest Colour INKspiration Challenge #CI167 this photo was chosen by Colour INKspiration Crew Member, Bronwyn. 


The chosen colour combination for #CI167 is Pretty in Pink, Basic White and Basic Black. As well as the chosen colours you may also like to add Very Vanilla, Basic Beige, Crumb Cake and metallics to your project. We also allow 'Ivory', 'Bronze' and 'Natural Tones' in the Stampin' Blends. If you don't have all the colour palette, feel free to use the closest SU substitute (ie: Bubble Bath instead of Pretty in Pink.... for example).

The challenge will run for almost 2 weeks until 7pm (AEST) on Monday 24th June 2024 details to follow at the end of my blog.


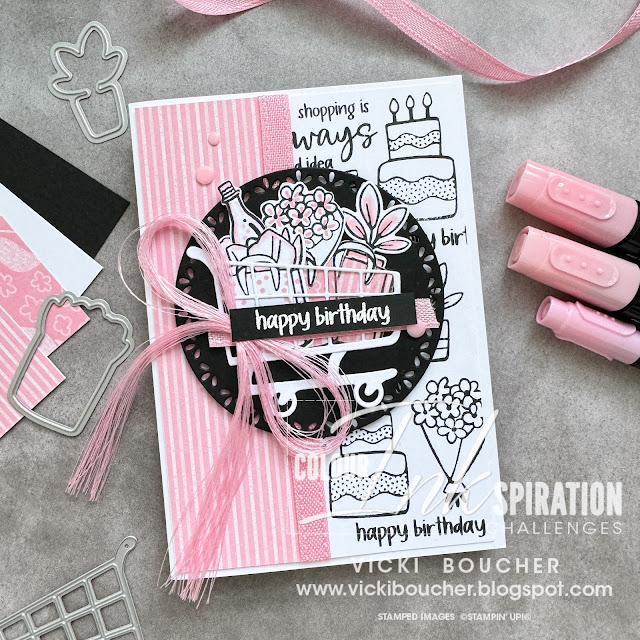
I just love this colour palette and the inspiration photo is gorgeous! Pretty in Pink was on top of the list when I first saw this new In Color, it's so much fun! I used Attention Shoppers bundle for my card and the circle die from the Spotlight on Nature dies is perfect to showcase the shopping bags in the trolley.


I used the paper piecing technique by stamping the gift bag image onto Pretty in Pink 2024-2026 In Color 6x6 Designer Series Paper and also on Basic White cardstock. Then I fussy cut out the images and added the white carry bag handles to the pretty pattern paper. To create the left gift bag, I drew pink polka dots using Pretty in Pink Stampin' Write Marker. The bags are full of gifts which was fun to do.


The inked up black and white background was using all of the smaller images and some of the sentiments onto Basic White cardstock panel leaving some white space in between the stamped images. On the other side of the stamped panel, I added a strip of Pretty in Pink In Color DSP and Pretty in Pink Bordered Ribbon.

I created a large pink bow by using Pretty in Pink Bordered Ribbon, to do this I use the Paper Snips and cut along the center of the ribbon until there's enough length to tie a bow. Losen the strands by gently pulling the strands away and then carefully tie into a bow. Tip, make sure you don't have any glue on your fingers or else the threads will stick to your fingers.


To finish off the card I heat embossed the sentiment and added a few of Pretty in Pink embellishments to the card.


I hope I've inspired you with the latest challenge and I do hope you'll join in. We so look forward to seeing a variety of projects using the challenge colours. Please ensure that your project is new and made specifically for this challenge.

Challenge guidelines:

  • Create a NEW project made specifically for this challenge.
  • Use all of the challenge colours (or close substitutions) unless stated.
  • Upload only ONE picture per entry straight to the discussion wall and NOT in an album.

Colour INKspiration Challenge #CI167 will run until 7pm (ADET) on Monday 24th June 2024.

To get your creative ideas flowing, make sure you check out the Crew's Project in the CI167 Album.

Please click on the link here to join the challenge.


Thank you for visiting my blog today, I would so love to hear your thoughts on my project by leaving a comment below.

Please email me if you would like a copy of the 2024-2025 Stampin' Up! Annual Catalogue send an email to me here


If you live in Australia and don't have a demonstrator, you can purchase any of the Stampin' Up! products by shopping with me at my Stampin' Up! online store here.

Make sure you follow me on social media via Facebook, Instagram and Pinterest.


Happy Stamping

Vicki Boucher


05 June 2024

Colour Creations Blog Hop - Basic Beige


Hello and welcome my friends,

My name is Vicki Boucher and I'm from Melbourne, Australia. Today, I'll be sharing with you another colour for Colour Creations blog hop and we are now at week 6 with the Art With Heart Team in Australia. 

The next colour is Basic Beige which is a new colour and it is part of the Basics range. It comes in Cardstock, Classic Ink Pad, Ink Refill, Ribbon and Designer Series Paper. This colour goes with anything and it compliments other colours when used together. 


Today's project I created a shabby chic card using the online exclusive Magnolia Mood bundle (163507) which includes a stamp set and dies in the bundle. 


Magnolia Mood Bundle (163507)


Exciting news is that this bundle plus many more are all on sale with an extra 10% off the bundle from today 5th June - 30th June 2024, so take advantage of the sale and add some new bundles to your collection. 


Plus, save 10% on Stampin' Cut & Emboss Machine and Mini Stampin' Cut & Emboss Machine. These machines make the perfect crafting partner for stamp and die bundles. This is an amazing offer! You can visit my online store for these fantastic offers.


I just love the images from the Magnolia bundle and I've been wanting to use the large, detailed magnolia image from the Magnolia Mood dies. I started with Basic White cardstock and die-cut the magnolia out. Then I took Wild Wheat ink and a Blending Brush and added ink lightly to all three magnolias next, I added Pecan Pie and to finish in the center, I used a Sponge Dauber and Pebbled Path ink.


Using Basic White cardstock to create two smaller heat embossed stamped magnolias then I used the emboss resist technique by adding the same colours as before, but I also added Basic Beige ink with the Blending Brush and Sponged Daubers.


I used Basic Beige Bordered Ribbon twice by using the threads tied in a bow and by placing a strip of ribbon under the sentiment. A die cut circle used in Basic Beige cardstock and the Spotlight on Nature dies acts as a focal point for all of the images added to the card. 


To create interest, I added three different types of designer series papers to the Basic Beige card base starting with a panel using the Distressed Tile Embossing Folder embossed using Basic Beige Country Lace Designer Series Paper, then another panel in Basic Beige Country Lace Designer Series Paper and followed by a panel from the Nature's Sweetness Specialty Designer Series Paper using the Pebbled Path scripted and gold embossed paper. I've distressed the paper with either using my fingers, Bone Folder and Paper Snips Scissors blade. 


To finish off the card I added embellishments in gold Neutrals Adhesive-Backed Sequins and Brushed Brass Butterflies.

Thank you for visiting my blog today, I would so love to hear your thoughts on my project by leaving a comment below.


Now for the next blog please visit the very talented Rosa Leyden click on the link below.


If the next button link is not working or you'd like to see the entire list of participants go to Catherine Proctor's blog.


Please email me if you would like a copy of the 2024-2025 Stampin' Up! Annual Catalogue send an email to me here

If you live in Australia and don't have a demonstrator, you can purchase any of the Stampin' Up! products by shopping with me at my Stampin' Up! online store here.

Make sure you follow me on social media via Facebook, Instagram and Pinterest.


Happy Stamping

Vicki Boucher