Showing posts with label Stamping Sunday Blog Hop. Show all posts

15 June 2025

Stamping Sunday Blog Hop - Sketch and In Color


Hello and welcome,

My name is Vicki Boucher and I'm from Melbourne, Australia. Today marks the Stamping Sunday blog hop for June, and this month's theme is "Sketch and In Color," which involves selecting any sketches from the Stampin' Up! Annual Catalogue and incorporating the new In Colors into our projects. 

As it is the third Sunday of the month, I'm looking forward to seeing everyone's creations, which can be accessed by on their names at the conclusion of my blog. Here's my card I made for this month.


Sketches provide an excellent foundation for cards, gift tags, or even scrapbook pages, making the creative process more manageable. I have selected a portrait sketch, which is located on page 24 of the catalogue. A photo has been included below.


I have used the Thankful Garden bundle, part of the Lovely Garden Suite Collection (165541). This Online Exclusive product includes designer series paper, stamp set, decorative masks, dies, ribbon, sequins, which work well together seamlessly to add texture, dimension and color to your creations. The masks simplify coloring by all five masks in conjunction with ink and a Blending Brush. This technique allows for significant variation in color.


I used three of five In Colors 2025-2027, beginning with Secret Sea, stamp the hydrangea onto Basic White Cardstock. It is a beautiful color and significantly softer than black Memento Ink.


Next, I applied Strawberry Slush ink using the first three masks, followed by Secret Sea ink with the next two masks. Inspired by Stacey Marsh, an Artisan Designer, who created a card using this bundle, admired her technique of producing a 3D effect by stamping the hydrangea flower head an additional time and was eager to try it myself. 


To achieve this look, just simply add color to the extra flower head, carefully fussy cut the tiny flowers, and use Stampin' Dimensionals to add depth. I needed a third hydrangea as per previous step for my extra pieces of tiny flowers placed onto the card with adhesive.


The hydrangea is positioned on two panels of Cloud Cover paper, sourced from the 2025-2027 In Color 6x6 Designer Series Paper. Additionally, I incorporated Cover 2025-2027 In Color Flat Pearls and stamped the sentiment using Secret Sea ink. For this, I used a separate stamp set titled Beautiful Motifs.

Thank you for visiting my blog today, I would so love to hear your thoughts on my project by leaving a comment below.

Please email me if you would like a copy of the 2025-2026 Stampin' Up! Annual Catalogue send an email to me here

If you live in Australia and don't have a demonstrator, you can purchase any of the Stampin' Up! products by shopping with me at my Stampin' Up! online store here.

Make sure you follow me on social media via Facebook, Instagram and Pinterest.


Happy Stamping

Vicki Boucher


To see all of the amazing projects by the Stamping Sunday Design Team please click on their names below. 


15 September 2024

Stamping Sunday Blog Hop - Unfold Funfolds


Hello and welcome,

My name is Vicki Boucher and I'm from Melbourne, Australia. Today is Stamping Sunday blog hop for the month of September and for this month's theme is "Unfold Funfolds" which means anything like a Fancy Fold or Fun Fold in our projects. It's the 3rd Sunday of the month. I'm looking forward to seeing everyone's projects and you'll be able to see them by clicking on their names at the end of my blog.


I haven't made a fun fold card in a long time, so it was fun to try something different when it comes to card making. I made a Twist and Pop Card back in July 2020 and there is a You Tube video on how to make this type of card, I'll add it at the end of this post.


For today's project a made a Christmas pop & twist card using products from both the Mini and Annual Stampin' Up! Catalogues. I used the Decorative Trees Bundle (164085) which is located on page 42 of the Mini Catalogue and also the Peaceful Season Bundle (164021) which is located on page 25. 

The card looks simple from the outside, but once opened the inside pops out! There is a 4 panel, pop up element inside. You don't need an engineering degree either to make one of these. You'll just need Cardstock and strong adhesive; I've used Stampin' Seal and Multipurpose Liquid Glue which has worked for my project. I used Thick Basic White cardstock for the card base and everything else is either Basic White cardstock or specialty paper.


Let's have a look inside the card, I used the Brushed Gold Cards & Envelopes (162177) and used one of the cards for the 4 panels. This was my starting point to how I was going to make my card. 


I just love gold and white together it's so sophisticated and a classic for Christmas cards. I used different types of Christmas trees dies from the Decorative Trees Dies to form the Christmas trees.


The greeting inside the card is from the Decorative Trees stamp set and is heat embossed using Versamark ink, adding Gold Embossing Powder and heat set with the Heat Tool. 


Now for the outside of the card which I made lots of different layers starting with the three Christmas Trees; two of them are die-cut out using Basic White Cardstock and the top Christmas tree is heat embossed using Gold Embossing Powder. 


The three trees are layered over a sheet of white & gold paper from the Nature's Sweetness Specialty Paper (162616), there's an embossed panel in white cardstock using the Forever Plaid 3D Embossing Folder (164049) which is gorgeous to use and then underneath that is a panel of Gold Foil (132622) I 'am so happy it's back!


I used the Peaceful Season Dies for the sentiment, die-cut out using gold foil and basic white cardstock and heat embossed the 'Merry' with gold embossing powder. To finish off the card I added a gold foil star for the tree and gold Blooming Pearls for the embellishments. 


Here is the link for the You Tube tutorial on how to make this Twist & Pop Fancy Fold card.


Thank you for visiting my blog today, I would so love to hear your thoughts on my project by leaving a comment below.

Please email me if you would like a copy of the 2024-2025 Stampin' Up! Annual Catalogue or Mini 2024 Catalogue send an email to me here

If you live in Australia and don't have a demonstrator, you can purchase any of the Stampin' Up! products by shopping with me at my Stampin' Up! online store here.

Make sure you follow me on social media via Facebook, Instagram and Pinterest.


Happy Stamping

Vicki Boucher


To see all of the amazing projects by the Stamping Sunday Design Team please click on their names below. 


21 July 2024

Stamping Sunday Blog Hop - Kaleidoscopic Depths


Hello and welcome,

My name is Vicki Boucher and I'm from Melbourne, Australia. Today is Stamping Sunday blog hop for the month of July and for this month's theme is "Kaleidoscopic Depths" colours from under the sea for our projects. It's the 3rd Sunday of the month. I'm looking forward to seeing everyone's projects and you'll be able to see them by clicking on their names at the end of my blog.


The colours I've chosen are turquois a mixture of blues and greens for my card and here's my inspiration photo I found it on Pinterest, see below. I do love the colours of the sea. I used a range of Stampin' Up! Colors starting with Pool Party, Coastal Cabana, Summer Splash, Shy Shamrock, Azure Afternoon, Blueberry Bushel and Night of Navy.


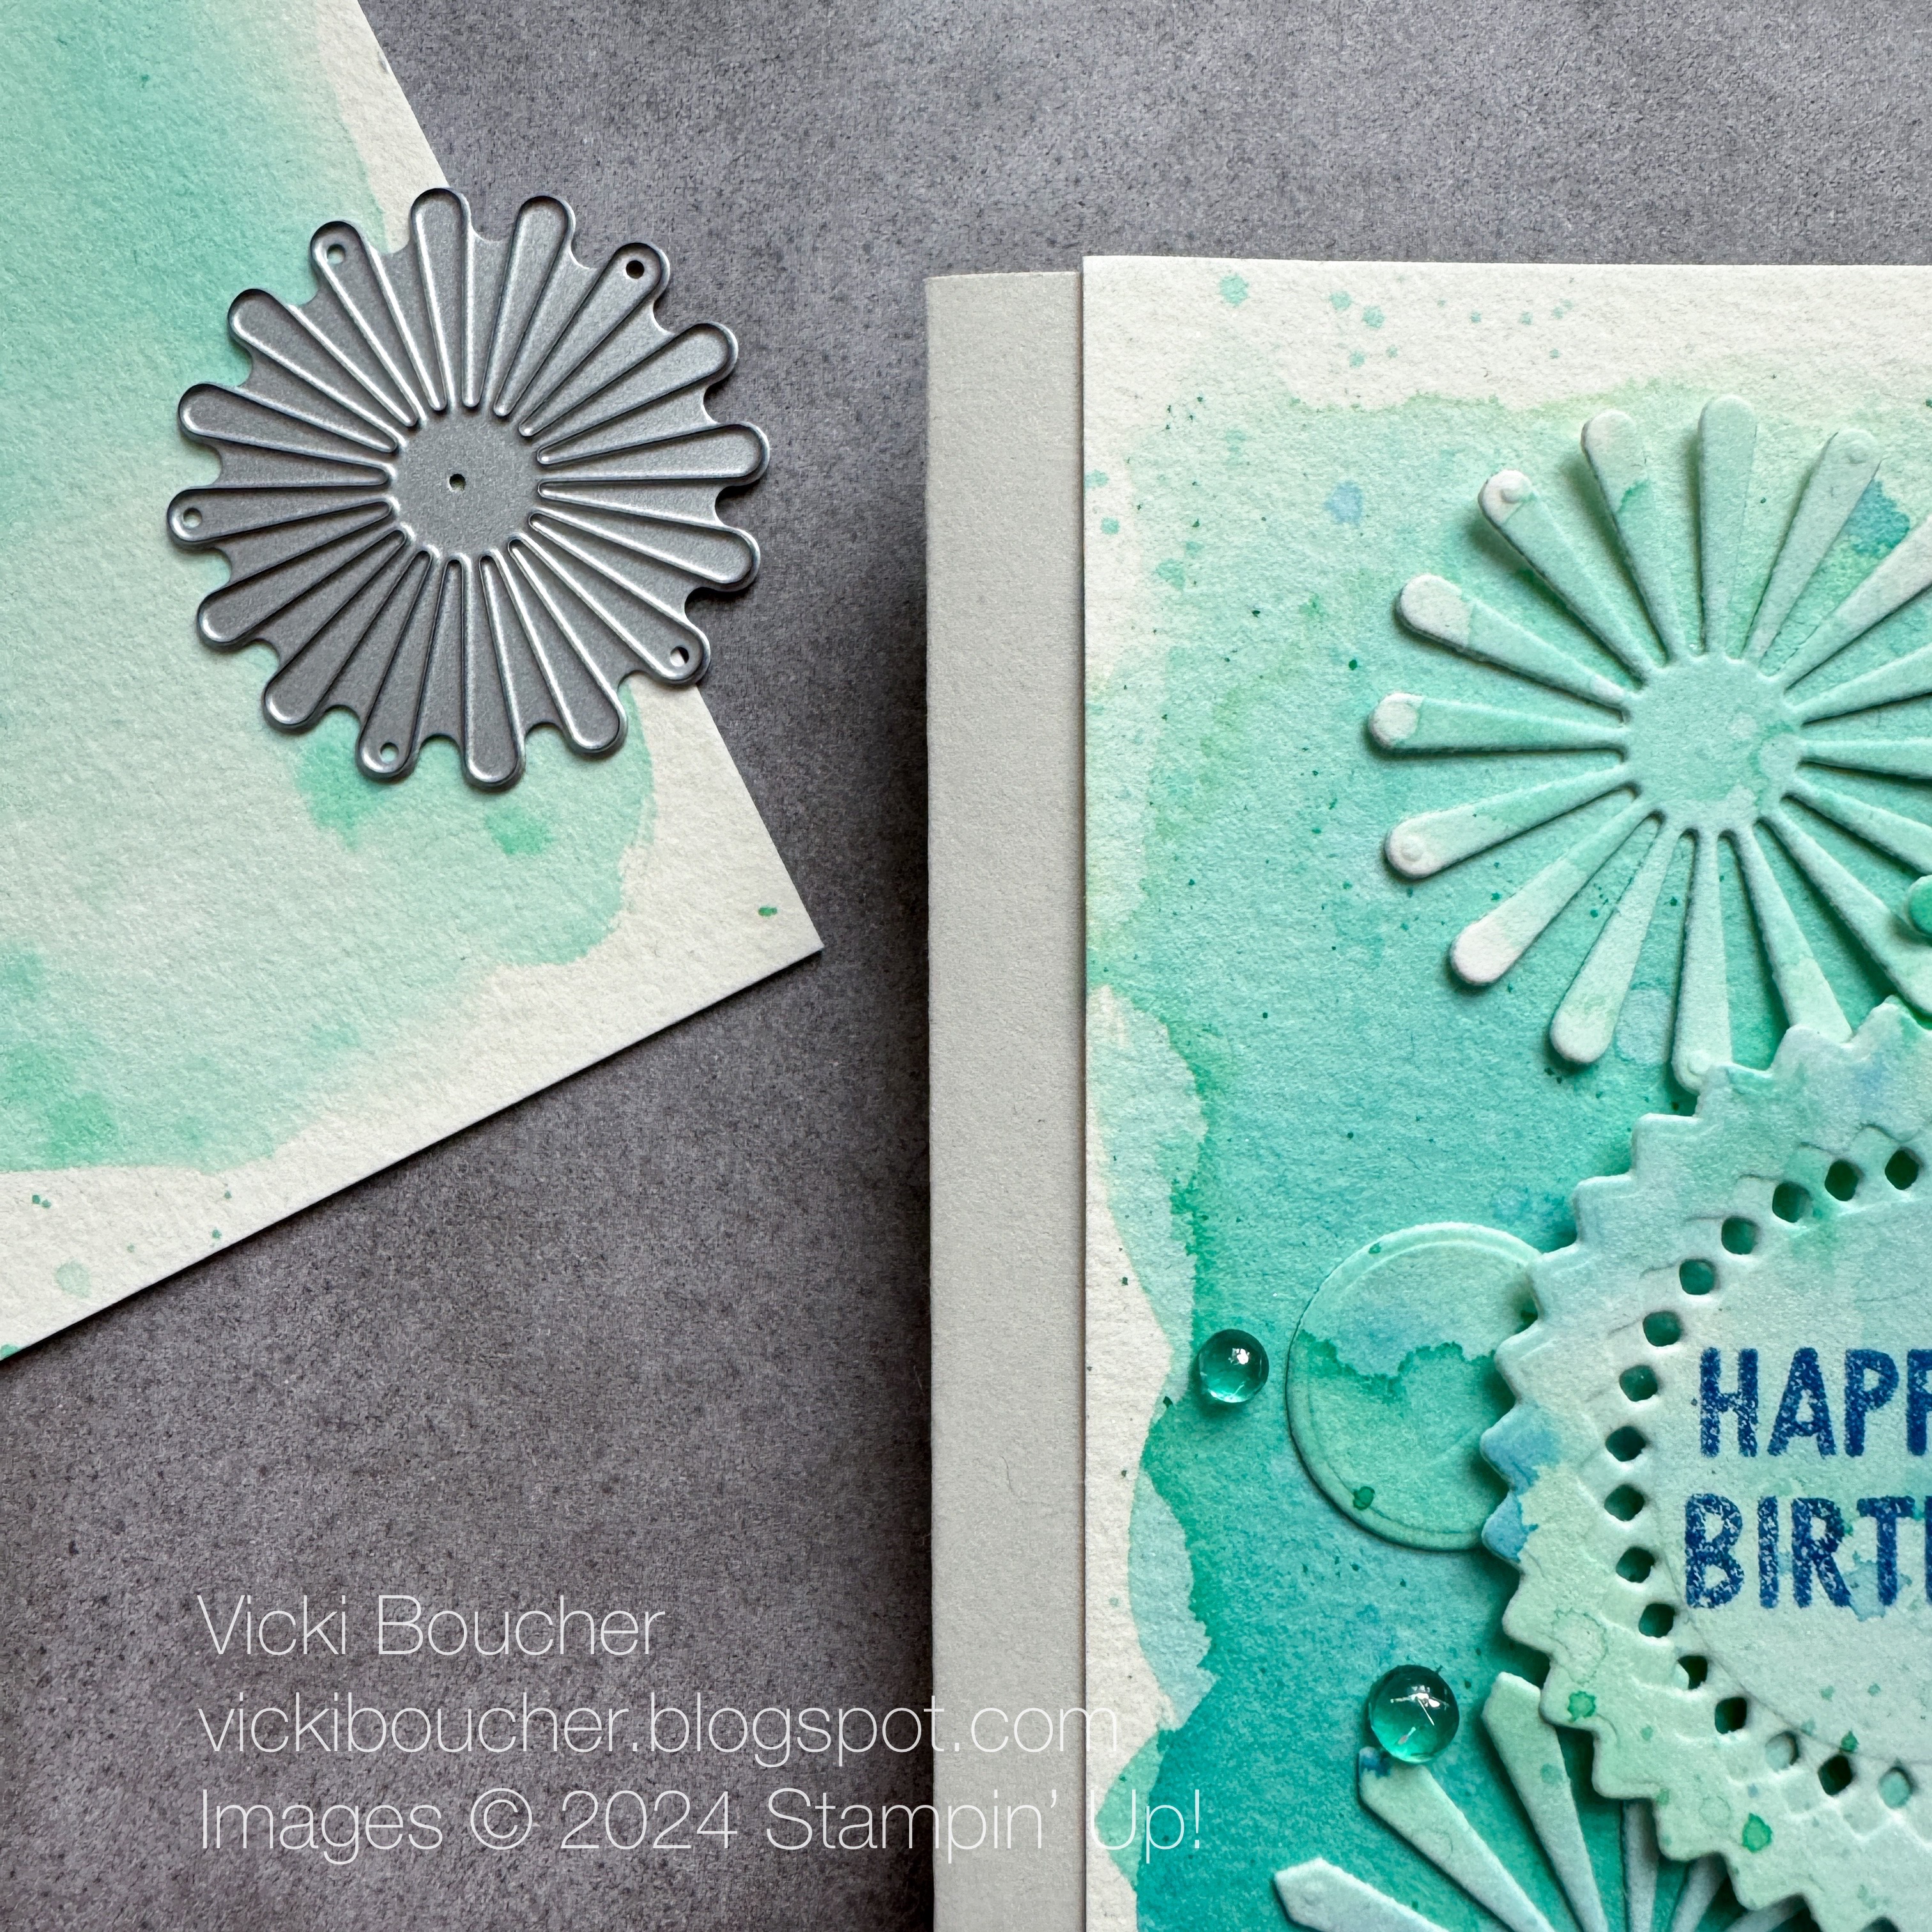
I started playing around with the colours for a water colour wash and a under the sea background. I used Fluid Flow Watercolour Paper, a wide tip brush Water Painter and all of the above mentioned coloured inks. I started with the lightest colour at the top and then moved my way down to the darkest colour. I used the Heat Tool to dry the inks on the watercolour paper and then I would apply more ink to achieve a deeper colour. Next, I added splatters of ink by tapping the brush against the Bone Folder.


I used the Round We Go Bundle which is in the Stampin' Up! Annual Catalogue and is located on page 63. I love the pinwheels from the Round We Go Dies they are so much to use and to create different elements for your projects. I made another water colour wash using the same technique as before for the pinwheels and smaller circles.


The sentiment is stamped in Blueberry Bushel onto a part of the watercolour wash and then I used the Round We Go Dies to die-cut the sentiment. Then I layered the different elements onto the card and added Tinsel Gems in Blueberry Bushel and Lost Lagoon. 


Thank you for visiting my blog today, I would so love to hear your thoughts on my project by leaving a comment below.


Please email me if you would like a copy of the 2024-2025 Stampin' Up! Annual Catalogue send an email to me here


If you live in Australia and don't have a demonstrator, you can purchase any of the Stampin' Up! products by shopping with me at my Stampin' Up! online store here.

Make sure you follow me on social media via Facebook, Instagram and Pinterest.


Happy Stamping

Vicki Boucher


To see all of the amazing projects by the Stamping Sunday Design Team please click on their names below. 


16 June 2024

Stamping Sunday Blog Hop - CASE the Catalogue


Hello and welcome,

My name is Vicki Boucher and I'm from Melbourne, Australia. Today is Stamping Sunday blog hop for the month of March and for this month's theme is "CASE the Catalogue" for our projects. It's the 3rd Sunday of the month and it's great to back after being away on holidays for the last couple of months. I'm looking forward to seeing everyone's projects and you'll be able to see them by clicking on their names at the end of my blog.


The page I've chosen for my CASE (copy and share everything) is located on page 29 and I've chosen the two gift tags at the bottom of the page. They are from the Frames & Flowers 12 x 12 Specialty Designer Series Paper and it has three sheets of double-sided designs with floral and greenery designs one side and all-purpose patterns on the other. It also has three sheets of die-cut greenery elements that you can use on card fronts or to frame photos on scrapbook pages. 


Frames & Flowers 12 x 12 Specialty Designer Series Paper


The Stampin' Up! products I've used for my projects is Thoughtful Journey Suite Collection (163320) which is located on page 46 - 47 of the catalogue. Included in the suite is Thoughtful Wishes Stamp Set and Dies Bundle (163314), Adhesive Backed Pearl Trio (163319), Thoughtful Designs 12 x 12 Specialty Designer Series Paper (163317) and Thoughtful Journey 6 x 6 Designer Series Paper (163303).


Thoughtful Journey Suite Collection 


Thinking of You Card


The first card I made is all about the wreath using the circle die from the Spotlight in Nature Dies used as a focal point and I used Misty Moonlight ink for the sentiment. Next, I added lots of elements layered under the circle by die-cutting lots of detailed images using the Thoughtful Journey 6 x 6 Designer Series Paper and Thoughtful Wishes Dies. 


The colour palette is Misty Moonlight, Boho Blue, Blackberry Bliss and Petunia Pop. I also added Petunia Pop Glimmer Specialty Paper (163771) and die-cut out using the detailed die, adding a little bit of sparkle to your projects is always fun!


I just love the Thoughtful Journey DSP so much and you have a beautiful background already made for your card making and one of my favourite pieces would have to be the Misty Moonlight sheet. It's so pretty and I layered it over the Petunia Pop and Blackberry Bliss sheet for my base layer. 


To finish off my card I used the Petunia Pop Bordered Ribbon and made it into a bow. To do this I use the Paper Snips and cut along the center of the ribbon until there's enough length to tie a bow. Losen the strands by gently pulling the strands away and then carefully tie into a bow. Tip, make sure you don't have any glue on your fingers or else the threads will stick to your fingers.


Missing You Card


Next, is my other card I made using the both the Thoughtful Wishes Stamp Set and Dies. This time the colour palette is Pretty Peacock, Lost Lagoon, Mossy Meadow and Wild Wheat. Starting with the sentiment stamped in Pretty Peacock onto Basic White and die-cut out using the Nested Essentials Dies.


The Thoughtful Journey DSP has been used again with the different detailed dies from the Thoughtful Wishes Dies then layered over the Pretty Peacock DSP panel, which I've stamped the leaf image a few times onto the DSP. I also stamped the same image in Pretty Peacock onto Lost Lagoon Thoughtful Journey DSP and then die-cut out the image and layered under the sentiment.


To finish off the card I added a bow in Basic Beige Bordered Ribbon by making fine strands as I did with the above Petunia Pop bow. I also added a few of the Lost Lagoon Tinsel Gems to the card.


Thank you for visiting my blog today, I would so love to hear your thoughts on my project by leaving a comment below.


Please email me if you would like a copy of the 2024-2025 Stampin' Up! Annual Catalogue send an email to me here


If you live in Australia and don't have a demonstrator, you can purchase any of the Stampin' Up! products by shopping with me at my Stampin' Up! online store here.

Make sure you follow me on social media via Facebook, Instagram and Pinterest.


Happy Stamping

Vicki Boucher


To see all of the amazing projects by the Stamping Sunday Design Team please click on their names below. 


21 January 2024

Stamping Sunday Blog Hop - Manly or Mainly Monochrome


Hello and welcome,

My name is Vicki Boucher and I'm from Melbourne, Australia. Today is Stamping Sunday blog hop for the month of January and for this month's theme is "Manly or Mainly Monochrome" for our projects. It's the 3rd Sunday of the month and it's great to back for the start of a new year. I'm looking forward to seeing everyone's projects and you'll be able to see them by clicking on their names at the end of my blog.


I went with a manly monochrome card for my project using the Nature's Sweetness Suite Collection (162645) and shades of neutral colours such as Crumb Cake and Pecan Pie. I used both bundles from the collection, which include the Lovely & Sweet and Notes of Nature Stamp Set and Dies. This suite is amazing, I just love how it all coordinates so you can mix and match different images together. 


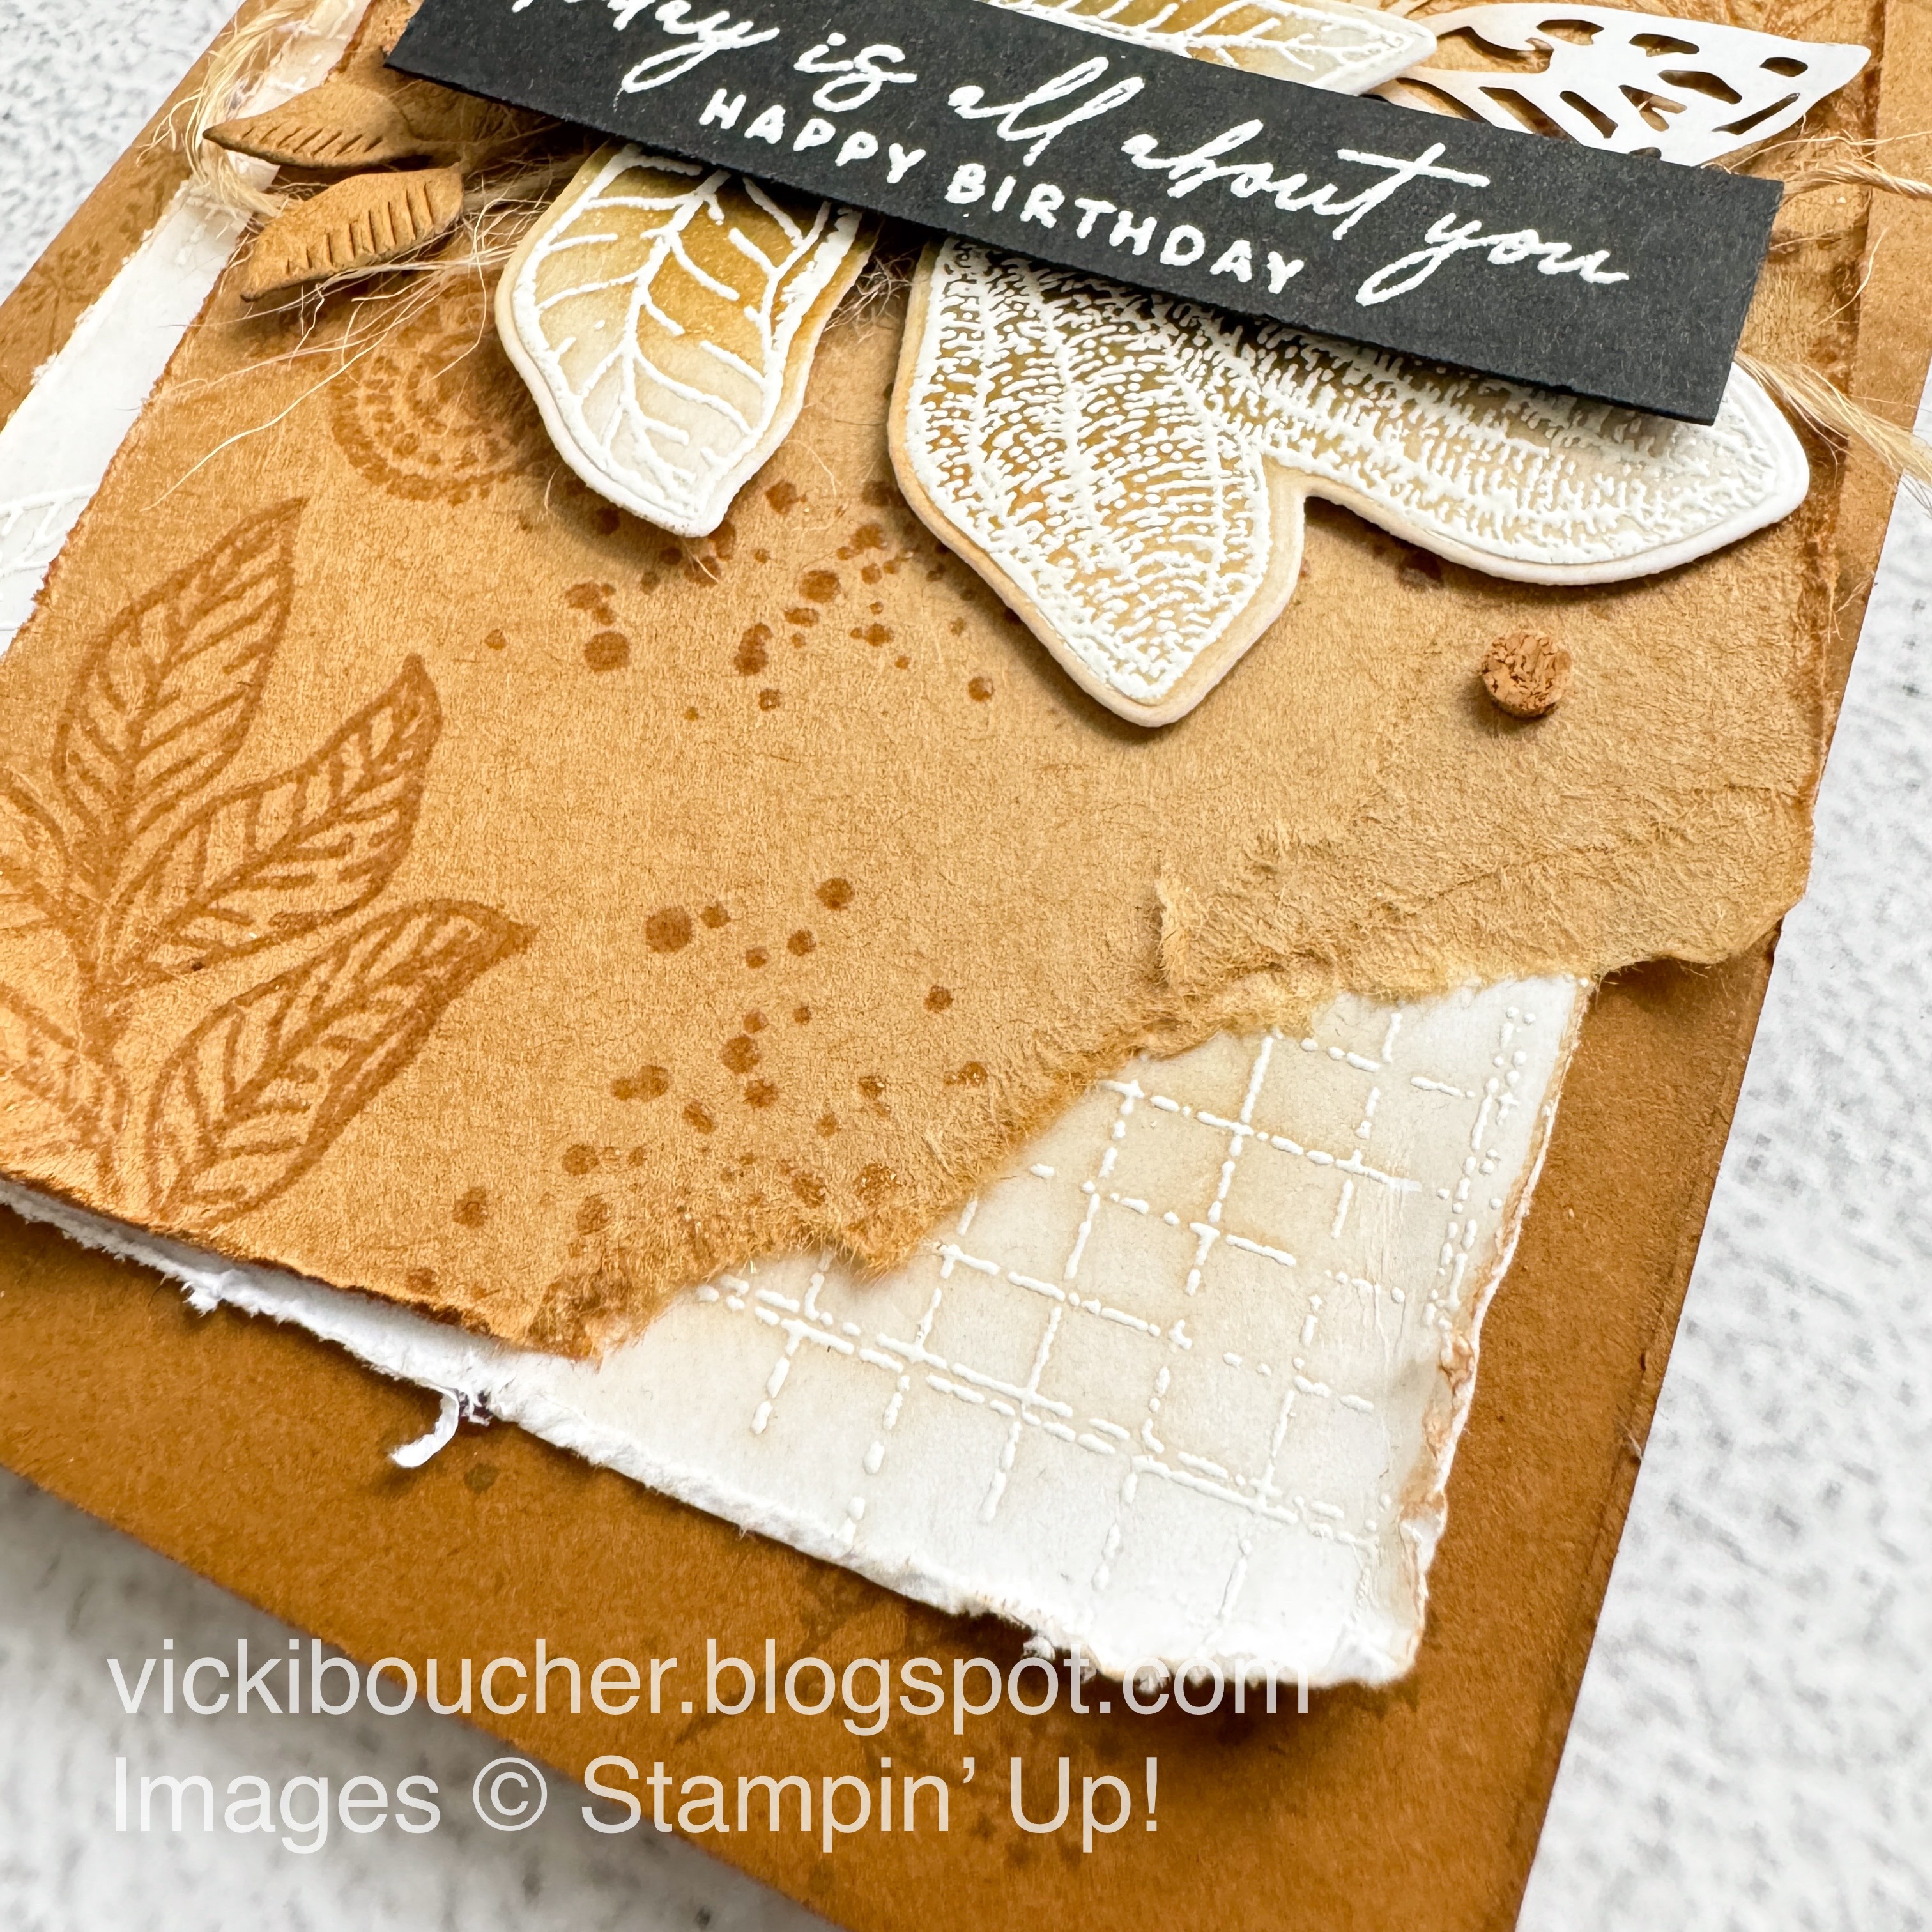
I used the emboss resist technique for the cocoa bean by stamping the image in VersaMark onto Basic White Cardstock, add White Stampin' Emboss Powder tap off any lose powder and then heat set with the Heat Tool. Once it has cooled down, I then started with Crumb Cake ink and applied lightly to the embossed bean with the Blending Brush, next I went onto Pecan Pie and then finished off blending in Pebbled Path ink for a darker brown.


My other main focal point is the destressed notebook which I used the card front from the Kraft Note Cards & Envelopes (159247) it measures at 9 x 12.8cm. I wanted to create a tone-on-tone effect by using the stamp images from the Notes of Nature stamp set, stamped in Versamark then I used clear Stampin' Emboss Powder and heat set with the Heat Tool.


To create the notebook look I used the long journal die to die-cut along the top of the Kraft paper, I just love this look and the details this die gives you. Using paper snips, I ran the blade along the edges of the Kraft paper and added Pecan Pie ink with the Blending Brush to create a destressed look. Then I tore a corn to show the Basic White panel embossed underneath.


Other elements added to the card is the Paper Butterfly Accents (162612) I used a smaller butterfly with Pecan Pie ink added to the center of the butterfly. The adhesive backed Cork Rounds (162643), Pecan Pie Bordered Ribbon and threads from the Silver Threaded Twine.


Thank you for visiting my blog today, I would so love to hear your thoughts on my projects by leaving a comment below.

Please email me if you would like a copy of the new 2023-2024 Annual and Mini Jan-April 2024 Catalogue, please contact me here

If you live in Australia and don't have a demonstrator, you can purchase any of the Stampin' Up! products by shopping with me at my online store here

Make sure you follow me on social media via Facebook, Instagram and Pinterest.


Happy Stamping

Vicki Boucher

To see all of the amazing projects by the Stamping Sunday Design Team please click on their names below. 


19 November 2023

Stamping Sunday Blog Hop - Stocking Fillers


 Hello and welcome,

My name is Vicki Boucher and I'm from Melbourne, Australia. Today is the Stamping Sunday blog hop for the month of November and for this month's theme is "Stocking Fillers". It's the 3rd Sunday of the month and can you believe it we are not too far away until the end of the year! I'm looking forward to seeing everyone's projects and you'll be able to see them by clicking on their names which will be at the end of my blog.


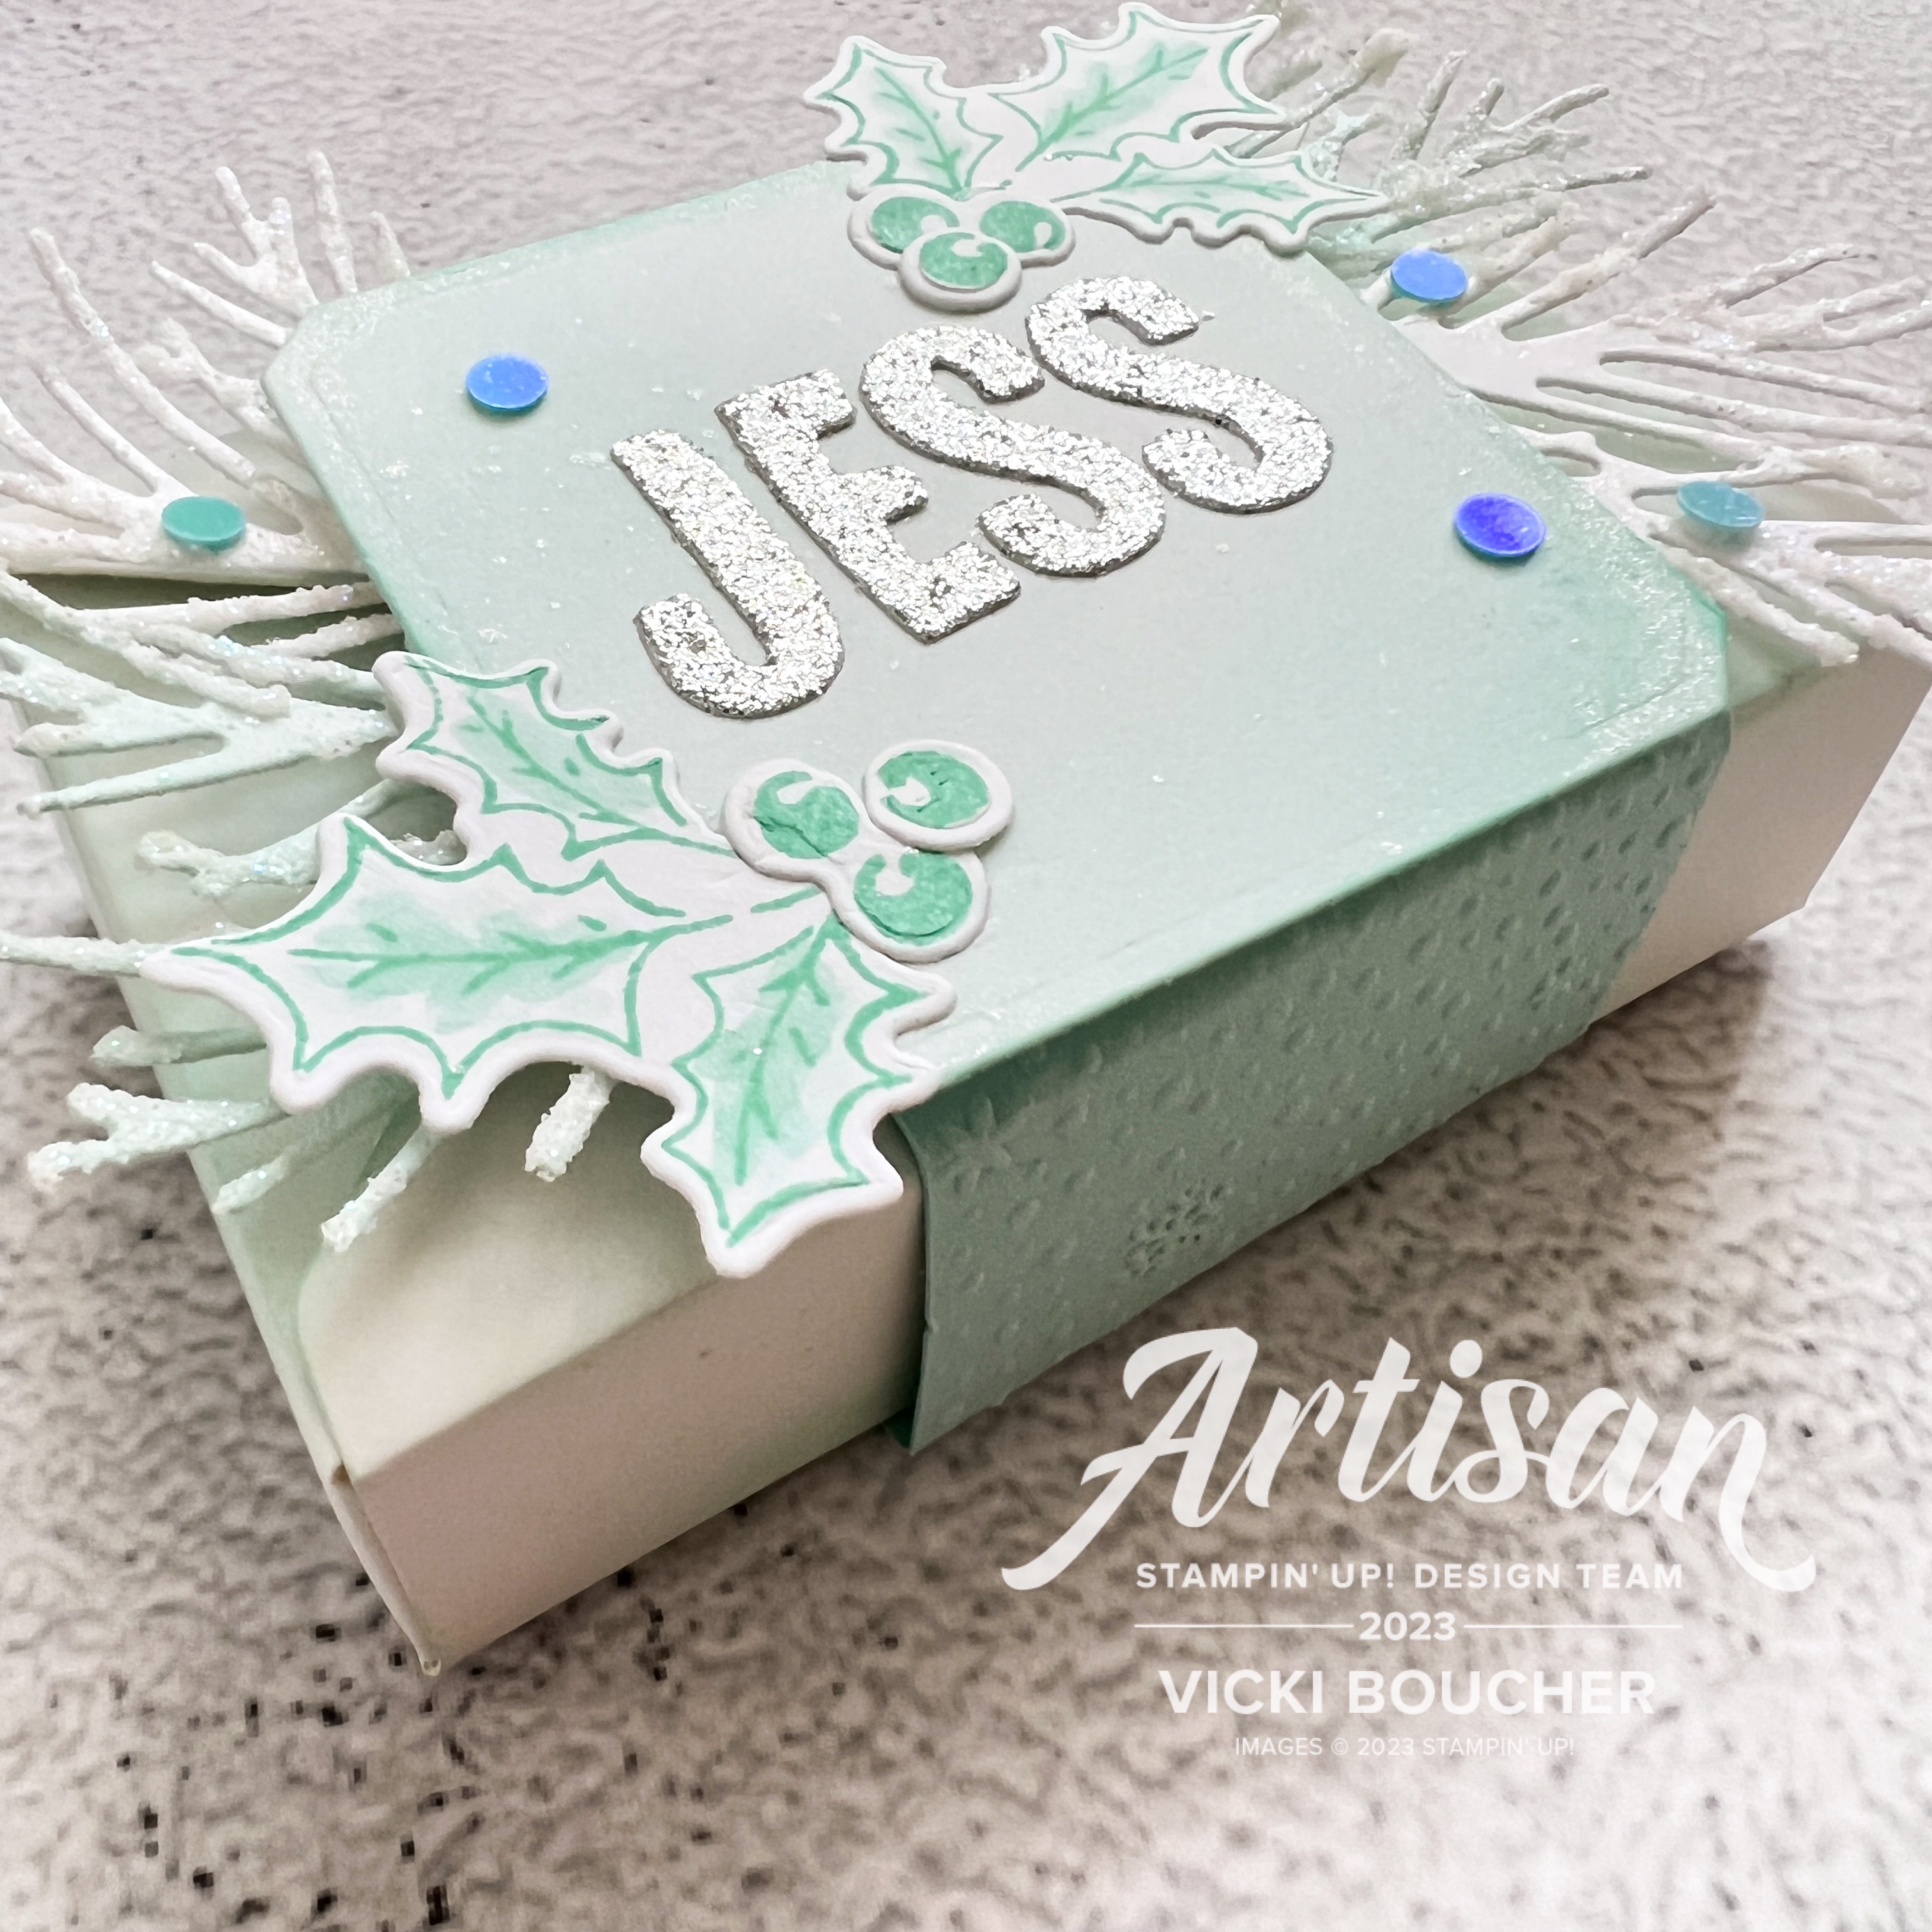
This was a fun challenge to think about and I went with two cute treat boxes using the Envelope Treat Boxes (159788) and they are for my two daughters; I'll be popping them into their Christmas stockings. 

I recently received a new order from Stampin' Up! and it's always exciting to receive new products which is from the new Mini Catalogue Jan-April 2024. I just love it! There are so many pretty items, and my wish list is very long! One of the items is the Mini Alphabet Dies (162934) which will be available for customers in January 2024. They are perfect for cute labels such as these treat boxes. 


For the Pool Party treat box, I used the Silver & Gold Glimmer 12" x 12" Adhesive Backed Glimmer Paper (162288) for the letters. It's just gorgeous and I love that it has adhesive on the back of the paper.


For the pink treat box, I used the Berry Burst Soft Shimmer Paper 12" x 12" Specialty Paper (161750) for the letters. I just love a little bit of sparkle added to my projects.


I haven't used Shimmery White Embossing Paste in a while and I recently got this amazing tip from fellow Artisan Mikaela Titheridge, she used White Embossing Paste to create snow and applied to the detailed pine die-cut pieces. I love this die and it's from the Joy of Noel Dies (161965) I also added Clear Wink of Stella and Pool Party ink with the Blending Brush applying to the white die-cut pine pieces. It adds the perfect glimmer to your projects.


The images from the Christmas Classics Dies (161976) makes the perfect focal point for this treat box, die cutting the images in Basic White Cardstock and then adding Bubble Bath and Berry Burst ink with a Blending Brush. Then I added Clear Wink of Stella to the foliage and layered over Berry Burst belly band.  


Thank you for visiting my blog today, I would so love to hear your thoughts on my projects by leaving a comment below.

Please email me if you would like a copy of the new 2023-2024 Annual and Mini Jan-April 2024 Catalogue, please contact me here

If you live in Australia and don't have a demonstrator, you can purchase any of the Stampin' Up! products by shopping with me at my online store here

Make sure you follow me on social media via Facebook, Instagram and Pinterest.


Happy Stamping

Vicki Boucher

To see all of the amazing projects by the Stamping Sunday Design Team please click on their names below.