Hello and welcome,
It's Stamping 2nd Sunday latest blog hop for October and for this month the design team will be showcasing the theme 'Treats Not Tricks' in our projects. The list of participants will be at the end of this blog. Did you see follow Artisan, Tami Hewlett's amazing projects? I just love her creations!
Today, I'll be sharing with two projects and turning them into 3D gifts for a special occasion such as a birthday, anniversary, engagement, wedding etc...
I've used the Ranunculus Romance Stamp Set and coordinating Ranunculus Dies which can be found in the Stampin' Up! Annual 2022-23 Catalogue. I haven't really used this stamp set and dies much in my projects, so this was the perfect opportunity to use them. I've also used the adorable Envelope Treat Boxes they came in a pack of 10 in white, they are easy to fold and ensemble. I've stamped images and added ink with a Blending Brush onto the box. I love the scripty stamp image, it's very vintage.
I have to give a shout out to Charlet Mallett who is an amazing paper crafter and is also on the Artisan Design Team for 2022. She created a beautiful 3D paper flower back in March 2022 and I've CASED her flower but changed up the colours.
Blushing Bride 3D Paper Flower and Box
I think Blushing Bride is my go-to colour at the moment and it's a pretty colour to use. To make the 3D paper flower you'll need to die-cut out about 12 outline flower shapes using the flower die. You will need about 5 in Blushing Bride and 7 in Basic White Cardstock. I added Blushing Bride ink with the Blending Brush to the edges of the Basic White die-cut flowers and left one white.
Here comes the fun part! You'll need a Bone Folder and Stampin' Spritzer filled with water. One layer at a time lightly spritz, then with the Bone Folder curve the edges inwards and crinkle the edges using your fingers. As you get closer to the center piece, cut a slit towards the middle of the flower layer and use adhesive such as Multi-Purpose Glue. You may want to cut up to four slits on the finale layer.
To assemble the flower, start at the bottom layer, add Multi-Purpose Glue as you go with each layer. To create the final center piece, I used a strip of Basic white Cardstock, coloured the edges using the Blending Brush and Blushing Bride ink. Then with Paper Snips snip all the way along the strip, creating fine slits and then roll up into a spiral. I used Stampin' Seal + to secure the spiral. To add the center piece to the flower I used the glue gun works best.
I wanted to add some sparkle to the flower, so I've used Clear Wink of Stella to the edges of each layer. It's hard to see in the photos but in real life it looks so pretty.
To create the belly band around the box I used Vellum cut the strip at 5cm x 19.5cm. Then dry embossed the Vellum strip using the Timeworn Type 3D Embossing Fold. Once embossed score at 4cm, 6.5cm, 12.5cm and 15cm to fit around the box and adhere using Stampin' Seal +
I added White Glittered Organdy Ribbon, two Vellum leaves and the sentiment stamped in Blushing Bride onto Basic White Cardstock and die-cut out using the Tailored Made Tag Dies.
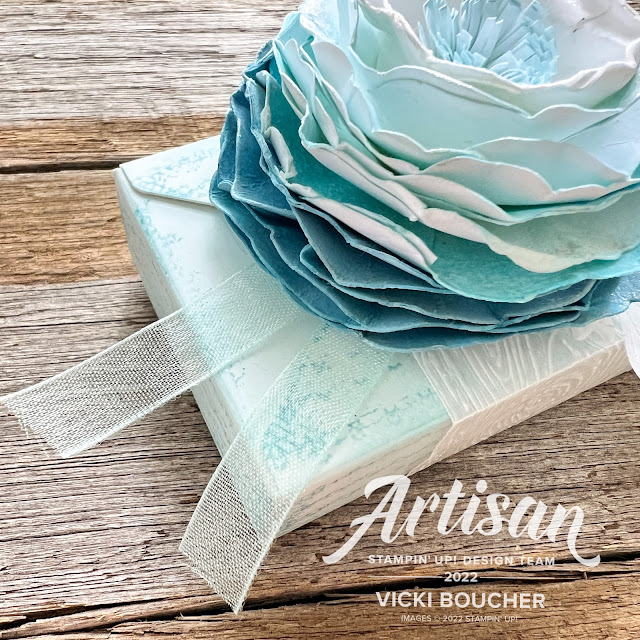
Balmy Blue 3D Paper Flower and Box
I've used Balmy Blue for the second treat box and flower. Using the same technique as above. You'll need about 5 in Balmy Blue and 7 in Basic White Cardstock. I added Balmy Blue ink with the Blending Brush to the edges of the Basic White die-cut flowers and left one white. Then create your 3D flower as above directions.
To create the final center piece, I used a strip of Basic white Cardstock, coloured the edges using the Blending Brush and Balmy Blue ink. Then as above cut tiny slits all the way along the strip and roll up into a spiral. Adhere the center piece to the flower with a heat gun.
To create the belly band around the box I used Vellum cut the strip at 5cm x 19.5cm. Then dry embossed the Vellum strip using the Timber 3D Embossing Fold. Once embossed score at 4cm, 6.5cm, 12.5cm and 15cm to fit around the box and adhere using Stampin' Seal +
I added Pool Party 3/8" Sheer Ribbon, two Vellum leaves and the sentiment stamped in Balmy Blue onto Basic White Cardstock and die-cut out using the Tailored Made Tag Dies.
Thank you for visiting my blog today, I would so love to hear your thoughts on my project by leaving a comment below.
Please email me if you would like a copy of the 2022-2023 Annual Catalogue and the July-Dec 2022 Mini Catalogue, please contact me here.
If you live in Australia and don't have a demonstrator, you can purchase any of the Stampin' Up! products by shopping with me at my online store here.
Make sure you follow me on social media via Facebook, Instagram and Pinterest.
Happy Stamping
Vicki Boucher
To see all of the amazing projects by the Stamping Sunday Design Team please click on their names below. Next up is the fabulous creative Mikaela Titheridge from the UK.


No comments:
Post a Comment