Showing posts with label Paper Crafting. Show all posts

29 May 2024

Colour Creations Blog Hop - Summer Splash - Loveliest Tree


Hello and welcome my friends,

My name is Vicki Boucher and I'm from Melbourne, Australia. Today, I'll be sharing with you another colour for Colour Creations blog hop and it's week 5 with the Art With Heart Team in Australia. I missed out on the last two In Colors as I was away in Tasmania on holidays with my husband celebrating his 50th birthday. 

The next colour is Summer Splash which is part of the In Color Collection for 2024 - 2026 Stampin' Up! sure know how to create some beautiful new colors for us to play with and they are here with us for the next two years. Now that's exciting!

All of the new In Colors come in a range of Stampin' Up! products such as ink, cardstock, ribbon, designer series paper, embellishments, Stampin' Blends and so on.


New colours means new Stampin' Up! products to try out from the new Stampin' Up! 2024 -2025 Annual Catalogue and I'll be showing you the Loveliest Tree bundle (163716) you can find it on pages 71 in the catalogue. This bundle has everything you need to make a beautiful card and there are handy sentiments for most occasions. 


I think Summer Splash would have to be the prettiest new In Color for 2024-26 it goes so well with most colours. I created a masculine card with some water colouring which I haven't done in a while and the colours I've used to go with Summer Splash are Blueberry Bushel, Old Olive, Wild Wheat and Copper Clay.


To make the tree I used Fluid 100 Watercolor Paper, wide tip Water Painter and the above mentioned inks. I like to apply water to the watercolor paper first then try out different colour combinations and mix them together, if there is too much water or runny ink, I will use the Heat Tool to dry up the ink or blot it with a tissue. I used the dies for the tree from the Loveliest Tree dies and die-cut out the images. 


I created the watercolour background using a half sheet of Fluid 100 Watercolour Paper, wide tip Water Painter for the sky I used Summer Splash and Blueberry Bushel and for the grass I used Old Olive and Wild Wheat. 

Other elements I added to the card are detailed leaves dies from Unbounded Love Dies and I placed it under the sentiment with Summer Splash Bordered Ribbon. I used Basic Beige cardstock panel and embossed it with the Timber 3D Embossing Folder then placed it over Summer Splash card base. 


Thank you for visiting my blog today, I would so love to hear your thoughts on my project by leaving a comment below.


Now for the next blog please visit the very talented Sharon Davern click on the link below.


If the next button link is not working or you'd like to see the entire list of participants go to Catherine Proctor's blog.


Please email me if you would like a copy of the 2024-2025 Stampin' Up! Annual Catalogue send an email to me here


2024-2025 Stampin' Up! Annual Catalogue


If you live in Australia and don't have a demonstrator, you can purchase any of the Stampin' Up! products by shopping with me at my Stampin' Up! online store here.

Make sure you follow me on social media via Facebook, Instagram and Pinterest.


Happy Stamping

Vicki Boucher


09 August 2023

Colour INKspiration Challenge #CI149


Hello and welcome, 

My name is Vicki Boucher, and I am from Melbourne, Australia. Tonight, is the latest Colour INKspiration Challenge #CI149 this photo was chosen by Lou Kitzelman.


The chosen colour combination for #CI149 is Fresh Freesia, Moody Mauve and Misty Moonlight. As well as the chosen colours you may also like to add Basic White, Basic Black, Very Vanilla, Crumb Cake and metallics to your project. We also allow 'Ivory', 'Bronze' and 'Natural Tones' in the Stampin' Blends. If you don't have all the colour palette, feel free to use the closest SU substitute (ie: Night of Navy instead of Misty Moonlight .... you get the drift).

The challenge will run for almost 2 weeks until 7pm (AEST) on Monday 21st August 2023 details to follow at the end of my blog.


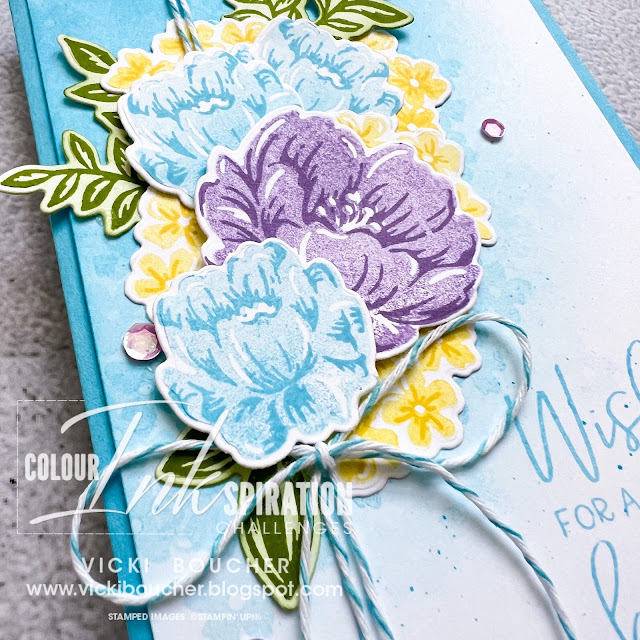
These colours are so beautiful together and so is the photo. For my card I went with the Translucent Florals bundle (162253) which is in the new Mini Catalogue Sept-Dec 2023. This will be available as of next month for customers.


I've used a new embossing folder which is also from the Mini Catalogue and it's called Distressed Tile 3D Embossing Folder. It's part of the All About Autumn Suite and will be available next month for customers to purchase. I've embossed it using Misty Moonlight Cardstock, then distressed the embossed panel with Paper Snips and added White Craft ink with the Sponge Dauber.


Next, I create a watercolour wash background using Water Paper and the three challenge colours. I like to add water using the Water Painter I used the wide brush tip and applied water to the Water Paper. I started with Misty Moonlight ink then added Fresh Freesia and Moody Mauve.

The stamped images from the Translucent Florals Stamp Set add a soft look to the images. I then used the coordinating dies to die-cut them out.


The sentiment is heat embossed using Versamark, White Stampin' Emboss Powder and heat set with the Heat Tool. I've used one of the labels dies from Cracker & Treat Box Dies and die-cut out the sentiment.

Other elements I've used are Moody Mauve Jute Trim and Fresh Freesia Tinsel Gems.

I hope I've inspired you with the latest challenge and I do hope you'll join in. We so look forward to seeing a variety of projects using the challenge colours. Please ensure that your project is new and made specifically for this challenge.


Upload only one picture per entry straight to the discussion wall and not in an album

Colour INKspiration Challenge #CI149 will run until 7pm (ADET) on Monday 21st August 2023.

To get your creative ideas flowing, make sure you check out the Crew's Project in the CI149 Album.

Please click on the link here to join the challenge.


Thank you for visiting my blog today, I would so love to hear your thoughts on my project by leaving a comment below.


Please email me if you would like a copy of the 2023-2024 Stampin' Up! Annual Catalogue send an email to me here

If you live in Australia and don't have a demonstrator, you can purchase any of the Stampin' Up! products by shopping with me at my Stampin' Up! online store here.

Make sure you follow me on social media via Facebook, Instagram and Pinterest.


Happy Stamping

Vicki Boucher


27 February 2023

Stampin' Fancy Friday - Sketch Challenge


 Hello and welcome,

My name is Vicki Boucher and I'm from Melbourne, Australia. Today I'll be sharing with you a fun sketch challenge for Stampin' Fancy Friday. The design team were asked to create a fancy project using the sketch provided. 


A sketch challenge is a huge time saver when it comes to card making and I love this layout. I went for a shabby chic look using pretty paper and I distressed the edges of the paper with Paper Snips. 


The products I've used are Sentimental Park Bundle and Regency Park Designer Series Paper the paper is stunning and I love the colours too! They are in the Stampin' Up! Jan to April 2023 Mini Catalogue.


Stating with Night of Navy Cardstock for the card base, I stamped the flower images directly onto the card using Night of Navy Ink. Then I added layers of Regency Park Designer Series Paper, followed by die-cut images from Sentimental Park Dies in Night of Navy and Basic White Cardstock. There are so many pretty detailed dies to create with!


I finished off the card using the Something Fancy Stamp Set for the sentiment. Tied a bow using White Baker's Twine and added a few Polished Dots embellishments. 


Make sure you visit the Stampin' Fancy Friday Instagram and Facebook pages for lots of ideas using this sketch and we hope you'll join in the challenge with us.


Thank you for visiting my blog today, I would so love to hear your thoughts on my project by leaving a comment below.

Please email me if you would like a copy of the 2022-2023 Annual Catalogue and the January - April 2023 Mini Catalogue and Saleabration Catalogue please send me an email here

If you live in Australia and don't have a demonstrator, you can purchase any of the Stampin' Up! products by shopping with me at my Stampin' Up! online store here.

Make sure you follow me on social media via Facebook, Instagram and Pinterest.


Happy Stamping

Vicki Boucher

22 February 2023

Colour INKspiration Challenge #CI138


Hello and welcome,

My name is Vicki Boucher, and I am from Melbourne, Australia. Tonight, is the latest Colour INKspiration Challenge #CI138 this photo was chosen by Monica Formosa, which was photographed by her daughter's partner tim_wildlife (instagram handle) a beautiful photo of a Gouldian Finch.


The chosen colour combination for #CI138 is Daffodil Delight, Granny Apple Green, Tahitian Tide and Highland Heather. As well as the chosen colours you may also like to add Basic White, Very Vanilla, Basic Black, Crumb Cake, Sahara Sand and metallics to your project. We also allow 'Ivory', 'Bronze' and 'Natural Tones' in the Stampin' Blends. If you don't have all the colour palette, feel free to use the closest SU substitute (ie: Mango Melody instead of Daffodil Delight .... you get the drift).

The challenge will run for almost 2 weeks until 7pm (AEST) on Monday 6th March 2023 details to follow at the end of my blog.


The card I've created is a birthday card using the Two-Tone Flora bundle and Framed Florets Stamp Set. These colours are so beautiful together and are perfect for flowers. 


Starting with the floral images from the Two-Tone Floral stamp set I found it was easier to use the detailed flower image in full strength, then use the solid flower image and stamp off before layering the image over the detailed stamped image. I used Highland Heather, Tahitian Tide and Daffodil Delight for the flowers and Granny Apple Green for the leaves. 


For the background panel, I stamped the solid flower image many times in Tahitian Tide ink until fading out. I also used the Blending Brush to add Tahitian Tide ink to the panel. The sentiment is from Framed Florets Stamp Set and stamped directly onto the background panel. 


The other elements to the card are Tahitian Tide Baker's Twine and I coloured in a few of the Petal Pink Pastel Sequins using Highland Heather Dark Stampin' Blend. 


I hope I've inspired you with the latest challenge and I do hope you'll join in. We so look forward to seeing a variety of projects using the challenge colours. Please ensure that your project is new and made specifically for this challenge.


Upload only one picture per entry straight to the discussion wall and not in an album

Colour INKspiration Challenge #CI138 will run until 7pm (ADET) on Monday 6th March 2023.

To get your creative ideas flowing, make sure you check out the Crew's Project in the CI138 Album.

Please click on the link here to join the challenge.


Thank you for visiting my blog today, I would so love to hear your thoughts on my project by leaving a comment below.

Please email me if you would like a copy of the 2022-2023 Annual Catalogue and the January - April 2023 Mini Catalogue and Saleabration Catalogue please send me an email here

If you live in Australia and don't have a demonstrator, you can purchase any of the Stampin' Up! products by shopping with me at my Stampin' Up! online store here.

Make sure you follow me on social media via Facebook, Instagram and Pinterest.


Happy Stamping

Vicki Boucher


19 February 2023

Global Design Project #GDP381


  Hello and welcome,

Today I'll be sharing with you the latest colour challenge #GDP381 at Global Design Project make sure you check out their designs using these pretty colours.

These colours are just stunning together and I was up for the challenge! They are Blushing Bride, Fresh Freesia and Highland Heather.


I've used the Easter Bunny bundle (160606) which includes an Easter Bunny Punch, Dainty Delight Dies (160674) and Conversation Bubbles bundle (160637). All of these products can be found in the Stampin' Up! Mini Catalogue Jan - April 2023.

I stamped off the bunny image using Sahara Sand ink onto paper then stamped onto Fluid 100 Watercolor Paper and watercoloured the bunny in with the challenge colours.


I created a wreath using the Dainty Delight Dies using the curved foliage in Fresh Freesia and Highland Heather. The stamped images are from the Easter Bunny stamp set stamped in Highland Heather and coloured with the Blender Pen and ink from the ink pads.


To finish off the card I used the Conversation Bubbles bundle, stamped the sentiment in Fresh Freesia and die cut out the image. The card base is Fresh Freesia and layered with Blushing Bride Cardstock panel.


Thank you for visiting my blog today, I would so love to hear your thoughts on my project by leaving a comment below.

Please email me if you would like a copy of the 2022-2023 Annual Catalogue, the Jan - April 2023 Mini Catalogue and the Saleabration Catalogue please contact me here

If you live in Australia and don't have a demonstrator, you can purchase any of the Stampin' Up! products by shopping with me at my online store here.

Make sure you follow me on social media via Facebook, Instagram and Pinterest.


Happy Stamping

Vicki Boucher

05 February 2023

Artisan Design Team - Rain or Shine Suite


Hello and welcome,

My name is Vicki Boucher and I'm from Melbourne, Australia. Today, I'll be sharing with you two projects I created for the February Monthly Artisan Assignment using the Rain or Shine Suite. I had a couple of photos from a trip to Queensland about 11 years ago and I knew they would be perfect for a mini pocket scrapbook page with this suite. It was a rainy tropical day and the kids just loved to play in the rain! 

The Artisan Design Team are featuring the Rain or Shine Suite on Stampin' Up! Facebook and Instagram page where you'll sure to be inspired by everyone's creations, I'll add the link at the end of my blog. 


The Rain or Shine Suite (160556) is located on page 50 to 51 of the Stampin' Up! January - April 2023 Mini Catalogue. The bundle includes the following items. Playing in the Rain Bundle (160551) with (10% bundle savings), Raindrops embossing Folder (160554), Loose Daisy Embellishments (160555) and Rain or Shine 12" x 12" Specialty Designer Series Paper. This suite is perfect for card making and or scrapbooking and those cute daisies are so much fun to use on your projects.


Rain or Shine Suite (160555)


Mini Pocket Scrapbook Page

I created these cute 3" x 4" cards and placed them inside the Stampin' Up! Variety Pack 6"x 8" Photo Pocket Pages (144205) they are to be used with the Basic Black 6" x 8" Album (144203) which is sold separately. 


I just love the fun stamped images especially the cute bunny dancing in the rain or sunshine. I used Stazon Ink and stamnped the images onto Shimmery White Cardstock. The images are water coloured in using Water Painters, inks and I like to have a bowl of water to control how much water I use and a paper towel. 


The colours from the photos went well with the Rain or Shine Specialty Designer Series Paper, I also added Real Red for the rabbit's raincoat and Starry Sky for the fox's raincoat and umbrella.


Rainy Days Card

For my second project I created a card using all of the products from the Rain or Shine Suite. I really liked the combination of Starry Sky with Balmy Blue and Mango Melody. The Balmy Blue background panel is dried embossed using the Raindrops Embossing Folder, then I added Starry Sky and Orchid Oasis inks and applied with the Blending Brush.


I used the cloud dies from Playing in the Rain Dies and die-cut them out in Basic White Cardstock and added a little of Starry Sky ink to the edges of the clouds.


My favourite sheet of paper from Rain or Shine DSP would have to be the flowers in Mango Melody and incorporated it by adding a strip under the sentiment and Baker's Twine.


Thank you for visiting my blog today, I would so love to hear your thoughts on my projects by leaving a comment below. Make sure you pop over onto Stampin' Up! Facebook page or Stampin' Up! Instagram page for lots of inspiration using the Rain or Shine Suite.


If you would like a copy of the Stampin' Up! Jan - April 2023 Mini, Saleabration Jan - Feb 2023 or the Annual Catalogue 2022 - 2023 please contact me here

If you live in Australia and don't have a demonstrator, you can purchase any of the Stampin' Up! products by shopping with me at my online store here.


Happy Stamping

Vicki Boucher


09 October 2022

Stamping Sunday Blog Hop - Treats Not Tricks


Hello and welcome,

It's Stamping 2nd Sunday latest blog hop for October and for this month the design team will be showcasing the theme 'Treats Not Tricks' in our projects. The list of participants will be at the end of this blog. Did you see follow Artisan, Tami Hewlett's amazing projects? I just love her creations!

Today, I'll be sharing with two projects and turning them into 3D gifts for a special occasion such as a birthday, anniversary, engagement, wedding etc...


I've used the Ranunculus Romance Stamp Set and coordinating Ranunculus Dies which can be found in the Stampin' Up! Annual 2022-23 Catalogue. I haven't really used this stamp set and dies much in my projects, so this was the perfect opportunity to use them. I've also used the adorable Envelope Treat Boxes they came in a pack of 10 in white, they are easy to fold and ensemble. I've stamped images and added ink with a Blending Brush onto the box. I love the scripty stamp image, it's very vintage. 

I have to give a shout out to Charlet Mallett who is an amazing paper crafter and is also on the Artisan Design Team for 2022. She created a beautiful 3D paper flower back in March 2022 and I've CASED her flower but changed up the colours.


Blushing Bride 3D Paper Flower and Box

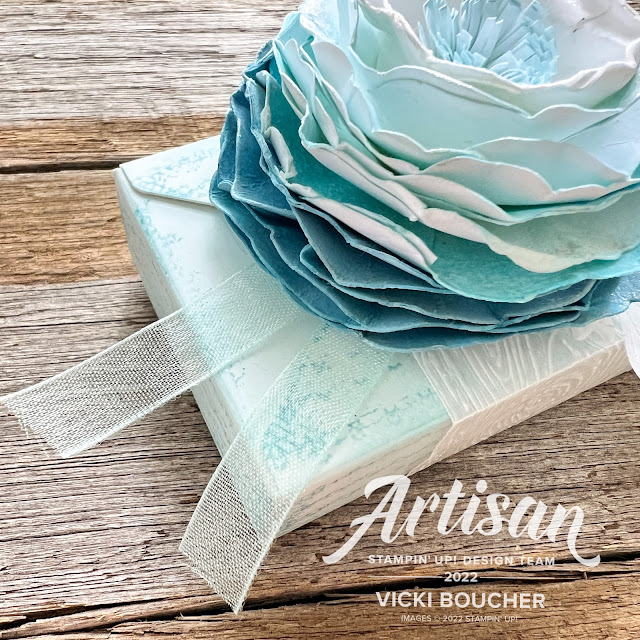
I think Blushing Bride is my go-to colour at the moment and it's a pretty colour to use. To make the 3D paper flower you'll need to die-cut out about 12 outline flower shapes using the flower die. You will need about 5 in Blushing Bride and 7 in Basic White Cardstock. I added Blushing Bride ink with the Blending Brush to the edges of the Basic White die-cut flowers and left one white. 


Here comes the fun part! You'll need a Bone Folder and Stampin' Spritzer filled with water. One layer at a time lightly spritz, then with the Bone Folder curve the edges inwards and crinkle the edges using your fingers. As you get closer to the center piece, cut a slit towards the middle of the flower layer and use adhesive such as Multi-Purpose Glue. You may want to cut up to four slits on the finale layer.


To assemble the flower, start at the bottom layer, add Multi-Purpose Glue as you go with each layer. To create the final center piece, I used a strip of Basic white Cardstock, coloured the edges using the Blending Brush and Blushing Bride ink. Then with Paper Snips snip all the way along the strip, creating fine slits and then roll up into a spiral. I used Stampin' Seal + to secure the spiral. To add the center piece to the flower I used the glue gun works best.


I wanted to add some sparkle to the flower, so I've used Clear Wink of Stella to the edges of each layer. It's hard to see in the photos but in real life it looks so pretty.


To create the belly band around the box I used Vellum cut the strip at 5cm x 19.5cm. Then dry embossed the Vellum strip using the Timeworn Type 3D Embossing Fold. Once embossed score at 4cm, 6.5cm, 12.5cm and 15cm to fit around the box and adhere using Stampin' Seal +


I added White Glittered Organdy Ribbon, two Vellum leaves and the sentiment stamped in Blushing Bride onto Basic White Cardstock and die-cut out using the Tailored Made Tag Dies.


Balmy Blue 3D Paper Flower and Box

I've used Balmy Blue for the second treat box and flower. Using the same technique as above. You'll need about 5 in Balmy Blue and 7 in Basic White Cardstock. I added Balmy Blue ink with the Blending Brush to the edges of the Basic White die-cut flowers and left one white. Then create your 3D flower as above directions.


To create the final center piece, I used a strip of Basic white Cardstock, coloured the edges using the Blending Brush and Balmy Blue ink. Then as above cut tiny slits all the way along the strip and roll up into a spiral. Adhere the center piece to the flower with a heat gun.


To create the belly band around the box I used Vellum cut the strip at 5cm x 19.5cm. Then dry embossed the Vellum strip using the Timber 3D Embossing Fold. Once embossed score at 4cm, 6.5cm, 12.5cm and 15cm to fit around the box and adhere using Stampin' Seal +


I added Pool Party 3/8" Sheer Ribbon, two Vellum leaves and the sentiment stamped in Balmy Blue onto Basic White Cardstock and die-cut out using the Tailored Made Tag Dies.


Thank you for visiting my blog today, I would so love to hear your thoughts on my project by leaving a comment below.

Please email me if you would like a copy of the 2022-2023 Annual Catalogue and the July-Dec 2022 Mini Catalogue, please contact me here

If you live in Australia and don't have a demonstrator, you can purchase any of the Stampin' Up! products by shopping with me at my online store here.

Make sure you follow me on social media via Facebook, Instagram and Pinterest.


Happy Stamping

Vicki Boucher


To see all of the amazing projects by the Stamping Sunday Design Team please click on their names below. Next up is the fabulous creative Mikaela Titheridge from the UK.