Showing posts with label Christmas Gift. Show all posts

19 November 2023

Stamping Sunday Blog Hop - Stocking Fillers


 Hello and welcome,

My name is Vicki Boucher and I'm from Melbourne, Australia. Today is the Stamping Sunday blog hop for the month of November and for this month's theme is "Stocking Fillers". It's the 3rd Sunday of the month and can you believe it we are not too far away until the end of the year! I'm looking forward to seeing everyone's projects and you'll be able to see them by clicking on their names which will be at the end of my blog.


This was a fun challenge to think about and I went with two cute treat boxes using the Envelope Treat Boxes (159788) and they are for my two daughters; I'll be popping them into their Christmas stockings. 

I recently received a new order from Stampin' Up! and it's always exciting to receive new products which is from the new Mini Catalogue Jan-April 2024. I just love it! There are so many pretty items, and my wish list is very long! One of the items is the Mini Alphabet Dies (162934) which will be available for customers in January 2024. They are perfect for cute labels such as these treat boxes. 


For the Pool Party treat box, I used the Silver & Gold Glimmer 12" x 12" Adhesive Backed Glimmer Paper (162288) for the letters. It's just gorgeous and I love that it has adhesive on the back of the paper.


For the pink treat box, I used the Berry Burst Soft Shimmer Paper 12" x 12" Specialty Paper (161750) for the letters. I just love a little bit of sparkle added to my projects.
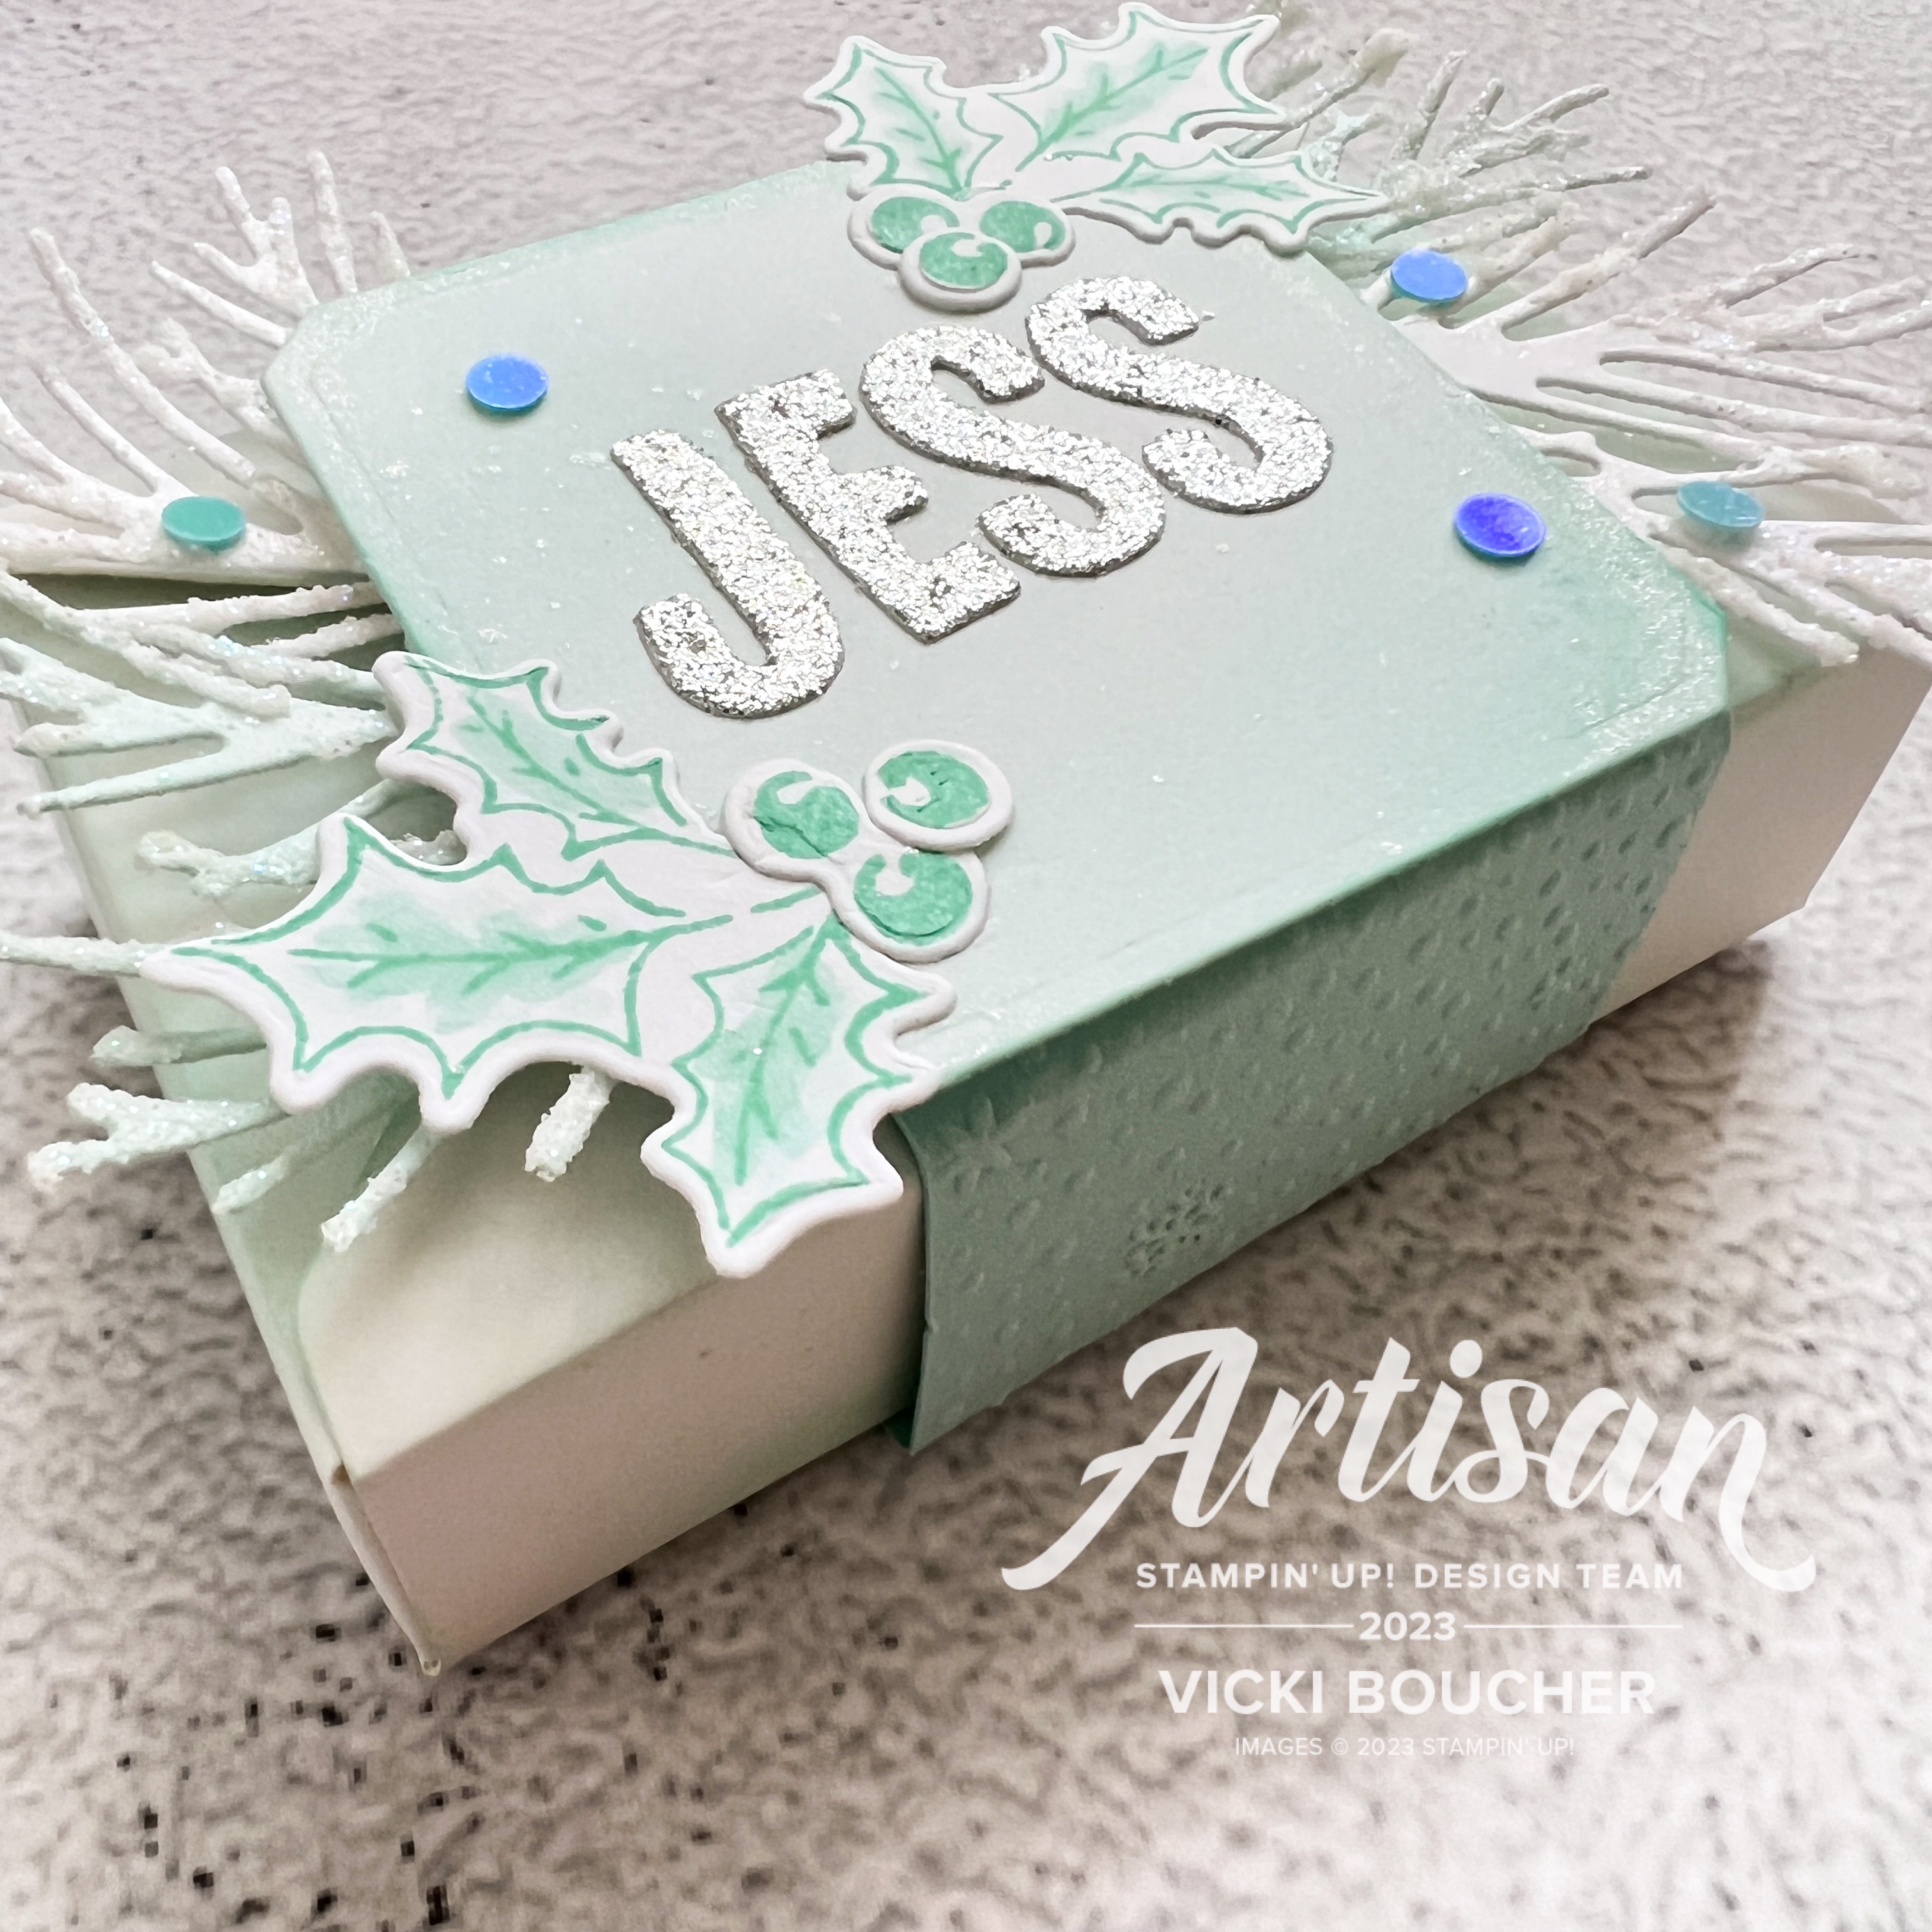


I haven't used Shimmery White Embossing Paste in a while and I recently got this amazing tip from fellow Artisan Mikaela Titheridge, she used White Embossing Paste to create snow and applied to the detailed pine die-cut pieces. I love this die and it's from the Joy of Noel Dies (161965) I also added Clear Wink of Stella and Pool Party ink with the Blending Brush applying to the white die-cut pine pieces. It adds the perfect glimmer to your projects.


The images from the Christmas Classics Dies (161976) makes the perfect focal point for this treat box, die cutting the images in Basic White Cardstock and then adding Bubble Bath and Berry Burst ink with a Blending Brush. Then I added Clear Wink of Stella to the foliage and layered over Berry Burst belly band.  


Thank you for visiting my blog today, I would so love to hear your thoughts on my projects by leaving a comment below.

Please email me if you would like a copy of the new 2023-2024 Annual and Mini Jan-April 2024 Catalogue, please contact me here

If you live in Australia and don't have a demonstrator, you can purchase any of the Stampin' Up! products by shopping with me at my online store here

Make sure you follow me on social media via Facebook, Instagram and Pinterest.


Happy Stamping

Vicki Boucher

To see all of the amazing projects by the Stamping Sunday Design Team please click on their names below. 


03 October 2022

Creation Station Blog Hop - Tweets & Treats


  Hello and welcome

My name is Vicki Boucher, and I am from Melbourne, Australia. This is the latest hop with the design team at Creation Station, if you have come from Martin Stone or you may have started with me. Please make sure you hop around and see everyone's amazing projects. I'll pop a link at the end of my blog to hop around....

The design team at Creation Station are presenting their projects with the theme "Tweets or Treats" anything 3D.


Today's project I've created two Christmas gift packages using the Peekaboo Treat Bags (159252) and other Stampin' Up! products which are located in either the Annual Stampin' Up 2022 - 2023 Catalogue and the Mini July - Dec 2022 Catalogue. I love the treat bags they come in Kraft and White and they are food safe. I've placed a couple of gingerbread biscuits inside them for show. 


Noel Kraft Peekaboo Treat Bag


For my first treat bag I've used the natural Kraft package, using the cluster of stars stamp which is from Spruced Up Stamp Set and stamped it in Crumb Cake ink. I added different types of ribbon and baker's twine for a natural look. 


My go to at the moment is the Celebration Tag Dies which I just love so much! The cute gift tag is die-cut out in Kraft Paper, then I added Soft Suede ink with a Blending Brush and I used the Celebrate with Tags Stamp Set for the To: and From: in Soft Suede ink. The stitched heart & snowflake are die-cut out using Very Vanilla Cardstock and sponged using Crumb Cake ink.


The cute natural wood elements are from the Santa Express Memories & More card pack (159595) there are a variety of different words for Christmas and other occasions, plus stars as well. I use the Fine Tip Glue Pen for these elements.


Made with Love White Peekaboo Treat Bag


Next is a traditional red and white treat bag, this could be for Christmas or any occasion. I love the sentiment from the Celebrate with Tags Stamp Set, I've heat embossed it by stamping the image in Versamark onto Real Red Cardstock, add White Stampin' Emboss Powder and heat set with the Heat Tool. There is a label die to die-cut out the sentiment and I just used the paper snips scissors to cut out the word "with".


I used the same tag die from the Celebrations Tag Dies, die-cut out three tags one in Real Red Cardstock, Snowflake Specialty Vellum and layered over in Basic White Cardstock. The snow flake is die-cut out the same sheet of  Snowflake Specialty Vellum. The cute winter gloves are stamped in Real Red ink onto Basic White Cardstock and die-cut out. To finish off the tag I added White Glittered Organdy Ribbon and White Baker's Twine.


To add some love to the white treat bag, I used the cluster of hearts stamp and stamped the image in Real Red ink. Plus two stitched Real Red hearts.


Thank you for visiting my blog today, I would so love to hear your thoughts on my project by leaving a comment below. Make sure you pop over to Julie Mercer Beltramo for lots of inspiration using Tweets or Treats.


Please email me if you would like a copy of the 2022-2023 Annual Catalogue and the July-Dec 2022 Mini Catalogue, please contact me here

If you live in Australia and don't have a demonstrator, you can purchase any of the Stampin' Up! products by shopping with me at my online store here.

Make sure you follow me on social media via Facebook, Instagram and Pinterest.


Happy Stamping

Vicki Boucher


08 November 2021

Creation Station Blog Hop - Specialty Paper


Hello and welcome, if you have come from the talented Denita Wright-Smee who is also from Australia or you may of started with me. Please make sure you hope around and see everyone's projects. I'll pop a link at the end of my blog....


The design team at Creation Station are presenting their projects with the theme "Specialty Paper" I've used the new Ever Eden 12" x 12" Specialty Designer Series Paper and Cork 12" x 12" Specialty Paper for my creations. 


The Ever Eden Specialty DSP is part of the Eden's Garden Collection which is an exclusive early release which consists of Eden's Garden Bundle 10% off (Eden's Garden Stamp Set and Eden Dies) which is part of the Stampin' Up! Mini Jan - June 2022 Catalogue. The stunning Ever Eden 12 x 12 DSP, Ever Eden 12 x 12 Cotton Paper and Garden Gems are only available while supplies last. I was so excited when I received my order and just how stunning the Specialty Paper is. I just had to buy two! I love the different tones of Soft Succulent, Evening Evergreen and the addition of Gold Foil through out the paper.

I've also used the Cork 12" x 12" Specialty Paper which is from the Stampin' Up! Mini July - December 2021 Catalogue. I love it's nature inspired look and it also has gold flecks throughout. You receive 2 sheets and it's perfect for adding layers, scrapbooking, card making, die-cutting and more!


3D Christmas Wreath Treat Box


When I started creating my projects it was the Scalloped Kraft Treat Box that was my inspiration to begin with. Using both of the Specialty Papers they balanced well against the Kraft Box with the gold polka dots and the stunning Gold Shimmer Ribbon.


I've cut the Ever Eden DSP to cover the top of the box and wrapped the Gold Shimmer Ribbon around the box. The next layers are Tailor Made Dies, I've added Stampin' Dimensionals under the DSP, so the ribbon can be removed. 


Next I've used the wreath die which is from the Seasonal Swirl Dies in the Cork and Ever Eden DSP layered over the tags. I added a few of the Cherry Cobbler round Garden Gems to the wreath for a little sparkle.


The greeting fits perfect using the Eden Dies. The sentiment is from Sparkle of the Season Stamp Set and is heat embossed using Versmark Ink, Gold Stampin' Powder and heat set with the Heat Tool. This was the only stamping I did when creating my projects.


Christmas Wreath Card


Starting off with Evening Evergreen Cardstock for the card base, layered with a panel of the Ever Eden 12" x 12" Specialty Designer Series Paper and I added a circle die-cut from the Layering Circle Dies as my base for the wreath.


I just love a Christmas wreath and the small leaf die from the Eden Dies is perfect! Using the Ombre sheet side from the Ever Eden 12" x 12" Specialty Designer Series Paper and with lots of die-cutting, you'll be able to make a wreath too. I also added a few of the Cork 12" x 12" Specialty Paper to add some contrast. To finish off the wreath I added Soft Succulent marquise Garden Gems


Next I used the label die from Eden Dies in Cork Specialty Paper and for the greeting I used the Playful Alphabet Dies using the Ever Eden Specialty Paper. To give the letters some height I've used Foam Adhesive Sheets.


Christmas Gift Tag


A last minute addition to the trio of my creations. As I had a few pieces left over I wanted to create a Christmas Gift Tag using both of the Specialty Papers and Tailor Made Tags Dies.


The addition of the trio of Christmas trees which are from the Christmas Trees Dies they are so cute! The greeting is using the Ombre sheet from the Ever Eden Specialty DSP, Playful Alphabet Dies and Foam Adhesive Sheets.


The Christmas tag is finished off using the Soft Succulent Open Weave Ribbon and White Baker's Twine.


The best thing about this stunning paper from Eden's Garden Collection is you can use it for any occasion and with the festive season coming up soon it's perfect for paper crafting. All of the above products are available in my online store.


Now it's time to visit the very creative Mikaela Titheridge from the UK to see her projects and visit her blog. I'm looking forward to reading all about her creations. Just click on the next link below.


Need the supplies that I've mentioned above? You can purchase all Stampin' Up! products from my online store here or send me a message and I'll be happy to help you out with your order.

Thank you for visiting my blog today, I would so love hear your thoughts on my project by leaving a comment below.

If you would like a copy of the new Stampin' Up! Mini August to December 2021 Catalogue and Annual Catalogue 2021 - 2022 please contact me here

If you live in Australia and don't have a demonstrator, you can purchase any of the Stampin' Up! products by shopping with me at my online store here.


Happy Stamping

Vicki Boucher


02 December 2019

Creation Station Blog Hop "Put A Ring On It"


Hello and welcome,

I am so excited to be part of this amazing group of Stampin’ Up! Demonstrators who all blog hop at the Creation Station Design Team. The hop is always the first Sunday of every month we have a different theme to create something special. If you’ve started here with me make sure you hop all the through to see Dena Rekow’s amazing creation.


Today’s theme we are going all out “Put a Ring on It” which means creating a Belly Band for cards, boxes, or anything you can think of. I’ve chosen to do a Mini Fold Out Christmas Gift with slide out Gift Tag and Bookmark, plus an area to write a special message.


Have you seen the gorgeous Feels Like Frost DSP? It’s in the current 2019 Holiday Catalogue and it’s just so stunning. There is photographic imagery on one side, hand drawn designs with silver foil on the other side. I just love the colours in the DSP which I’ve used Night of Navy, Seaside Spray, Silver and Whisper White.


The Belly Band has so many layers starting with the strip of Night of Navy Cardstock, I’ve spritzed it with Frost White Shimmer Paint and Rubbing Alcohol combined together in a Stampin’ Spritzer. I’ve used   Feels Like Frost DSP in the band to coordinate with the Mini Fold Out Gift holder.

I’ve added three different types of Ribbon together, Seaside Spray Metallic Ribbon, Whisper White Polka Dot, Silver Metallic Edge Ribbon and wrapping them around the Belly Band. This gives an added soft texture to the Belly Band and I'm happy how I’ve tied the ribbon in a knot.  


The layer of Night of Navy Corrugated Embossed Cardstock has so many elements to it. I’ve used Silver Emboss Powder by lightly placing Versamark Ink Pad in random places on the Embossed Cardstock and sprinkling the Silver Emboss Powder. If I find there’s too much powder, I lightly brush it off before heat setting with the Heat Tool. I wanted to add some more sparkle and go all out with the Shimmery Crystal Effects and Ice Stampin’ Glitter. 


My next layer I’ve used the Beautiful Boughs Dies using the medium size branch die with Whisper White Cardstock and adding Shimmery Crystal Effects with Stampin’ Glitter.


To finish off the Belly Band I’ve placed the Silver Foil die cut image of the deer from the Detailed Deer Dies and Silver Foil Snow Flakes from the Christmas Layers Dies. In each center of the Snow Flakes I’ve added a Clear Epoxy Droplets. The greeting is from the Itty Bitty Christmas Stamp Set using White Stampin’ Emboss Powder, heat set on Night of Navy Cardstock and fussy cut out.


The Belly Band fits nicely over the Mini Fold Out Christmas Gift I found it easier to wrap the band around before sealing it with Tear and Tape. I think this gift would be lovely idea as a teacher’s Thank You gift for my daughter’s teacher. What do you think?

All of the Stampin’ Up! products I’ve used will be at the bottom of this blog and are available at my online store. 


Now it's time to head over to Kathy Brown Kartak on the Design Team and to see her creation.

Be sure to visit everyone’s blog and I’m sure you’ll be inspired to create a Belly Band for someone special too!

Thank you for stopping by!

Happy Crafting


Vicki Boucher

To purchase any of these products I’ve used today you can click on my direct links above or visit my Online Store here.

Product List
Paper/Cardstock: Night of Navy, Whisper White, Silver Foil and Feels Like Frost 6” x 6” DSP
Ink: Night of Navy and Seaside Spray
Stamps: Still Scenes, So Many Stars and Itty Bitty Christmas
Dies: Snow Globe Scenes, Beautiful Boughs, Christmas Layers and Detailed Deer
Punches: Delightful Tag Topper
Embossing Folder: Corrugated 3D
Embellishments: Clear Epoxy Droplets
Ribbon: Seaside Spray ¼” Metallic Ribbon, Whisper White 5/8” Polka Dot Tulle Ribbon and Silver 3/8” Metallic Edge Ribbon
Colouring Tools: Stampin’ Spritzers, Frost White Shimmer Paint, Versamark, Heat Tool, Stampin’ Glitter, Embossing Buddy, Silver Stampin’ Emboss Powder, White Stampin’ Emboss Powder, Ice Stampin’ Glitter and Shimmery Crystal Effects