Showing posts with label Christmas Card. Show all posts

01 September 2025

Heart of Christmas Blog Hop Week 1


Hello and welcome,

My name is Vicki Boucher and I'm from Melbourne, Australia. Today, I'll be sharing with you a Christmas card I made for our first Christmas blog hop with the Art with Heart Team. They will be held on Monday at 8pm each week until November 24th. I'm so excited to see everyone's beautiful creations, so make sure you hop around. The link for the next person will be at the end of my blog.

The new mini Stampin' Up! catalogue and online exclusives for September are nearly here. Among the upcoming items is the Festive Friends bundle, which includes both a stamp set and coordinating dies. The images are so adorable, featuring an elf, a snowman and Father Christmas, of which they have matching dies for easy die-cutting.


For my card, I selected the traditional Christmas colors: Poppy Parade, Shaded Spruce, and Pool Party. These colors, along with black and white, have been used consistently used throughout the card. The elf has been coloured in using Stampin' Blends.


I created a custom plaid background using Basic White cardstock Stampin' Blends, grid paper and a plastic ruler. Utilizing the grid paper as a guide for the lines, I began with dark Pool Party brush tip to achieve a thicker appearance. Next, I used the fine tip for Poppy Parade and Shaded Spruce to complete the design.

Keeping the plaid theme, I used the Forever Plaid Embossing Folder and embossed the strip of Basic Black cardstock and Poppy Parade cardstock panel. 

The cute holly is from the Jolly Holly bundle and I added a few Pool Party embellishments to finish off the card.


Thank you for visiting my blog today, I would so love to hear your thoughts on my project by leaving a comment below.


Now it's time to visit Rachel Woollard blog, I can't wait to see her beautiful Christmas project.

If the link is broken Sharon is our host for the Heart of Christmas blog hop with all of the list of the participants, click on Sharon Davern's name to see the list.


If you live in Australia and don't have a demonstrator, you can purchase any of the Stampin' Up! products by shopping with me at my Stampin' Up! online store here.

Make sure you follow me on social media via Facebook, Instagram and Pinterest.


Happy Stamping

Vicki Boucher

16 November 2024

Colour INKspiration Challenge #CI177


Hello and welcome,

My name is Vicki Boucher, and I am from Melbourne, Australia. Tonight, is the latest Colour INKspiration Challenge #CI177 this photo was chosen by Colour INKspiration Crew Member, Cathy Pinchbeck.


The chosen colour combination for #CI177 is Melon Mambo, Blueberry Bushel, Pretty Peacock and Gold. As well as the chosen colours you may also like to add Basic White, Basic Black, Very Vanilla, Crumb Cake, Basic Beige and metallics to your project. We also allow 'Ivory', 'Bronze' and 'Natural Tones' in the Stampin' Blends. If you don't have all the colour palette, feel free to use the closest SU substitute (ie: Berry Burst instead of Melon Mambo .... for example).

The challenge will run for almost 2 weeks until 7pm (AEDT) on Monday 25th November 2024 details to follow at the end of my blog.

I'm a little bit late with this latest challenge as we've been really busy with house renovations, our family gift hamper business is in full swing with Christmas coming up, plus we are off to a farmers' market in the Yarra Valley tomorrow and it was mine and hubby's 20th wedding anniversary. So, this week has been crazy!


Here's my card for the latest colour challenge, I've made a Christmas card using these colours and combining different Stampin' Up! products by mixing them up.

How about a shop till you drop type of card using the trolly die-cut pieces to make a gold trolly, add lots of shopping bags full of Christmas decorations, Christmas tree, Christmas presents, a bottle of bubbly and a bunch of flowers. 


This unique card was so much fun I used the Attention Shoppers bundle for the trolly, shopping bags, flowers and bottle of bubbly. To change things up I added stamped images from the Snowy Wonder bundle and who said you can't have a pink penguin! The pink and white Christmas tree is from the Decorative Trees dies.


To create the blue background, I used a smaller piece of Basic White cardstock and applied Blueberry Bushel ink with the Blending Brush. Next, I splattered water droplets with a Water Painter onto the coloured card and to dry them I used the Heat Tool. 

I used the Forever Plaid 3D embossing folder and embossed the Basic White cardstock panel. To finish off the card I stamped the sentiment in Melon Mambo ink onto white cardstock. 


I hope I've inspired you with the latest challenge and I do hope you'll join in. We so look forward to seeing a variety of projects using the challenge colours. Please ensure that your project is new and made specifically for this challenge.

Challenge guidelines:

  • Create a NEW project made specifically for this challenge.
  • Use all of the challenge colours (or close substitutions) unless stated.
  • Upload only ONE picture per entry straight to the discussion wall and NOT in an album.

Colour INKspiration Challenge #CI177 will run until 7pm (AEDT) on Monday 25th November 2024.

To get your creative ideas flowing, make sure you check out the Crew's Project in the CI177 Album.

Please click on the link here to join the challenge.


Thank you for visiting my blog today, I would so love to hear your thoughts on my project by leaving a comment below.

Make sure you follow me on social media via Facebook, Instagram and Pinterest.


Happy Stamping

Vicki Boucher


07 October 2024

Creation Station Blog Hop - Into The Night


 Hello and welcome,

My name is Vicki Boucher, and I am from Melbourne, Australia. This is the latest hop with the design team at Creation Station, if you have come from Mikaela's blog or you may have started with me. Please make sure you hop around and see everyone's amazing projects. I'll pop a link at the end of my blog.

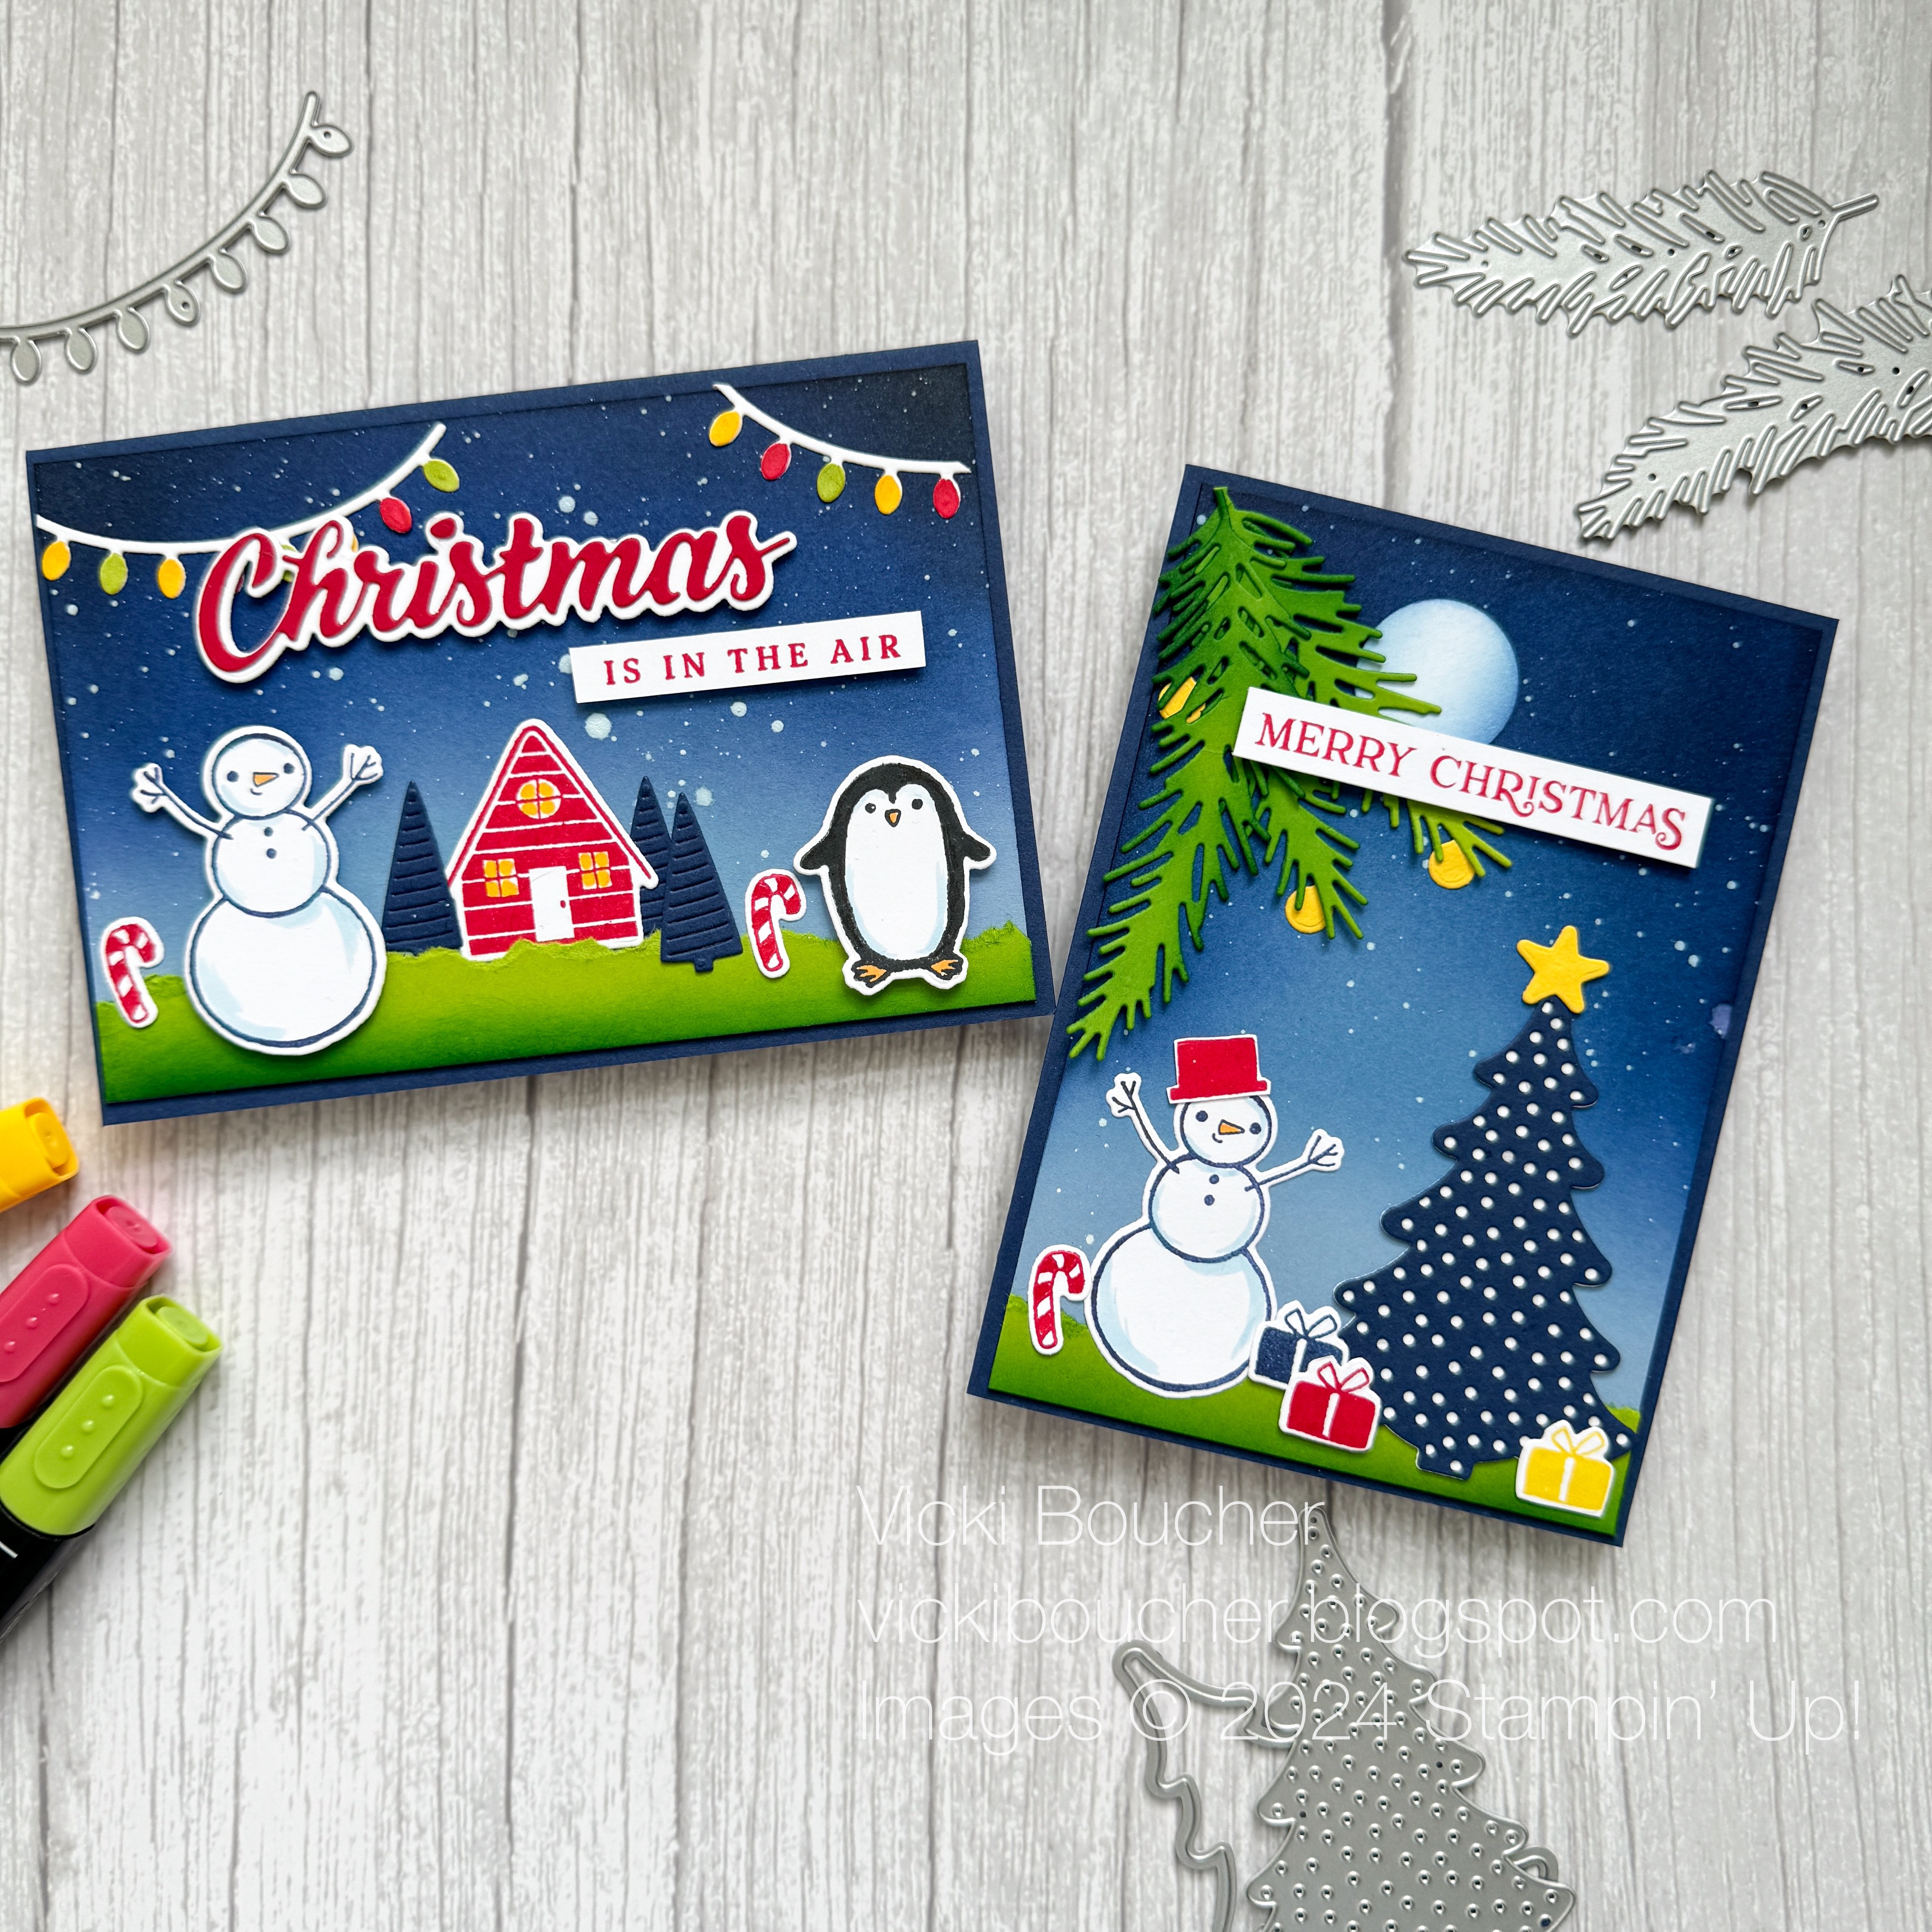
The design team at Creation Station are presenting their projects with the theme "Into the Night" and for my two projects I went with an Aussie themed Christmas using Stampin' Up! products from the 2024 Mini Catalogue and an Online Exclusive. 

There's one thing I love to do at Christmas with the family and that's going out looking at Christmas lights in my neighbourhood at nighttime. In December it's usually hot so we love to buy an ice cream and wonder around looking at all of the amazing lights & Christmas displays.


So, this is how I came up with the idea for my two cards using the Snowy Wonder bundle and making it into a non-snow look scene.

I started with the background panel in Boho Blue cardstock with a Blending Brush I applied from light to dark in the following colours Misty Moonlight, Night of Navy and Black Memento ink. The black ink makes the sky look darker by blending it in at the corners at the top of each background panel.

This next step has been around for some time, and I've always wanted to try it out, thanks to Mikaela for this amazing tip that she shared recently. Next, I wanted to have tiny white stars, so I created the splattered look by using white Craft ink placed in a dish, dilute with a little water and mix using a Water Painter. Then carefully tap the brush against a pencil and splatter away. It's so much fun! Just be careful not to get it onto yourself or the surrounding area. Allow to dry before completing your card.


I placed some of the elements onto the grass and to make the green grass I used the following technique. I used a strip of Granny Apple Green cardstock and torn the cardstock using my fingers giving it an organic look. Then I added Garden Green, Shaded Spruce ink with a Blending Brush to create an ombre look to the cardstock.


Christmas is in the Air Card

I do like to mix up different Stampin' Up! products for this card I used the lights from the Reindeer Fun dies and coloured the lights using Stampin' Blends in the following colours Real Red, Granny Apple Green and Daffodil Delight.


There are so many different images in the Snowy Wonder bundle and I like the penguin he's so cute! I also used the smowman and stamped him in Night of Navy and coloured him in just lightly with the Stampin' Blends.


The house is in Real Red and to make it look like the lights are on I used Daffodil Delight Stampin' Blend. The trees are die-cut using Night of Navy and the tree die from the Snowy Wonder dies.


I used the Peaceful Season bundle for the sentiment combing Real Red and Basic White makes it really pop against the nighttime sky.


Merry Christmas Card

To create my next card, I made a moon by punching out a 1" circle punch (retired) in Basic White cardstock and then I carefully added Boho Blue & Night of Navy ink with a Sponge Dauber to the edges of the moon. 


I placed the moon behind the branches to create some depth to the card. I used the Golden Greenery Dies, die-cut out two of the smaller branch and one large branch in Granny Apple Green cardstock. Then I applied Shaded Spruce ink with the Blending Bruch to each of the branches and layered them together with adhesive. 


The Christmas tree is from Decorative Trees Dies, using the spotted tree die in Night of Navy cardstock and the open tree die in Basic White cardstock. This gives the impression that the tree has lots of lights all lit up. 


I added the snowman again with some presents around the Christmas tree and a candy cane. I used Daffodil Delight cardstock for the star and bauble balls.


The sentiment is from Reindeer Fun stamp set, stamped in Real Red onto a strip of Basic White cardstock.


Thank you for visiting my blog today, I would so love to hear your thoughts on my project by leaving a comment below. Make sure you pop over to see Rachel Traudt's blog for lots of inspiration with her projects.


Make sure you follow me on social media via Facebook, Instagram and Pinterest for more inspiration.

Please email me if you would like a copy of the new Stampin' Up! 2024-2025 Annual Catalogue or Mini Catalogue, please contact me here.


Stampin' Up! 2024 Mini Catalogue coming soon.


If you live in Australia and don't have a demonstrator, you can purchase any of the Stampin' Up! products by shopping with me at my Stampin' Up! online store here.


Happy Stamping

Vicki Boucher


23 September 2024

Heart of Christmas Blog Hop - Week 8


Hello and welcome my friends,

My name is Vicki Boucher and I'm from Melbourne, Australia. Today, I'll be sharing with you a Christmas card I've made for the latest blog hop with the team from Art With Heart in Australia and we are now onto week 8.

The Heart of Christmas blog hop will be on Monday at 8pm each week until November 25th. I'm looking forward to seeing everyone's beautiful creations, so make sure you visit everyone's blog. The link for the next person will be at the end of my blog.


Here's my card for tonight's blog hop I used the Decorative Trees bundle (164085) which is located on page 42 of the Stampin' Up! Mini Catalogue. I created a whimsical Christmas card using soft tones from the three colours I used and made a magical watercolour wash background.


Starting with the three Christmas trees I heat embossed them using white Stampin' Emboss Powder and used the emboss resist technique. The colours I used for the trees are Summer Splash, Blueberry Bushel and Fresh Freesia all three colours are beautiful when used for a colour combination. I applied the inks using a Blending Brush for each of the colours and keeping it soft for a pretty look.


I used the same colours for the watercolour wash background using lots of water with the inks to dilute the colours when applied to the watercolour paper. Tip; I like to use the wide brush tip Water Painter and a bowl of water this gives me more control when adding water to the coloured inks. I use the Heat Tool to speed up the drying process and then add more colour to the watercolour paper. 

Afterwards I added lots of splattered ink to the background using the same Water Painter. I also mixed together white Kraft ink diluted with a little water in a bowl. Then tap the brush against a pair of scissors or a pencil to achieve the splattered look. Make sure it's dry before adding your next layer (I found out the hard way that kraft ink takes a lot longer to dry out on watercolour paper than normal cardstock).


As you can see, I used the Iridescent Striped Ribbon it is so pretty and it complements the three colours so well together. Using the ribbon, I made a faux bow to be placed under the trees. I placed Stampin' Dimensionals under the trees for some added dimension. 

The sentiment is from the Decorative Trees stamp set and is stamped in Fresh Freesia ink onto Basic White cardstock. The stitched label die from the Cheerful Daisies dies fits the greeting perfectly and finishes the card off nicely. I used white Iridescent adhesive-backed discs for a little sparkle! They blend in well with the other colours used.


Thank you for visiting my blog today, I would so love to hear your thoughts on my project by leaving a comment below.


Now it's time to visit Judy May's blog, I can't wait to see her beautiful Christmas project.


If the link is broken Sharon is our host for the Heart of Christmas blog hop with all of the list of the participants, click on Sharon Davern's name to see the list.


Please email me if you would like a copy of the 2024-2025 Stampin' Up! Annual Catalogue or Mini 2024 Catalogue send an email to me here


Stampin' Up! 2024 Mini Catalogue


If you live in Australia and don't have a demonstrator, you can purchase any of the Stampin' Up! products by shopping with me at my Stampin' Up! online store here.

Make sure you follow me on social media via Facebook, Instagram and Pinterest.


Happy Stamping

Vicki Boucher


15 September 2024

Stamping Sunday Blog Hop - Unfold Funfolds


Hello and welcome,

My name is Vicki Boucher and I'm from Melbourne, Australia. Today is Stamping Sunday blog hop for the month of September and for this month's theme is "Unfold Funfolds" which means anything like a Fancy Fold or Fun Fold in our projects. It's the 3rd Sunday of the month. I'm looking forward to seeing everyone's projects and you'll be able to see them by clicking on their names at the end of my blog.


I haven't made a fun fold card in a long time, so it was fun to try something different when it comes to card making. I made a Twist and Pop Card back in July 2020 and there is a You Tube video on how to make this type of card, I'll add it at the end of this post.


For today's project a made a Christmas pop & twist card using products from both the Mini and Annual Stampin' Up! Catalogues. I used the Decorative Trees Bundle (164085) which is located on page 42 of the Mini Catalogue and also the Peaceful Season Bundle (164021) which is located on page 25. 

The card looks simple from the outside, but once opened the inside pops out! There is a 4 panel, pop up element inside. You don't need an engineering degree either to make one of these. You'll just need Cardstock and strong adhesive; I've used Stampin' Seal and Multipurpose Liquid Glue which has worked for my project. I used Thick Basic White cardstock for the card base and everything else is either Basic White cardstock or specialty paper.


Let's have a look inside the card, I used the Brushed Gold Cards & Envelopes (162177) and used one of the cards for the 4 panels. This was my starting point to how I was going to make my card. 


I just love gold and white together it's so sophisticated and a classic for Christmas cards. I used different types of Christmas trees dies from the Decorative Trees Dies to form the Christmas trees.


The greeting inside the card is from the Decorative Trees stamp set and is heat embossed using Versamark ink, adding Gold Embossing Powder and heat set with the Heat Tool. 


Now for the outside of the card which I made lots of different layers starting with the three Christmas Trees; two of them are die-cut out using Basic White Cardstock and the top Christmas tree is heat embossed using Gold Embossing Powder. 


The three trees are layered over a sheet of white & gold paper from the Nature's Sweetness Specialty Paper (162616), there's an embossed panel in white cardstock using the Forever Plaid 3D Embossing Folder (164049) which is gorgeous to use and then underneath that is a panel of Gold Foil (132622) I 'am so happy it's back!


I used the Peaceful Season Dies for the sentiment, die-cut out using gold foil and basic white cardstock and heat embossed the 'Merry' with gold embossing powder. To finish off the card I added a gold foil star for the tree and gold Blooming Pearls for the embellishments. 


Here is the link for the You Tube tutorial on how to make this Twist & Pop Fancy Fold card.


Thank you for visiting my blog today, I would so love to hear your thoughts on my project by leaving a comment below.

Please email me if you would like a copy of the 2024-2025 Stampin' Up! Annual Catalogue or Mini 2024 Catalogue send an email to me here

If you live in Australia and don't have a demonstrator, you can purchase any of the Stampin' Up! products by shopping with me at my Stampin' Up! online store here.

Make sure you follow me on social media via Facebook, Instagram and Pinterest.


Happy Stamping

Vicki Boucher


To see all of the amazing projects by the Stamping Sunday Design Team please click on their names below. 


11 September 2024

Colour INKspiration Challenge #CI173


 Hello and welcome, 

My name is Vicki Boucher, and I am from Melbourne, Australia. Tonight, is the latest Colour INKspiration Challenge #CI173 this photo was chosen by Colour INKspiration Crew Member, Bronwyn Eastley (Colour INKspiration founder).


The chosen colour combination for #CI173 is Very Vanilla, Shy Shamrock and Cherry Cobbler. As well as the chosen colours you may also like to add Basic White, Basic Black, Very Vanilla, Basic Beige, Crumb Cake and metallics to your project. We also allow 'Ivory', 'Bronze' and 'Natural Tones' in the Stampin' Blends. If you don't have all the colour palette, feel free to use the closest SU substitute (ie: Real Red instead of Cherry Cobbler .... for example).

The challenge will run for almost 2 weeks until 7pm (AEST) on Monday 23rd September 2024 details to follow at the end of my blog.


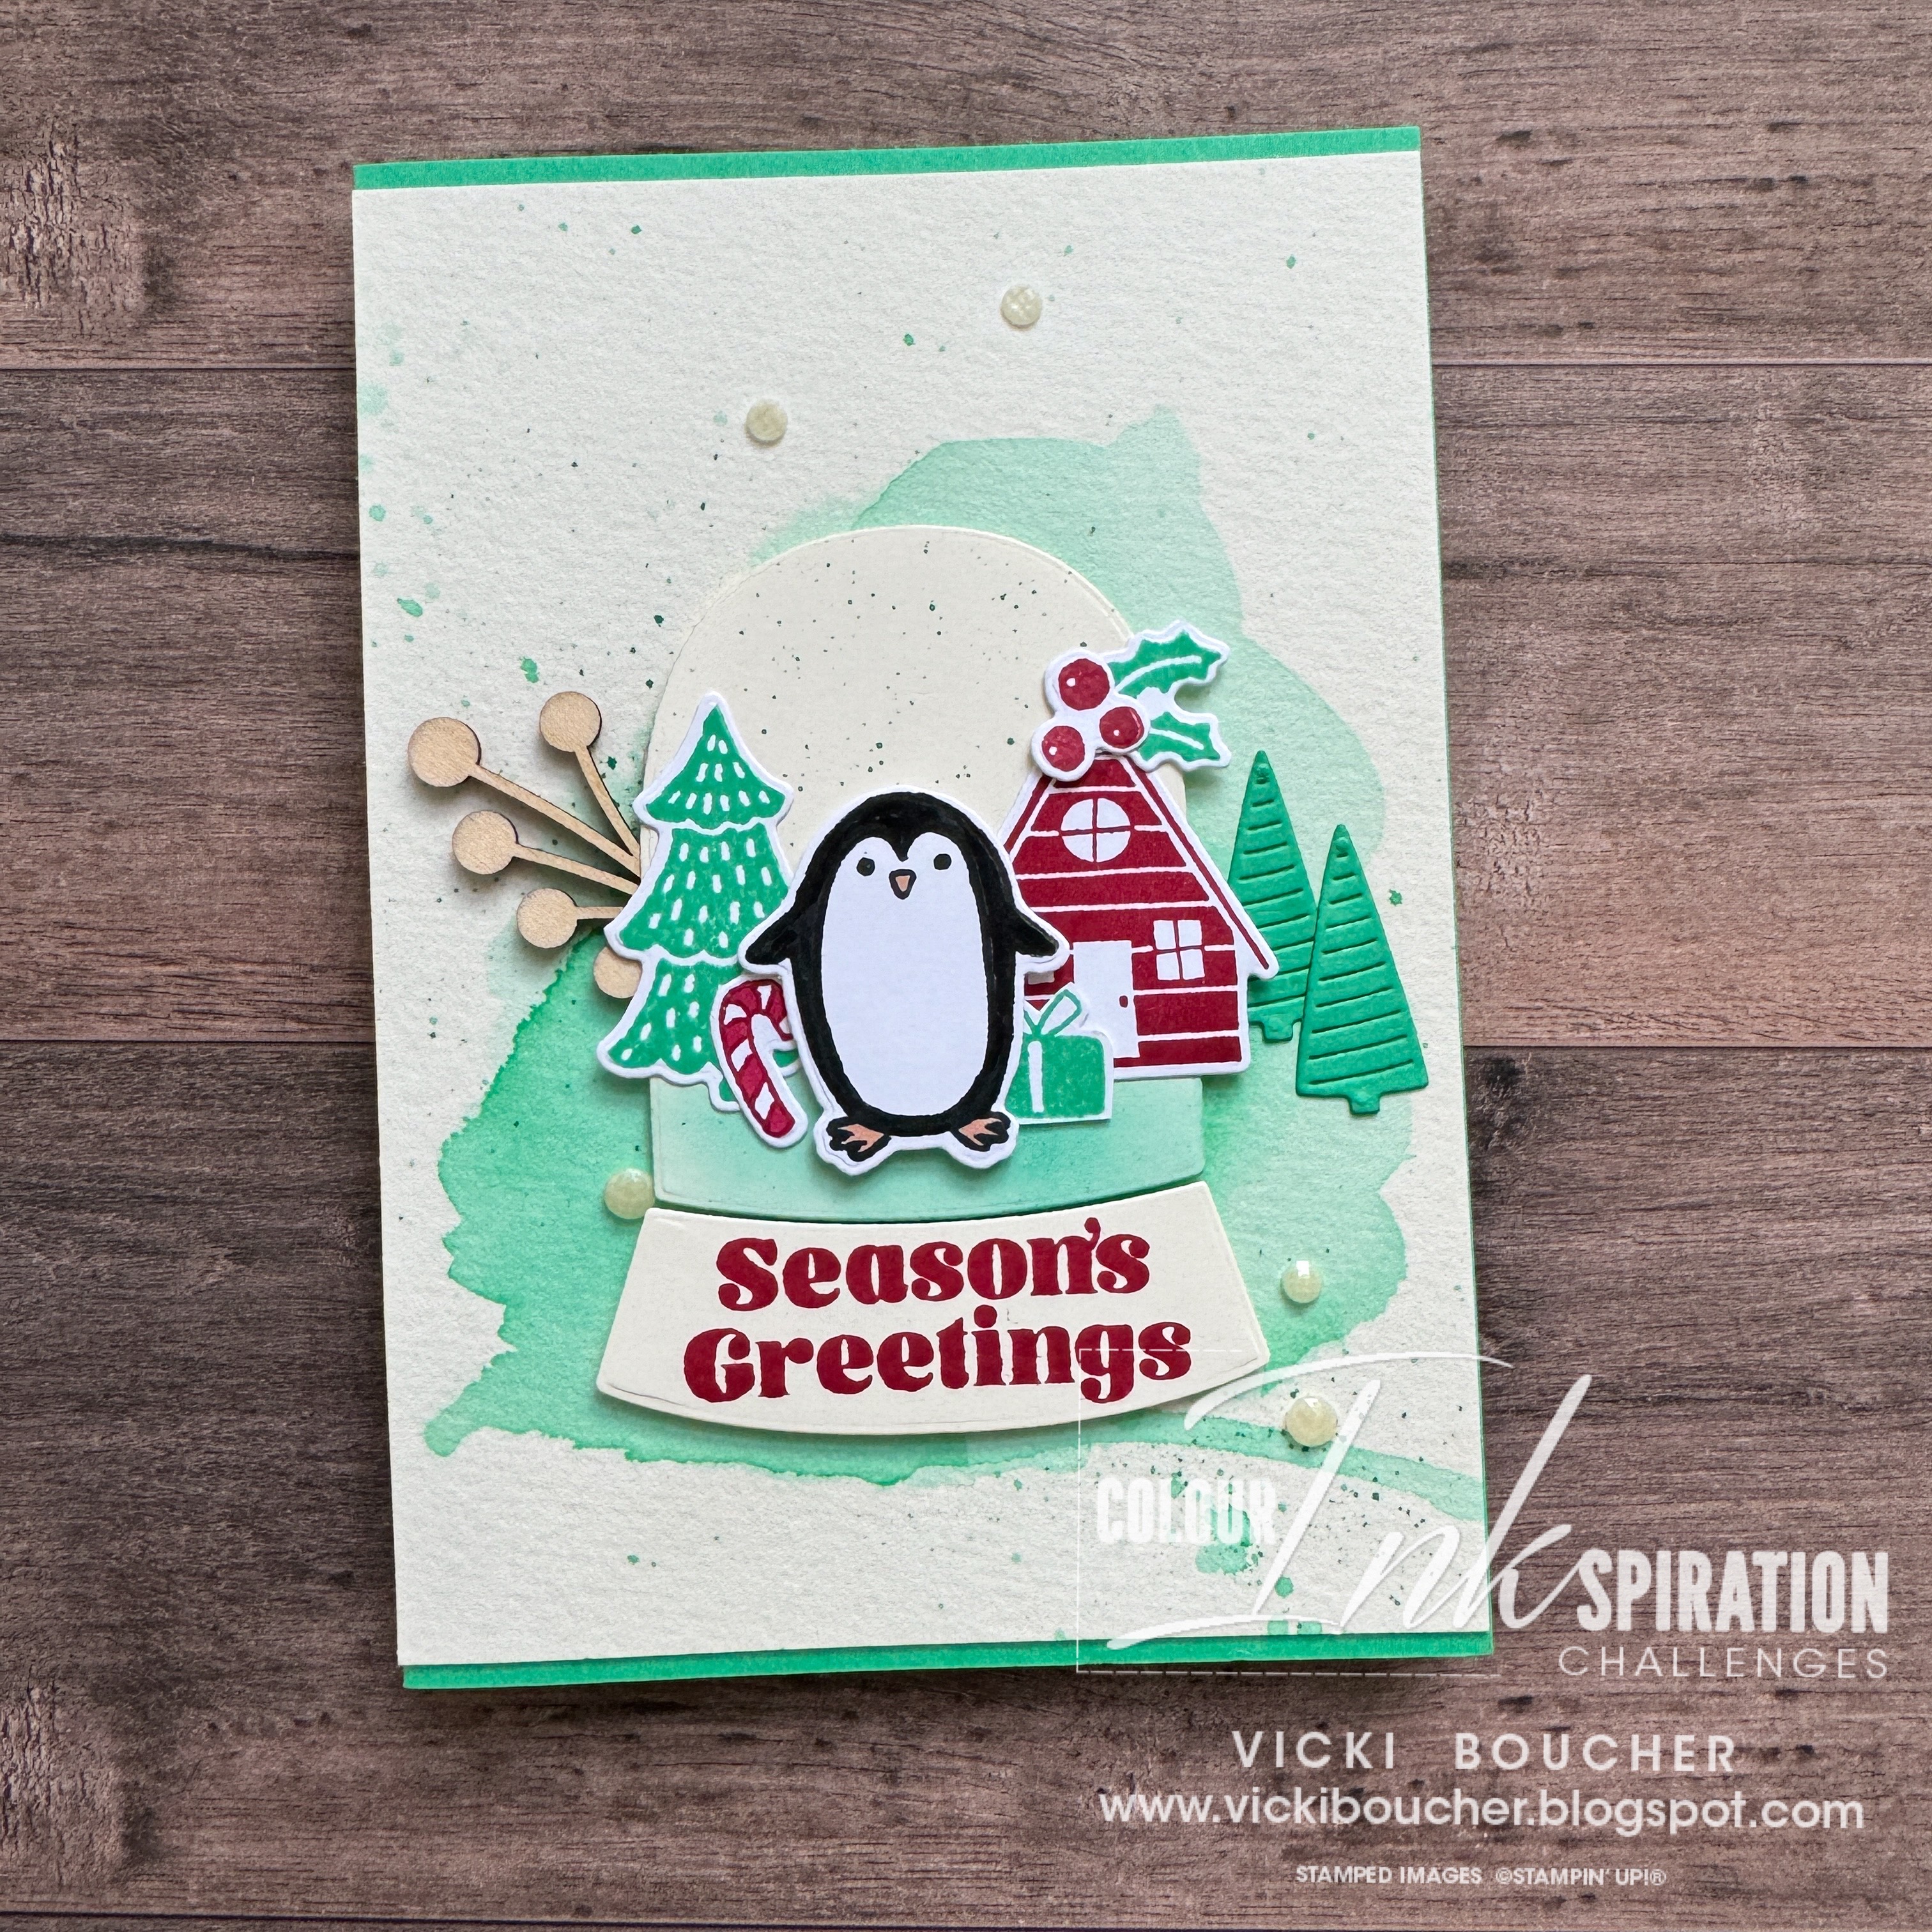
Today's card is a Christmas card using the Snowy Wonder bundle (164125) it's from the Snowy Scenes Suite Collection and it's located on page 33 of the Stampin' Up! 2024 Mini Catalogue. I instantly fell in love with the cute penguin from the stamp set and I just had to get it. He's so cute!

I stamped the images using the challenge colours onto Basic White cardstock and the penguin using Tuxedo Black Memento ink. Then I used the coordinating Snowy Wonder Dies to die-cut out the images.


There are two different types of dies to make a snow globe where you could make a shaker card, but I went with a simpler way by using Very Vanilla cardstock die-cut out the snow globe and then add the different elements to the snow globe.

I made a background water colour wash using Fluid 100 Watercolor Paper and Shy Shamrock ink. To create this effect, I first add water with the Water Painter to the watercolor paper, next I add diluted ink to the paper and push it around with the Heat Tool until the ink dries out. I like to go back and add more ink to the paper to achieve a deeper colour.

I added some embellishments to the card using Very Vanilla Earth Tones Shimmer Gems (164070) and Textural Elements (159966).


I hope I've inspired you with the latest challenge and I do hope you'll join in. We so look forward to seeing a variety of projects using the challenge colours. Please ensure that your project is new and made specifically for this challenge.

Challenge guidelines:

  • Create a NEW project made specifically for this challenge.
  • Use all of the challenge colours (or close substitutions) unless stated.
  • Upload only ONE picture per entry straight to the discussion wall and NOT in an album.

Colour INKspiration Challenge #CI173 will run until 7pm (ADET) on Monday 23rd September 2024.

To get your creative ideas flowing, make sure you check out the Crew's Project in the CI173 Album.

Please click on the link here to join the challenge.


Thank you for visiting my blog today, I would so love to hear your thoughts on my project by leaving a comment below.

Please email me if you would like a copy of the 2024-2025 Stampin' Up! Annual Catalogue send an email to me here


If you live in Australia and don't have a demonstrator, you can purchase any of the Stampin' Up! products by shopping with me at my Stampin' Up! online store here.

Make sure you follow me on social media via Facebook, Instagram and Pinterest.


Happy Stamping

Vicki Boucher


09 September 2024

Heart of Christmas Blog Hop - Week 6


Hello and welcome my friends,

My name is Vicki Boucher and I'm from Melbourne, Australia. Today, I'll be sharing with you a Christmas card I've made for the latest blog hop with the team from Art With Heart in Australia and we are now onto week 6.

The Heart of Christmas blog hop will be on Monday at 8pm each week until November 25th. I'm looking forward to seeing everyone's beautiful creations, so make sure you visit everyone's blog. The link for the next person will be at the end of my blog.


Here's my card for tonight's hop, I've used the Reindeer Fun Bundle (164044) which is located on page 27 of the Stampin' Up! Mini Catalogue and it's part of the Reindeer Days Suite Collection. I went in another direction with this bundle and went with Nordic style using white and neutral colours. I just love the paper from the Country Woods Designer Series Paper (163393) and the Oxidized Copper Specialty Designer Series Paper (162190) for some of the elements.

Using a panel of wood paper selected from the Country Woods DSP I like to tear the paper by using my fingers and to create an organic look. I like how it exposes some of the white part from the printed paper. The sentiment is from the Reindeer Fun Stamp Set, stamped in VersaMark ink adding white powder and heat embossed the sentiment using the heat tool.


The deer is stamped in Early Espresso and coloured in using Stampin' Blends in the following colours SU500, SU800, light & dark Pecan Pie and Color Lifter. I like to leave some white space around the face, throat, tail and just near their feet (hooves). I used the coordinating Reindeer Fun Dies to die-cut out the deer. 


To make the presents I used the two present dies from the Reindeer Fun Dies, die-cut two in Basic White Cardstock and one in Oxidized Copper Specialty DSP. I also used the cute bow die for the top of the presents. I used thin strips of white cardstock and copper paper to match the bows for the presents. Tip; use Adhesive Sheets (152334) and attach to the backing of cardstock or DSP to make your own stickers this makes it easier to apply to your card making.


To make the Christmas lights I used the detailed lights die and die-cut out two in Basic White and two in Oxidized Copper. Next, using paper snips scissors I snipped off the light bulb in copper and added them to the white Christmas lights. I also used adhesive sheets for the backing of the Christmas lights.

The stamped images on the white background panel are stamped in Crumb Cake ink and then I added the peekaboo window using the circular open tree die using Basic White Cardstock and layered it over the stamped panel.


Thank you for visiting my blog today, I would so love to hear your thoughts on my project by leaving a comment below.


Now it's time to visit Rosa Leyden's blog, I can't wait to see her beautiful Christmas project.


If the link is broken Sharon is our host for the Heart of Christmas blog hop with all of the list of the participants, click on Sharon Davern's name to see the list.


Please email me if you would like a copy of the 2024-2025 Stampin' Up! Annual Catalogue or Mini 2024 Catalogue send an email to me here


Stampin' Up! 2024 Mini Catalogue


If you live in Australia and don't have a demonstrator, you can purchase any of the Stampin' Up! products by shopping with me at my Stampin' Up! online store here.

Make sure you follow me on social media via Facebook, Instagram and Pinterest.


Happy Stamping

Vicki Boucher