23 August 2023

Colour INKspiration Challenge #CI150


Hello and welcome, 

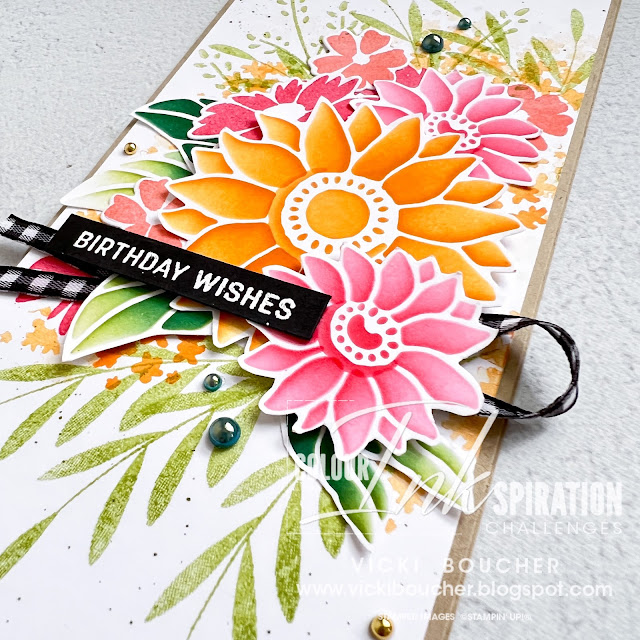
My name is Vicki Boucher, and I am from Melbourne, Australia. Tonight, is the latest Colour INKspiration Challenge #CI150 this photo was chosen by Lou Kitzelman. They are gorgeous happy colours for our 150th birthday. It certainly reminds me of spring which is not too far away.


The chosen colour combination for #CI150 is Pumpkin Pie, Calypso Coral, Sweet Sorbet, Old Olive and Pretty Peacock. As well as the chosen colours you may also like to add Basic White, Basic Black, Very Vanilla, Crumb Cake and metallics to your project. We also allow 'Ivory', 'Bronze' and 'Natural Tones' in the Stampin' Blends. If you don't have all the colour palette, feel free to use the closest SU substitute (ie: Night of Navy instead of Misty Moonlight .... you get the drift).

The challenge will run for almost 3 weeks until 7pm (AEST) on Monday 11th September 2023 details to follow at the end of my blog.


Happy birthday to Colour INKspiration!! 150 colour challenges which is amazing! I just love our design team and the variety of different colour combinations we get to try out each fortnight or sometimes three weeks. I really love a colour challenge because it challenges me to try out different colour palettes I wouldn't normally use. 


Today's slimline card I have created using the new Abundant Beauty Decorative Masks (162331) which will be available to customers in the up incoming Stampin' Up! Sep-Dec 2023 Mini Catalogue. They are amazing and so easy to use. You get 7 masks in total and 4 of them are to create sunflowers and leaves. I used the large sunflower mask by applying Pumpkin Pie ink with the Blending Brush and two smaller sunflowers in Sweet Sorbet ink. The leaves are a mix of Old Olive and Pretty Peacock I love the shading of these colours mixed together. Then I fussy cut the images out.


I combined a few different stamp sets to go with the sunflowers and the flowers from the Sending Smiles Stamp Set was perfect as they are solid images when stamped and white outline space around them. 

The background panel is Basic White Cardstock using the Lighting the Way and Gorgeously Made Stamp Sets I selected some leaf images to create lots of stamping in Old Olive ink.


To finish off the card I added Black & White Gingham Ribbon, heat embossed the sentiment and added a few Blooming Pearls embellishments in gold and Pretty Peacock. 


I hope I've inspired you with the latest challenge and I do hope you'll join in. We so look forward to seeing a variety of projects using the challenge colours. Please ensure that your project is new and made specifically for this challenge.


Upload only one picture per entry straight to the discussion wall and not in an album

Colour INKspiration Challenge #CI150 will run until 7pm (ADET) on Monday 11th September 2023.

To get your creative ideas flowing, make sure you check out the Crew's Project in the CI150 Album.

Please click on the link here to join the challenge.


Thank you for visiting my blog today, I would so love to hear your thoughts on my project by leaving a comment below.


Stampin' Up! Mini Catalogue Sep-Dec 2023

Please email me if you would like a copy of the 2023-2024 Stampin' Up! Annual or Mini Catalogue send an email to me here

If you live in Australia and don't have a demonstrator, you can purchase any of the Stampin' Up! products by shopping with me at my Stampin' Up! online store here.

Make sure you follow me on social media via Facebook, Instagram and Pinterest.


Happy Stamping

Vicki Boucher


13 August 2023

Artisan Design Team - Countryside Inn Suite


Hello and welcome,

My name is Vicki Boucher and I'm from Melbourne, Australia. Today, I'll be sharing with you three projects I created for Stampin' Up! earlier this month for my Monthly Artisan Assignment using the Countryside Inn Suite and Lasting Joy Stamp Set which was shared on Stampin' Up! socials. The design team did such an amazing job on their projects so make sure you check out their creations. I'll have the link at the bottom on my blog.

The Countryside Inn Suite (161474) is in the Stampin' Up! 2023-24 Annual Catalogue and is located on page 62-63 of the catalogue. The suite includes the following: Countryside Corners Bundle 161472 (10% bundled savings), Countryside Inn 12"x12" Designer Series Paper 161467 and Countryside Blossoms Embossing Folder 161473. Plus, we were also given the Lasting Joy Stamp Set 161442 to work with for our projects. 


Countryside Inn Suite (161474)


Countryside Inn 12"x12" Designer Series Paper 161467

Lasting Joy Stamp Set 161442


Here are my three projects that I have created using the Countryside Inn Suite and Lasting Joy Stamp Set. This suite and stamp set are designed to go together and I'll be showing you different ways on how to use these products. Throughout the cards I've selected different colours to go with the blues and basic white.


For You Fresh Freesia Card

For my first card I created the background panel using Lasting Joy Stamp Set, Fresh Freesia Cardstock and stamping the images in Night of Navy ink. I've also stamped a few more images and fussy cut them out with the Paper Snips to add to the card later on. 


I've added layers of paper to the card using Countryside Inn Designer Series Paper and Night of Navy Cardstock Embossed with Countryside Blossoms Embossing Folder. I like to tear the edges of the embossed cardstock and designer series paper. 


The Countryside Corners stamp set is one large only stamp and you can create elegant borders for your images, greetings, labels, or add border patterns to your cards. There are coordinating Countryside Corners Dies to match with each layer, I've used the second smallest image using Fresh Freesia Cardstock and Night of Navy ink. Then die-cut out with the second smallest die.


To finish off the card I've heat embossed the sentiment from the Lasting Joy Stamp Set by stamping the image in VersaMark onto a strip of Night of Navy Cardstock, add White Stampin' Emboss Powder and heat set with the Heat Tool. I've added Misty Moonlight Tinsel Gems to the card.


Birthday Wishes Melon Mambo Card

For this card, I started with the Countryside Inn Designer Series Paper by tearing up different strips of paper and layering them down on a larger size of Night of Navy Cardstock die-cut out using the Countryside Corners Dies. 


This is a great way to use up those strips of paper and produce an effective background for your card. Once the strips are layered with adhesive, I then used the next die down from the Countryside Corners Dies and added to the embossed Basic White Cardstock.


Using the following colours to stamp images from the Lasting Joy Stamp Set in Melon Mambo, Night of Navy, Misty Moonlight and Boho Blue inks. Once stamped fussy cut with paper snips before adhering to my card.


The sentiment was heat embossed as the same as the above card and then placed over the torn paper and stamped images. Other elements added was White Baker's Twine and coloured in White Classics Dots with Melon Mambo Stampin' Blend. 


Lasting Joy Bubble Bath Card

On my third card, I used the Countryside Blossoms Embossing Folder in two different ways by using different coloured cardstock and techniques. 


To start with the Bubble Bath side, I embossed a strip of Vellum and adhered to the cardstock. For the Misty Moonlight side, I applied White Craft ink with a Sponge Dauber to the paper, this gave a softer and different look to Misty Moonlight.


Next, I fussy cut out a few of the images from the Countryside Inn Designer Series Paper with paper snips and added them to the white on Night of Navy heat embossed using one of the larger Countryside Inn label Dies. 


Then it was placed over an even larger label die using Bubble Bath Cardstock and Night of Navy ink. The ribbons under the labels are Bubble Bath Sheer Ribbon and Night of Navy Borded Ribbon cut in half lengthways.  


Thank you for visiting my blog today, I would so love to hear your thoughts on my project by leaving a comment below. I hope I've inspired you to create and have with this beautiful Countryside Inn Suite. I would love to see what you come up with using these Stampin' Up! products.


Make sure you pop over onto Stampin' Up! Facebook page or Stampin' Up! Instagram page for lots of inspiration using the Countryside Inn Suite and Lasting Joy Stamp Set. You will just need to go back to the last weekend of August 2023 to view our projects.

Please email me if you would like a copy of the 2023-2024 Stampin' Up! Annual Catalogue send an email to me here

If you live in Australia and don't have a demonstrator, you can purchase any of the Stampin' Up! products by shopping with me at my Stampin' Up! online store here.

Make sure you follow me on social media via Facebook, Instagram and Pinterest.

Happy Crafting

Vicki Boucher


09 August 2023

Colour INKspiration Challenge #CI149


Hello and welcome, 

My name is Vicki Boucher, and I am from Melbourne, Australia. Tonight, is the latest Colour INKspiration Challenge #CI149 this photo was chosen by Lou Kitzelman.


The chosen colour combination for #CI149 is Fresh Freesia, Moody Mauve and Misty Moonlight. As well as the chosen colours you may also like to add Basic White, Basic Black, Very Vanilla, Crumb Cake and metallics to your project. We also allow 'Ivory', 'Bronze' and 'Natural Tones' in the Stampin' Blends. If you don't have all the colour palette, feel free to use the closest SU substitute (ie: Night of Navy instead of Misty Moonlight .... you get the drift).

The challenge will run for almost 2 weeks until 7pm (AEST) on Monday 21st August 2023 details to follow at the end of my blog.


These colours are so beautiful together and so is the photo. For my card I went with the Translucent Florals bundle (162253) which is in the new Mini Catalogue Sept-Dec 2023. This will be available as of next month for customers.


I've used a new embossing folder which is also from the Mini Catalogue and it's called Distressed Tile 3D Embossing Folder. It's part of the All About Autumn Suite and will be available next month for customers to purchase. I've embossed it using Misty Moonlight Cardstock, then distressed the embossed panel with Paper Snips and added White Craft ink with the Sponge Dauber.


Next, I create a watercolour wash background using Water Paper and the three challenge colours. I like to add water using the Water Painter I used the wide brush tip and applied water to the Water Paper. I started with Misty Moonlight ink then added Fresh Freesia and Moody Mauve.

The stamped images from the Translucent Florals Stamp Set add a soft look to the images. I then used the coordinating dies to die-cut them out.


The sentiment is heat embossed using Versamark, White Stampin' Emboss Powder and heat set with the Heat Tool. I've used one of the labels dies from Cracker & Treat Box Dies and die-cut out the sentiment.

Other elements I've used are Moody Mauve Jute Trim and Fresh Freesia Tinsel Gems.

I hope I've inspired you with the latest challenge and I do hope you'll join in. We so look forward to seeing a variety of projects using the challenge colours. Please ensure that your project is new and made specifically for this challenge.


Upload only one picture per entry straight to the discussion wall and not in an album

Colour INKspiration Challenge #CI149 will run until 7pm (ADET) on Monday 21st August 2023.

To get your creative ideas flowing, make sure you check out the Crew's Project in the CI149 Album.

Please click on the link here to join the challenge.


Thank you for visiting my blog today, I would so love to hear your thoughts on my project by leaving a comment below.


Please email me if you would like a copy of the 2023-2024 Stampin' Up! Annual Catalogue send an email to me here

If you live in Australia and don't have a demonstrator, you can purchase any of the Stampin' Up! products by shopping with me at my Stampin' Up! online store here.

Make sure you follow me on social media via Facebook, Instagram and Pinterest.


Happy Stamping

Vicki Boucher


06 August 2023

Creation Station Blog Hop - Ombre Blending


Hello and welcome,

My name is Vicki Boucher, and I am from Melbourne, Australia. This is the latest hop with the design team at Creation Station, if you have come from Kathy Brown Kartak or you may have started with me. Please make sure you hop around and see everyone's amazing projects. I'll pop a link at the end of my blog.

The design team at Creation Station are presenting their projects with the theme "Ombre Blending" this was a fun challenge to do. I create two projects with this theme using a mix of different Stampin' Up! products. 


When it comes to using the ombre technique for paper crafting I just love this technique. It's always fun to see how I can blend colours together. My usual go to are either Blending Brushes or Stampin' Blends. I like to mix similar colours together to achieve variation in colour.


Love You Card

Only just the other day I received my Artisan Stampin' Up! box of goodies and inside was the Autumn Leaves Stamp Set & Dies which is from the September to December 2023 Mini Catalogue. I die-cut out three Basic White leaves using the large leaf die and two smaller dies. I added the following colours to the larger leaf with the Blending Brush - Bubble Bath, Fresh Freesia, Highland Heather and Gorgeous Grape. For the smaller leaves I used Gorgeous Grape and Pretty Peacock.


I just couldn't resist those owls from the Bird's Eye View Stamp Set, stamped in Memento ink onto Basic White Cardstock and coloured in with the Stampin' Blends. I used Bubble Bath, Fresh Freesia, Highland Heather for the wings and Pool Party, Lost Lagoon and Pretty Peacock for the body. Those owls look so cute with the eyeglasses on them. These birds work well with the Stampin' Blends when it comes to colouring them in.


I used the Love For You Dies and created an ombre sentiment using Basic White Cardstock and adding Pretty Peacock ink to the cardstock with the Blending Brush. Then I die-cut the images out. 


For the background I used the Lost Lagoon ombre paper from the Bright & Beautiful 6x6 Designer Series Paper and added another torn layer in the same colour. To finish off the card I added Iridescent Discs in Pool Party.


Birthday Wishes Card

As I was having so much fun with these cute owls, I just had to create another card! This time I went for a more feminine card using pretty colours. The die-cut leaves are in Pretty Peacock. 


I used the Stampin' Blends to colour in the birds and books using Bubble Bath, Fresh Freesia and Highland Heather. Then I fussy cut them out with Paper Snips.

To create the sentiment, I added the following colours using a Blending Brush to Basic White Cardstock - Fresh Freesia, Highland Heather and Gorgeous Grape. I die-cut out the image with the Sending Dies and Foam Adhesive Sheets.


For the background layer I used Bubble Bath ombre paper from the Bright & Beautiful 6x6 Designer Series Paper and added another torn layer using the polka dots. 


Other elements I've used are Bubble Bath Sheer Ribbon, heat embossed the sentiment which is from the Sending Smiles Stamp Set and White Iridescent Discs.


Thank you for visiting my blog today, I would so love to hear your thoughts on my project by leaving a comment below. Make sure you pop over to Elizabeth Price for lots of inspiration using ombre blending in her projects.


Make sure you follow me on social media via Facebook, Instagram and Pinterest.

Please email me if you would like a copy of the new 2023-2024 Annual Catalogue and Sept-Dec 2023 Mini Catalogue, please contact me here


Mini Catalogue Sep-Dec 2023


If you live in Australia and don't have a demonstrator, you can purchase any of the Stampin' Up! products by shopping with me at my Stampin' Up! online store here.


Happy Stamping

Vicki Boucher