Showing posts with label Ink Blending Technique. Show all posts

01 September 2024

Creation Station Blog Hop - Stampin' Blends


 Hello and welcome,

My name is Vicki Boucher, and I am from Melbourne, Australia. This is the latest hop with the design team at Creation Station, if you have come from Yvonne's blog or you may have started with me. Please make sure you hop around and see everyone's amazing projects. I'll pop a link at the end of my blog.

The design team at Creation Station are presenting their projects with the theme Stampin' Blends. Stampin' Up! have a huge range of alcohol coloured markers and they are perfect for adding colour to line art images of people, nature and more. Plus there's a range of natural colours as well as Bronze and Ivory. Blending light and dark to give you depth and you can also remove colour by using the Colour Lifter.


Today's project I've made a Christmas card using the Reindeer Fun bundle (164044) which is located on page 27 of the Stampin' Up! 2024 Sept - Dec Mini Catalogue. I know I'm going to love this bundle. I've only used some of the images from the stamp set and the two reindeers together are so adorable. There's a variety of different dies from the Reindeer Fun Dies to use to decorate your Christmas cards, paper crafts and even scrapbooking. 


For the images of the reindeer, I used Basic Gray ink and stamped onto Basic White Cardstock, Basic Gray is a lot softer than Black ink and it blends in well with Smokey Slate Stampin' Blends. A helpful tip when colouring in the deer is to leave some white space such as the face and use the Colour Lifter to remove some of the gray, especially near the face and ears.


I coloured in the background panel under the white frame die-cut using Pool Party Stampin' Blends both light and dark. Then I added white snowflakes by stamping the images a number of times using Versamark ink, adding White Stampin' Emboss Powder and heat set with the Heat Tool. 


The torn strips of Basic White Cardstock are layered over one another and I added Stampin' Blend Pool Party to create a shadow to the snow.

I die-cut out the holly using Basic White cardstock and then coloured the holly using Pool Party and Petal Pink Stampin' Blends.


Thank you for visiting my blog today, I would so love to hear your thoughts on my project by leaving a comment below. Make sure you pop over to see Barb Pfeffer's Blog for lots of inspiration with her projects.


Make sure you follow me on social media via Facebook, Instagram and Pinterest for more inspiration.

Please email me if you would like a copy of the new Stampin' Up! 2024-2025 Annual Catalogue or Mini Catalogue, please contact me here.


Stampin' Up! 2024 Mini Catalogue coming soon.


If you live in Australia and don't have a demonstrator, you can purchase any of the Stampin' Up! products by shopping with me at my Stampin' Up! online store here.


Happy Stamping

Vicki Boucher


26 August 2024

Heart of Christmas Blog Hop - Week 4


Hello and welcome my friends,

My name is Vicki Boucher and I'm from Melbourne, Australia. Today, I'll be sharing with you my first Christmas card for the year with the team from Art With Heart in Australia and we are now onto week 4.

The Heart of Christmas blog hop will be on Monday at 8pm each week until November 25th. I'm so excited to see everyone's beautiful creations, so make sure you hop around. The link for the next person will be at the end of my blog.


Here's my card for tonight's hop, I've used the new Painted Trees 3D Embossing Folder (164026) which is located on page 25 of the Stampin' Up! Mini Catalogue, I've combined it with the new Peaceful Season Bundle (164021) and Gold Textured Adhesive Backed Dots (164027). All of these Stampin' Up! products are part of the Season of Elegance Suite Collection and will be available early September 2024.

I created a fun technique that I discovered from Maheswari Rajaguru on the Stampin' Up! Facebook page last week I just had to try it out and it's called Double Embossing Technique. 


Start with a panel of Basic White Cardstock and emboss it with the Snowflake Sky 3D Embossing Folder (162026). A great tip when embossing is to have the Stampin' Up! logo facing up to you when you emboss.


Next, use the Painted Trees 3D Embossing Folder to emboss the same piece of cardstock, giving you a clear raised image. This will give you the base for the wintery Christmas scene with lots of texture.


To create an ombre effect start with Boho Blue ink applied with the Blending Brush to the snowflake sky, next I added Misty Moonlight to the trees and followed by Night of Navy to finish off the ombre effect.


The sentiment is from Peaceful Season stamp set, heat embossed using Gold Embossing Powder and die-cut out using the Peaceful Season label die. The word Christmas is die-cut out using Gold Foil (I'm so glad it came back!) and layered over Basic White Cardstock.


I really like blue and gold together, so I had to use the Night of Navy Glittered Ribbon and place it under the word Christmas. I added a few of the Gold Textured Adhesive Backed Dots to finish off the card.

Thank you for visiting my blog today, I would so love to hear your thoughts on my project by leaving a comment below.


Now it's time to visit Andrea Sargent's blog, I can't wait to see her beautiful Christmas project.


If the link is broken Sharon is our host for the Heart of Christmas blog hop with all of the list of the participants, click on Sharon Davern's name to see the list.


Please email me if you would like a copy of the 2024-2025 Stampin' Up! Annual Catalogue or Mini 2024 Catalogue send an email to me here


Stampin' Up! 2024 Mini Catalogue coming soon.


If you live in Australia and don't have a demonstrator, you can purchase any of the Stampin' Up! products by shopping with me at my Stampin' Up! online store here.

Make sure you follow me on social media via Facebook, Instagram and Pinterest.


Happy Stamping

Vicki Boucher


02 June 2024

Creation Station Blog Hop - In Color & Core Color


Hello and welcome,

My name is Vicki Boucher, and I am from Melbourne, Australia. This is the latest hop with the design team at Creation Station, if you have come from Teri West or you may have started with me. Please make sure you hop around and see everyone's amazing projects. I'll pop a link at the end of my blog.

The design team at Creation Station are presenting their projects with the theme "In Color & Core Color" we got to choose our favourite colour combination. Choose one new In Color and one core color, plus Basic White/Beige/Grey/Black. I decided to go with Petunia Pop which is a new In Color for 2024-2026 and Old Olive which is a beautiful green. 


For my project I went with the Flower of Beauty (163376) and Unbounded Love (163384) bundles which are part of the Unbounded Beauty Suite Collection (163390) you can find them in the Stampin' Up! Annual Catalogue for 2024-25 and is located on page 52-55. I love everything about this suite including the gorgeous Designer Series Paper, embellishments and I love that all of the new In Colors are featured in this suite.


The Flowers of Beauty bundle consist of the Flowers of Beauty stamp set and dies, I've stamped the images in Memento Ink onto Basic White cardstock and then coloured them in using Petunia Pop and Old Olive Stampin' Blends. I then went over the coloured images with the same colour ink and lightly applied ink using the Blending Brush.


I've added a few die-cut images for the background using Petunia Pop In Color Glimmer Paper and a couple of additional green foliage images by blending Old Olive ink onto Basic White cardstock and die-cut out using the Flowers of Beauty and Unbounded Love dies.


I do love to add lots of different layers to a card and give it a vintage vibe with different Designer Series Paper, Embossing Folders, Ribbon, Embellishments and Twine. Here I've used Country Woods 12x12 Designer Series Paper (163393), 2024-2026 In Color 6x6 Designer Series Paper (163777), Timber 3D Embossing Folder (156406), Distressed Tile Embossing Folder (162189) Black & Very Vanilla Large Check Ribbon (161982), Linen Thread (104199) and Adhesive Backed Pearl Trio (163319).


Thank you for visiting my blog today, I would so love to hear your thoughts on my project by leaving a comment below. Make sure you pop over to see Yvonne for lots of inspiration with her projects.


Make sure you follow me on social media via Facebook, Instagram and Pinterest for more inspiration.

Please email me if you would like a copy of the new Stampin' Up! 2024-2025 Annual Catalogue, please contact me here.


Stampin' Up! 2024-2025 Annual Catalogue


If you live in Australia and don't have a demonstrator, you can purchase any of the Stampin' Up! products by shopping with me at my Stampin' Up! online store here.


Happy Stamping

Vicki Boucher


12 April 2024

Colour INKspiration Challenge #CI163


 Hello and welcome, 

My name is Vicki Boucher, and I am from Melbourne, Australia. Tonight, is the latest Colour INKspiration Challenge #CI163 this photo was chosen by Colour INKspiration Crew Member, Monica. What an awesome colour palette to work with and so very different. 


The chosen colour combination for #CI163 is Crushed Curry, Poppy Parade, Coastal Cabana, Gorgeous Grape and Starry Sky. As well as the chosen colours you may also like to add Basic White, Very Vanilla, Basic Beige, Crumb Cake, Basic Black and metallics to your project. We also allow 'Ivory', 'Bronze' and 'Natural Tones' in the Stampin' Blends. If you don't have all the colour palette, feel free to use the closest SU substitute (ie: Night of Navy instead of Starry Sky.... for example).

The challenge will run for almost 2 weeks until 7pm (AEST) on Monday 22nd April 2024 details to follow at the end of my blog.


When I first saw these colours I wasn't too sure on how I was going to use them as it's not my normal go to mix of colours and then I realised they are the colours of the rainbow! Especially when you start blending them together for example Crushed Curry with Poppy Parade makes orange, Starry Sky with Gorgeous Grape makes a violet or indigo and so on. This was so much fun and I like to play with colour.


I used a sheet of Basic White Cardstock and started adding ink onto the cardstock with the Blending Brush and then I would add a colour to see how it would blend in together. Once the ink dried, I then added splatter of water droplets using my fingers and I created lots of water droplets. I used the two small maple leaves dies from the Autumn Leaves Dies and die-cut out lots of maple leaves to form a rainbow wreath.


I created a large ring by die-cutting the two largest circle dies from the Stylish Shapes Dies this would form the base for my wreath and then I would start to add the leaves one by one using Multi Tombow Mono Liquid Glue.


I wanted the wreath to pop out from the card and so I used the new Basic Beige Cardstock for the background panel for some added texture I embossed it with the Timber 3D Embossing Folder and scored 2cm lines to create wood panels. Then I added some Crumb Cake ink using the Blending Brush and applied to the embossed panel this gives it some added interest to the embossed impressions. 


I also added another coloured layer underneath the Basic Beige embossed panel and it's just enough to peak through by curling the corner using your fingers. 


To finish off the card I heat embossed the sentiment which is from the new Simply Said Stamp Set which is in the new Stampin' Up! Annual Catalogue for 2024 to 2025.


I hope I've inspired you with the latest challenge and I do hope you'll join in. We so look forward to seeing a variety of projects using the challenge colours. Please ensure that your project is new and made specifically for this challenge.

Upload only one picture per entry straight to the discussion wall and not in an album

Colour INKspiration Challenge #CI163 will run until 7pm (ADET) on Monday 22nd April 2024.

To get your creative ideas flowing, make sure you check out the Crew's Project in the CI163 Album.

Please click on the link here to join the challenge.


Thank you for visiting my blog today, I would so love to hear your thoughts on my project by leaving a comment below.

Please email me if you would like a copy of the 2024-2025 Stampin' Up! Annual or Mini Catalogue send an email to me here

If you live in Australia and don't have a demonstrator, you can purchase any of the Stampin' Up! products by shopping with me at my Stampin' Up! online store here.

Make sure you follow me on social media via Facebook, Instagram and Pinterest.


Happy Stamping

Vicki Boucher


27 March 2024

Colour INKspiration Challenge #CI162


 Hello and welcome, 

My name is Vicki Boucher, and I am from Melbourne, Australia. Tonight, is the latest Colour INKspiration Challenge #CI162 this photo was chosen by Colour INKspiration Crew Member, Rose. I love the look of this wintery snow scene against the bright blue sky.


The chosen colour combination for #CI162 is Very Vanilla, Azure Afternoon, Boho Blue and Early Espresso. As well as the chosen colours you may also like to add Basic White, Basic Beige, Crumb Cake, Basic Black and metallics to your project. We also allow 'Ivory', 'Bronze' and 'Natural Tones' in the Stampin' Blends. If you don't have all the colour palette, feel free to use the closest SU substitute (ie: Tahitian Tide instead of Azure Afternoon.... for example).

The challenge will run for almost 2 weeks until 7pm (AEST) on Monday 8th April 2024 details to follow at the end of my blog.


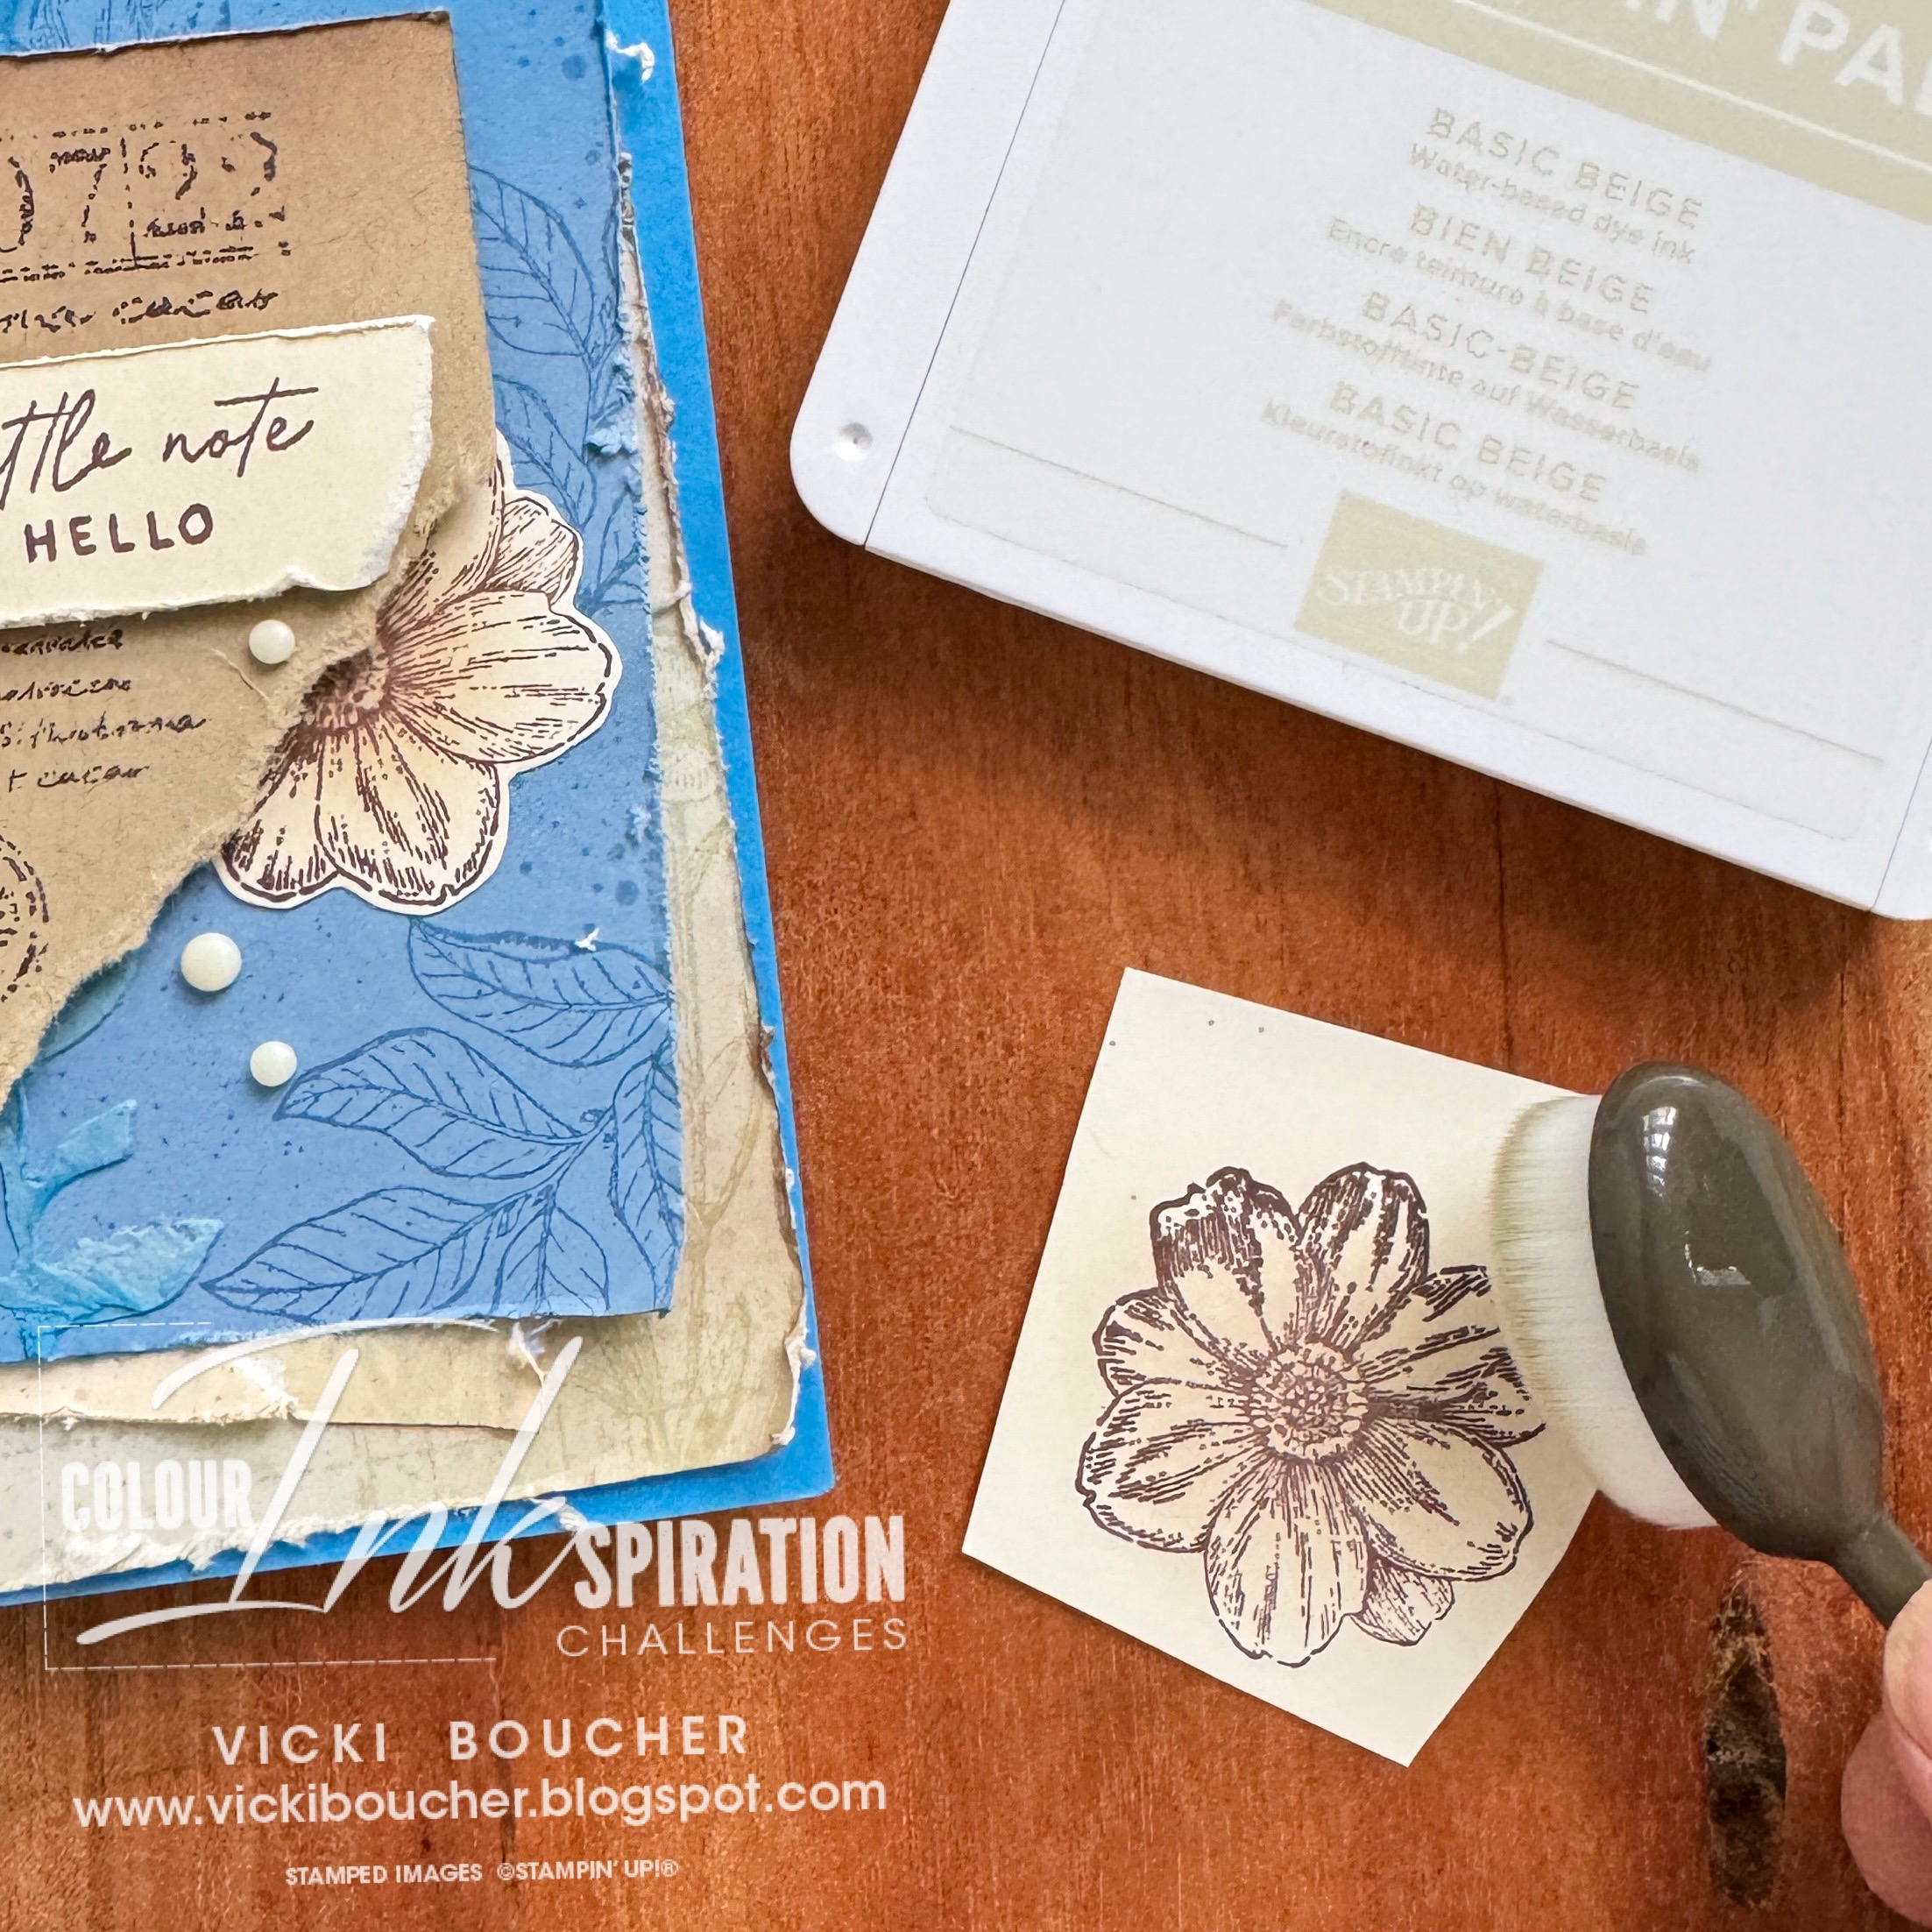
Today's card I decided to use some soon to be retiring bundles and stamp sets, except for the Paper Butterfly Accents they will be carrying over into the new Stampin' Up! Annual Catalogue for 2024-25. I just love the Notes of Nature bundle from the Mini Catalogue it just gives me vintage vibes and works well with the Quiet Meadow stamp set, I'm going to miss them both for sure.


Did you notice in my second paragraph we now have a new color called Basic Beige which comes in Classic Stampin' Pad (163806), A4 Cardstock (164512) and Classic Stampin' Ink Refill (163815) and we can use this color in our projects for the challenges. I love it so much!! It's similar to Sahara Sand which retired a year ago. I used the cardstock and stamped images using the ink pad for the bottom layer. 


I really went out and created lots of layers for this card, so there are lots to see and discover. I stamped the flower image in Early Espresso ink onto Very Vanilla cardstock, then with the small Blending Brush I added Basic Beige ink to the flower and then fussy cut out the image.


I do like to rough up the edges of cardstock by using the Paper Snips and running the blade along the cardstock. Adding colour to the cardstock with the Blending Brush gives you variation in the colour for example I used Crumb Cake Cardstock and I added Early Espresso ink to create a darker look to the cardstock.


I haven't used Embossing Paste in a while, so I created my own stencil by using the leaf die from Notes of Nature Dies, die-cut out the image using Cardstock and then I mixed up together Boho Ink with the paste and then I applied the coloured paste to Boho Blue Cardstock. It adds a fun texture to your projects.


I used one of the butterflies from the Paper Butterfly Accents (162612) which is carrying over from the Mini Catalogue. I coloured in the butterfly using Azure Afternoon and Early Espresso inks with a Sponge Dauber and Blending Brush leaving some white space between the two colours.


To finish off the card I added Very Vanilla Classic Matte Dots and Silver Threaded Twine both are retiring soon. 


I hope I've inspired you with the latest challenge and I do hope you'll join in. We so look forward to seeing a variety of projects using the challenge colours. Please ensure that your project is new and made specifically for this challenge.

Upload only one picture per entry straight to the discussion wall and not in an album

Colour INKspiration Challenge #CI162 will run until 7pm (ADET) on Monday 8th April 2024.

To get your creative ideas flowing, make sure you check out the Crew's Project in the CI162 Album.

Please click on the link here to join the challenge.


Thank you for visiting my blog today, I would so love to hear your thoughts on my project by leaving a comment below.

Please email me if you would like a copy of the 2024-2025 Stampin' Up! Annual or Mini Catalogue send an email to me here

If you live in Australia and don't have a demonstrator, you can purchase any of the Stampin' Up! products by shopping with me at my Stampin' Up! online store here.

Make sure you follow me on social media via Facebook, Instagram and Pinterest.


Happy Stamping

Vicki Boucher


22 October 2023

Artisan Design Team - All About Autumn Suite


 Hello and welcome,

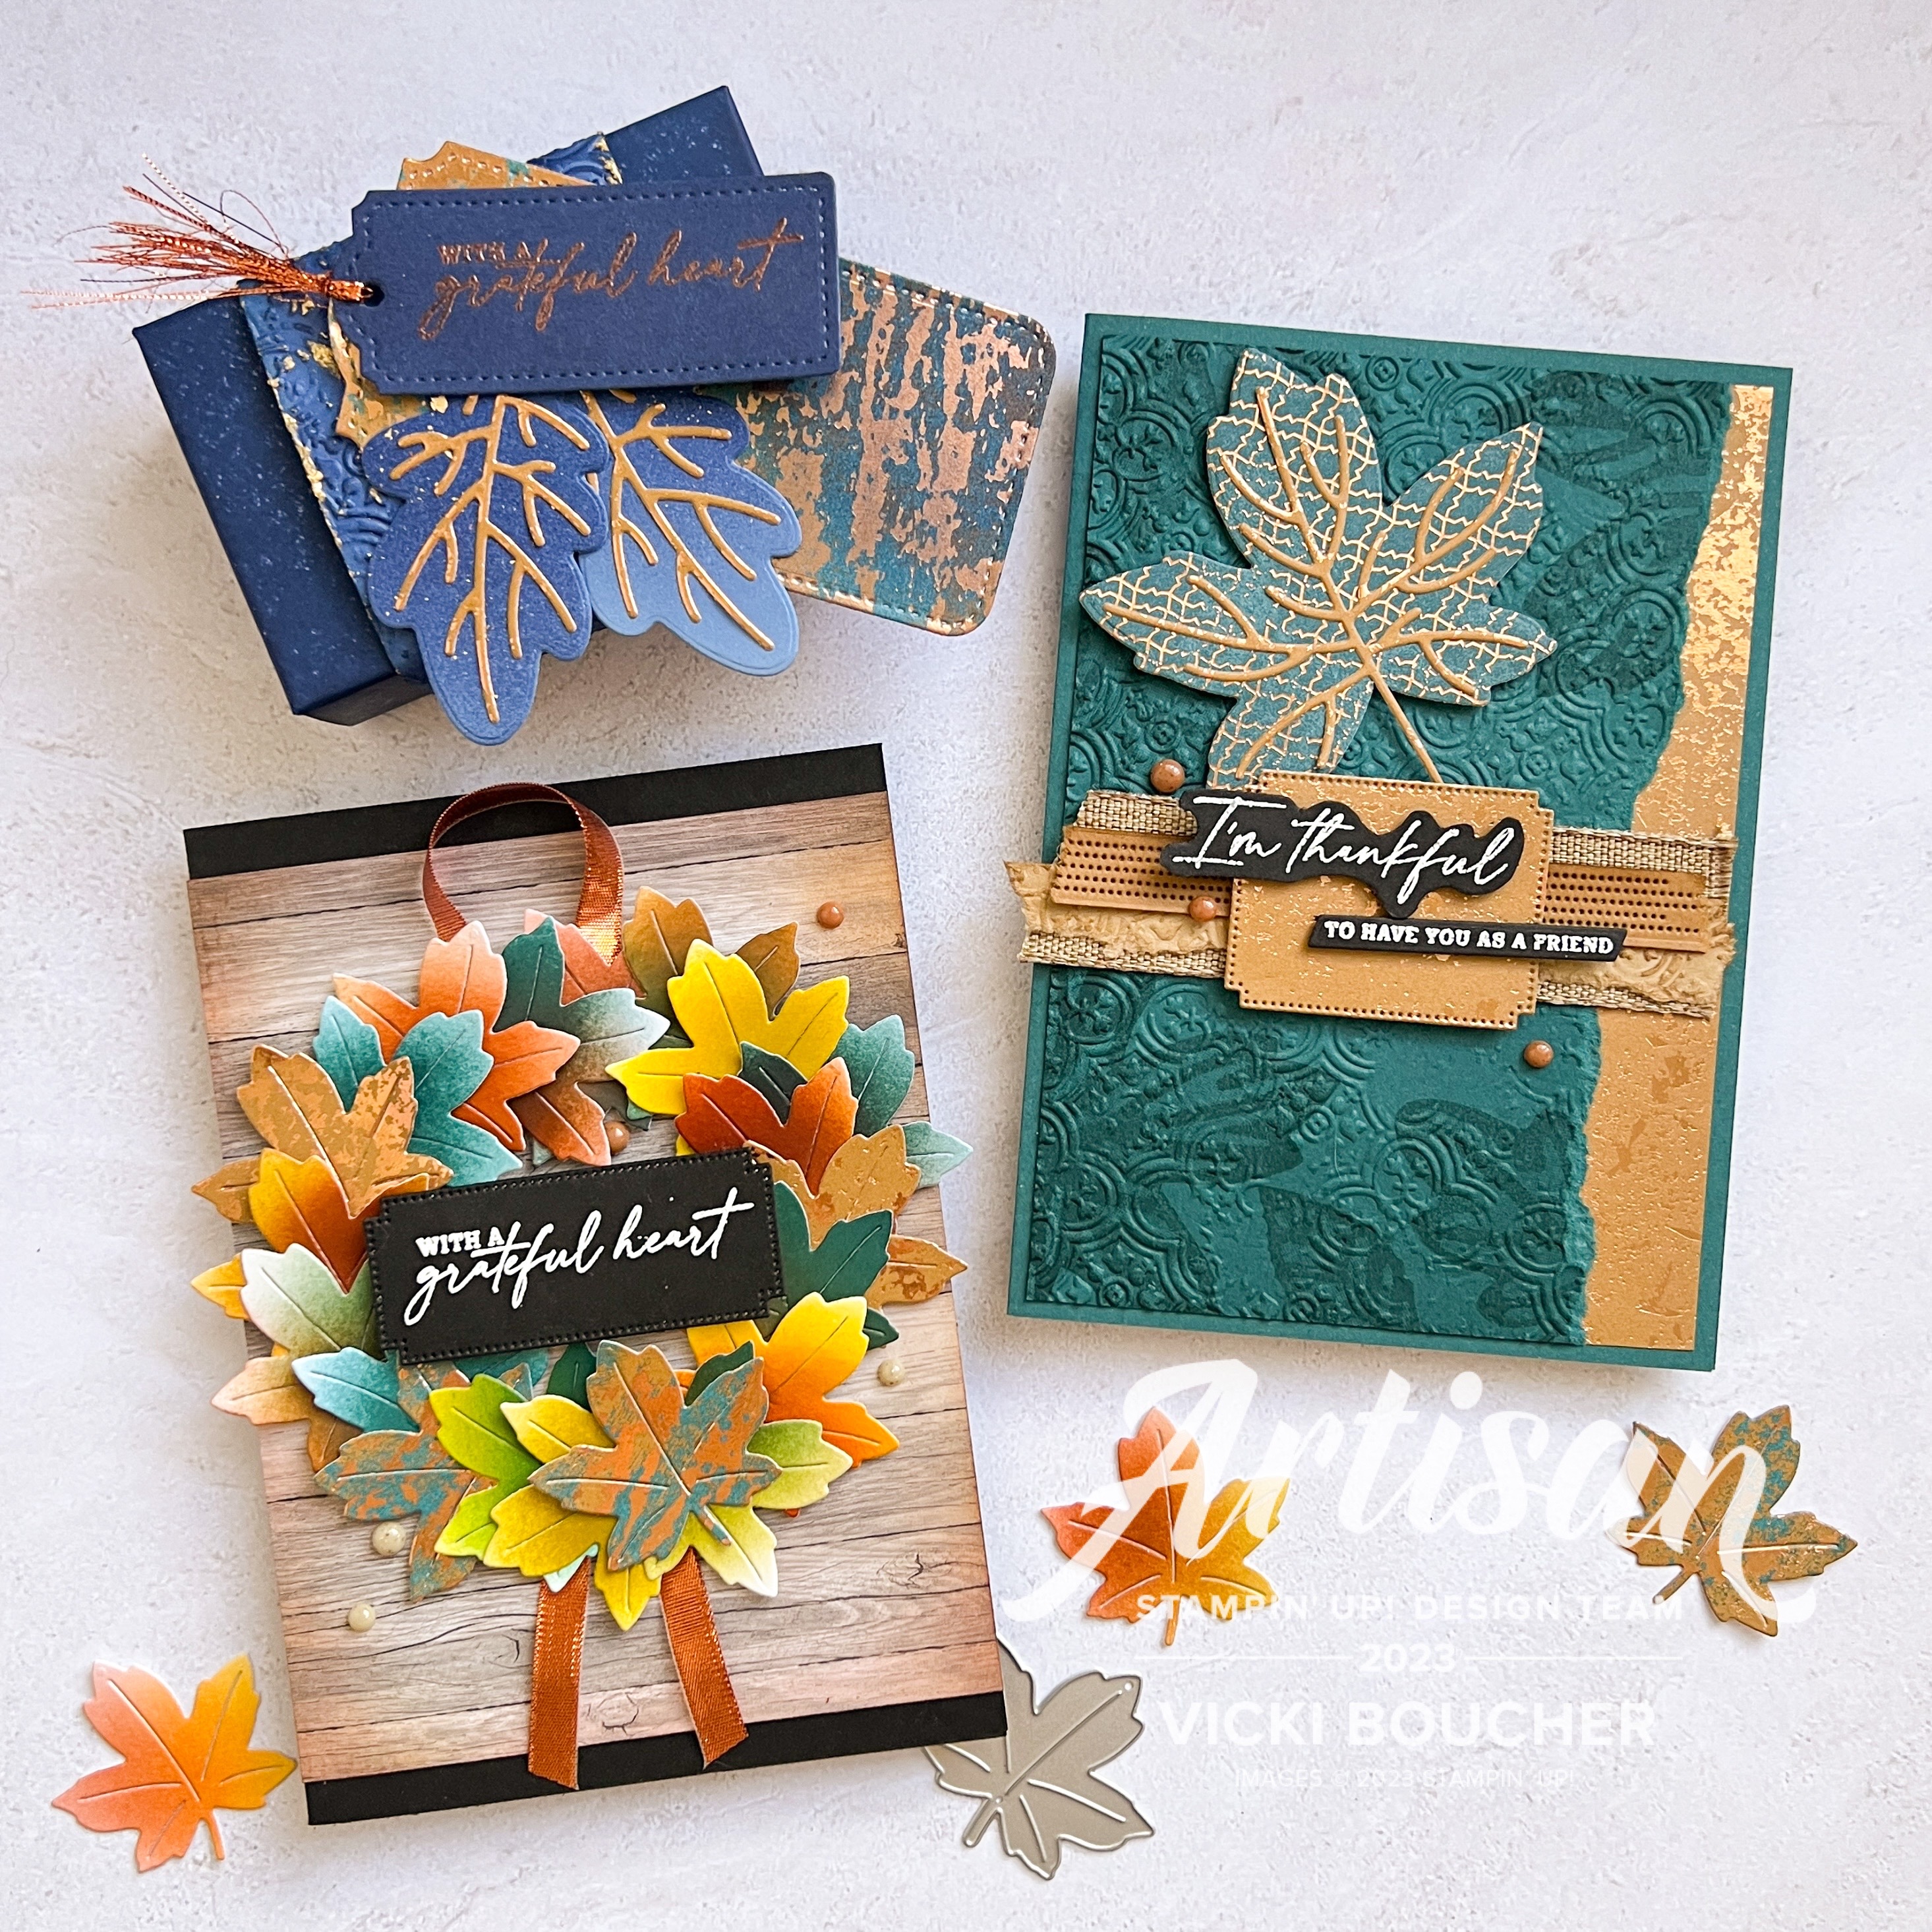
My name is Vicki Boucher and I'm from Melbourne, Australia. Today, I'll be sharing with you three projects I created for Stampin' Up! for the month of October 2023. The Artisan assignment we got to use the All About Autumn Suite which was shared on Stampin' Up! socials. The design team did such an amazing job on their projects so make sure you check out their creations. I'll have the link at the bottom of my blog.


All About Autumn Suite (162193)

The All About Autumn Suite (162193) is in the Stampin' Up! Sept - Dec 2023 Mini Catalogue and is located on page 42-44 of the catalogue. The suite includes the following: Autmn Leaves Bundle (162186), Adhesive-Backed Speckled Dots (162191), Copper & Natural Ribbon Combo Pack (162192), Distressed Tile #D Embossing Folder (162189), Oxidized Copper 12"x 12" Specialty Designer Series Paper (162190) and All About Autumn 6"x 6" Specialty Designer Series Paper (162178).


Here are my three projects using this gorgeous suite I've used rich colours and I also went outside the box by using non-traditional colours by using shades of blues for my mini gift box. I just love the images from the Autumn Leaves Dies and the stunning oxidized specialty paper. 


Grateful Heart Envelope Treat Box & Gift Tag

I wanted to create a blue tone & metallic mini gift box by using the Envelope Treat Box (159788) plus a belly band and gift tag. The colours I've used are Night of Navy, Misty Moonlight and Boho Blue. I used a mix of metallics such as Gold Gilded Leafing for the belly band, Copper Stampin' Powder for the heat embossed gift tag and Oxidized Copper Specialty DSP for the leaf veins.


The gift tag is a combination of Oxidized Copper Specialty DSP adding Night of Navy ink to colour in specialty paper with a Blending Brush and Night of Navy Cardstock for the smaller gift tag. I added metallic copper strands to tie the two gift tags together.


For the blue die-cut leaves, I added Night of Navy, Misty Moonlight & Boho Blue ink to the Boho Blue Cardstock by using a Blending Brush.


The belly band is embossed using the Distressed Tile 3D Embossing Folder in Boho Blue Cardstock and then adding the above-mentioned inks to the cardstock.


I'm Thankful Pretty Peacock Distressed Card

For my second project I wanted to focus on the Distressed Tile 3D Embossing Folder and use it for the main panel background. 


My favourite colour would have to be Pretty Peacock and it goes beautifully with the Oxidized Copper Specialty DSP.


I stamped the various leaf images in Pretty Peacock onto the Pretty Peacock Cardstock and embossed it with the embossing folder. 


I do like to tear cardstock at the moment and it gives you another layer to play with, so I added a layer in Copper from the Oxidized Copper Specialty DSP.


Adding different elements to the card by layering different textures such as a strip of the Natural Ribbon, embossed strip of cardstock and using detailed dies to add interest.


Grateful Heart Paper Leaf Wreath Card

When I saw the Maple leaf die from the Autumn Leaf Dies, I just knew I had to create a paper leaf wreath and the background wood panel DSP would work well against the wreath. Yes, there was lots of die-cutting involved but it was so worth it!


Using Basic White Cardstock for the leaves I added a range of different colours to make the leaves and I also used the Oxidized Copper Specialty DSP for some contrast. 


The colours are the following Cajun Craze, Wild Wheat, Crushed Curry, Copper Clay, Pretty Peacock and Pecan Pie. I used a Blending Brush to blend in the colours together and then die-cut out the images to form the wreath. 


The Metallic Copper Ribbon balanced the wreath out and the sentiment layered over the wreath to finish the card off.


Thank you for visiting my blog today, I would so love to hear your thoughts on my project by leaving a comment below.


Make sure you pop over onto Stampin' Up! Facebook page or Stampin' Up! Instagram page for lots of inspiration using the All About Autumn Suite.

Please email me if you would like a copy of the 2023-2024 Stampin' Up! Annual or Mini Catalogue send an email to me here

If you live in Australia and don't have a demonstrator, you can purchase any of the Stampin' Up! products by shopping with me at my Stampin' Up! online store here.

Make sure you follow me on social media via Facebook, Instagram and Pinterest.


Happy Stamping

Vicki Boucher