Showing posts with label adt2023. Show all posts

22 October 2023

Artisan Design Team - All About Autumn Suite


 Hello and welcome,

My name is Vicki Boucher and I'm from Melbourne, Australia. Today, I'll be sharing with you three projects I created for Stampin' Up! for the month of October 2023. The Artisan assignment we got to use the All About Autumn Suite which was shared on Stampin' Up! socials. The design team did such an amazing job on their projects so make sure you check out their creations. I'll have the link at the bottom of my blog.


All About Autumn Suite (162193)

The All About Autumn Suite (162193) is in the Stampin' Up! Sept - Dec 2023 Mini Catalogue and is located on page 42-44 of the catalogue. The suite includes the following: Autmn Leaves Bundle (162186), Adhesive-Backed Speckled Dots (162191), Copper & Natural Ribbon Combo Pack (162192), Distressed Tile #D Embossing Folder (162189), Oxidized Copper 12"x 12" Specialty Designer Series Paper (162190) and All About Autumn 6"x 6" Specialty Designer Series Paper (162178).


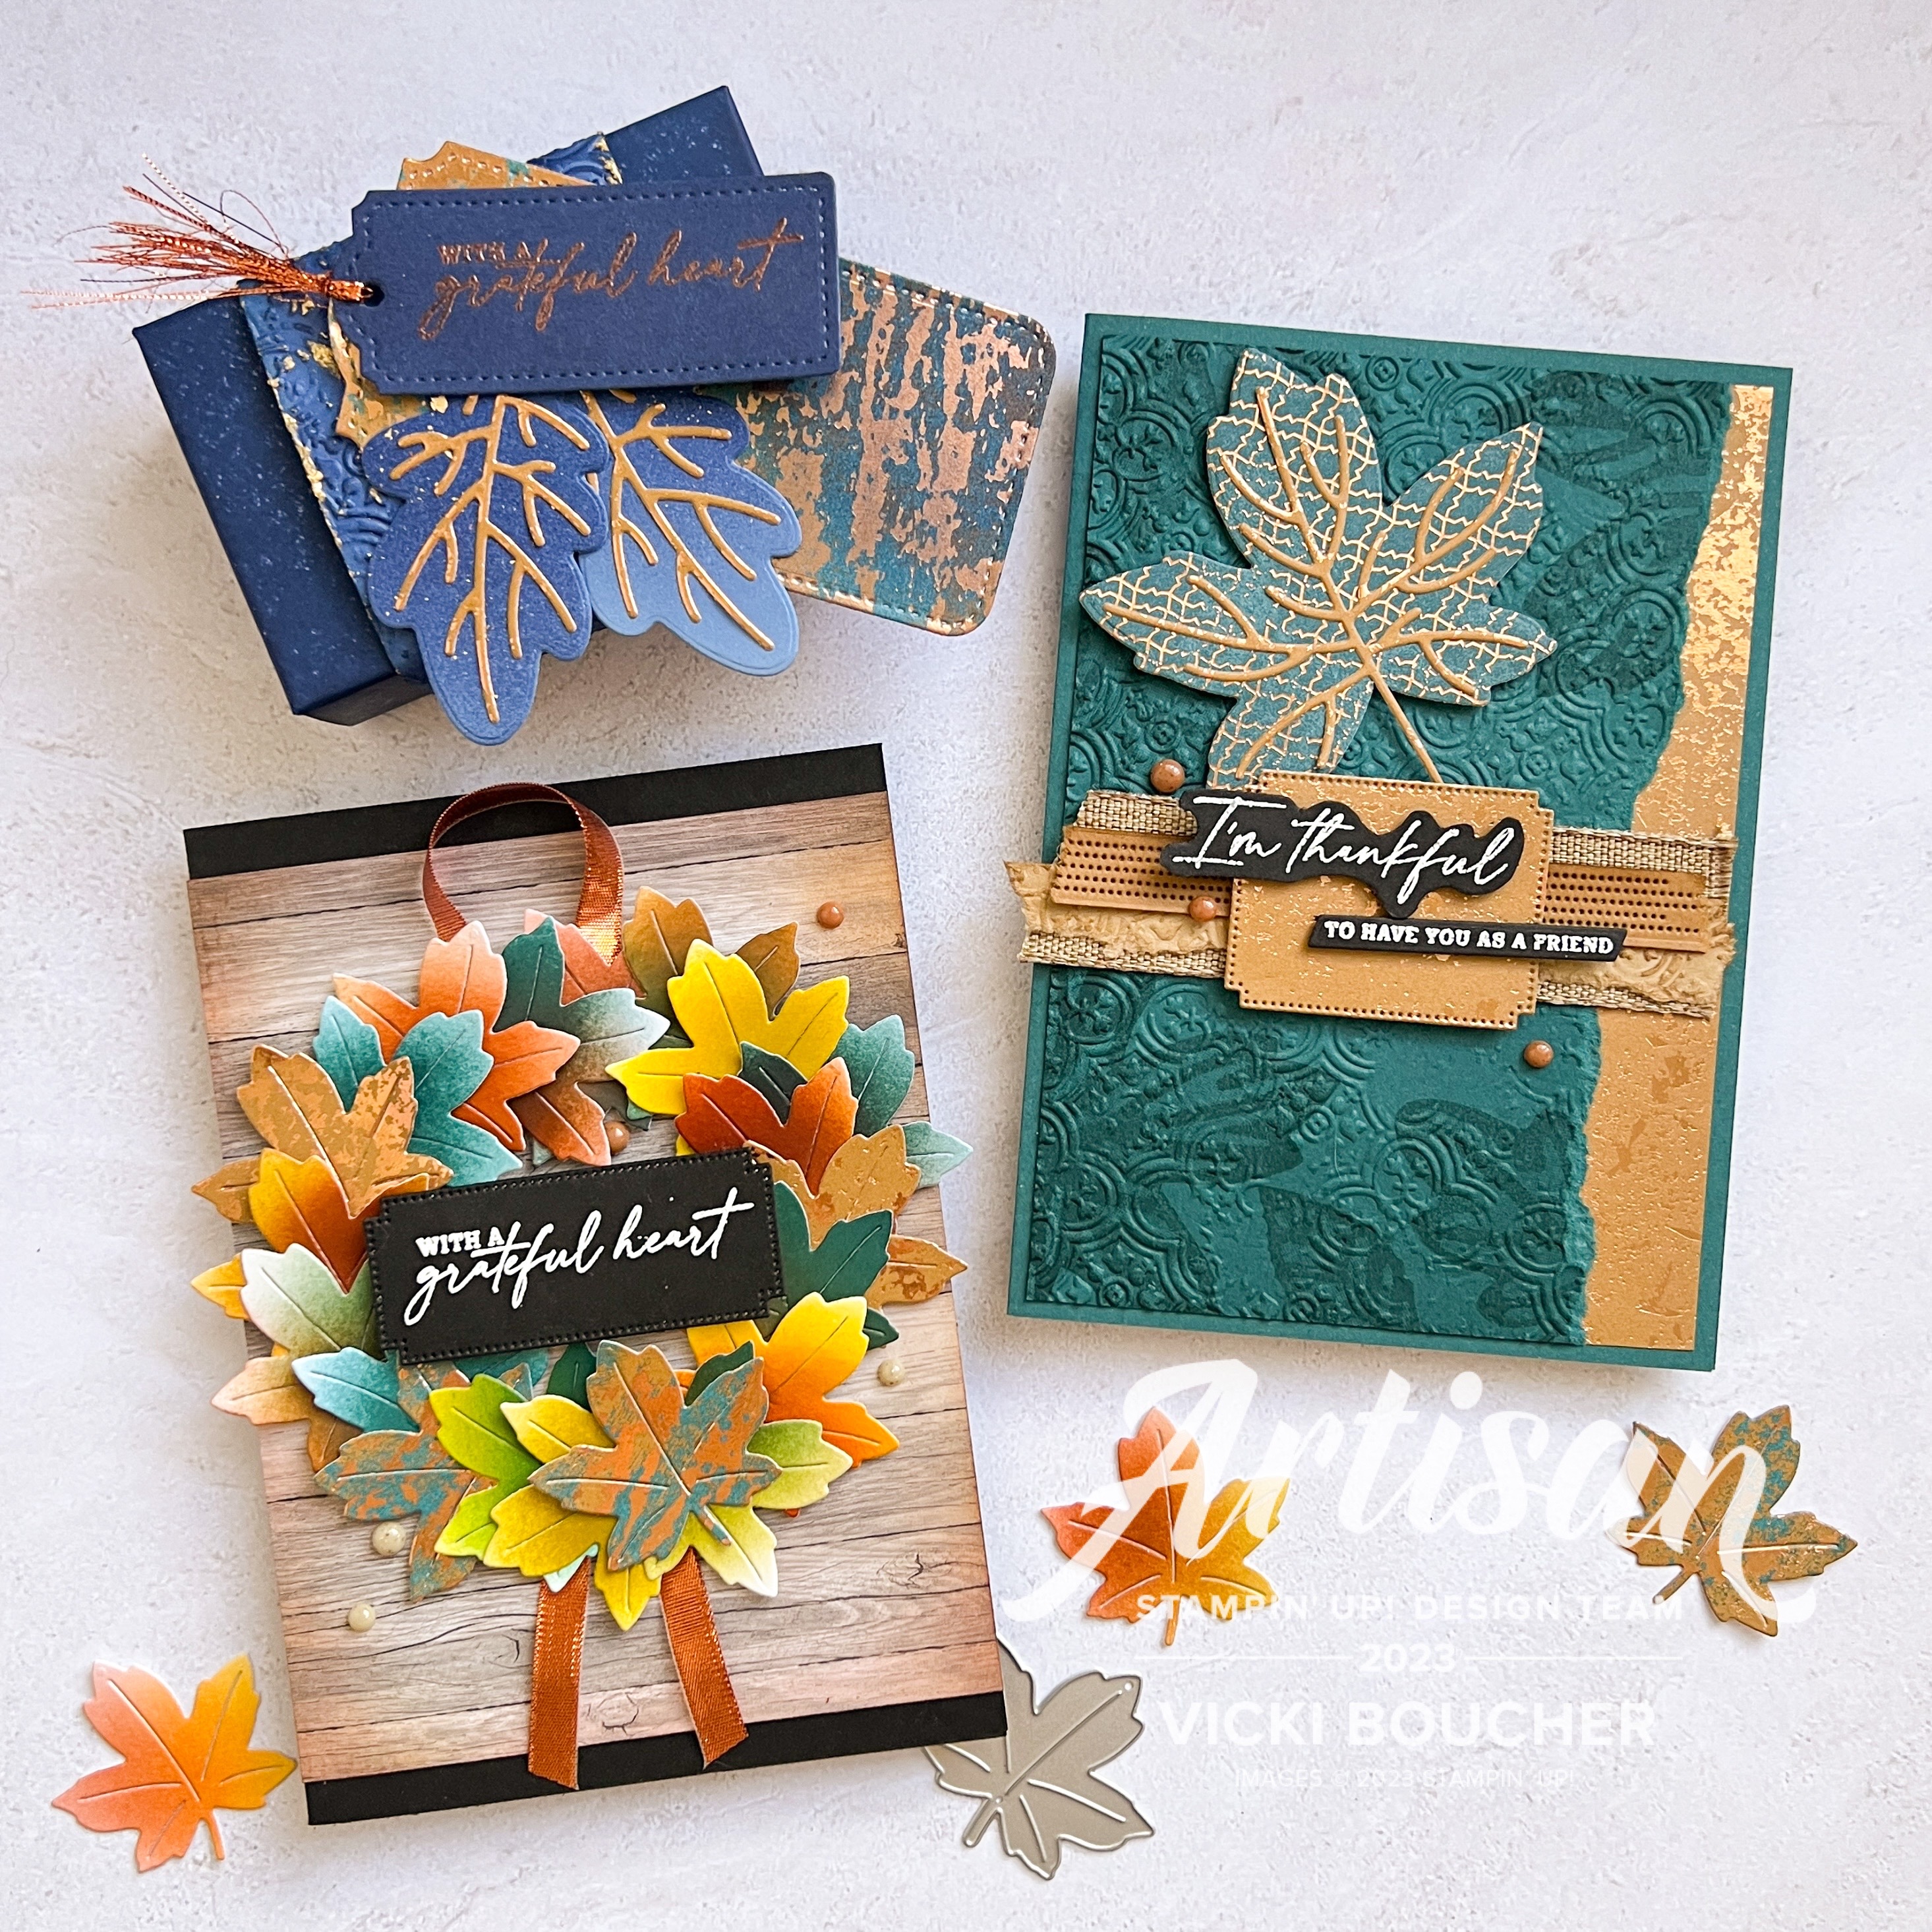
Here are my three projects using this gorgeous suite I've used rich colours and I also went outside the box by using non-traditional colours by using shades of blues for my mini gift box. I just love the images from the Autumn Leaves Dies and the stunning oxidized specialty paper. 


Grateful Heart Envelope Treat Box & Gift Tag

I wanted to create a blue tone & metallic mini gift box by using the Envelope Treat Box (159788) plus a belly band and gift tag. The colours I've used are Night of Navy, Misty Moonlight and Boho Blue. I used a mix of metallics such as Gold Gilded Leafing for the belly band, Copper Stampin' Powder for the heat embossed gift tag and Oxidized Copper Specialty DSP for the leaf veins.


The gift tag is a combination of Oxidized Copper Specialty DSP adding Night of Navy ink to colour in specialty paper with a Blending Brush and Night of Navy Cardstock for the smaller gift tag. I added metallic copper strands to tie the two gift tags together.


For the blue die-cut leaves, I added Night of Navy, Misty Moonlight & Boho Blue ink to the Boho Blue Cardstock by using a Blending Brush.


The belly band is embossed using the Distressed Tile 3D Embossing Folder in Boho Blue Cardstock and then adding the above-mentioned inks to the cardstock.


I'm Thankful Pretty Peacock Distressed Card

For my second project I wanted to focus on the Distressed Tile 3D Embossing Folder and use it for the main panel background. 


My favourite colour would have to be Pretty Peacock and it goes beautifully with the Oxidized Copper Specialty DSP.


I stamped the various leaf images in Pretty Peacock onto the Pretty Peacock Cardstock and embossed it with the embossing folder. 


I do like to tear cardstock at the moment and it gives you another layer to play with, so I added a layer in Copper from the Oxidized Copper Specialty DSP.


Adding different elements to the card by layering different textures such as a strip of the Natural Ribbon, embossed strip of cardstock and using detailed dies to add interest.


Grateful Heart Paper Leaf Wreath Card

When I saw the Maple leaf die from the Autumn Leaf Dies, I just knew I had to create a paper leaf wreath and the background wood panel DSP would work well against the wreath. Yes, there was lots of die-cutting involved but it was so worth it!


Using Basic White Cardstock for the leaves I added a range of different colours to make the leaves and I also used the Oxidized Copper Specialty DSP for some contrast. 


The colours are the following Cajun Craze, Wild Wheat, Crushed Curry, Copper Clay, Pretty Peacock and Pecan Pie. I used a Blending Brush to blend in the colours together and then die-cut out the images to form the wreath. 


The Metallic Copper Ribbon balanced the wreath out and the sentiment layered over the wreath to finish the card off.


Thank you for visiting my blog today, I would so love to hear your thoughts on my project by leaving a comment below.


Make sure you pop over onto Stampin' Up! Facebook page or Stampin' Up! Instagram page for lots of inspiration using the All About Autumn Suite.

Please email me if you would like a copy of the 2023-2024 Stampin' Up! Annual or Mini Catalogue send an email to me here

If you live in Australia and don't have a demonstrator, you can purchase any of the Stampin' Up! products by shopping with me at my Stampin' Up! online store here.

Make sure you follow me on social media via Facebook, Instagram and Pinterest.


Happy Stamping

Vicki Boucher


07 October 2023

Artisan Design Team - Creative Project - Merriest Trees Bundle


Hello! My name is Vicki Boucher, and I am from Melbourne, Australia. Today I'm sharing two Christmas slimline card ideas using the lovely and versatile Merriest Trees Bundle and other Stampin' Up! products.

When it comes to creating my projects, I love to show a variety of different techniques and add lots of layers. Playing with different colour palettes is always fun! Slimline cards can add another dimension to your paper craft when using Stampin' Up! products.


Here are two magical Christmas cards made using non-traditional colours. I love to create and mix colours together using different tools. I'll add the product details at the end of my blog. 


Spirit of the Season Slimline Christmas Card

For my first card I wanted to create a whimsical watercolour Christmas trees using Fluid 100 Watercolor Paper and have fun mixing inks together.


Create unique watercolour trees by mixing ink with water, then apply sections of colour to Watercolor Paper using a large, flat, brush tip Water Painter. The colors I used are Boho Blue, Orchid Oasis and Blueberry Bushel. Move the ink around on the paper with the Heat Tool until dry. Use the Merriest Trees Dies to die cut several different tree sizes. 


To add interest to the trees, use a Sponge Dauber and apply VersaMark Ink to the edges of the branches. Then, add white Stampin' Emboss Powder, brush off the excess with a brush, and heat set using the Heat Tool. I like to use the Stampin' Up! tweezers to hold onto smaller pieces of images, so I don't heat my fingers with the Heat Tool.

To decorate the trees, I used Soft Shimmer Paper in Bubble Bath, placed Adhesive Sheet to the back of the paper and then die-cut out the tree decorations and stars. 

To add layers to the card, create background snow by tearing up two layers using Basic White Cardstock and add Boho Blue and Orchid Oasis ink using the Blending Brush.


Stamp the stars a number of times to the background panel using VersaMark Ink, add white Stampin' Emboss Powder and heat set with the Heat Tool. Then apply lightly using Boho Blue and Orchid Oasis Ink with the Blending Brush to the background panel. 


Merry Christmas Slimline Card

For my second card I went for a nighttime scene using darker cardstock and inks. This created a totally different look to my first card. 


Create two snow layers for the background by tearing up Basic White Cardstock with your fingers. Next, using a Blending Brush to create contrast and leaving some white space between each of the layers. This helps create a snow effect for your layers. The colours used are Orchid Oasis and Starry Sky inks.


Apply colour to the trees using a Sponge Dauber for smaller sections and Blending Brushes for larger areas. I used Orchid Oasis and Starry Sky inks. Leave some white space to create snow for each of the layers. Then, add water droplets to the trees by tapping the medium tip Water Painter against Paper Snips and set them with the Heat Tool.

To create the background trees, use Starry Sky ink and stamp two of the trees directly onto Orchid Oasis Cardstock slimline panel. The third tree stamp onto a scrap piece of Orchid Oasis Cardstock and then die-cut out using the second largest tree die from the Merriest Tree Dies. 


To finish off the card, heat embossed the sentiment using VersaMark Ink, onto Orchid Oasis Cardstock, add white Stampin' Emboss Powder tap off excess and heat set with Heat Tool. Die-cut out tree using second largest tree die.


Here are the products you will need:

Merriest Trees Bundle (162048)
Starry Sky Cardstock (159263)
Orchid Oasis Cardstock (159267)
Basic White Cardstock (159276)
Fluid 100 Watercolor Paper (149612)
Soft Shimmer Specialty Paper (161750)
Starry Sky Classic Stampin' Pad (159212)
Orchid Oasis Classic Stampin' Pad (159214)
Boho Blue Classic Stampin' Pad (161650)
Blueberry Bushel Classic Stampin' Pad (147138)
Iridescent Adhesive-Backed Discs (161954)
Basics Stampin' Emboss Powders (155554)
Heat Tool (129053)
Embossing Additions Tool Kit (159971)
VersaMark Pad (102283)
Blending Brushes (153611)
Small Blending Brushes (160518)
Water Painters (151298)
Sponge Daubers (133773)
Wink of Stella Glitter Brush (141897)
Adhesive Sheets (152334)
Mini Stampin' Dimensionals (144108)
Multipurpose Glue (110755)
Paper Snips Scissors (103579)


Thank you for visiting my blog today, I would so love to hear your thoughts on my project by leaving a comment below.

Please email me if you would like a copy of the 2023-2024 Stampin' Up! Annual or Mini Catalogue send an email to me here

If you live in Australia and don't have a demonstrator, you can purchase any of the Stampin' Up! products by shopping with me at my Stampin' Up! online store here.

Make sure you follow me on social media via Facebook, Instagram and Pinterest.


Happy Stamping

Vicki Boucher


13 August 2023

Artisan Design Team - Countryside Inn Suite


Hello and welcome,

My name is Vicki Boucher and I'm from Melbourne, Australia. Today, I'll be sharing with you three projects I created for Stampin' Up! earlier this month for my Monthly Artisan Assignment using the Countryside Inn Suite and Lasting Joy Stamp Set which was shared on Stampin' Up! socials. The design team did such an amazing job on their projects so make sure you check out their creations. I'll have the link at the bottom on my blog.

The Countryside Inn Suite (161474) is in the Stampin' Up! 2023-24 Annual Catalogue and is located on page 62-63 of the catalogue. The suite includes the following: Countryside Corners Bundle 161472 (10% bundled savings), Countryside Inn 12"x12" Designer Series Paper 161467 and Countryside Blossoms Embossing Folder 161473. Plus, we were also given the Lasting Joy Stamp Set 161442 to work with for our projects. 


Countryside Inn Suite (161474)


Countryside Inn 12"x12" Designer Series Paper 161467

Lasting Joy Stamp Set 161442


Here are my three projects that I have created using the Countryside Inn Suite and Lasting Joy Stamp Set. This suite and stamp set are designed to go together and I'll be showing you different ways on how to use these products. Throughout the cards I've selected different colours to go with the blues and basic white.


For You Fresh Freesia Card

For my first card I created the background panel using Lasting Joy Stamp Set, Fresh Freesia Cardstock and stamping the images in Night of Navy ink. I've also stamped a few more images and fussy cut them out with the Paper Snips to add to the card later on. 


I've added layers of paper to the card using Countryside Inn Designer Series Paper and Night of Navy Cardstock Embossed with Countryside Blossoms Embossing Folder. I like to tear the edges of the embossed cardstock and designer series paper. 


The Countryside Corners stamp set is one large only stamp and you can create elegant borders for your images, greetings, labels, or add border patterns to your cards. There are coordinating Countryside Corners Dies to match with each layer, I've used the second smallest image using Fresh Freesia Cardstock and Night of Navy ink. Then die-cut out with the second smallest die.


To finish off the card I've heat embossed the sentiment from the Lasting Joy Stamp Set by stamping the image in VersaMark onto a strip of Night of Navy Cardstock, add White Stampin' Emboss Powder and heat set with the Heat Tool. I've added Misty Moonlight Tinsel Gems to the card.


Birthday Wishes Melon Mambo Card

For this card, I started with the Countryside Inn Designer Series Paper by tearing up different strips of paper and layering them down on a larger size of Night of Navy Cardstock die-cut out using the Countryside Corners Dies. 


This is a great way to use up those strips of paper and produce an effective background for your card. Once the strips are layered with adhesive, I then used the next die down from the Countryside Corners Dies and added to the embossed Basic White Cardstock.


Using the following colours to stamp images from the Lasting Joy Stamp Set in Melon Mambo, Night of Navy, Misty Moonlight and Boho Blue inks. Once stamped fussy cut with paper snips before adhering to my card.


The sentiment was heat embossed as the same as the above card and then placed over the torn paper and stamped images. Other elements added was White Baker's Twine and coloured in White Classics Dots with Melon Mambo Stampin' Blend. 


Lasting Joy Bubble Bath Card

On my third card, I used the Countryside Blossoms Embossing Folder in two different ways by using different coloured cardstock and techniques. 


To start with the Bubble Bath side, I embossed a strip of Vellum and adhered to the cardstock. For the Misty Moonlight side, I applied White Craft ink with a Sponge Dauber to the paper, this gave a softer and different look to Misty Moonlight.


Next, I fussy cut out a few of the images from the Countryside Inn Designer Series Paper with paper snips and added them to the white on Night of Navy heat embossed using one of the larger Countryside Inn label Dies. 


Then it was placed over an even larger label die using Bubble Bath Cardstock and Night of Navy ink. The ribbons under the labels are Bubble Bath Sheer Ribbon and Night of Navy Borded Ribbon cut in half lengthways.  


Thank you for visiting my blog today, I would so love to hear your thoughts on my project by leaving a comment below. I hope I've inspired you to create and have with this beautiful Countryside Inn Suite. I would love to see what you come up with using these Stampin' Up! products.


Make sure you pop over onto Stampin' Up! Facebook page or Stampin' Up! Instagram page for lots of inspiration using the Countryside Inn Suite and Lasting Joy Stamp Set. You will just need to go back to the last weekend of August 2023 to view our projects.

Please email me if you would like a copy of the 2023-2024 Stampin' Up! Annual Catalogue send an email to me here

If you live in Australia and don't have a demonstrator, you can purchase any of the Stampin' Up! products by shopping with me at my Stampin' Up! online store here.

Make sure you follow me on social media via Facebook, Instagram and Pinterest.

Happy Crafting

Vicki Boucher


23 July 2023

Artisan Design Team - Layering for a Vintage Look


My name is Vicki Boucher and I'm from Melbourne, Australia. Today I'll be sharing with you how to layer a card using the vintage look. This is something I like to do when it comes to paper crafting and what a better way to show you how.


Some of the elements I like to use are different types of paper, stamped images, texture such as dry embossing, embellishments, ribbon etc... Very Vanilla Cardstock works well with Pecan Pie and Crumb Cake ink. I've used a mix of different stamp sets for this card they are Quiet Meadow and Stamped With Love I just love the postbox image from the set. 


To create this technique first, emboss Very Vanilla Cardstock with any embossing folder I've used Timeworn Type 3D Embossing Folder and add Pecan Pie ink using the Blending Brush. Use the Paper Snips blade to distress the edges of the cardstock. I also did this same technique with the Stripes 3D Embossing Folder in Crumb Cake Cardstock and die-cut out the image using the Nested Essentials Dies.


Next, using multiple images, stamp off on scrap paper, then stamp directly on the Delightfully Electric Designer Series Paper. I've used Petal Pink ink for the images.


To achieve variation in colour for your watercolour images, start by adding a lighter colour, allow the image to dry, then continue to use more colour. Here, I've used Petal Pink, Crumb Cake and Pecan Pie inks.


Lastly, add interest and texture by using the Paper Snips to cut ribbon along one side; then loosen the threads and use the Take Your Pick tool to break down the Silver-Threaded Twine fibers.


Thank you for visiting my blog today, I would so love to hear your thoughts on my projects by leaving a comment below.

Please email me if you would like a copy of the new 2023-2024 Annual Catalogue, please contact me here

If you live in Australia and don't have a demonstrator, you can purchase any of the Stampin' Up! products by shopping with me at my online store here

Make sure you follow me on social media via Facebook, Instagram and Pinterest.


Happy Stamping

Vicki Boucher