28 July 2022

Colour INKspiration Challenge #CI126


  Hello and welcome,

My name is Vicki Boucher and I am from Melbourne, Australia. Tonight, it's the latest Colour INKspiration Challenge #CI126 and this photo was chosen by Denita Wright-Smee. This is a painting titled 'Womens's Ceremony' by Kaureen Bird. The colours are gorgeous together. 


The colour combination for #CI126 is Pumpkin Pie, Bermuda Bay, Melon Mambo, Cajun Craze and Soft Suede. As well as the chosen colours you may also add Basic White, Very Vanilla, Basic Black, Crumb Cake, Sahara Sand and metallics to your project. We also allow 'Ivory' and 'Bronze' in the Stampin' Blends. If you don't have all the colour palette, feel free to use the closest SU substitute (ie: Calypso Coral instead of Pumpkin Pie .... you get the drift).

The challenge will run for almost 2 weeks until 7pm (AEST) on Monday 8th August 2022 details to follow at the end of my blog.


Today's card is using the True Beauty Stamp Set and Organic Beauty Dies which is on page 67 of the  2022-2023 Annual Stampin' Up! Catalogue. The True Beauty stamp set is a Distinktive stamp set which has special texture that gives added depth and dimension, creating photo-realistic images. I love the watercolour look of the stamp images without any fussy! Just ink and stamp the beautiful floral images.

True Beauty Bundle (158984) 


I must admit these colours aren't my normal go to colours from Stampin' Up! but I was willing to give it a try and come up with something, in fact I ended up creating two cards. The second card was just a test on where I was going to place the different stamped images. I liked it so much, I decided not to waste the panel.
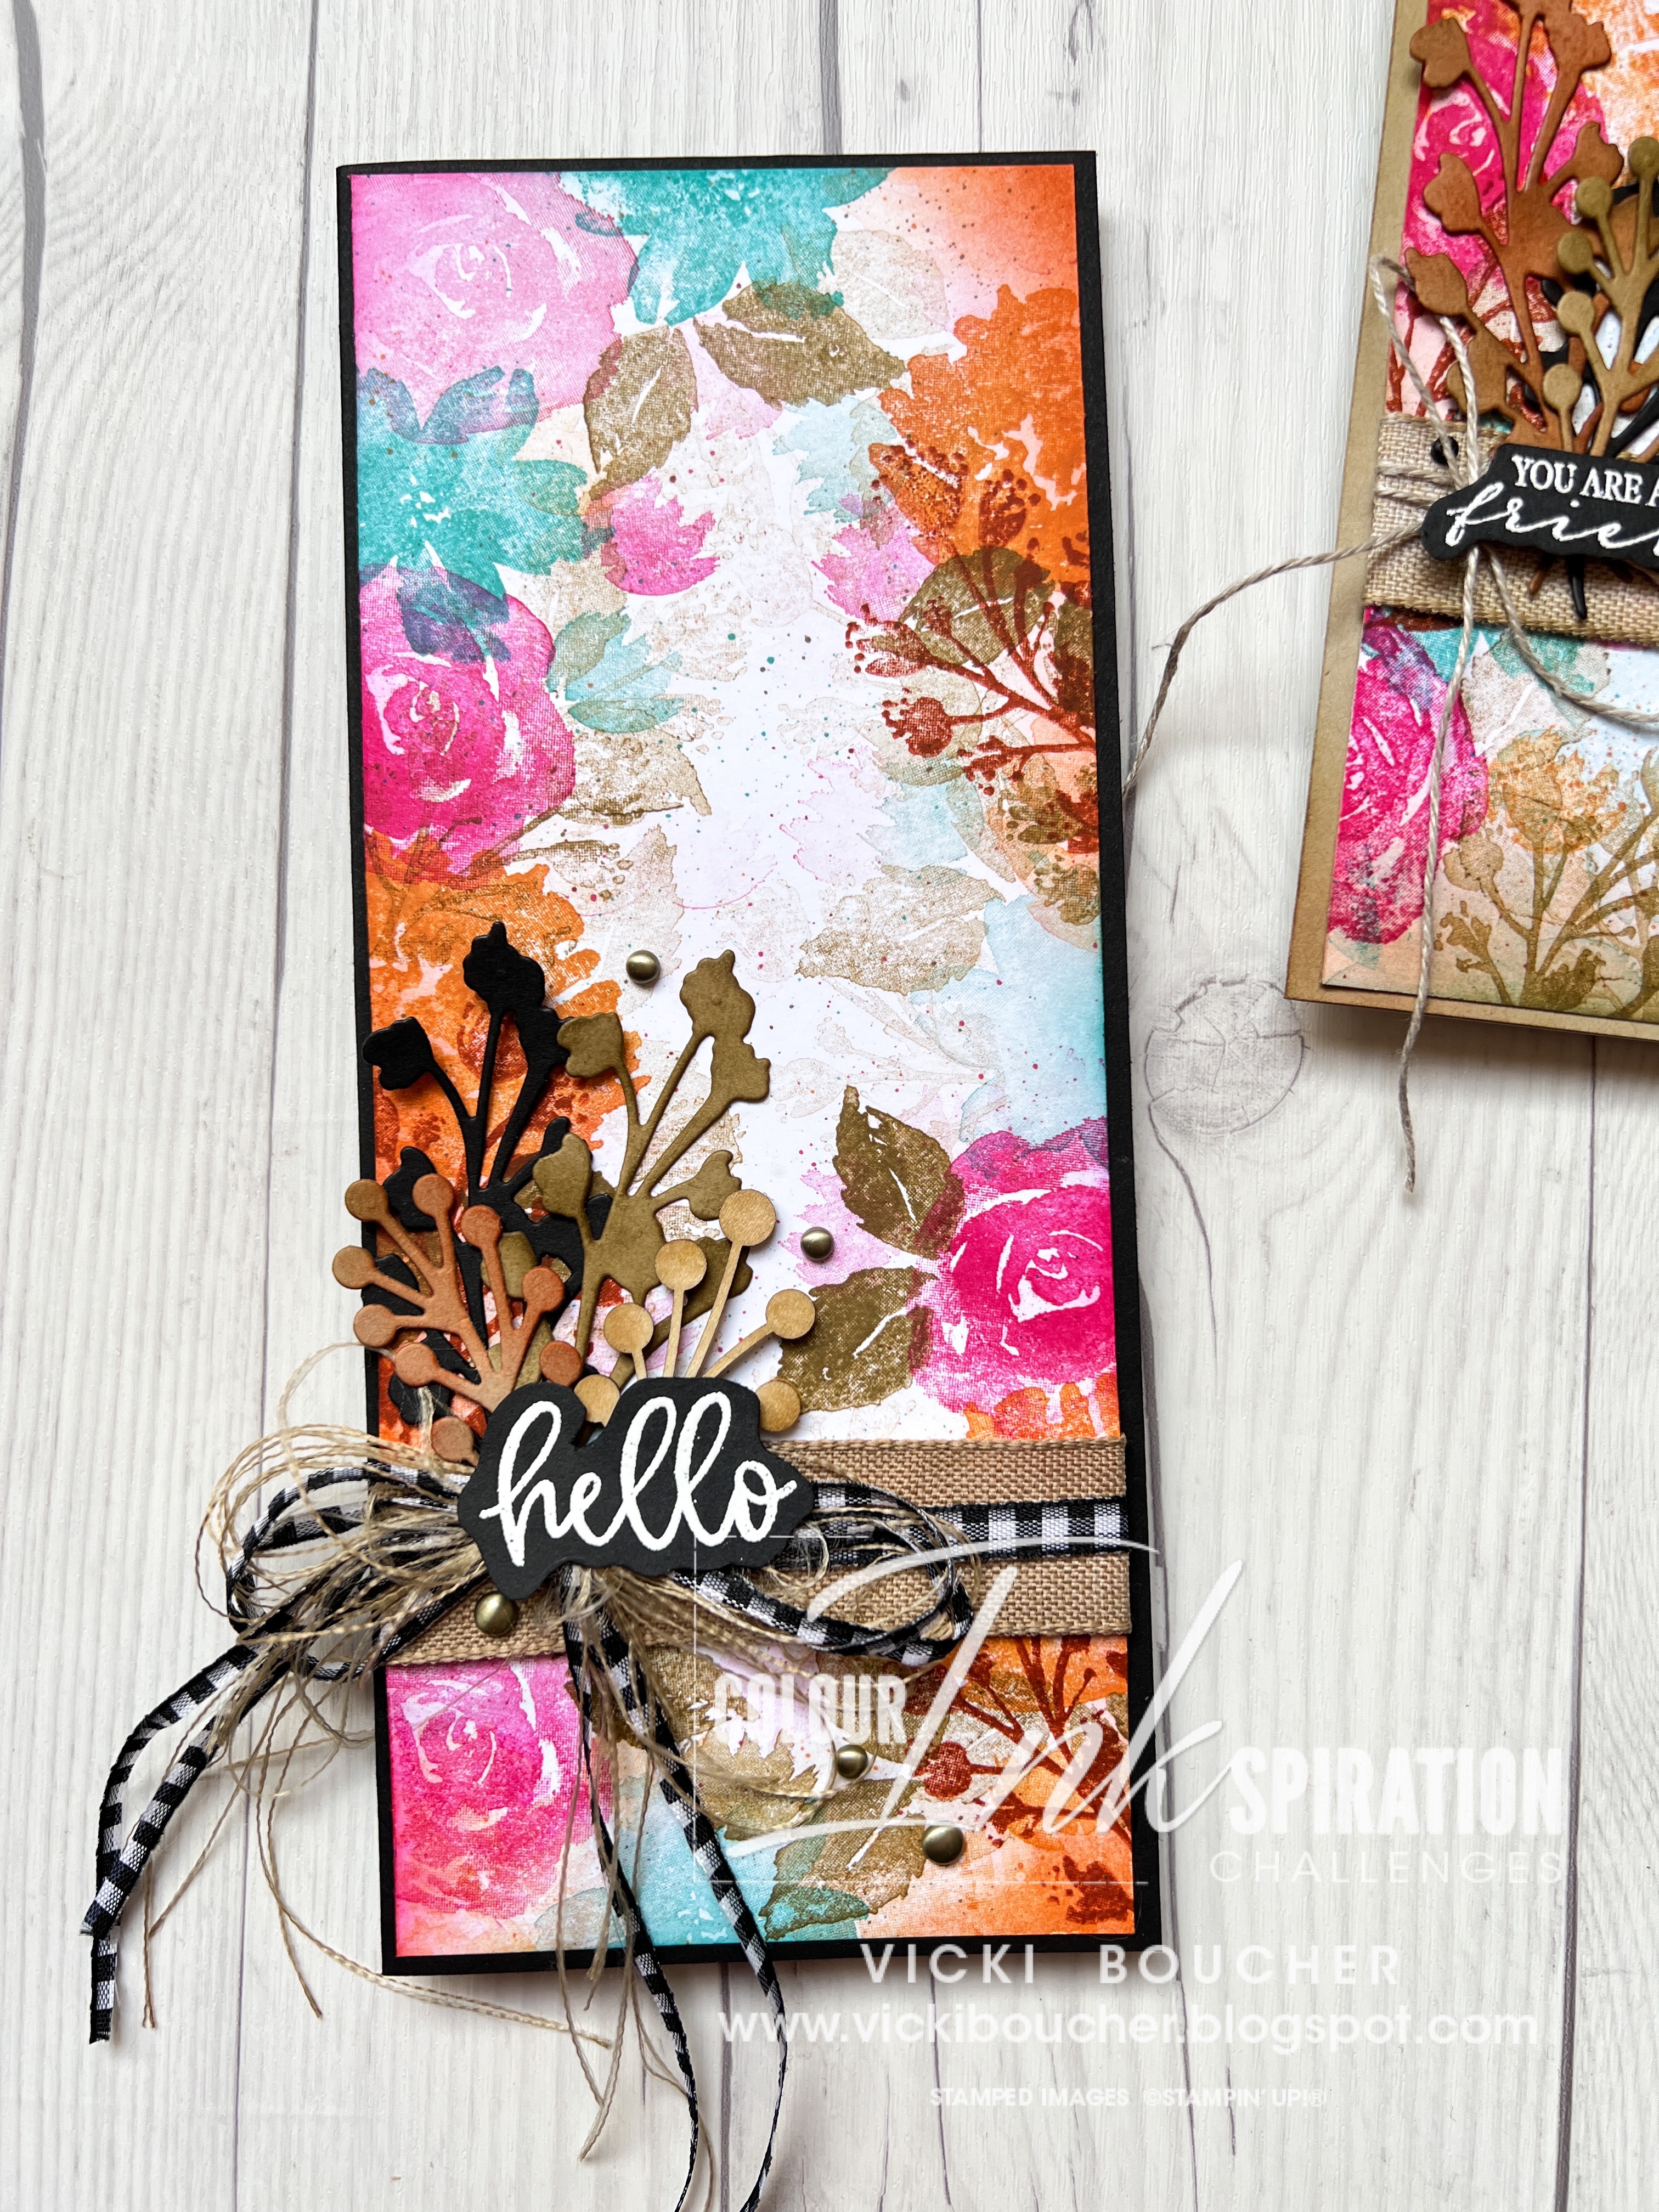


Hello Slimline Card

To create my first card, start with Basic White for the panel and stamp the images in the above mentioned challenge colours. I started with Cajun Craze then onto Pumpkin Pie, Melon Mambo, Bermuda Bay and Soft Suede. 


To create a soft look I stamped off a couple of times before inking up the white panel. I also used a Blending Brush, inked up the brush and applied to the stamp before stamping the image onto the white cardstock.


I also have all of the colours in the Stampin' Write Markers, so I like to flick the brush tip against the lid and splatter onto the panel.

I've used the coordinating Organic Beauty Dies, die-cut out using the detailed dies in Basic Black and Crumb Cake. Using the Blending Brush with Soft Suede and Cajun Craze ink, I applied to the die-cut pieces. I also added Soft Suede Ink to the Natural Finish Ribbon.


I create a fancy bow using strands from the Natural Finish Ribbon and combined it with the Black & White Gingham Ribbon. I actually cut the Gingham Ribbon in half to make it thinner and easier to make into a bow.

To finish off the card I used the sentiment from Biggest Whish Stamp Set, used Versamark, White Stampin' Emboss Powder and heat set with the Heat Tool. I added a few of the Brushed Metallic Dots to the card. I added a new embellishment from the July-Dec Mini Catalogue, it's the Textural Elements and I lightly coloured it with Soft Suede ink.

You are a True Friend Slimline Card

To create my second card I used the same above technique with stamping the images in the same colours. The die-cut pieces are the same as well. I've used the sentiment from the True Beauty Stamp Set and heat embossed it.


The other different items are Linen Thread, Black Classic Matte Dots and Crumb Cake Cardstock for the card base.


I hope I've inspired you with the latest challenge and I do hope you'll join in. We so look forward to seeing a variety of projects using the challenge colours. Please ensure that your project is new and made specifically for this challenge.


Use all of the challenge colours (or close substitutions) unless stated.

Upload only one picture per entry straight to the discussion wall and not in an album

Colour INKspiration Challenge #CI126 will run until 7pm (ADET) on Monday 8th August 2022.

To get your creative ideas flowing, make sure you check out the Crew's Project in the CI125 Album.

Please click on the link here to join the challenge.


Thank you for visiting my blog today, I would so love hear your thoughts on my project by leaving a comment below.


Please email me if you would like a copy of the 2022-2023 Annual Catalogue and the July-Dec 2022 Mini Catalogue, July-August Saleabration Catalogue please contact me here

If you live in Australia and don't have a demonstrator, you can purchase any of the Stampin' Up! products by shopping with me at my online store here.

Make sure you follow me on social media via Facebook, Instagram and Pinterest.


Happy Stamping

Vicki Boucher


25 July 2022

Heart of Christmas Stampin' Up! - Week 4


Hello and welcome,

Tonight, I'll be blog hopping along with the ladies from Art With Heart Team and we are up to week 4. I've been wanting to join in the hop, but I've been busy and I also came back from holidays in New Zealand with the family. I'll try join in when I can, as I just love making Christmas cards and other projects.

The Heart of Christmas blog hop will be on Monday at 8pm each week until November 28th. I'm so excited to see everyone's beautiful creations, so make sure you hop around. I'll have the link at the end of my blog.


I've created two projects a slimline card and a gift tag using products from the Stampin' Up! July - December 2023 Mini Catalogue. I've used the Decorated with Happiness bundle (159711) 10% bundle savings is located on page 27 I love the hand drawn sketched style images and the variety of detailed die images for your projects. I've also used the Celebrations Tag Dies (159866) which is located on page 67 this die set comes with tags, banners, labels and other shapes. I'm really looking forward to creating with this set over the coming months.


Christmas Slimline Card

To create the slimline card I've used Evening Evergreen Cardstock cut at 21.5 x 18.2cm, score at 9.1cm. Crumb Cake Cardstock cut at 8.6 x 21.2cm. The Decorated with Happiness stamp set is a Two-Step stamp set, it allows you to layer two or more images. It's also a Distinktive stamp set which has special texture that gives added depth and dimension, creating photo-realistic images. 


I've used the large pine boughs image and stamped a number of times in Evening Evergreen ink which gives you depth. I also added Evening Evergreen and Crumb Cake ink with the Blending Brush to the panel.


There are so many different dies from the Decorated Pine Dies to use, so I decided to use the the large pine boughs die and die-cut in Evening Evergreen Cardstock. The baubles and bells are die-cut out in Real Red Cardstock and Red Glimmer Paper. 


To create the label, use Stylish Shapes Dies to create a smaller label for your sentiment by die-cutting the cardstock across the cardstock for a cute, stitched look.


I really love the Textural Elements with a natural wooden element to your paper craft, I added some colour for the berries using dark Cherry Cobbler Stampin' Blend. I used the fine tip end.


Christmas Gift Tag

I wanted to create a gift tag to go with the card and I haven't used the new Celebrations Tag Dies yet.


This cute die has lovely detail with some stitching and scalloped edging. Using Crumb Cake Cardstock for the gift tag and stamping the pine boughs stamp onto the tag. 


Keeping with the same colours as the card, I've added Real Red Ribbon with Linen Thread and Real Red Cardstock and Glimmer Paper for the bell. I've fussy cut out the sentiment.


Now it's time to visit Sharon Davern I can't wait to see her beautiful Christmas project.


Sharon is also the host of the hop with all of the list of the participants, click here to see the list


Thank you for visiting my blog today, I would so love hear your thoughts on my project by leaving a comment below.


If you would like a copy of the new July - December 2022 Mini CatalogueSaleabration Catalogue and Annual Catalogue 2022 - 2023 please contact me here

If you live in Australia and don't have a demonstrator, you can purchase any of the Stampin' Up! products by shopping with me at my online store here


Happy Stamping

Vicki Boucher


24 July 2022

Artisan Design Team - Lovely and Lasting Bundle


 Hello and welcome,

My name is Vicki Boucher and I'm from Melbourne, Australia. Today I'll be sharing two projects using the Lovely & Lasting Bundle, turning them into two cards.


The Artisan Design Team are featuring the Lovely & Lasting Bundle on Stampin' Up! Facebook and Instagram page where you'll sure to be inspired by everyone's creations, I'll add the link at the end of my blog. 


Lovely & Lasting Bundle (158652)


The Lovely & Lasting Bundle  (158652) 10% Bundle Savings is located on page 25 of the Stampin' Up! 2022 - 2023 Annual Catalogue. The bundle includes Lovely & Lasting Stamp Set (158646) and coordinates Lasting Label Punch (158651). This is a great set to have in your crafty stash, I just love the variety of different labels for paper crafting.


Night of Navy Happy Birthday Card

To create this card I've used the following colours Night of Navy, Basic Gray and Fresh Freesia. Starting with Basic White panel I've added Night of Navy and Basic Gray Ink with the Blending Brush. I lightly added the ink to the panel but also leaving white space. Using the brush tip against the lid of the Stampin' Write Markers, I splattered Night of Navy and Basic Gray ink onto the panel.


Next I used the tile stamp in Basic Gray and stamped off before applying to the panel a couple of times. I also used the tile stamp in Versamark ink onto Vellum Cardstock and heat embossed using White Stampin' Emboss Powder and fussy cut the image out.


The images of the flowers have either been stamped in the above mentioned colours or I added ink to the stamp using the Blending Brush, this gives a softer look. Then with the paper snips, I've fussy cut all of the images out.


A great way to save time and create multiple sentiments for your projects. Is to stamp your images multiple times in Versamark onto a strip of Cardstock add Stampin' Emboss Powder and heat set with the Heat Tool. Then with the Lasting Label Punch, punch out your labels to add to your projects.


To finish off the card I've added a fancy bow using the following ribbons, White Glittered Organdy Ribbon, Starry Sky Metallic Woven Ribbon and Silver Simply Elegant Trim. Plus I added a few Rhinestones for some bling.


Gorgeous Grape Thinking of You Card

For my next card, which is in shades of purple and is very similar to my other card with a few changes. Starting with the colours I've used Gorgeous Grape, Smoky Slate, Night of Navy and Fresh Freesia. The card base is Gorgeous Grape and with the Blending Brush I've added Gorgeous Grape ink to the Basic White Panel.


I've stamped off tile image in Smoky Slate ink and applied to the panel. Next I used the sentiment and stamped the image a couple of times onto the panel. I added splattered ink in Smoky Slate with the Stampin' Write Marker. I've roughed up the edges of the panel using the blade of the Paper Snips.


The flower images are stamped in Night of Navy, Fresh Freesia and Gorgeous Grape. I've also heat embossed the flower image using Versamark ink onto Vellum Cardstock, White Stampin' Emboss Powder and heat set with the Heat Tool. Then I've fussy cut the images and arranged under the sentiment.


To finish off the card I've added Pearls, Sliver Simply Elegant Trim and Fresh Freesia Open Weave Ribbon.  


Thank you for visiting my blog today, I would so love hear your thoughts on my project by leaving a comment below. Make sure you pop over onto Stampin' Up! Facebook page for lots of inspiration using the Lovely & Lasting Bundle.

If you would like a copy of the new Annual Catalogue 2022 - 2023 please contact me here

If you live in Australia and don't have a demonstrator, you can purchase any of the Stampin' Up! products by shopping with me at my online store here.


Happy Stamping

Vicki Boucher


13 July 2022

Colour INKspiration Challenge #CI125


 Hello and welcome,

My name is Vicki Boucher and I am from Melbourne, Australia. Tonight, it's the latest Colour INKspiration Challenge #CI125 and this photo was chosen by Cheryll Miller. The colours are gorgeous together in this photo.  


The colour combination for #CI125 is Sweet Sorbet, Pacific Point, Starry Sky and Basic Gray. As well as the chosen colours you may also add Basic White, Very Vanilla, Basic Black, Crumb Cake, Sahara Sand and metallics to your project. We also allow 'Ivory' and 'Bronze' in the Stampin' Blends. If you don't have all the colour palette, feel free to use the closest SU substitute (ie: Poppy Parade instead of Sweet Sorbet .... you get the drift).

The challenge will run for almost 2 weeks until 7pm (AEST) on Monday 25th July 2022 details to follow at the end of my blog.

Today's card is using the Nature's Prints Stamp Set and Natural Prints Dies which is on page 91 of the  2022-2023 Annual Stampin' Up! Catalogue. I love the different botanical images and the elegant sentiments for many different occasions.


I wanted to try out the new Stampin' Up! Masking Paper which is available from the Annual Catalogue, you get 12 adhesive-backed sheets (5" x 7") it's great to keep your projects ink free by masking up a section and keeping it clean. Here I've torn the Masking Paper and layered it over a panel of Basic White Cardstock.


I started with Starry Sky ink and applied with the Blending Brush to the panel. Then I added Pacific Point and Sweet Sorbet blending into the cardstock and onto the Masking Paper. Next I stamped the images from the Nature's Prints Stamp Set in the same colour as where I had added colour to the cardstock.


I also added ink splatter using the Stampin' Write Markers in the following colours Starry Sky, Pacific Point and Sweet Sorbet. Then carefully peel off the Masking Paper and you'll have a layer of Basic White showing. The cardstock did tear a little but I managed to cover it up with the stamp images and layered them over using Stampin' Dimensionals. 


To finish off the card I stamped the sentiment in Basic Gray and added a bow in Starry Sky Baker's Twine.


I hope I've inspired you with the latest challenge and I do hope you'll join in. We so look forward to seeing a variety of projects using the challenge colours. Please ensure that your project is new and made specifically for this challenge.

Use all of the challenge colours (or close substitutions) unless stated.

Upload only one picture per entry straight to the discussion wall and not in an album

Colour INKspiration Challenge #CI125 will run until 7pm (ADET) on Monday 25th July 2022.

To get your creative ideas flowing, make sure you check out the Crew's Project in the CI125 Album.

Please click on the link here to join the challenge.


Thank you for visiting my blog today, I would so love hear your thoughts on my project by leaving a comment below.


Please email me if you would like a copy of the 2022-2023 Annual Catalogue and the July-Dec 2022 Mini Catalogue, July-August Saleabration Catalogue please contact me here

If you live in Australia and don't have a demonstrator, you can purchase any of the Stampin' Up! products by shopping with me at my online store here.

Make sure you follow me on social media via Facebook, Instagram and Pinterest.


Happy Stamping

Vicki Boucher


+


10 July 2022

Artisan Design Team - Ray of Light Background Stamp


 Hello and welcome,

Today, I'll show you a fun way to create an inky background with the Ray of Light background Stamp. 

This stamp is available in the Stampin' Up! Annual Catalogue 2022 - 2023 and can be located on page 116. The stamp is very large and is perfect for a background panel for card making.


Use three Classic Stampin' Ink Pads to apply ink to a clear block, I used Block F the colours are Polished Pink, Pale Papaya and Sweet Sorbet. Spritz water with the Stampin' Spritzer.


Place background stamp onto a plate of the Stamparatus. Apply the inked up Clear Block onto the background stamp and press lightly with your hand.


Use a panel of Shimmery White Cardstock and place onto Stamparatus Deluxe Foam Mat. Apply inked up stamp to Shimmery White panel and press down.


For more intense color, repeat the previous steps. Allow to dry completely.


To create the sun and clouds I used Crushed Curry Cardstock die-cut out using the smallest circle die from the Stylish Shapes Dies. I punched out two clouds in Basic White Cardstock with the Cloud Punch, applied Tahitian Tide ink with the Blending Brush and faux stitching with Pacific Point Marker.


The sentiment is from Good Feelings Stamp Set, stamped in Tahitian Tide ink onto Basic White then fussy cut out. I added a bow in Tahitian Tide Baker's Twine.


Thank you for visiting my blog today and I hope I've inspired you to create this inky background technique. I would so love hear your thoughts on my project by leaving a comment below. 

If you would like a copy of the new Annual Catalogue 2022 - 2023 please contact me here

If you live in Australia and don't have a demonstrator, you can purchase any of the Stampin' Up! products by shopping with me at my online store here.


Happy Stamping

Vicki Boucher