Showing posts with label Emboss. Show all posts

26 March 2023

Artisan Design Team - Fragrant Flowers Bundle


 Hello and welcome,

My name is Vicki Boucher and I'm from Melbourne, Australia. Today, I'll be sharing with you two projects I created for the March Monthly Artisan Assignment using the Fragrant Flowers Bundle which was shared earlier this month (March) through Stampin' Up! socials.
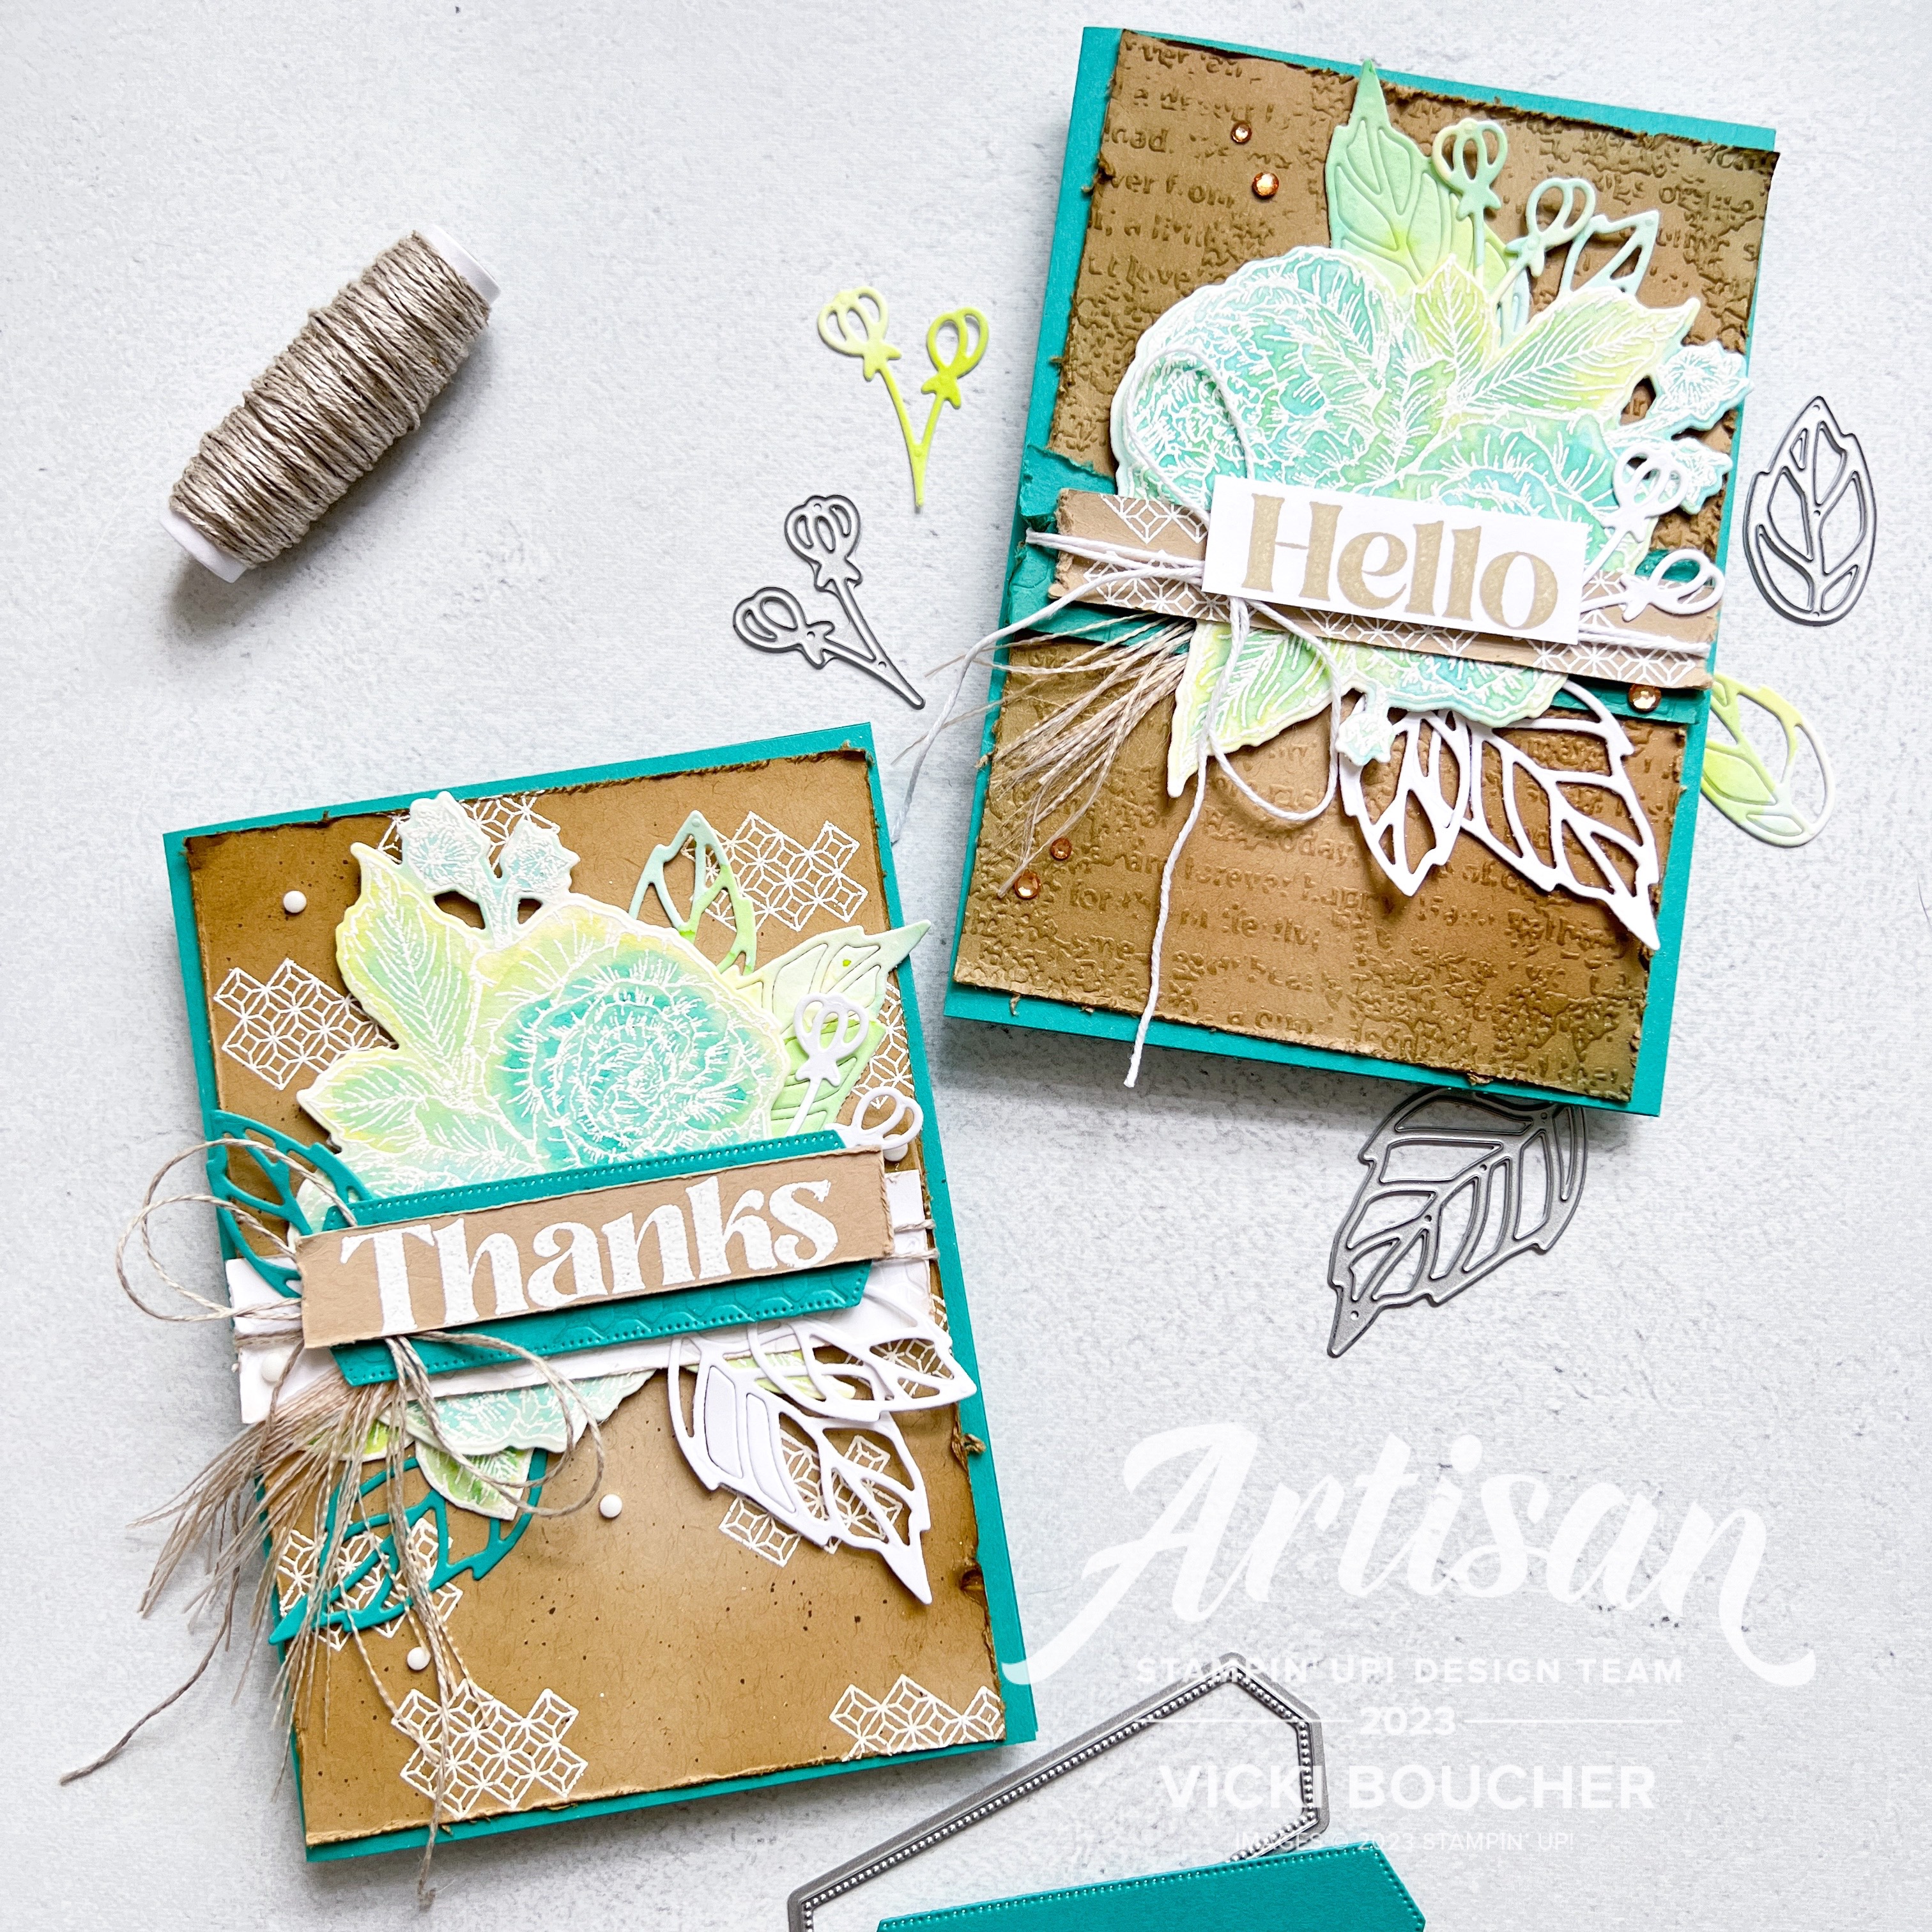


I wanted to share a few ideas on how I created these cards and this bundle is gorgeous to create with I just love the large flower images. The bold sentiments are perfect for a simple hello or thanks. Hope you like my shabby chic creations.

Hello Card

For my first card I used the emboss resist technique and watercolour for the flowers. Use Fluid Flow 100 Watercolor Paper for best results when applying lots of ink. I used a mix of colours Bermuda Bay, Shaded Spruce and Parakeet Party. I like to use the large flat brush tip from the Water Painters, have a bowl of water and paper towel to soak up excess water when needed. The detailed die images are a watercolour wash using the same colors and watercolor paper. Once dry I then die-cut them out with the Stampin' Cut Emboss Machine.


The background panel is dried embossed using Timeworn Type 3D Embossing Folder in Crumb Cake cardstock and I applied Soft Suede ink with the Blending Brush. To create the edges, I used the blade of the Paper Snips and run along the edges of the cardstock. 


When it comes to creating my paper craft, I do love to add lots of layers, embellishments and twine. I always love to see if I can unravel different types of ribbon and add them to my projects. Here I've used White Baker's Twine, Natural Finish Ribbon and Champagne Rhinestones.


Thanks Card

For my second card I used the same techniques for the flowers I like to blend the colours together and see what I'll get. The white embossing of the flowers coordinates well with the colours I've used.


I always love stitching on any dies and this stitched label die in Bermuda Bay cardstock added the perfect layer to my card. It makes the sentiment pop! I've heat embossed the sentiment using White Emboss Powder onto Crumb Cake cardstock.


I added Soft Suede ink with the Blending Bruch around the edges to the Crumb Cake Cardstock panel, then with the Soft Suede Stampin' Write Marker, I flicked the brush tip against the lid to create lots of tiny splatters. It's a fun way to create splatter, but just be careful with your markers when do this trick. The white images on the panel are heat embossed using Versamark, White Emboss Powder and heat set with the Heat Tool.


To finish off this card I used White Classic Matte Dots, Linen Thread and Burlap Ribbon.


Thank you for visiting my blog today, I would so love to hear your thoughts on my projects by leaving a comment below. Make sure you pop over onto Stampin' Up! Facebook page or Stampin' Up! Instagram page for lots of inspiration using the Fragrant Flowers Bundle. You will just need to go back a couple of weeks to view their projects.


If you would like a copy of the Stampin' Up! Jan - April 2023 Mini, or the Annual Catalogue 2022 - 2023 please contact me here. 

If you live in Australia and don't have a demonstrator, you can purchase any of the Stampin' Up! products by shopping with me at my online store here.


Happy Stamping

Vicki Boucher


07 August 2022

Creation Station Blog Hop - Embossing


Hello and welcome

My name is Vicki Boucher and I am from Melbourne, Australia. This is the latest hop with the design team at Creation Station, if you have come from Sara Nell Langland or you may of started with me. Please make sure you hop around and see everyone's amazing projects. I'll pop a link at the end of my blog to hop around....

The design team at Creation Station are presenting their projects with the theme "Anything Embossing" which can be heat or dry embossing which I've done both and I'll have a few tips and tricks to show you. 


I think heat embossing is amazing! It really gives you the wow factor for your paper craft. I just love it! I especially love White Stampin' Emboss Powder on Basic Black Cardstock it really makes the sentiments pop. Dry embossing is great for when you want texture added for your projects.


Embossing Additions Tool Kit (159971)


My favourite tool would have to be the new Embossing Additions Tool Kit (159971) you can find it on page 49 of the Stampin' Up! Mini July - Dec 2022 Catalogue. It comes with Embossing Buddy, Powder Pal, Crafting Tweezers great for holding tiny pieces of cardstock and Crafting Brush. The tray keeps your work space clean and tidy and the loose embossing powder can be placed back into the jar.


Kindest Gnomes Bundle (159626)


The Kindest Gnomes stamp set and Gnomes Dies are my favourite at the moment, they are perfect for a wintery snow scene and for Christmas. They are just so cute! Here I've used the stamp set and dies for all three cards. You can find the bundle on page 43 of the Stampin' Up! Mini July - Dec 2022 Catalogue. 

Dry Emboss Christmas Card

I've created a whimsical Christmas village using the Charming Landscapes Embossing Fold and Fluid 100 Watercolor Paper. 


I used a whole sheet of watercolor paper for two projects, first I added lots of water using the Stampin' Spritzer and then I added ink in the following colours Orchid Oasis, Pale Papaya and Polished Pink. I like to use the Heat Tool to create interesting movement with the ink and sometimes I would add more ink and water. Once it's completely dry, I'll emboss it with the embossing folder.


The Orchid Oasis background panel is dry embossed using Painted Texture 3D Embossing Folder and I also added Orchid Oasis Ink with the Blending Brush for more depth.


The sentiment is from the Kindest Gnomes Stamp Set and is heat set. First use the Embossing Buddy to remove any static from the Cardstock then stamp your image using Versamark ink, add White Stampin' Emboss Powder, remove any excess by tapping the back of the Cardstock and very carefully use the brush to remove any unwanted powder. 


The Stampin' Up! Heat Tool has two settings and I usually always use the higher setting to heat the powder.


Christmas Greetings Sliver Emboss with White Craft Ink

I've used the other half of the Fluid 100 Watercolor Paper for my next card and dry embossed it using the snowy mountain tops embossing folder from the Charming Landscapes Embossing Folder. 


Here I've used the Paper Snips and roughed up the edges with the blade. Then embossed the edges with a Sponge Dauber, White Craft Ink, Sliver Embossing Powder and heat set with the Heat Tool. Craft ink holds the powder better and thicker.


I also did this with the Gnomes beard and toadstools, but this time I used the fine Water Painter Brush and make sure the brush tip is dry. I like to add the White Craft Ink onto the Clear Block and use as a palette. 


One of my favourite embossing folders would have to be Timeworn Type 3D Embossing Folder, I just love the texture and I usually rough up the edges with the Paper Snips.


The sentiment is from Trees for Sale Stamp Set (159785), heat embossed again using White Emboss Powder on Basic Black Cardstock. 


Emboss Resist You Light up the Season Card

Emboss resist is always a fun way to use White Emboss Powder and heat set over blended coloured Cardstock. 


This was a last minute creation as I wanted to use this technique by using the trees from the Trees for Sale Stamp Set and Saleabration item Tree Lot Dies (159938). 


Using Basic White Cardstock I lightly applied Pale Papaya ink with the Blending Brush, then Polished Pink and Orchid Oasis. Stamping three of the different size trees, snow flakes in Versamark ink onto the cardstock add White Stampin' Emboss Powder, heat set with the Heat Tool. 


For extra dimension, I embossed the larger tree stamp on Basic White Cardstock and lightly added Orchid Oasis ink with the Blending Brush and die-cut out using Tree Lot Dies.


The sentiment is from Trees for Sale Stamp Set (159785), heat embossed again using White Emboss Powder on Basic Black Cardstock. 


Thank you for visiting my blog today, I would so love hear your thoughts on my project by leaving a comment below. Make sure you pop over to Mikaela Titheridge for lots of inspiration using embossing.


Please email me if you would like a copy of the 2022-2023 Annual Catalogue and the July-Dec 2022 Mini Catalogue, July-August Saleabration Catalogue please contact me here. 

If you live in Australia and don't have a demonstrator, you can purchase any of the Stampin' Up! products by shopping with me at my online store here.

Make sure you follow me on social media via Facebook, Instagram and Pinterest.


Happy Stamping

Vicki Boucher


24 July 2022

Artisan Design Team - Lovely and Lasting Bundle


 Hello and welcome,

My name is Vicki Boucher and I'm from Melbourne, Australia. Today I'll be sharing two projects using the Lovely & Lasting Bundle, turning them into two cards.


The Artisan Design Team are featuring the Lovely & Lasting Bundle on Stampin' Up! Facebook and Instagram page where you'll sure to be inspired by everyone's creations, I'll add the link at the end of my blog. 


Lovely & Lasting Bundle (158652)


The Lovely & Lasting Bundle  (158652) 10% Bundle Savings is located on page 25 of the Stampin' Up! 2022 - 2023 Annual Catalogue. The bundle includes Lovely & Lasting Stamp Set (158646) and coordinates Lasting Label Punch (158651). This is a great set to have in your crafty stash, I just love the variety of different labels for paper crafting.


Night of Navy Happy Birthday Card

To create this card I've used the following colours Night of Navy, Basic Gray and Fresh Freesia. Starting with Basic White panel I've added Night of Navy and Basic Gray Ink with the Blending Brush. I lightly added the ink to the panel but also leaving white space. Using the brush tip against the lid of the Stampin' Write Markers, I splattered Night of Navy and Basic Gray ink onto the panel.


Next I used the tile stamp in Basic Gray and stamped off before applying to the panel a couple of times. I also used the tile stamp in Versamark ink onto Vellum Cardstock and heat embossed using White Stampin' Emboss Powder and fussy cut the image out.


The images of the flowers have either been stamped in the above mentioned colours or I added ink to the stamp using the Blending Brush, this gives a softer look. Then with the paper snips, I've fussy cut all of the images out.


A great way to save time and create multiple sentiments for your projects. Is to stamp your images multiple times in Versamark onto a strip of Cardstock add Stampin' Emboss Powder and heat set with the Heat Tool. Then with the Lasting Label Punch, punch out your labels to add to your projects.


To finish off the card I've added a fancy bow using the following ribbons, White Glittered Organdy Ribbon, Starry Sky Metallic Woven Ribbon and Silver Simply Elegant Trim. Plus I added a few Rhinestones for some bling.


Gorgeous Grape Thinking of You Card

For my next card, which is in shades of purple and is very similar to my other card with a few changes. Starting with the colours I've used Gorgeous Grape, Smoky Slate, Night of Navy and Fresh Freesia. The card base is Gorgeous Grape and with the Blending Brush I've added Gorgeous Grape ink to the Basic White Panel.


I've stamped off tile image in Smoky Slate ink and applied to the panel. Next I used the sentiment and stamped the image a couple of times onto the panel. I added splattered ink in Smoky Slate with the Stampin' Write Marker. I've roughed up the edges of the panel using the blade of the Paper Snips.


The flower images are stamped in Night of Navy, Fresh Freesia and Gorgeous Grape. I've also heat embossed the flower image using Versamark ink onto Vellum Cardstock, White Stampin' Emboss Powder and heat set with the Heat Tool. Then I've fussy cut the images and arranged under the sentiment.


To finish off the card I've added Pearls, Sliver Simply Elegant Trim and Fresh Freesia Open Weave Ribbon.  


Thank you for visiting my blog today, I would so love hear your thoughts on my project by leaving a comment below. Make sure you pop over onto Stampin' Up! Facebook page for lots of inspiration using the Lovely & Lasting Bundle.

If you would like a copy of the new Annual Catalogue 2022 - 2023 please contact me here. 

If you live in Australia and don't have a demonstrator, you can purchase any of the Stampin' Up! products by shopping with me at my online store here.


Happy Stamping

Vicki Boucher


26 June 2022

Artisan Design Team - Texture Chic Suite


Hello and welcome,

My name is Vicki Boucher and I'm from Melbourne, Australia. Today I'll be sharing three projects using the Texture Chic Suite, turning them into two cards and a gift bag.


The Artisan Design Team are featuring the Texture Chic Suite on Stampin' Up! Facebook and their new Instagram page where you'll sure to be inspired by everyone's creations, I'll add the link at the end of my blog. This suite is perfect for all four seasons Summer, Autumn, Winter and Spring.


Texture Chic Suite (158819)


The Texture Chic Suite  (158819) is located on page 99 of the Stampin' Up! 2022 - 2023 Annual Catalogue. The suite includes 10% Bundle Savings Season of Chic Bundle, Photopolymer (158816), Season of Chic Stamp Set (158810), coordinates with Chic Dies (158815), Texture Chic Specialty 12" x 12" Designer Series Paper (158808) and Distressed Gold 12" x 12" Specialty Paper.


Thinking of You Winter Card

To create a wintery card I've used the emboss resist technique stamping the snowflake images in Versamark onto a panel of Basic White Cardstock, white Stampin' Emboss Powder and heat set with the Heat Tool. The colours I've used are Pool Party and Sahara Sand ink lightly adding the ink with the Blending Brush. 


I've added lots of layers to add interest to the card, starting with the Distressed Gold Specialty Paper and the crosshatch pattern die which is perfect as a background from the Chic Dies. The next three layers I've used the Tailor Made Tags Dies using three different sizes the bottom layer is the Texture Chic Specialty Designer Series Paper, Shimmery White Cardstock inking up the stamp with Pool Party Ink, spritz water onto the stamp and then stamp onto the paper. 


The sentiment is heat embossed using Versamark ink onto Pool Party Cardstock, white Stampin' Emboss Powder and heat set with the Heat Tool. To finish off the card I've used Pool Party Sheer Ribbon with a Linen Thread tied into a bow and a few of the Iridescent Pearl Basic Jewels. 


Thanks Autumn Peekaboo Treat Bag

This cute treat bag was fun to make and I especially like the addition of Blushing Bride with the Distressed Gold Specialty Paper. I've used the Kraft food safe Peekaboo Treat Bag stamp the leaf image in Soft Suede ink and adding more Soft Suede ink to the bag with the Blending Brush.


I've used the Tailor Made Tags for the gift tag the bottom layer is the Distressed Gold Specialty Paper then as above Shimmery White Cardstock, ink up the stamp in Soft Suede ink, spritz water onto the stamp and stamp the image onto the Cardstock. The top layer is Blushing Bride Cardstock adding the brushstroke stamp in Blushing Bride ink as a background and then heat emboss using Gold Stampin' Emboss Powder.


I added Gold Gilded Leafing to the Blushing Bride die-cut leaves which is from the Chic Dies and I love the Petal Pink Solid Faceted Gems they add just the right interest to your 3D project.


Gold and Pool Party Thanks Spring Card

To create the final card I've used Pool Party Cardstock for the card base, layered with the Texture Chic Specialty 12" x 12" Designer Series Paper, I love the colours and the gold foil throughout the DSP. I even used some of the DSP for the die-cut elements from the Chic Dies. 


The flowers are heat embossed stamping the images in Versamark onto either Petal Pink or Pool Party Cardstock, Gold Emboss Powder and heat set with the Heat Tool. Using Stampin' Blends to colour the flowers for more depth and shading for the flowers. I used Petal Pink Stampin' Blends for the pink flowers and Pool Party Stampin' Blends for the blue flowers. 


To create shape and dimension to your projects by using your Bone Folder to curve the edges of the flowers and leaves. This will make them stand out on your card.


The heat embossed gold sentiment fits nicely inside the largest of the label die from the Stylish Shapes Dies and I just love the addition of the Brushed Brass Butterflies to the card. 


Thank you for visiting my blog today, I would so love hear your thoughts on my project by leaving a comment below. Make sure you pop over onto Stampin' Up! Facebook page for lots of inspiration using the Texture Chic Suite.

If you would like a copy of the new Annual Catalogue 2022 - 2023 please contact me here. 

If you live in Australia and don't have a demonstrator, you can purchase any of the Stampin' Up! products by shopping with me at my online store here.


Happy Stamping

Vicki Boucher


12 July 2021

Heart of Christmas Blog Hop


 Hello and welcome,

I'm so happy my Stampin' Up! box of Christmas goodies arrived at my door step and now I can share with you one of the bundles for our second week of Heart of Christmas blog hop. This week is hosted by the lovely Tina Gillespie from the Art With Heart Team. 

Stampin' Up! have the new July - December 2021 Stampin' Up Mini Catalogue which is coming out very soon for our customers. As demonstrators we are lucky receive the catalogue and also pre-purchase products from the Mini Catalogue and there's more exciting news! Stampin' Up! have Sale-A-Bration for 3 August - 30 September 2021 or unless sold out earlier. Choose a FREE Sale-A-Bration product with every $90 AUD or $180 AUD you spend (before shipping and handling). I always love free Stampin' Up! products.


I decided to go with non-traditional colours and paper for my handmade Christmas card. I've used the new Frosted Gingerbread bundle which comes with coordinating Gingerbread Dies. This bundle also comes in the Gingerbread & Peppermint Suite there are so many beautiful products in this Suite and I can't wait to play with more of it.


I've created an emboss resist technique by stamping the Christmas bauble image a number of times in Versamark Ink onto Basic White panel, adding White Stampin' Emboss Powder remove excess and heat with the Heat Tool. Then with the Blending Brush and Fresh Freesia Ink apply lightly to the embossed Christmas baubles.

Using a strip of Fresh Freesia Designer Series Paper I wanted to try the scrunching, folding, pleating technique which I discovered from Lou Kitzelman on her Instagram for her non-traditional Christmas card. I like how it gives you more dimension to the card and I always love to add more layers. 


I added a strip of  Fresh Freesia gingham paper which is from the Pansy Petals Designer Series Paper which is currently on sale until 2nd August 2021 with 15% discount. There are a total of 9 Designer Series Paper on sale, more details below and on my online store.


The Christmas die-cut images from the Gingerbread Dies are cut out using Basic White and Fresh Freesia Cardstock. I love the white swirls against Fresh Freesia. I've wrapped around White Baker's Twine and added a bow to the card. To finish off the greeting fits nicely inside the white image of the Christmas bauble.

I hope I've inspired you to start creating your own Christmas projects using paper craft. Stampin' Up! have so many beautiful products and I just love how it all coordinates.

Well that's it for me and I'm so excited to see everyone's Christmas projects so make sure you hope around the blog hop. Next up is Tina Gillespie just click on the next button below.


 If at any time you find a broken link please head to the blog of this week’s Host of the Heart of Christmas Blog Hop, Tina Gillespie, and she will have the list of all who are participating.


Thank you for visiting my blog today, I would so love hear your thoughts on my project by leaving a comment below.

If you live in Australia, you can purchase any of the Stampin' Up! products by shopping with me at my online store here.


Here is the list of Designer Series Paper which is on sale with 15% off discount and is available for purchase from my online store.


Happy Stamping 

Vicki Boucher