Showing posts with label Faux Masking Technique. Show all posts

15 October 2023

Stamping Sunday Blog Hop - Celebrating Good Times


 Hello and welcome,

My name is Vicki Boucher and I'm from Melbourne, Australia. Today is the Stamping Sunday blog hop for the month of October and for this month's theme is "Celebrating Good Times". It's the 3rd Sunday of the month and can you believe it we are not too far away until the end of the year! I'm looking forward to seeing everyone's projects and you'll be able to see them by clicking on their names which will be at the end of my blog.

For my theme I actually went with something different as my oldest daughter has just finished her last day of school and then she'll have her exams over the next month. I wanted to make her something special for her graduation next month, so I made two projects a card and a mini gift box to give to her.    


When I was thinking about my project, I knew I wanted to use the Wanted to Say Dies and use the Celebrate die for both projects. I also wanted to keep the colours soft tones and add sparkle for some of the elements.


Let's Celebrate You! Card

I just love Pecan Pie and would one of my favourite Stampin' Up! color! I like to tone it down when using it with Basic White and Very Vanilla Cardstock. Adding ink with the Blending Brush to the embossed cardstock using the very popular Distressed Tile 3D Embossing Folder and then rip along the edges of the cardstock.


I've added a number of different layers to the card starting with Oxidized Copper Specialty Designer Series Paper, Burlap Ribbon I just love the white stitching on the ribbon and Very Vanilla Baker's Twine.


For a soft pretty look I added a couple of Petal Pink daisies by using the daisies masks from the Abundant Beauty Decorative Masks and then fussy cut them out.


I've used the Celebrate with Tags Stamp Set for the sentiment and the Celebrate die using the Oxidized Copper Specialty Designer Series Paper.


Celebrate Envelope Treat Box

Have you seen the cute Envelope Treat Boxes? They are on page 126 of the Stampin' Up! Annual Catalogue and they make the perfect gift for someone special. They are white but you can stamp on them or add colour to the boxes. I used Pecan Pie ink and applied it with the Blending Brush.


I added a belly band to the box and decorated it. Starting with a strip of Basic White Cardstock and embossed it using the Distressed Tile 3D Embossing Folder. Using the same embossing folder, I embossed the Very Vanilla gift tag and added Pecan Pie ink with the Blending Brush.


I like the idea of mixing up Very Vanilla and Basic White together it gives you a fresh clean look and added a soft subtle colour like Petal Pink gives it a wow look! For the Celebrate I die-cut the image out using the Champagne paper from the More Dazzle Specialty Paper. 


Other elements used are Natural Wavy Trim and I unraveled the Burlap Ribbon to form lots of strands.


Thank you for visiting my blog today, I would so love to hear your thoughts on my projects by leaving a comment below.

Please email me if you would like a copy of the new 2023-2024 Annual and Mini Sep-Dec 2023 Catalogue, please contact me here

If you live in Australia and don't have a demonstrator, you can purchase any of the Stampin' Up! products by shopping with me at my online store here

Make sure you follow me on social media via Facebook, Instagram and Pinterest.


Happy Stamping

Vicki Boucher

To see all of the amazing projects by the Stamping Sunday Design Team please click on their names below. 


25 November 2022

Artisan Design Team - Star Treats Bag


Hello and welcome,

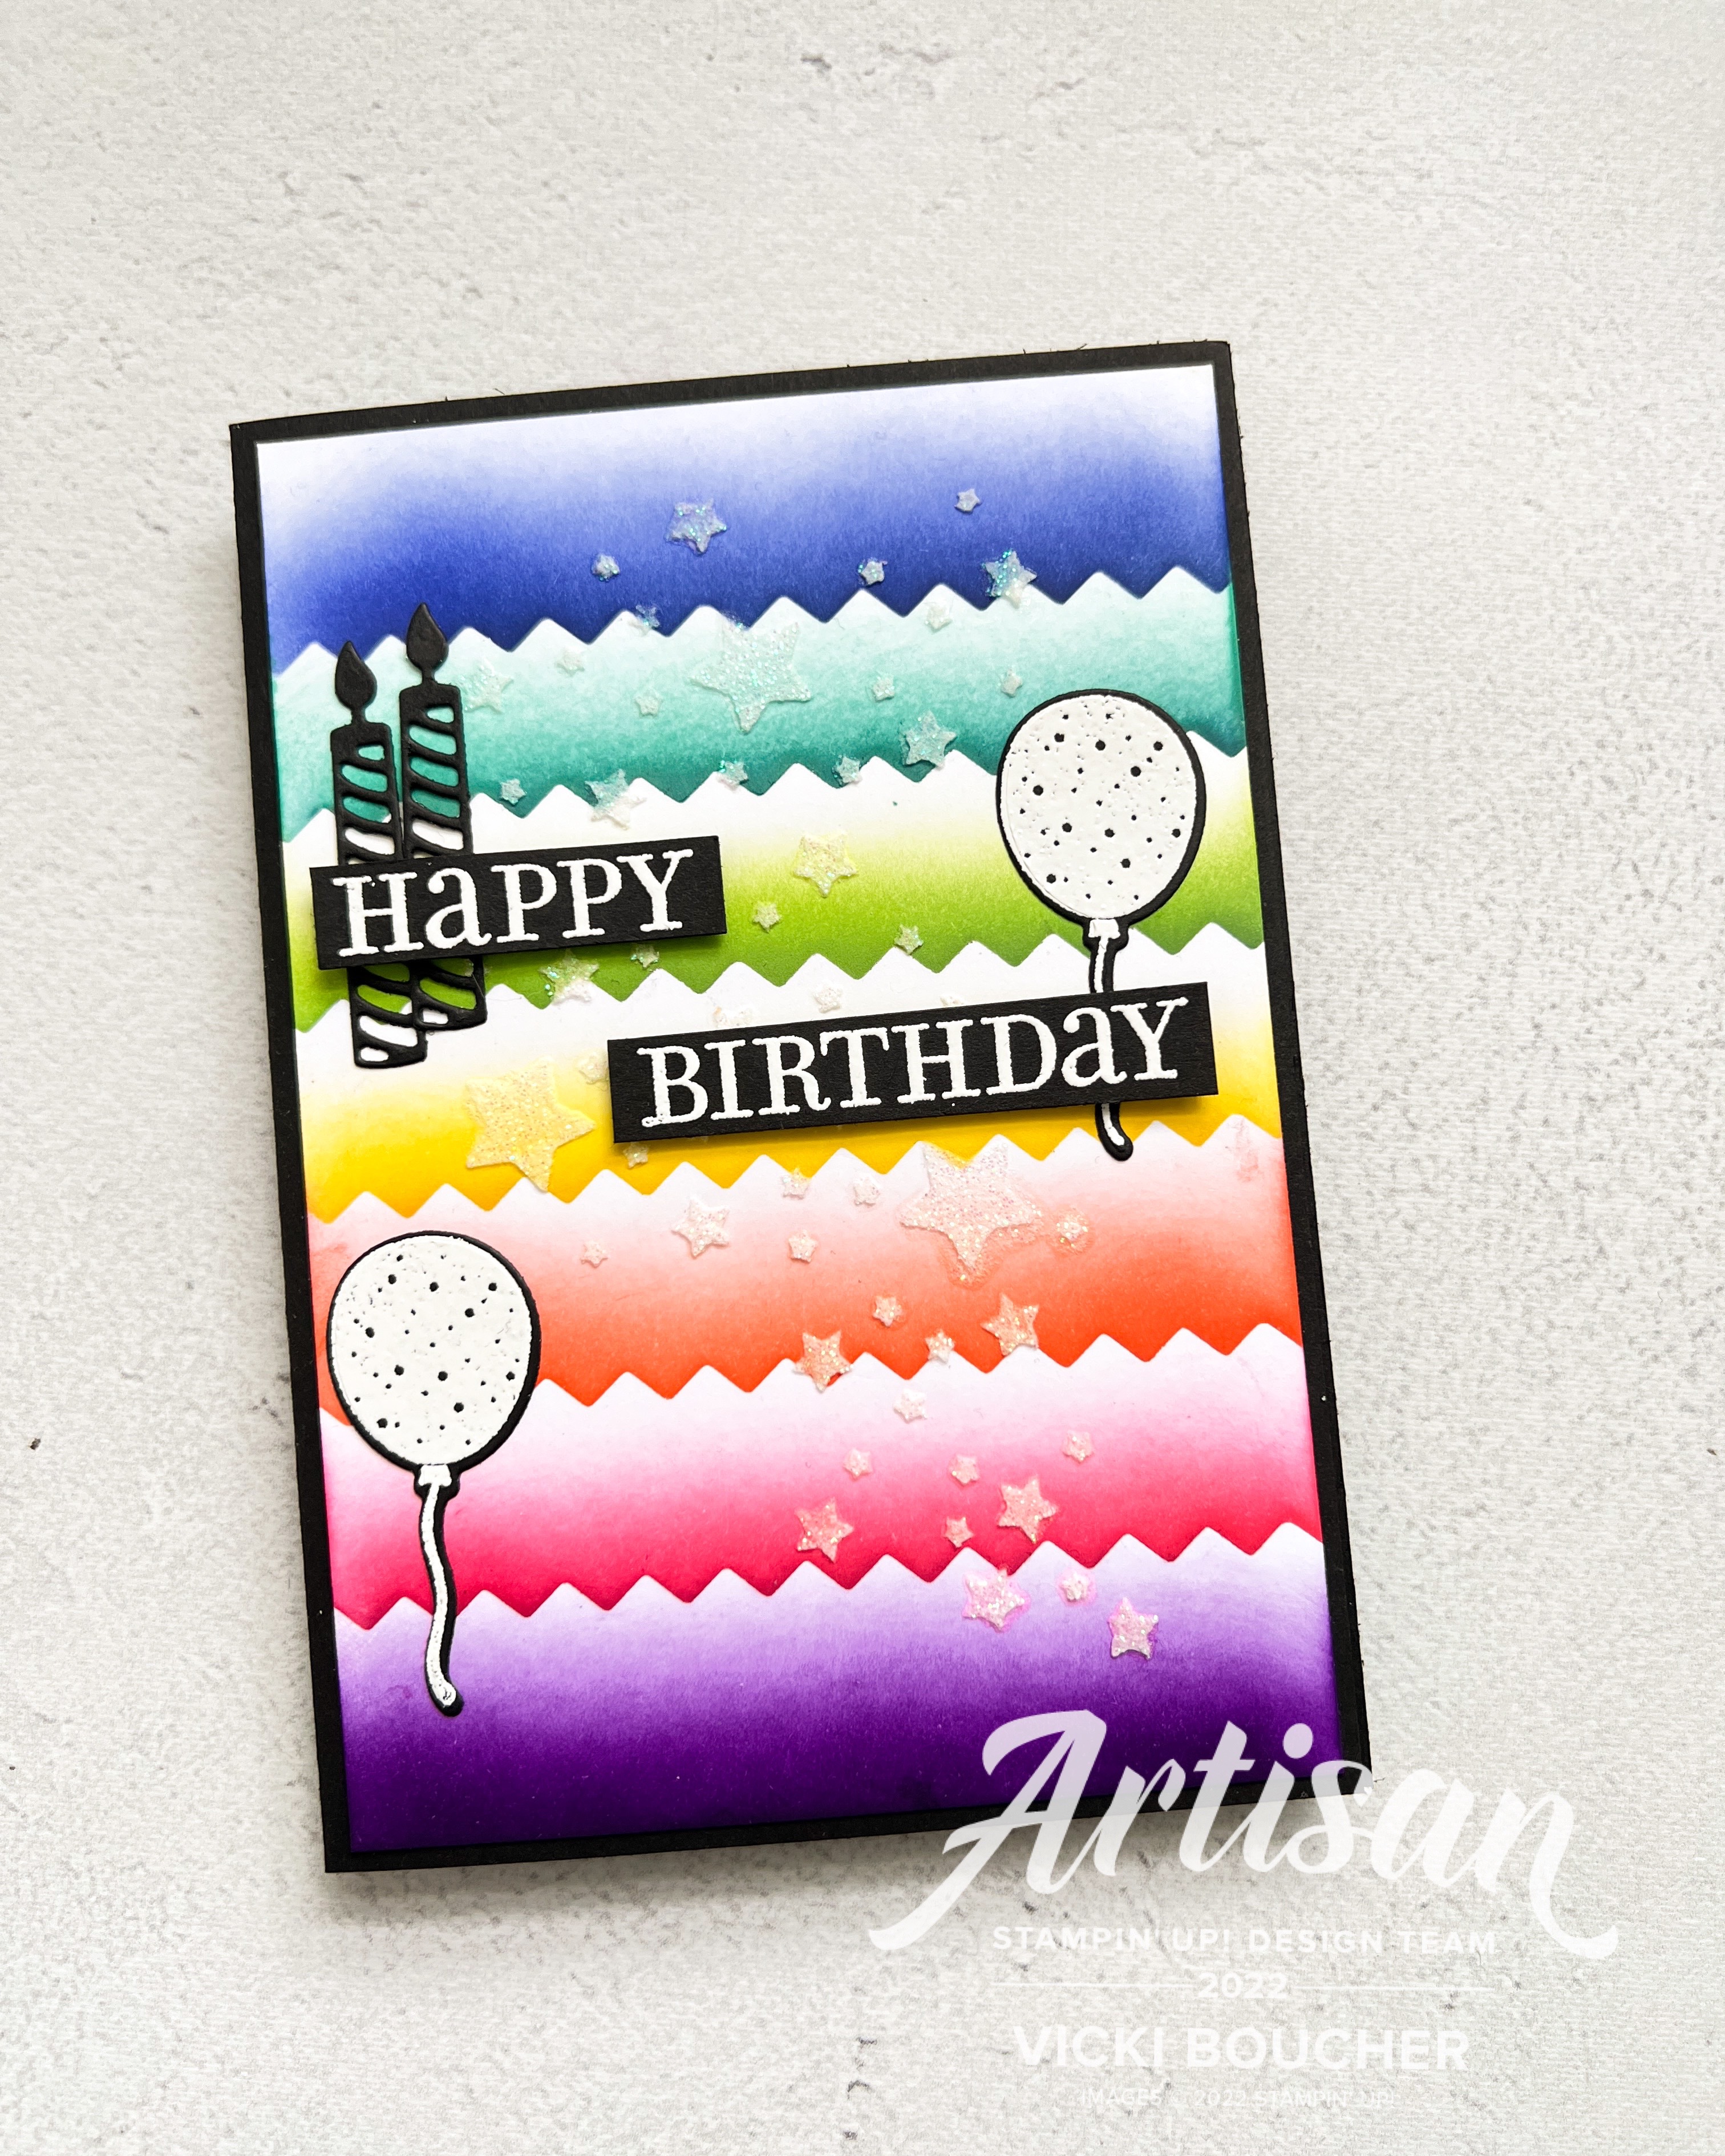
My name is Vicki Boucher and I'm from Melbourne, Australia. Today I'll be sharing with you how to create a fun background by using the Stars Treats Bags (159833) in different ways. They are great as gift bags but sometimes I like to use Stampin' Up! products by thinking outside the box and create something a little bit different with what you've got.


Here I used a vibrant colour combo of Orchid Oasis, Coastal Cabana, Parakeet Party, Daffodil Delight, Calypso Coral, Polished Pink, and Gorgeous Grape.


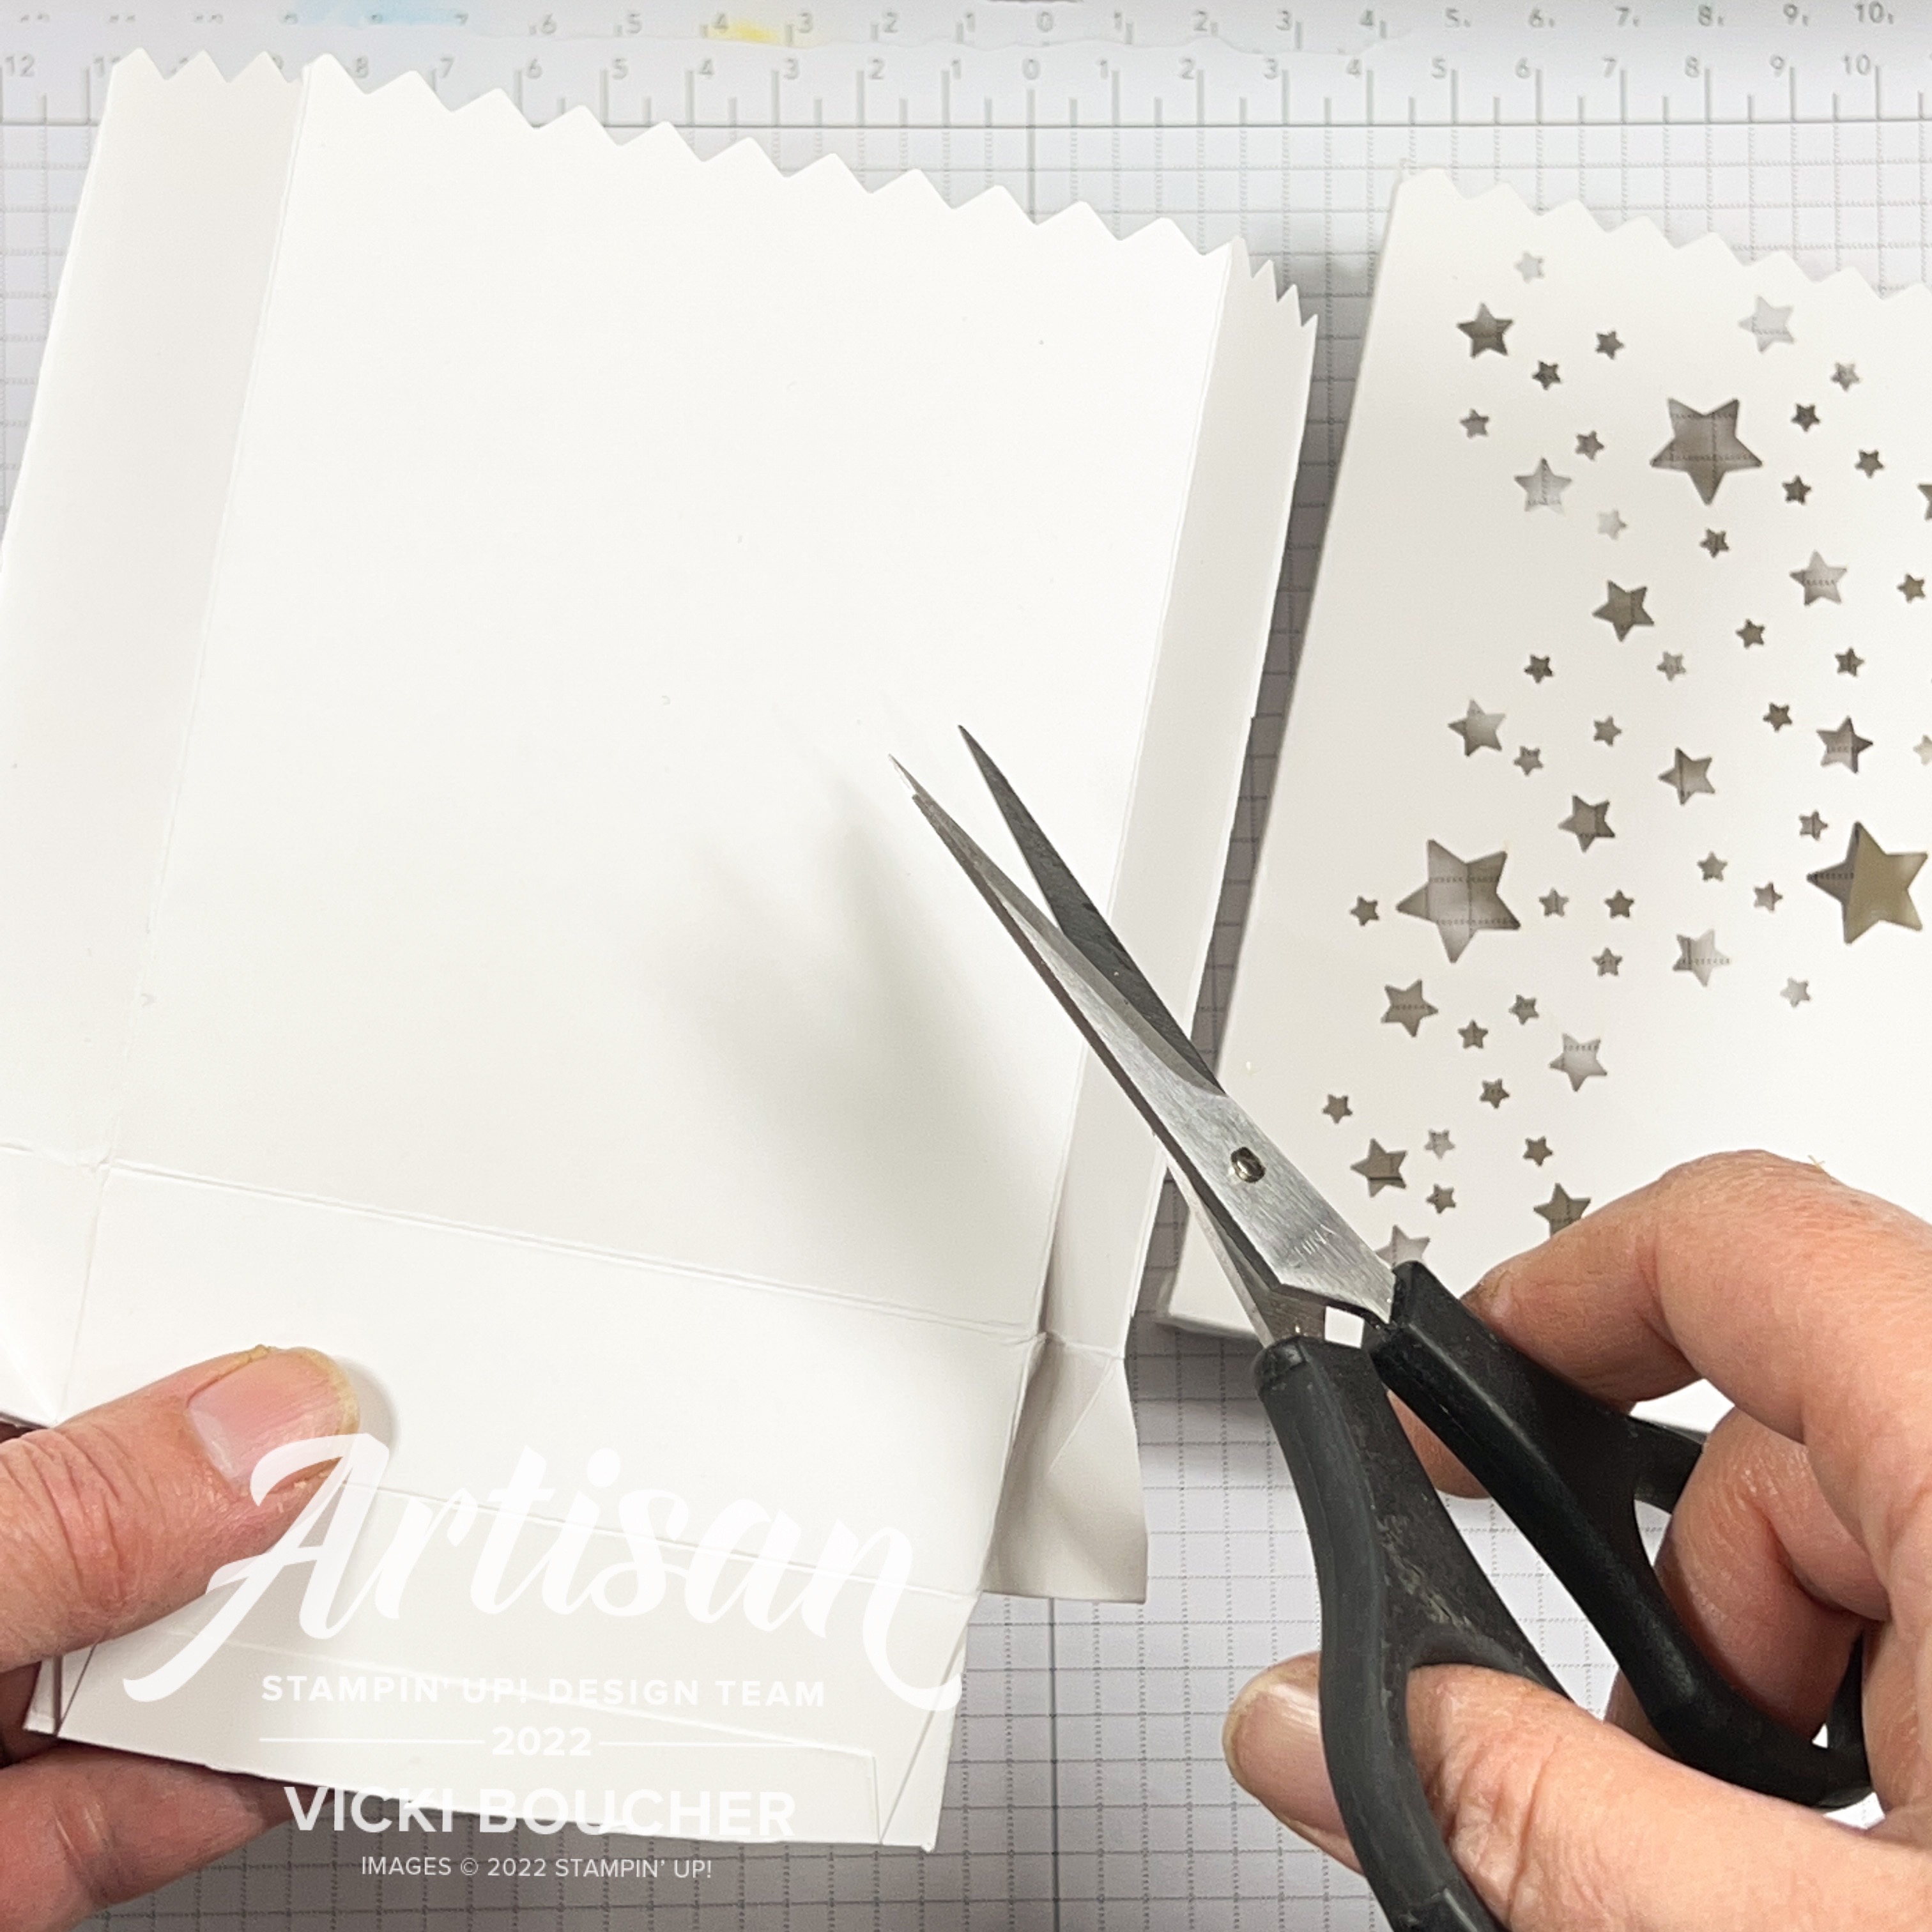
Start by cutting the Star Treat Bag in half with Paper Snips.


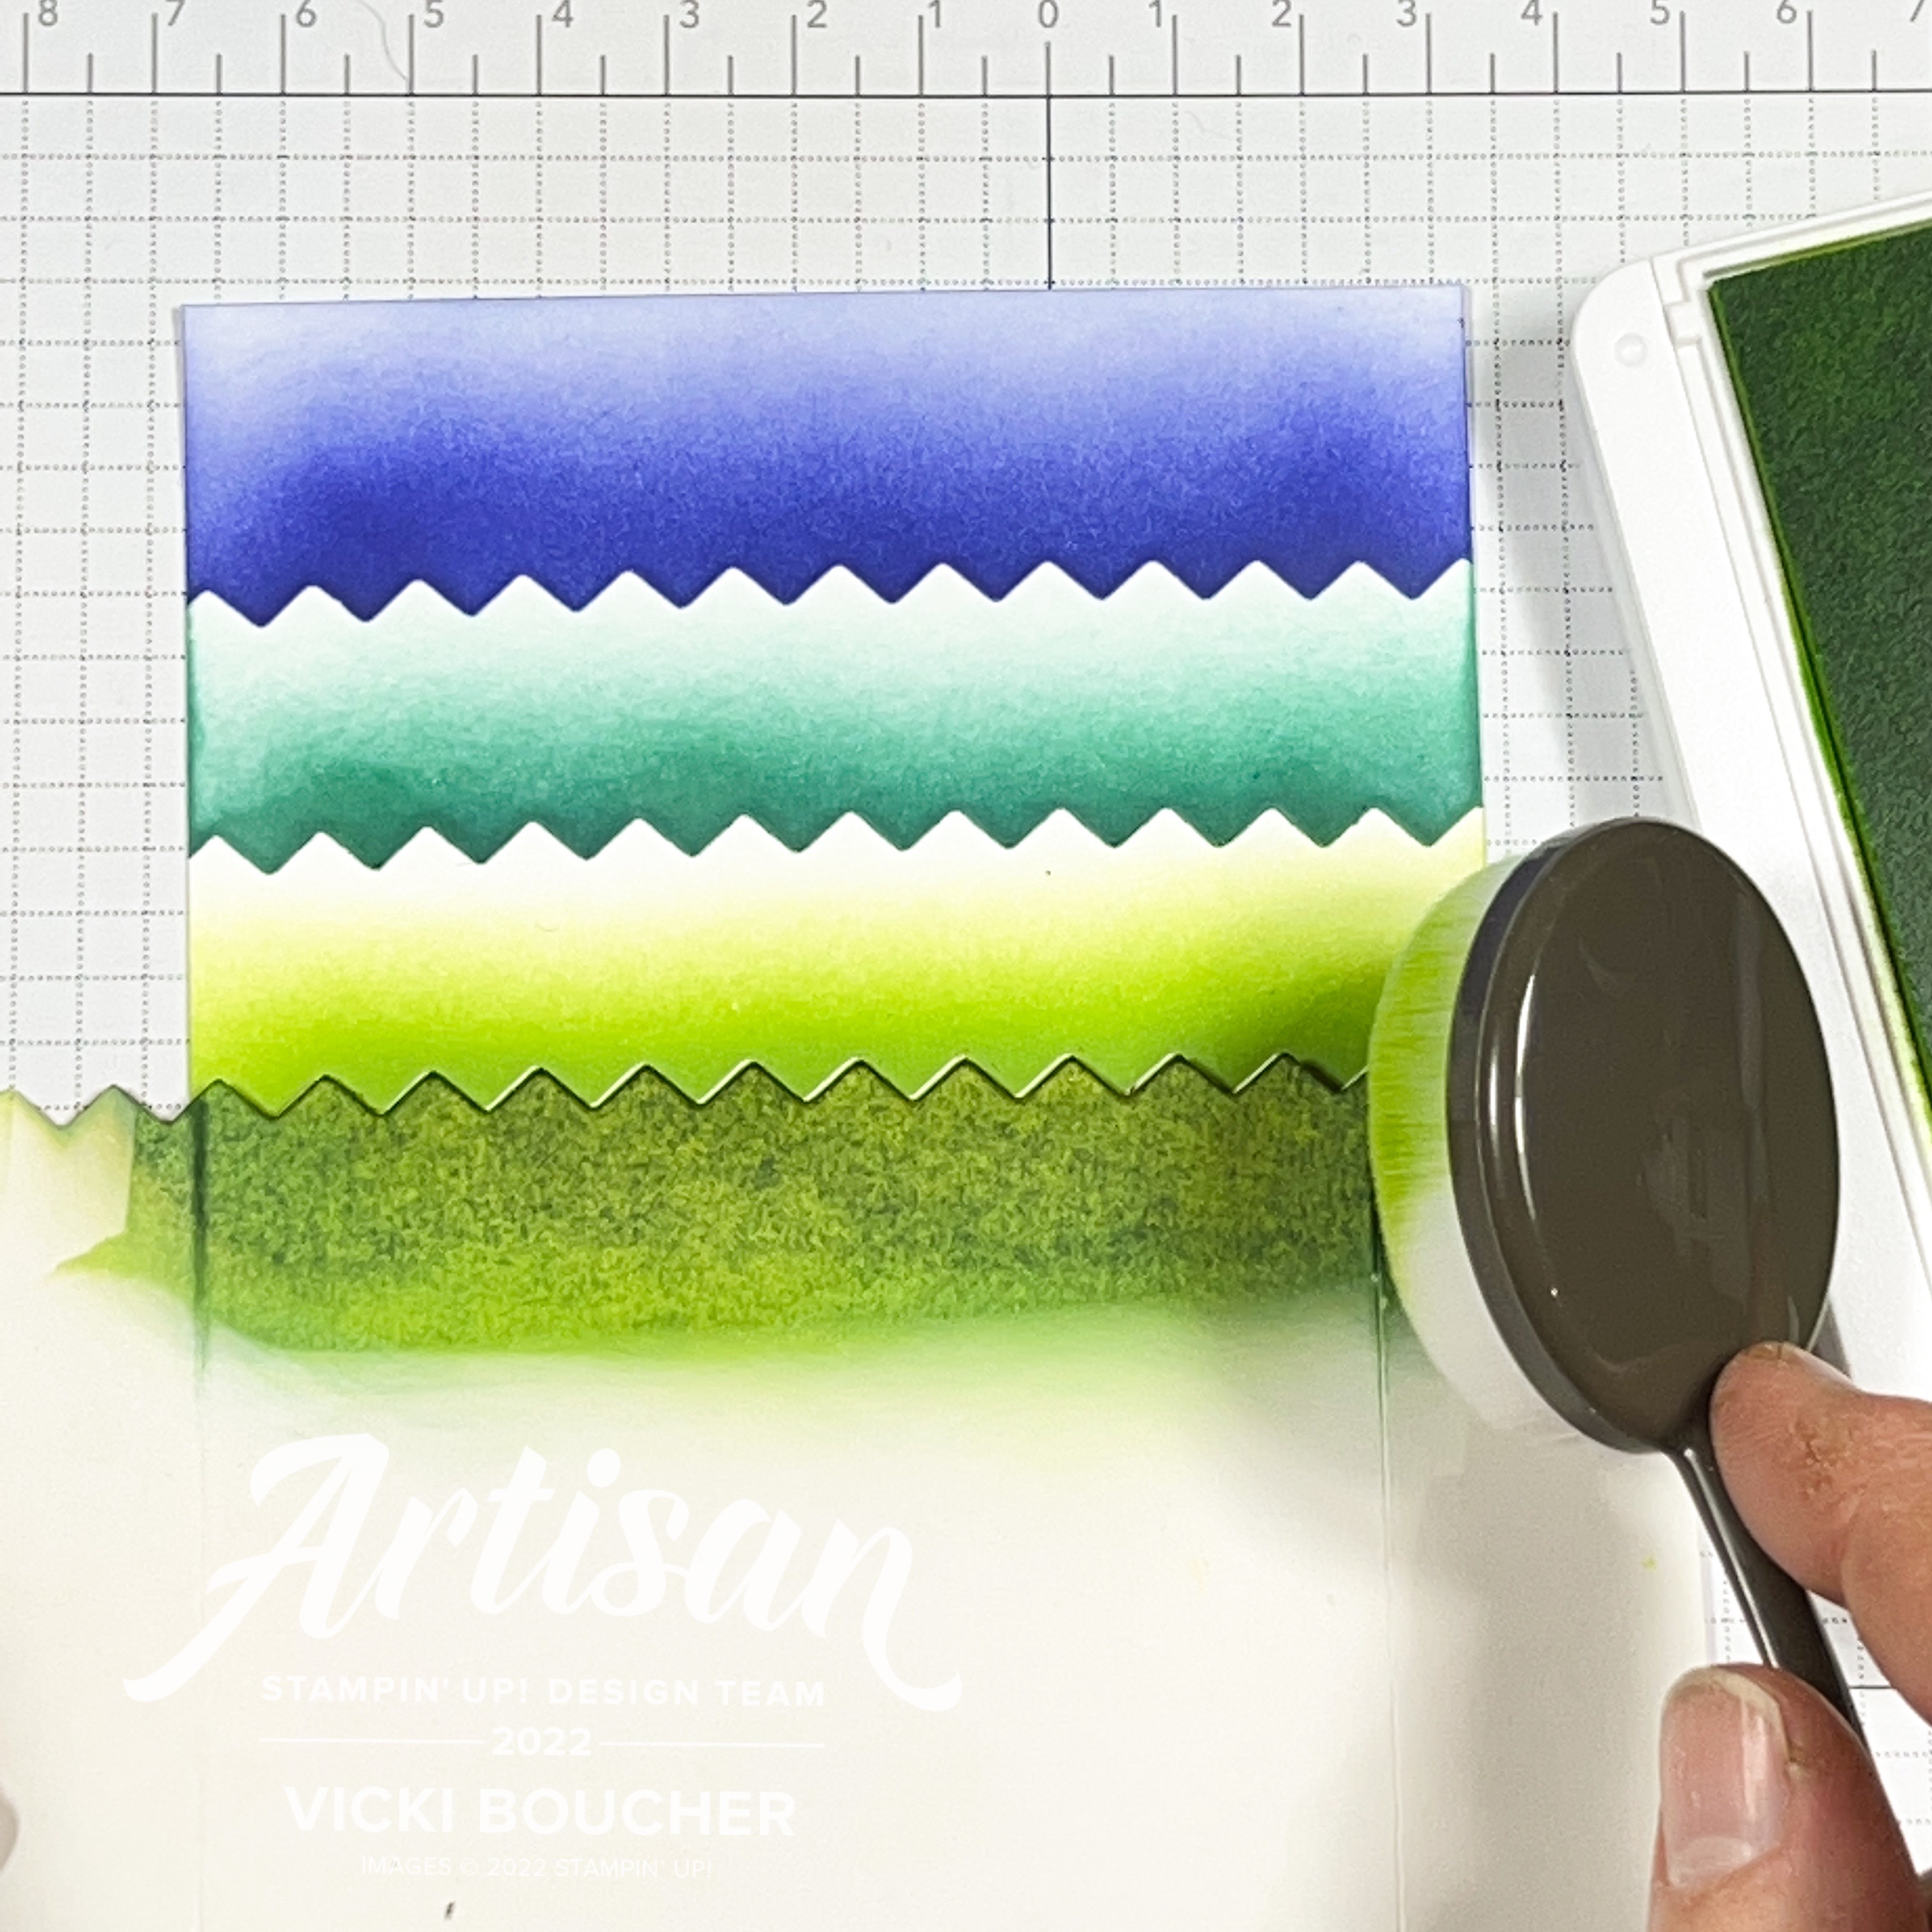
Next use the zig zag edge of the bag to create an ombre effect with the Blending Brush and ink. Start with the cool colours first.


So the inks don't blend, use a new bag stencil for the warm colours. Continue until you've completed with all of the colours.


Use the stars side of the treat bag as a mask with a Palette Knife and Shimmery White Embossing Paste. Carefully remove mask and let the embossing paste dry. 


Celebrate with Tags (159974)


To go with the background layer, I used the Celebration with Tags bundle (159974) which can be located on page 67 in the Stampin' Up! July - December 2022 Mini Catalogue. 

The stamped images are from the Celebrate with Tags stamp set, stamped in Versamark onto Basic Black cardstock, add White Stampin' Emboss Powder remove any excess and heat set with the Heat Tool. Then die-cut out the images with the coordinating Celebration Tag Dies. I've fussy cut out the sentiment with Paper Snips.


Thank you for visiting my blog today, I would so love to hear your thoughts on my project by leaving a comment below.


Please email me if you would like a copy of the 2022-2023 Annual Catalogue and the July-Dec 2022 Mini Catalogue Catalogue, send me an email here

If you live in Australia and don't have a demonstrator, you can purchase any of the Stampin' Up! products by shopping with me at my Stampin' Up! online store here.

Make sure you follow me on social media via Facebook, Instagram and Pinterest.


Happy Stamping

Vicki Boucher

13 July 2022

Colour INKspiration Challenge #CI125


 Hello and welcome,

My name is Vicki Boucher and I am from Melbourne, Australia. Tonight, it's the latest Colour INKspiration Challenge #CI125 and this photo was chosen by Cheryll Miller. The colours are gorgeous together in this photo.  


The colour combination for #CI125 is Sweet Sorbet, Pacific Point, Starry Sky and Basic Gray. As well as the chosen colours you may also add Basic White, Very Vanilla, Basic Black, Crumb Cake, Sahara Sand and metallics to your project. We also allow 'Ivory' and 'Bronze' in the Stampin' Blends. If you don't have all the colour palette, feel free to use the closest SU substitute (ie: Poppy Parade instead of Sweet Sorbet .... you get the drift).

The challenge will run for almost 2 weeks until 7pm (AEST) on Monday 25th July 2022 details to follow at the end of my blog.

Today's card is using the Nature's Prints Stamp Set and Natural Prints Dies which is on page 91 of the  2022-2023 Annual Stampin' Up! Catalogue. I love the different botanical images and the elegant sentiments for many different occasions.


I wanted to try out the new Stampin' Up! Masking Paper which is available from the Annual Catalogue, you get 12 adhesive-backed sheets (5" x 7") it's great to keep your projects ink free by masking up a section and keeping it clean. Here I've torn the Masking Paper and layered it over a panel of Basic White Cardstock.


I started with Starry Sky ink and applied with the Blending Brush to the panel. Then I added Pacific Point and Sweet Sorbet blending into the cardstock and onto the Masking Paper. Next I stamped the images from the Nature's Prints Stamp Set in the same colour as where I had added colour to the cardstock.


I also added ink splatter using the Stampin' Write Markers in the following colours Starry Sky, Pacific Point and Sweet Sorbet. Then carefully peel off the Masking Paper and you'll have a layer of Basic White showing. The cardstock did tear a little but I managed to cover it up with the stamp images and layered them over using Stampin' Dimensionals. 


To finish off the card I stamped the sentiment in Basic Gray and added a bow in Starry Sky Baker's Twine.


I hope I've inspired you with the latest challenge and I do hope you'll join in. We so look forward to seeing a variety of projects using the challenge colours. Please ensure that your project is new and made specifically for this challenge.

Use all of the challenge colours (or close substitutions) unless stated.

Upload only one picture per entry straight to the discussion wall and not in an album

Colour INKspiration Challenge #CI125 will run until 7pm (ADET) on Monday 25th July 2022.

To get your creative ideas flowing, make sure you check out the Crew's Project in the CI125 Album.

Please click on the link here to join the challenge.


Thank you for visiting my blog today, I would so love hear your thoughts on my project by leaving a comment below.


Please email me if you would like a copy of the 2022-2023 Annual Catalogue and the July-Dec 2022 Mini Catalogue, July-August Saleabration Catalogue please contact me here

If you live in Australia and don't have a demonstrator, you can purchase any of the Stampin' Up! products by shopping with me at my online store here.

Make sure you follow me on social media via Facebook, Instagram and Pinterest.


Happy Stamping

Vicki Boucher


+


16 February 2022

Stampin' Up! Tip and technique Friends of the Forest


 Hello and welcome,

Today I wanted to share with you my latest tip and technique by using the faux masking technique with Blending Brushes and Grid Paper. I've used the Friends of the Forest Stamp Set which is in the Stampin' Up! Mini Catalogue January to June 2022.


Create a faux torn paper look by tearing up Grid Paper and using it as a mask over Basic White Cardstock. Apply ink to the Cardstock with Blending Brushes. Here I've used Balmy Blue for the sky and Old Olive for the ground.


Add stamped images and then remove the Grid Paper. Complete your project as desired. Here I've used Watercolor Pencils and Clear Wink of Stella to colour in the stamped images and then fussy cut out using the Paper Snips. 


I've used the following colours Garden Green, Granny Apple Green, Old Olive and Cajun Craze for the tree. Real Red and Basic Gray for the toad stools. Daffodil Delight and Old Olive for the daisies. Basic Gray and Melon Mambo for the rabbit. 


To finish off the card I added White Baker's Twine to the panel and greeting is adhered with Stampin' Dimensionals. The panel is layered over Old Olive Cardstock for the card base.


Thank you for visiting my blog today, I would so love hear your thoughts on my project by leaving a comment below.

If you would like a copy of the new Stampin' Up! Mini January to June 2022 Catalogue and Annual Catalogue 2021 - 2022 please contact me here

If you live in Australia and don't have a demonstrator, you can purchase any of the Stampin' Up! products by shopping with me at my online store here.


Happy Stamping

Vicki Boucher


30 January 2022

Artisan Design Team - Rainbow of Happiness Bundle


 Hello and welcome,

I'm so excited to be sharing with you my first assignment with the Artisan Design Team for 2022! Over the next 12 months I'll be sharing with you my creative designs using Stampin' Up! products. Make sure you visit Stampin' Up! Facebook page for lots of inspiration, techniques and tips. 


I'm on a team of five creative Artisan's from around the world and we were asked to create using the Rainbow of Happiness Bundle. This bundle includes Rainbow of Happiness Stamp Set and Brilliant Rainbow Dies they are in the new Mini Catalogue January to June 2022. I love the sentiments from the stamp set and they are perfect to brighten up someone's day! 


Rainbow of Happiness Bundle #157727 bundle savings $77.25


For my projects I've created a slimline card and three mini note cards using bright happy colours. The smaller rainbow die-cuts are the perfect size for the note cards, I'll be popping them in my daughter's lunch box for when she's at school. 

Slimline Card

The Brilliant Rainbow Dies have a variety of different sizes of Rainbows die-cut images and I've used the larger image. I was playing around with the different watercolour wash die-cut pieces and then an image popped into my head. My daughter was given a shooting star necklace trinket for Christmas and I thought why not try this same look with the larger image of the rainbow. 


The watercolour wash is a mix of colours on Shimmery White Cardstock, Water Painter I like to use the large flat brush tip and water in a bowl. The combination of colours are So Saffron and Mango Melody for the yellows, Polished Pink and Magenta Madness for the pinks, Balmy Blue and Pacific Point for blues and Fresh Freesia and Gorgeous Grape for the purples. 

I like to use a good size of Shimmery White Cardstock for my watercolour wash, cut a sheet at 10cm x 21cm for each colour this will create enough for all four cards in today's projects. Then spritz water using the Stampin' Spritzer or apply water using the Water Painter to the Shimmery paper. I always start with the lighter colour and then add more colour with the darker shade of ink. Playing around with colour is so much fun and it can change on how much ink you use.


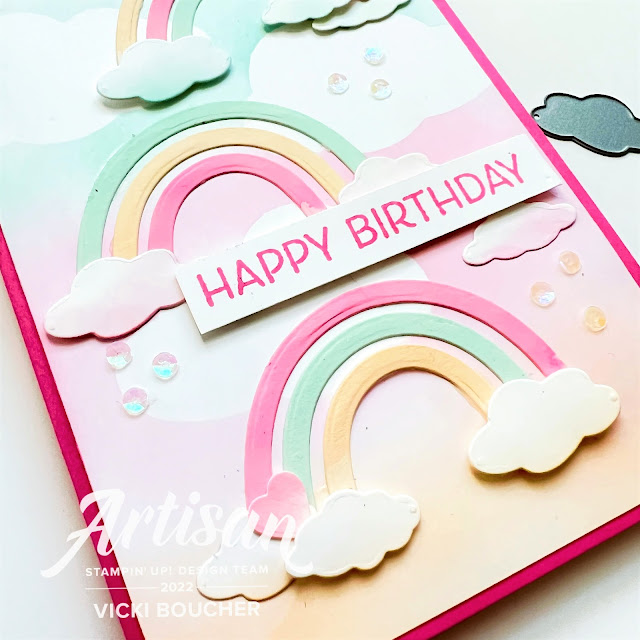
The cloud background panel is using the faux masking technique by punching out the cloud image from the Cloud Punch and applying ink with the Blending Brush. I've used a mix of Polished Pink, Gorgeous Grape and Pacific Point to the background.

I wanted a shooting star look so I added four of the stitched stars which fits perfectly at the end of the rainbow panel. The stars are from the Give it a Whirl Dies and I just love the stitched look. The sentiment fits perfectly on the Gorgeous Grape rainbow. 

I added the additional smaller rainbow, coloured using Sponge Daubers and placed it amongst the clouds. To finish off the card I've placed a few Fresh Freesia iridescent gems and splatter of Clear Wink of Stella.


3 Mini Note Cards


The Rainbow of Happiness bundle is perfect for creating three adorable fun note cards and I just couldn't go past without making them for my daughter. I know she'll be so happy to receive them in her lunch box while at school.

Using the same colours as the above mentioned watercolour wash on Shimmery White Cardstock as I did for the slimline card and die-cut out using the medium size rainbow for the three cards. 

The measurements for the cards are - Card base 16cm x 8cm, score at 8cm and Shimmery White Panel 7.5cm x 7.5cm.


The Pacific Point card is my favourite out of the three I just love the watercolour wash background using the Balmy Blue and Pacific Point. I've added White Baker's Twine and layered the sentiment over the rainbow.


The Mango Melody card is bright and I added Gold Gilded Leafing to the card for the idea of a pot of gold at the end of the rainbow. The watercolour wash panel is a mix of So Saffron and Mango Melody. The stitched heart and star are from the Give it a Whirl Dies. I left out the greeting, as I think the card looks perfect without one.


The Fresh Freesia card has a bright pink background wash using Polished Pink and Magenta Madness inks. To create the purple rainbow I've used Gorgeous Grape and Fresh Freesia by adding ink onto the Clear Block and mix with water. Apply coloured ink to Shimmery White Cardstock and move the ink around using the Heat Tool for a fun splattered look. 


I just love the greeting on this card "you make me happy" it's a fun positive message! I've added a couple of the stitched stars to the greeting and finished off with Polished Pink iridescent rhinestones for pink raindrops.


Thank you for stopping by today and I hope you've enjoyed my projects featuring the Rainbow of Happiness Bundle. Now click on over to the Stampin' Up! Facebook page for more ideas on this bundle.

I would so love hear your thoughts on my project by leaving a comment below.
If you would like a copy of the new Stampin' Up! Mini January to June 2022 Catalogue and Annual Catalogue 2021 - 2022 please contact me here

If you live in Australia and don't have a demonstrator, you can purchase any of the Stampin' Up! products by shopping with me at my online store here.


Happy Stamping

Vicki Boucher


Meet the Artisan Design Team for 2022

ANN ALEXANDER
Instagram @bellestampinwithann

BERDIEN WEIDEVELD
Instagram @berdien_weideveld

BRENDA NELSON
Instagram @stampwithbrenda

BRIGITTE KEILING 
Instagram @stempelfantasie

CHARLET MALLETT
Instagram @i.heart.stamps

CHELSEY CHRISTENSEN
Instagram @creativechelsey

HÉLÈNE LEGRAND
Instagram @stamp2linotte

KAREN HADLER
Instagram @karenhadlerstampingbees

KARINE LISON
Instagram @karinelison73choupinette

KIM FEE
Instagram @simplyfairies_kimfee

LEAH FEDYNAK
Instagram @ellefedynak


MADELEINE MROTZEK
Instagram @stempelschick

MARTIN STONE
Instagram @martinmayhem

MELODIE VILJOEN
Instagram @stampingwithmelodie

SANDRA HERZOG
Instagram @herzerlskreativecke

SILVIA BERGER-FRÖHLICH
Instagram @silvie.creates

STESHA BLOODHART
Instagram @stampinhoot

TAMI HEWLETT
Instagram @tamilhewlett

VICKI BOUCHER
Instagram @vickiboucher

YVONNE SPIKMANS-VAN BRUGGEN
Instagram @thecreativeteacup


16 January 2022

Global Design Project #GDP325 Colour Challenge


Hello and welcome,

I just had to enter into the latest Global Design Project #GDP325 and it's a Colour Challenge. I just couldn't resist these pretty colours they've chosen, it's like cotton candy!

I'm really loving rainbows at the moment and the Rainbow of Happiness bundle is perfect for Polished Pink, Pale Papaya and Pool Party. That's a lot of PP's!


To create the background cloud panel, I've used the Cloud Punch and punched out a cloud to create a faux masking technique with Blending Brushes. Starting with Pool Party then onto Polished Pink and Pale Papaya. 

The rainbows are a watercolour wash using Shimmery White Cardstock, the challenge colours and Water Painters I like to use the wide brush tip. This gives the rainbows a softer look. I've used the Brilliant Rainbow Dies to die-cut out three rainbows.


All rainbows need soft clouds with a little colour and a couple of hearts. I've used the Sparkle & Shine Sequins to create raindrops and a little sparkle. To finish off the card I've stamped the sentiment in Polished Pink and adhered the cloud/rainbow panel to the card base.


Thank you for visiting my blog today, I would so love hear your thoughts on my project by leaving a comment below.

If you would like a copy of the new Stampin' Up! Mini January to June 2022 Catalogue and Annual Catalogue 2021 - 2022 please contact me here

If you live in Australia and don't have a demonstrator, you can purchase any of the Stampin' Up! products by shopping with me at my online store here.


Happy Stamping

Vicki Boucher

12 September 2021

Global Design Project #308 Case the Designer


Hello and welcome

I've entered into the latest Global Design Project #GDP308 Case The Designer - Wilma de Korte who is an amazing designer from the team. I've CASED her card by using the layout and I just love all of those stamped images against the white background.


Today's card is shades of purples/mauves and using the Delicate Dahlias Stamp Set. I've used the faux masking technique with Blending Brushes and Grid Paper. This is a fun technique to create white space on your card front. I've ripped the Grid Paper and layered over the Basic White panel with Washi Tape, this will help to keep your Cardstock from moving.

I've started with Fresh Freesia Ink, then a little of Magenta Madness and followed by Gorgeous Grape Ink for the faux masking technique. Keeping the Grid Paper on the Cardstock, I then stamped the small flower image from Delicate Dahlias Stamp Set in Fresh Freesia Ink and followed by Gorgeous Grape Ink, but I stamped off on a piece of scrap paper. This gives you a lighter purple.


The Biggest Wish Stamp Set was used for the greeting, it has to be my favourite stamp set in the Stampin' Up! Annual Catalogue. I just love to combined the bold and delicate font together.  

Thank you for visiting my blog today, I would so love hear your thoughts on my project by leaving a comment below.

If you would like a copy of the new Stampin' Up! Mini August to December 2021 and Saleabration Catalogue please contact me here

If you live in Australia and don't have a demonstrator, you can purchase any of the Stampin' Up! products by shopping with me at my online store here.


Happy Stamping

Vicki Boucher

23 June 2021

Colour Creations Blog Hop Bermuda Bay Week 4 Art With Heart Team Australia


 Hello and welcome

Tonight I'll be sharing with you Week 4 of Colour Creations Blog Hop with the Art With Heart Team in Australia. 

Each week there will be a Colour Creations blog hop showcasing Stampin' Up! Colors with a selection of members from the Art With Heart Team who will be joining in. I'm looking forward to seeing their beautiful projects using the Stampin' Up! Colors. You'll be able to hop around by clicking on the next link at the end of my blog.


The colour for tonight is Bermuda Bay which is part of the Brights Collection and comes in a number of different mediums such as Ink, Cardstock, DSP etc.... I've used Bermuda Bay with Soft Seafoam and Evening Evergreen as well as Crumb Cake and Gray Granite for my handmade cards.


I wanted to see how Bermuda Bay would interact with two very different greens from the Stampin' Up! Colors by using different ink blending techniques. I always love using greens for the Simply Succulents Stamp Set and coordinating Pottered Succulents Dies which is in the Stampin' Up! 2021 - 2022 Annual Catalogue.


For my first card I've used the Faux Masking technique by ripping up Grid Paper and placing it onto a panel of Basic White Cardstock. 


I've placed masking tape onto the Grid Paper as you don't want it to move on you. I started applying Soft Seafoam ink using the Blending Brush then onto Bermuda Bay and finished off with Evening Evergreen. I also added splattered ink by using the Stampin' Blends in the same colours. 


The stamped images of the succulents for the first card are inked up in Memento Black Ink and coloured in using Bermuda Bay and Evening Evergreen light and dark Stampin' Blends. I also like to take off some of the colour by using the Colour Lifter.


For the Potted Succulents die cut images, I've blended Bermuda Bay and Soft Seafoam Ink onto Basic White Cardstock. I like to add a little dimension to my cards, so I've used Stampin' Dimensionals for some of the images. 


For my second card, I've created a watercolour look using the large succulent image and stamped it in Stazon Ink onto Shimmery White Cardstock. I've coloured in the succulents using the fine tip Water Painter and combined Bermuda Bay, Soft Seafoam and Evening Evergreen Ink. It's amazing the colours you can come up with when combing them together. 


The ink blending background is a panel of Basic White Cardstock using the Blending Brush and starting with Soft Seafoam, then mixing in with Bermuda Bay and finishing off with Evening Evergreen. This makes a lovely soft background.


The card base for both cards is Bermuda Bay Cardstock. I wanted a couple of birthday cards, so I've used the Pansy Patch Stamp Set. I've heat embossed the sentiment using Versamark Ink, White Stampin' Emboss Powder and Heat Tool.


Now it's time to hop along and visit the lovely Andrea Sargent to see her project please click on the link below.


The list of participants are listed below.

Michele Taylor

Kate Morgan

Sharon Davern

Ros Davidson

Catherine Proctor

Kristine D'Auria

Rachel Palmieri

Christine Blain

Rachel Woollard

Diane Furniss

Theresa Gerrard

Caroline Manwaring

Rosa Leyden

Tina Gillespie

Vicki Boucher you are here

Andrea Sargent


Thank you for visiting my blog today, I would so love hear your thoughts on my project by leaving a comment below.

If you live in Australia, you can purchase any of the Stampin' Up! products by shopping with me at my online store here.

Happy Stamping 

Vicki Boucher