Showing posts with label Fancy Fold. Show all posts

15 September 2024

Stamping Sunday Blog Hop - Unfold Funfolds


Hello and welcome,

My name is Vicki Boucher and I'm from Melbourne, Australia. Today is Stamping Sunday blog hop for the month of September and for this month's theme is "Unfold Funfolds" which means anything like a Fancy Fold or Fun Fold in our projects. It's the 3rd Sunday of the month. I'm looking forward to seeing everyone's projects and you'll be able to see them by clicking on their names at the end of my blog.


I haven't made a fun fold card in a long time, so it was fun to try something different when it comes to card making. I made a Twist and Pop Card back in July 2020 and there is a You Tube video on how to make this type of card, I'll add it at the end of this post.


For today's project a made a Christmas pop & twist card using products from both the Mini and Annual Stampin' Up! Catalogues. I used the Decorative Trees Bundle (164085) which is located on page 42 of the Mini Catalogue and also the Peaceful Season Bundle (164021) which is located on page 25. 

The card looks simple from the outside, but once opened the inside pops out! There is a 4 panel, pop up element inside. You don't need an engineering degree either to make one of these. You'll just need Cardstock and strong adhesive; I've used Stampin' Seal and Multipurpose Liquid Glue which has worked for my project. I used Thick Basic White cardstock for the card base and everything else is either Basic White cardstock or specialty paper.


Let's have a look inside the card, I used the Brushed Gold Cards & Envelopes (162177) and used one of the cards for the 4 panels. This was my starting point to how I was going to make my card. 


I just love gold and white together it's so sophisticated and a classic for Christmas cards. I used different types of Christmas trees dies from the Decorative Trees Dies to form the Christmas trees.


The greeting inside the card is from the Decorative Trees stamp set and is heat embossed using Versamark ink, adding Gold Embossing Powder and heat set with the Heat Tool. 


Now for the outside of the card which I made lots of different layers starting with the three Christmas Trees; two of them are die-cut out using Basic White Cardstock and the top Christmas tree is heat embossed using Gold Embossing Powder. 


The three trees are layered over a sheet of white & gold paper from the Nature's Sweetness Specialty Paper (162616), there's an embossed panel in white cardstock using the Forever Plaid 3D Embossing Folder (164049) which is gorgeous to use and then underneath that is a panel of Gold Foil (132622) I 'am so happy it's back!


I used the Peaceful Season Dies for the sentiment, die-cut out using gold foil and basic white cardstock and heat embossed the 'Merry' with gold embossing powder. To finish off the card I added a gold foil star for the tree and gold Blooming Pearls for the embellishments. 


Here is the link for the You Tube tutorial on how to make this Twist & Pop Fancy Fold card.


Thank you for visiting my blog today, I would so love to hear your thoughts on my project by leaving a comment below.

Please email me if you would like a copy of the 2024-2025 Stampin' Up! Annual Catalogue or Mini 2024 Catalogue send an email to me here

If you live in Australia and don't have a demonstrator, you can purchase any of the Stampin' Up! products by shopping with me at my Stampin' Up! online store here.

Make sure you follow me on social media via Facebook, Instagram and Pinterest.


Happy Stamping

Vicki Boucher


To see all of the amazing projects by the Stamping Sunday Design Team please click on their names below. 


07 November 2022

Creation Station Blog Hop - Fun & Fancy Folds


 Hello and welcome

My name is Vicki Boucher, and I am from Melbourne, Australia. This is the latest hop with the design team at Creation Station, if you have come from Julie Beltramo or you may have started with me. Please make sure you hop around and see everyone's amazing projects. I'll pop a link at the end of my blog to hop around....

The design team at Creation Station are presenting their projects with the theme "Fun & Fancy Folds".


Today's project I've created a Fun or Fancy Fold this particular fold I've been using for over the last couple of years. It's my go to! It's easy to create and the card fits inside a C6 medium envelope from Stampin' Up!


To make the fold start with Real Red Cardstock cut at 14.9 x 21cm then score at 5.4, 8.4, 12.4 and 15.4cm use the Bone Folder when folding the along the score lines.


I've used the tartan stencil which is from the Artistic Mix Decorative Masks for the two panels and added Real Red ink with the Blending Brush. Then I added Shaded Spruce ink around the edges of the cardstock with the Blending Brush. I really like how it gives you the illusion of depth to each of the panels.


I've used a range of different products from the July to December 2022 Mini Catalogue, I like to mix them up for a different look. The candy cane is stamped in Real Red ink onto Kraft Paper and I added Crumb Cake ink around the edges with a Sponge Dauber. The holly leaves are die-cut out in Kraft Paper and then I added Shaded Spruce ink to the leaves with a Blending Brush.


Other elements I've used are stars or snowflakes from the Santa Express Memories & More card pack, I added a little ink to them to make them darker. I love wood elements when it comes to Christmas cards, so I used one of the Textural Elements and added ink for some interest.

To create the bow, I unraveled the Silver Threaded Twine and used the natural twine to form the bow. I just love the Bell Trinkets they are so cute! 

All of the above pieces mentioned are added to the embossed gift tag from the Celebrations Tag Dies. I've die-cut the tag in Crumb Cake Cardstock, dry embossed using the Stripes 3D Embossing Folder and added Soft Suede ink to the edges. 


Thank you for visiting my blog today, I would so love to hear your thoughts on my project by leaving a comment below. Make sure you pop over to Elizabeth Price for lots of inspiration using something Fancy or Fun in her projects.


Please email me if you would like a copy of the 2022-2023 Annual Catalogue and the July-Dec 2022 Mini Catalogue, please contact me here

If you live in Australia and don't have a demonstrator, you can purchase any of the Stampin' Up! products by shopping with me at my online store here.

Make sure you follow me on social media via Facebook, Instagram and Pinterest.


Happy Stamping

Vicki Boucher


03 August 2022

Bron's B'day Blog Hop - Fancy Fold


Hello and welcome,

My name is Vicki Boucher and I'm from Melbourne, Australia. Tonight, I'll be blog hopping along with other stamping friends that are celebrating Bron's 60th Birthday in 2022 with six blog hops, over six months with six different themes. This month is all about Fancy Folds.


Bronwyn Eastley of Addinktive  Designs creates the most amazing 3D projects and has set up this blog hop for her birthday. I'm so excited to see everyone's amazing Fancy Folds projects and I'm so glad I could join in the fun with everyone. Whether you just came from Leonie Stuart's blog or are just starting here, be sure to continue on through the rest of the blog hop by clicking the navigation buttons at the end of this post. I'll pop the next link at the end of my blog.


Tree Lot Dies (159938)


Tonight's Fancy Fold is a fun fold card using the very cute, FREE! Saleabration item, Tree Lot Dies (159938) which is on page 12 of the Sale-A-Bration Catalogue. The dies coordinates with the Trees for Sale Stamp Set (159785) which is on page 39 of the July - Dec Mini Stampin' Up! Catalogue. You can earn the dies for FREE with a qualifying purchase of $180 AUD from now until 31st August 2022 or until while supplies last. I've seen some amazing creations using both the dies and stamp set, so be quick before they go!


Trees for Sale Stamp Set (159785)


Another Stampin' Up! item I've used is the Charming Landscapes Embossing Folders (159593) which can be found in the Mini Catalogue on page 17. I thought this would be great to use for my 3D project, I've used the snowy mountain tops, creating an outdoorsy type of landscape with the caravan. 


Charming Landscapes Embossing Folders (159593)


The fun fold can open and close and fits inside a normal size envelope. Dimensions for cutting and scoring are listed below. This fun fold I've used a number of times and it stands up really well.

Measurements: 

 Starry Sky Card Base 

- Cut at 21cm x 14.9cm

- Score and fold at 5.5cm, 8.5cm, 12.5 and 15.5cm


Basic White Cardstock 

- Cut two Basic White at 14.4cm x 5cm each

- Cut one middle piece Basic White at 14.4cm x 3.5cm

Emboss all three panels using the snowy landscape embossing folder from Charming Landscapes Embossing Folders.


Main front panel

Stitched Rectangle Die - Use 10.4 x 6.9cm in Basic White 

Emboss die-cut piece using the snowy landscape embossing folder from Charming Landscapes Embossing Folders.


To create the illusion of a midnight sky and blue mountains for the embossed panels and stitched die-cut front panel. I embossed another piece of Basic White Cardstock and the snowy landscape embossing folder and fussy cut around the mountains. 


Holding the cut embossed piece over the panel to create a mask, use Blending Brush and apply using different shades of inks. I used Orchid Oasis, Starry Sky and Night of Navy Classic Stampin' Pad. I also used the mountain top to keep white and coloured in the mountain with the Blending Brush.


I wanted to create different shades of blues for the trees and also to keep with the theme of blue. I used coloured cardstock in Night of Navy and Orchid Oasis, using the Blending Brush to add more depth with the same colour to the tree. Then using Basic White cardstock and the detailed die to create snowy trees.


I always love red, white and blue together so I just had to use Real Red as part of my caravan and silver makes it look even more special. Shiny too! I used Vellum Cardstock for one of the layers for the curtains and the other is Basic White, coloured in with Starry Sky ink.


I hardly did any stamping for tonight's card which is not like me at all. I used the Trees for Sale Stamp Set for the sentiment and the cute "Trees for Sale" sign in Real Red ink.


Please click on the below button to see the amazing Sharni Haines, I always love seeing her Fancy Fold creativity. 


Thank you for visiting my blog today, I would so love hear your thoughts on my project by leaving a comment below.


Please email me if you would like a copy of the 2022-2023 Annual Catalogue and the July-Dec 2022 Mini Catalogue, July-August Saleabration Catalogue please contact me here

If you live in Australia and don't have a demonstrator, you can purchase any of the Stampin' Up! products by shopping with me at my online store here.

Make sure you follow me on social media via Facebook, Instagram and Pinterest.


Happy Stamping

Vicki Boucher


23 July 2020

Your Creative Connection 112 - Return To The Fold


Hello and welcome to my first creative showcase with Your Creative Connection, I will be joining in on the Global hop around the world with other Demonstrators for the next couple of months. I hope I will inspire you with my creations.

This week our theme is 'Return To The Fold" which means anything like a Fancy Fold or Fun Fold project. I haven't ever created this type of card before and I've seen some amazing ideas, so I searched up on Pinterest to find out more about these types of cards. 


I've cased my card from the lovely Artisan Demonstrator Rochelle Blok who had created a Twist and Pop Card. She also shared a You Tube video on how to make this type of card. I'll add it at the end of this post.

The card looks simple from the outside, but once opened the inside pops out! There is a 4 panel, pop up element inside. You don't need an engineering degree either to make one of these. You'll just need Cardstock and strong adhesive; I've used Tear & Tape and Multipurpose Liquid Glue which has worked for my project.


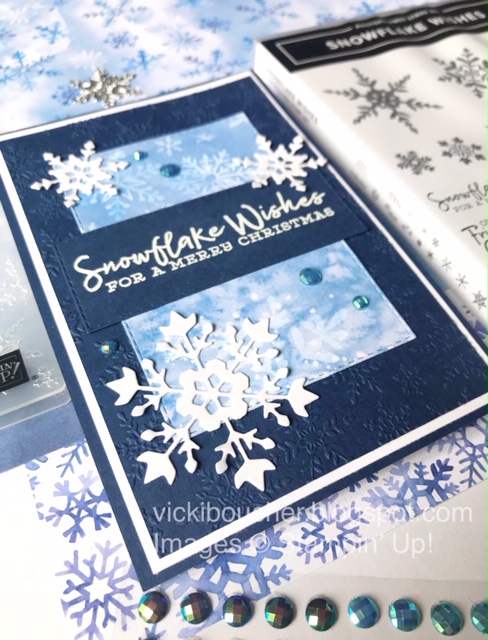
My project is a Christmas card, I know it's just over 5 months away until Christmas, but I just couldn't resist on making my first Christmas Fancy Fold project. I recently received brand new products from the new Stampin' Up! August - December 2020 Mini Catalogue. Demonstrators can do this for the month of July. I've used the Snowflake Splendor Suite which is on page 36 - 38 from the Mini Catalogue, it caught my eye with the different shades of blues and it was certainly on my next Stampin' Up! order.

Stampin' Up! 2020 Mini Catalogue


I've used the stunning Snowflake Splendor Designer Series Paper which has hand painted snowflakes and wintery blues. I've combined the DSP with Night of Navy, Whisper White and Silver Foil for my card.


Here is a diagram of the measurements in cm for the card base, I've used Night of Navy, adding panels in Whisper White and finishing off with the DSP.

Cut 3 pieces in Night of Navy; 20cm x 9cm, 26cm x 9cm and 30cm x 10cm
Score where mentioned - - - - -


On the front of the card, I've embossed the Night of Navy panel using the Winter Snow Embossing Folder and also on the inside of the card, but this time I've used Whisper White. I just love all of the Snowflakes and embossing is quick and easy!


The Snowflakes are from the So Many Snowflakes Dies, which I've placed both inside and outside of the card. I've created white sparkle Snowflakes with the Shimmery Crystal Effects this gives added glitter effects and a glossy lacquer to the Snowflakes.


My sentiments are from the Snowflake Wishes Stamp Set for the one on the front of the card, I've heat embossed it in White Stampin' Emboss Powder onto Night of Navy Cardstock and then die cut out using the Stitched Rectangle Dies. The one on the inside is heat embossed in Silver Stampin' Emboss Powder onto the panel of Whisper White Cardstock.

The final touch, I've added the Balmy Blue Adhesive-Backed Gems and they also come in Night of Navy. The are so beautiful with an iridescent sheen to them. 

Now it's time to visit the lovely Dawn Olchefske in Minneapolis, USA and see her Fancy Fold project.


Here is the list of the full participants


Vicki Boucher - Australia


Barbara Meyer - Austria

Kristine McNickle - New Zealand

Jenn Tinline - Canada

Jennifer Paul - Germany


Here is the link for the You Tube tutorial on how to make this easy Fancy Fold card.

Thank you so much for stopping by!

Vicki Boucher

If you would like the new Stampin’ Up! 2020-2021 Annual Catalogue or Stampin' Up! 2020 Mini Catalogue, I would be happy to send you a copy out to you. Please contact me here.