Showing posts with label Arts & Crafts Dies. Show all posts

15 September 2024

Stamping Sunday Blog Hop - Unfold Funfolds


Hello and welcome,

My name is Vicki Boucher and I'm from Melbourne, Australia. Today is Stamping Sunday blog hop for the month of September and for this month's theme is "Unfold Funfolds" which means anything like a Fancy Fold or Fun Fold in our projects. It's the 3rd Sunday of the month. I'm looking forward to seeing everyone's projects and you'll be able to see them by clicking on their names at the end of my blog.


I haven't made a fun fold card in a long time, so it was fun to try something different when it comes to card making. I made a Twist and Pop Card back in July 2020 and there is a You Tube video on how to make this type of card, I'll add it at the end of this post.


For today's project a made a Christmas pop & twist card using products from both the Mini and Annual Stampin' Up! Catalogues. I used the Decorative Trees Bundle (164085) which is located on page 42 of the Mini Catalogue and also the Peaceful Season Bundle (164021) which is located on page 25. 

The card looks simple from the outside, but once opened the inside pops out! There is a 4 panel, pop up element inside. You don't need an engineering degree either to make one of these. You'll just need Cardstock and strong adhesive; I've used Stampin' Seal and Multipurpose Liquid Glue which has worked for my project. I used Thick Basic White cardstock for the card base and everything else is either Basic White cardstock or specialty paper.


Let's have a look inside the card, I used the Brushed Gold Cards & Envelopes (162177) and used one of the cards for the 4 panels. This was my starting point to how I was going to make my card. 


I just love gold and white together it's so sophisticated and a classic for Christmas cards. I used different types of Christmas trees dies from the Decorative Trees Dies to form the Christmas trees.


The greeting inside the card is from the Decorative Trees stamp set and is heat embossed using Versamark ink, adding Gold Embossing Powder and heat set with the Heat Tool. 


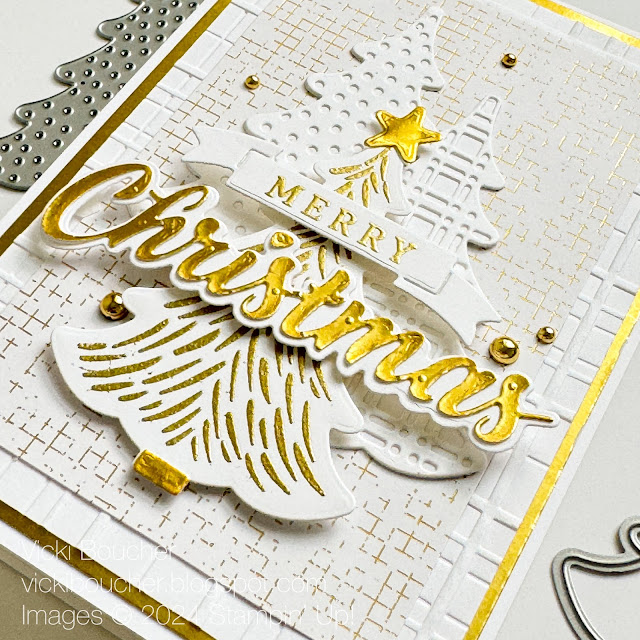
Now for the outside of the card which I made lots of different layers starting with the three Christmas Trees; two of them are die-cut out using Basic White Cardstock and the top Christmas tree is heat embossed using Gold Embossing Powder. 


The three trees are layered over a sheet of white & gold paper from the Nature's Sweetness Specialty Paper (162616), there's an embossed panel in white cardstock using the Forever Plaid 3D Embossing Folder (164049) which is gorgeous to use and then underneath that is a panel of Gold Foil (132622) I 'am so happy it's back!


I used the Peaceful Season Dies for the sentiment, die-cut out using gold foil and basic white cardstock and heat embossed the 'Merry' with gold embossing powder. To finish off the card I added a gold foil star for the tree and gold Blooming Pearls for the embellishments. 


Here is the link for the You Tube tutorial on how to make this Twist & Pop Fancy Fold card.


Thank you for visiting my blog today, I would so love to hear your thoughts on my project by leaving a comment below.

Please email me if you would like a copy of the 2024-2025 Stampin' Up! Annual Catalogue or Mini 2024 Catalogue send an email to me here

If you live in Australia and don't have a demonstrator, you can purchase any of the Stampin' Up! products by shopping with me at my Stampin' Up! online store here.

Make sure you follow me on social media via Facebook, Instagram and Pinterest.


Happy Stamping

Vicki Boucher


To see all of the amazing projects by the Stamping Sunday Design Team please click on their names below. 


25 November 2023

Colour INKspiration Challenge #CI156


 Hello and welcome, 

My name is Vicki Boucher, and I am from Melbourne, Australia. Tonight, is the latest Colour INKspiration Challenge #CI156 this photo was chosen by Colour INKspiration Crew Member, Jan Clothier. This is our 2nd last challenge of the year!


The chosen colour combination for #CI156 is Real Red, Shaded Spruce, Basic White and Basic Black. As well as the chosen colours you may also like to add Very Vanilla, Crumb Cake and metallics to your project. We also allow 'Ivory', 'Bronze' and 'Natural Tones' in the Stampin' Blends. If you don't have all the colour palette, feel free to use the closest SU substitute (ie: Sweet Sorbet instead of Real Red .... for example).

The challenge will run for almost 3 weeks until 7pm (AEST) on Monday 11th December 2023 details to follow at the end of my blog.


I'm a little late on the blog for this latest challenge as it has already started, but there is plenty of time for you to do the challenge. 

For my card I used the Sending Cheer bundle (162053) which will be retiring soon from the Stampin' Up! Sept-Dec 2023 Mini Catalogue. I just love the stocking die from the Sending Cheer dies. I used the image to die-cut out three of them in Basic White Cardstock then coloured them in with Real Red and Shaded Spruce inks with the Blending Brush.


The fun part was to create the tops of the stockings to do this I used Shimmery White Embossing Paste and applied the paste with a spatula to the die-cuts images in Basic White Cardstock. Once they are dry then add them to the coloured stockings. I added the stamped images of holly with adhesive to the stockings.


The fun sentiments are from the Sending Cheer Stamp Set, I used the heat embossing technique using VersaMark ink stamped the images onto Basic Black Cardstock, add White Stampin' Emboss Powder and heat set with the Heat Tool.


I used two embossing folders for the background they are Exposed Brick and Timber 3D embossing folders. Dried embossed using Basic White Cardstock. I added some retired twine and ribbon which I had on hand to use up. 


I hope I've inspired you with the latest challenge and I do hope you'll join in. We so look forward to seeing a variety of projects using the challenge colours. Please ensure that your project is new and made specifically for this challenge.

Upload only one picture per entry straight to the discussion wall and not in an album

Colour INKspiration Challenge #CI156 will run until 7pm (ADET) on Monday 11th December 2023.

To get your creative ideas flowing, make sure you check out the Crew's Project in the CI156 Album.

Please click on the link here to join the challenge.


Thank you for visiting my blog today, I would so love to hear your thoughts on my project by leaving a comment below.

Please email me if you would like a copy of the 2023-2024 Stampin' Up! Annual or Mini Catalogue send an email to me here

If you live in Australia and don't have a demonstrator, you can purchase any of the Stampin' Up! products by shopping with me at my Stampin' Up! online store here.

Make sure you follow me on social media via Facebook, Instagram and Pinterest.


Happy Stamping

Vicki Boucher


06 March 2023

Creation Station Blog Hop - Ink Blending


Hello and welcome,

My name is Vicki Boucher, and I am from Melbourne, Australia. This is the latest hop with the design team at Creation Station, if you have come from Sara Langland or you may have started with me. Please make sure you hop around and see everyone's amazing projects. I'll pop a link at the end of my blog to hop around....

The design team at Creation Station are presenting their projects with the theme "Ink Blending" this would have to be one of my favourite ways to use inks and trying out different techniques.


The Stampin' Up! products I've used for both cards are Artistically Inked Stamp Set, Artistic Dies, True Beauty Stamp Set and Organic Beauty Dies. The colours are shades of blues and purples which I just love and trying out different combinations is always fun!

To create these images, use the Stamparatus with Basic White Cardstock, ink pads and Blending Brushes. First use the ink pad in a lighter colour this way you can add more colours to the stamp as you go. Then with the Blending Brush add another colour and when you just want a little bit of colour I used the Mini Blending Brushes. You have more control. 


Here I've used Tahitian Tide, Orchid Oasis and a little of Starry Sky Inks for the top images and Fresh Freesia, Gorgeous Grape and Orchid Oasis Inks for the bottom row.

Now for the inked-up background panel this is something I haven't done before, but I was reading a tutorial from Tami Hewlett where she created this background layer using Basic White Cardstock, ink with Blending Brushes and splatter water droplets onto the cardstock. I've only ever used Shimmery White Cardstock and I was so surprised that it worked! I just love it and I created two panels. 


The colours I used for the blue slimline card are Tahitian Tide, Pacific Point, Orchid Oasis, Starry Sky and Night of Navy. I started with the lighter colour and worked my way through until I blended all of the colours together. Then I dipped my fingers into a bowl of water and flicked the water onto the inked-up panel. I really like how it worked against the darker colours. The higher you flick the water the smaller the droplets will be. 

For the leaves both stamped and delicate die-cut leaves I used Coastal Cabana and Bermuda Bay. The sentiment is heat embossed and I added Pastel Sequins in Balmy Blue.


The colours for the second card background panel are Tahitian Tide, Fresh Freesia, Orchid Oasis, Gorgeous Grape and Starry Sky. I used the same technique again with the water droplets and flicked the water onto the inked-up Cardstock. I also used the Heat Tool to dry them up quickly.

The colours for the detailed die-cut piece under the flowers are Night of Navy, Starry Sky, Orchid Oasis, Pacific Point and Tahitian Tide. I added the colours using the Blending Brush and applied the inks onto Basic White Cardstock and then die-cut the image out. For the leaves I used the Stamparatus and applied Orchid Oasis and Starry Sky with the Blending Brush to create a soft colour.

I added Pastel Sequins in Petal Pink and for some of them I coloured them in using Fresh Freesia Stampin' Blend.

Thank you for visiting my blog today, I would so love to hear your thoughts on my project by leaving a comment below. Make sure you pop over to Elizabeth Price for lots of inspiration using something Ink Blending in her projects.


Please email me if you would like a copy of the 2022-2023 Annual Catalogue and the January - April 2023 Mini Catalogue please send me an email here

If you live in Australia and don't have a demonstrator, you can purchase any of the Stampin' Up! products by shopping with me at my Stampin' Up! online store here.

Make sure you follow me on social media via Facebook, Instagram and Pinterest.


Happy Stamping

Vicki Boucher


26 June 2022

Artisan Design Team - Texture Chic Suite


Hello and welcome,

My name is Vicki Boucher and I'm from Melbourne, Australia. Today I'll be sharing three projects using the Texture Chic Suite, turning them into two cards and a gift bag.


The Artisan Design Team are featuring the Texture Chic Suite on Stampin' Up! Facebook and their new Instagram page where you'll sure to be inspired by everyone's creations, I'll add the link at the end of my blog. This suite is perfect for all four seasons Summer, Autumn, Winter and Spring.


Texture Chic Suite (158819)


The Texture Chic Suite  (158819) is located on page 99 of the Stampin' Up! 2022 - 2023 Annual Catalogue. The suite includes 10% Bundle Savings Season of Chic Bundle, Photopolymer (158816), Season of Chic Stamp Set (158810), coordinates with Chic Dies (158815), Texture Chic Specialty 12" x 12" Designer Series Paper (158808) and Distressed Gold 12" x 12" Specialty Paper.


Thinking of You Winter Card

To create a wintery card I've used the emboss resist technique stamping the snowflake images in Versamark onto a panel of Basic White Cardstock, white Stampin' Emboss Powder and heat set with the Heat Tool. The colours I've used are Pool Party and Sahara Sand ink lightly adding the ink with the Blending Brush. 


I've added lots of layers to add interest to the card, starting with the Distressed Gold Specialty Paper and the crosshatch pattern die which is perfect as a background from the Chic Dies. The next three layers I've used the Tailor Made Tags Dies using three different sizes the bottom layer is the Texture Chic Specialty Designer Series Paper, Shimmery White Cardstock inking up the stamp with Pool Party Ink, spritz water onto the stamp and then stamp onto the paper. 


The sentiment is heat embossed using Versamark ink onto Pool Party Cardstock, white Stampin' Emboss Powder and heat set with the Heat Tool. To finish off the card I've used Pool Party Sheer Ribbon with a Linen Thread tied into a bow and a few of the Iridescent Pearl Basic Jewels. 


Thanks Autumn Peekaboo Treat Bag

This cute treat bag was fun to make and I especially like the addition of Blushing Bride with the Distressed Gold Specialty Paper. I've used the Kraft food safe Peekaboo Treat Bag stamp the leaf image in Soft Suede ink and adding more Soft Suede ink to the bag with the Blending Brush.


I've used the Tailor Made Tags for the gift tag the bottom layer is the Distressed Gold Specialty Paper then as above Shimmery White Cardstock, ink up the stamp in Soft Suede ink, spritz water onto the stamp and stamp the image onto the Cardstock. The top layer is Blushing Bride Cardstock adding the brushstroke stamp in Blushing Bride ink as a background and then heat emboss using Gold Stampin' Emboss Powder.


I added Gold Gilded Leafing to the Blushing Bride die-cut leaves which is from the Chic Dies and I love the Petal Pink Solid Faceted Gems they add just the right interest to your 3D project.


Gold and Pool Party Thanks Spring Card

To create the final card I've used Pool Party Cardstock for the card base, layered with the Texture Chic Specialty 12" x 12" Designer Series Paper, I love the colours and the gold foil throughout the DSP. I even used some of the DSP for the die-cut elements from the Chic Dies. 


The flowers are heat embossed stamping the images in Versamark onto either Petal Pink or Pool Party Cardstock, Gold Emboss Powder and heat set with the Heat Tool. Using Stampin' Blends to colour the flowers for more depth and shading for the flowers. I used Petal Pink Stampin' Blends for the pink flowers and Pool Party Stampin' Blends for the blue flowers. 


To create shape and dimension to your projects by using your Bone Folder to curve the edges of the flowers and leaves. This will make them stand out on your card.


The heat embossed gold sentiment fits nicely inside the largest of the label die from the Stylish Shapes Dies and I just love the addition of the Brushed Brass Butterflies to the card. 


Thank you for visiting my blog today, I would so love hear your thoughts on my project by leaving a comment below. Make sure you pop over onto Stampin' Up! Facebook page for lots of inspiration using the Texture Chic Suite.

If you would like a copy of the new Annual Catalogue 2022 - 2023 please contact me here

If you live in Australia and don't have a demonstrator, you can purchase any of the Stampin' Up! products by shopping with me at my online store here.


Happy Stamping

Vicki Boucher


26 May 2021

Colour INKspiration Challenge #100


 Hello and welcome,

We have reached the 100th Colour INKspiration Challenge CI#100 which is very exciting!!! I'm so happy to be part of this amazing group of ladies over at Colour INKspiration design team where each fortnight there is a colour challenge.

The first challenge started back in January 11th 2017 CI#01 and was founded by Bronwyn Eastley, she put together a crew of 25 ladies from Australia and New Zealand, we still have 8 of the original members at the Colour INKspiration crew. 

I started joining in the challenges back in July 2017 CI#13 and then I was asked to join the crew in October 2019 CI#65. I've enjoyed looking back at the colour challenges and the cards I've created over the years. 


Now for the latest Colour INKspiration Challenge CI#100 and this beautiful photo was chosen by Bronwyn Eastley. The photograph is at Bridestowe Lavender Farm in Tasmania. I love the bright colours for the challenge.       

The colour combination for CI#100 are Gorgeous Grape, Magenta Madness and Bermuda Bay. As well as the chosen colours you may also add Basic White, Basic Black, Very Vanilla, Crumb Cake, Sahara Sand and metallics to your project. We also allow 'Ivory' and 'Bronze' in the Stampin' Blends. If you don't have all the colour palette, feel free to use the closest SU substitute (ie: Melon Mambo instead of Magenta Madness.... you get the drift). 

The challenge will run for almost 2 weeks until 7pm on the 7th June 2021 details to follow at the end of my blog.


I started with half a sheet of Basic White Cardstock for the card base, then I added a panel of Basic White Cardstock using the Ombre ink blending technique I slowly added Magenta Madness Ink with the Blending  Brush starting at the top and working my way down until I was about half way. 


I've splattered Magenta Madness Ink using the brush tip from the Stampin' Blend by flicking the brush against the lid onto the Magenta Madness Ombre panel.


Blending ink by using the three challenge colours onto the large flowers and leaves die cut image from the Artistic Dies. I just love the Expressions In Ink Suite so much! 


I've used the stitched label die from the Floral Heart Dies in Basic White Cardstock and I've added Gorgeous Grape Ink to highlight the stitching. 

I also added a few of the smaller die cut images from the Floral Heart Dies mixing them up with the Artistic leaves Dies.


The sentiment is from the Create with Friends Stamp Set I've fussy cut out the stamped image 'Celebrate' and heat embossed the 'Let's & You' using Versamark Ink, White Stampin' Emboss Powder and Heat Tool. To finish off I added a few of the Clear Epoxy Essentials to the card.


I hope you can participate in this latest round and as we so look forward to seeing a variety of projects using the challenge colours. Please ensure that your project is new and made specially for this challenge.

CI#100 will run until 7pm (ADET) on Monday 7th June 2021.

Please click on the link here to join the challenge.

Just a reminder to upload your challenge pics straight to the discussion wall and not in an album.

Thank you for visiting my blog today, I would so love hear your thoughts on my project by leaving a comment below.

If you live in Australia, you can purchase any of the Stampin' Up! products by shopping with me at my online store here.


Happy Stamping

Vicki Boucher


15 October 2020

Your Creative Connection Dies to Die for #YCC117


Hello and welcome to Your Creative Connection where you'll be hoping around the world to see our latest theme "Dies to Die for". We will be using Dies in our projects. 


Dies help you create unique die-cut shapes using different types of paper to cut-out shapes with a quick run through the Stampin' Cut and Emboss Machine. The Dies include ejection holes so you can remove the paper easily.

Stampin' Cut and Emboss Machine

I've created a Christmas card using a number of different Dies for my project. I started off with the Sounds of the Seasons Dies which is on page 33 of the Stampin' Up! August - December 2020 Mini Catalogue. 


Using Silver Foil I've die cut out three of the Jingle Bells and Green Foil for the foliage. I just love the tiny detail that's on the Jingle Bells and they shine nicely in Silver Foil.


The Stitched Rectangle Dies are perfect for a boarder around your images and they provide a nice finish to the card. There are 13 different sizes for the stitched rectangles and the largest one is 5-1/4" x 3-7/8" (13.3 x 9.8cm).

Wonder of the Season Specialty DSP

The Wonder of the Season is a Specialty Designer Series Paper the vintage designs come in red foil, gold foil and black script writing on the other side.


My brand new favourite Dies would have to be the Joy Dies they are in the Mini Catalogue and you can save 10% when purchased together. 

Peace & Joy Bundle

The Peace & Joy Bundle is a must for any crafter. I used them with the Foam Adhesive Sheets, giving you instant double sided adhesive and height to your projects.


To finish off my project I created a bow using the Real Red Sheer Ribbon for my Christmas card.


Now it's time to visit the lovely Dawn Olchefske in Minneapolis, USA and to see her beautiful project.

Here's the list of participants from around the world

Dawn Olchefske - USA

Barbara Meyer - Austria

Kristine McNickle - New Zealand

Janneke Dijkstra - de Jong - Netherlands

Sarah Berry - UK

Vicki Boucher - Australia


Thank you for visiting my blog today. Need a Mini 2020 Catalogue or any of these products? You can visit my online store here.

Happy Crafting

Vicki Boucher