Showing posts with label Itty Bitty Christmas. Show all posts

28 November 2019

Art With Heart November Blog Hop Featuring Boxes And Gift Bags


The Art With Heart Team are back with another inspirational Blog Hop. This month we are featuring Gift Bags and Boxes, just in time for the Christmas gift giving season. The bags and boxes featured are all made using current Stampin’ Up! products and any of our wonderful team members are happy to help you with the supplies you will need to reproduce these beautiful projects.


This is my first time I’ve ever made something like this and I’m so excited to be sharing with you my Explosion Box. I’ve used the gorgeous Let It Snow Specialty DSP and coordinating coloured Cardstock plus many other Stampin’ Up! products. 


Instructions to form the box are as follows


1.       Thick Whisper White Cardstock @ 21cm x 21cm square for the box

2.       Score at 7cm, 14cm both sides and fold the score line with Bone Folder

3.       Cut lines towards the base of the box please refer to photo of Grid Paper and instructions

4.       Cut away shaded pencil part with Paper Snips

5.       Inner - cut to measure 4 pieces of DSP @ 6.5cm square and cut 2 to make triangles

6.       Use preferred Adhesive to adhered triangle pieces down and secure a thin line of glue to form a pocket

7.       Place the other 2 pieces of DSP on inner squares

8.       Outer – cut to measure 4 pieces of DSP @ 6.5cm square and adhered to the outer of the box  


Instructions to form the lid are as follows


1.       Thick Whisper White Cardstock 11.2cm x 11.2cm square for the lid

2.       Score @ 2cm each of the sides and fold the score line with the Bone Folder

3.       Cut out the shaded pencil part with Paper Snips

4.       Use preferred Adhesive to adhered corners together to form the lid and make sure lid fits over box


Now the fun part begins! When it comes to decorating an Explosion Box the possibilities are endless. I wanted to use the colours from the Let It Snow Speciality DSP and to have a 3D item in the middle of the box. You can leave the centre blank and put a gift inside the box instead is another option.


Instructions to create the Christmas Tree are as follows


1.       You will need the following Stampin’ Up! products Sprig Punch, Twinkle Punch, smallest Layering Circle Dies, strip of Let It Snow DSP 1.3cm x 11cm, Real Red Glimmer Paper, Sliver Glimmer Paper, Sparkle Gimmer Paper, Take Your Pick Tool and Piece Mat

2.        You will also need a clean plastic bottle lid, tooth pick and Blu-Tak

3.       Punch out a number of Sprigs in Real Red and Sparkle Glimmer Paper and piece a whole at the end of each sprig with the Take Your Pick Tool and Piecing Mat

4.       Die cut out Real Red Glimmer with Layering Circle Die and thread onto toothpick

5.       Put a small amount of Blu-tak inside of bottle lid and secure the tooth pick into the Blu-tak

6.       Place a strip of Tear & Tape to DSP and adhered to outer of lid

7.       Thread Sprigs onto tooth pick to form a Tree

8.       Punch out star with Silver Glimmer Paper twice and attached to the top of the tree


I’ve used the Stitched Shapes Dies and Layering Circle Dies for the different layers of circles throughout the inner of the explosion box. I have also used the Delightful Tag Topper Punch for little messages to pull out.


For the lid I’ve attached the Real Red 1” Ruched Ribbon and formed a bow. I’ve used the Beautiful Boughs Dies to create the leaf and pinecone images with the dies. Shaded Spruce and Costal Cabana with some added glitter using Stampin’ Glitter and Shimmery Crystal Effects.


I hope I have inspired you to create an Explosion, the possibilities are endless with different Cardstock and DSP. I’m so glad I’ve taken part in the latest Blog Hop and created something I normally wouldn’t do. All of the products I’ve used will be at the bottom of this blog.


Thank you for stopping by!


Andrea Sargent


The next hop in the Blog Hop is the very talented Andrea Sargent.


If you have a broken link or have come to this blog hop midway, you can view all the participants below:


Rachel Palmieri

Sharon Davern

Rebecca Jacovou

Kathryn Ruddick

Catherine Proctor

Vicki Boucher

Andrea Sargent

Sujatha Harding

Rachel Woollard

Tina Gillespie

Kate Morgan

Kathryn Mangelsdorf


Happy Crafting


Vicki Boucher


Product List:

Stamps: Itty Bitty Christmas
Dies: Beautiful Boughs, Stitched Shapes and Layering Circles
Punches: 2" Circle Punch, Sprig Punch, Delightful Tag Topper Punch and Twinkle Builder Punch
Paper: Let It Snow Speciality DSP, Real Red Cardstock, Coastal Cabana Cardstock, Basic Black Cardstock, Thick Whisper White Cardstock, Shaded Spruce Cardstock, Real Red Glimmer Paper, Silver Glimmer Paper and Sparkle Glimmer Paper
Ribbon: Real Red 1" Ruched Ribbon and Bermuda Bay 1/4" Mini Striped Ribbon
Other Stampin' Up! Products: White Emboss Powder, Heat Tool, Embossing Buddy, Versamark, Shimmery Crystal Effects, Stampin' Glitter Stampin' Pierce Mat, Take Your Pick Tool and Memento Tuxedo Black


27 November 2019

Art With Heart ~ Heart Of Christmas Blog ~ Week 15


Hello and welcome back,


It’s time for week 15 of the Heart of Christmas blog hop with my friends from Art With Heart Team, this is the second last hop and we are almost in December. I just know you'll love all the wonderful ideas you'll see on this hop, so make sure you click on the link at the end of my blog.

Today’s card I’ll be showcasing different products from the Stampin' Up! 2019 Holiday Catalogue and 2019 - 2020 Annual Catalogue that I just love to use when making Christmas cards. Who likes shades of blues combined with shimmer and glitter? I know I do! 


I wanted to use the So Many Stars Stamp Set and coordinating Stitched Stars Dies with the gorgeous Feels Like Frost 6” x 6” DSP. Don't you think they go so well together? I just love all the different sizes of stars and you can really layer them up when making a card.


I stamped the delicate star stamp in Versamark Ink onto a piece of Whisper White Cardstock, White Stampin’ Emboss Powder covered the image and heat set with the Heat Tool. I sponged Night Of Navy Ink with a Sponged Dauber until I was happy with the shades of blue. Using a baby wipe to wipe away any ink on the White Stamped Image. The star images and the swirly star image are from the Stitched Stars Dies as pictured above.


To create a frosted look on the swirly star image using the Night Of Navy Cardstock, I used Shimmery Crystal Effects and Ice Stampin’ Glitter. The adhesive dries quickly so it's best to apply the Ice Glitter quickly. 


The Night Of Navy card base has been spritzed with Frost White Shimmer Paint and Rubbing Alcohol mixed in a Stampin’ Spritzer. Giving the card a nice shimmer.


The layers of Cardstock and DSP have been die cut out with Rectangle Stitched Dies and layered on the Night Of Navy card base. I’ve used Stampin’ Dimensionals to layer the stars this gives more depth to the card. I finished off the card with a little more sparkle with Rhinestones.


This week’s Heart of Christmas blog hop is hosted by Michelle Taylor to see her creation and the rest of the team please click here.

Thanks for stopping by today!

Happy Crafting,


Vicki Boucher


To purchase any of these products I’ve used today you can click on my direct links above or visit my Online Store here.


If you would like a copy of the current Stampin’ Up! 2019 Holiday Catalogue or the Annual 2019-2020 Catalogue please send me a message here.


Product List


Stamp Sets: Itty Bitty Christmas and So Many Stars

Dies: Stitched Stars and Rectangle Stitched Dies

Colouring Tools: Sponge Dauber, Emboss Buddy, White Stampin’ Emboss Powder, Versamark, Heat Tool, Frost White Shimmer Paint and Stampin’ Spritzers

Ink: Night of Navy

Other Stampin’ Products: Basic Jewels Rhinestones, Ice Stampin’ Glitter and Shimmery Crystal Effects

Other Products: Rubbing Alochol and Retired Big Shot


Colour INKspiration Challenge #68


Hello and welcome back,


Tonight I will be sharing with you a card that I’ve created for the latest Colour INKspiration Challenge #68. The colours for this challenge are Shaded Spruce, Blueberry Bushel, Pretty Peacock, Coastal Cabana and Silver. I just love this colour palette showcasing different shades of blues, greens and with a touch of silver. You can also add Basic Black, Whisper White, Very Vanilla and Metallics.


This challenge runs for 2 weeks and will end at 7pm (AEDT) on Monday 9th December 2019. I hope you’ll enter into the Colour INKspiration Challenge, we would so love to see your creation.


To keep in the theme with the photo I was inspired to create a Christmas card for this challenge. I’ve seen so many Christmas decorations in these colours at the department stores lately. I just might have to decorate my Christmas tree in these gorgeous colours too!


To create a watercolor wash background I’ve used half a sheet of Stampin’ Up! Fluid Water Color Paper, Aqua Painter, Clear Block, water and drops of ink in the above mentioned colours. Which can all be purchased from my Online Store.


For the background I simply used an Aqua Painter brush to wet the Stampin’ Up! Watercolor paper then with the Clear Block I added a drop of ink of each colour or you can also use the Ink Pads as well. I started off with Coastal Cabana the lightest colour and then mixing the other colours together. I like to use the Clear Block as a palette. Adding more water if needed for a washout look and use a tissue to remove any excess of water or colour. I wanted a subtle look for the card, once the ink was dry, I could then add my layers to the card.


I’ve used the Stitched Stars Dies, Beautiful Boughs Dies, Tree Punch and Itty Bitty Stamp Set for the greeting. 


The larger Stitched Star is in Vellum and the smaller one is in Silver Foil. I’ve die cut out the branch in Whisper White, used Shimmery Crystal Effects and Stampin’ Glitter to give the branch some sparkle. The silver Christmas tree is simply punch out using the Sliver Glimmer Paper. I just love the greeting how it’s not in a straight line, but curvy for a change. I used Sliver Emboss Powder and heat set with the Heat Tool. Layering all these items together with Silver Metallic Thread in between. 


I’ve added more glitter to the Watercolor Paper with the Shimmery Crystal Effects and Ice Stampin’ Glitter. For the last addition I’ve added a few of the Woven Threads Sequin Assortment.

The card base is Thick Whisper White, then a layer of Silver Foil and followed by the layer of Watercolor Paper.


Make sure you visit our Facebook group to enter your creation, we would love to see which colour combination you choose and it’s so much fun to share too!


Click to join Colour INKSpiration Facebook group to partake in the challenge. All you need to do is up load a photo and if you have a blog you can link it back to your personal blog. Share with your crafty friends so they can join in with the challenges too.


Hope to see you there!


Now for more inspiration please click on the next button to see our Guest Designer Cheryl Miller
I just love her card and how she’s used the colours for this challenge. 


Thank you for stopping by today!


Happy Crafting


Vicki Boucher


To purchase any of these products I’ve used today you can click on my direct links above or visit my Online Store here.

02 October 2019

Stampin' Up! 2019 Holiday Catalogue Art With Heart Team Blog Hop Week 7


Hello and welcome,


Today I will be sharing my creation with the team from the Art With Heart and it’s week 7. We will be showcasing Christmas projects using products from the 2019 Holiday Catalogue and 2019-2020 Annual Catalogue. 


I just love the Itty Bitty Stamp Set you get 18 Cling Stamps of Christmas and Holiday greetings and it comes in a bundle with the gorgeous Christmas Layers Dies with 10% off now that’s a great saving! I’ve paired them with the Stitched Labels Dies. The detail of the stitched dies makes any project a wow factor about them.


I’ve used Celestial Copper Deliocatta Ink, lightly sponged on the larger Stitched Die and on the Vellum branches. This gave the branches different shades of Copper the more ink I put on the vellum the stronger the colour. This gave the card a softer look with the creamy/coffee coloured Vellum.


The greeting is stamped in Versamark Ink, heat embossed with Copper Stampin’ Emboss Powder and finished off using the Heat Tool.


For the background I’ve used Early Espresso Ink and mixed it with White Embossing Paste. I applied the paste over the Brick - Pattern Party Decorative Mask, sprinkled Copper Stampin’ Emboss Powder before the Paste dries and heat set with the Heat Tool. I’ve created a card with this technique a couple of years and I just loved how it turned out.


I used my Paper Snips and ran the blade along the Early Espresso Cardstock edges. Giving it a different finish to my card.  When layering the pieces on the Copper Embossed brick wall I’ve used Stampin’ Dimensionals and Multipurpose Liquid Glue.


Thank you so much for visiting my blog today.


To see everyone’s creations, please visit Claire Daly’s blog. They are amazing and I hope we have inspired you to start creating Christmas projects too. 


To purchase any of the products that I’ve used please click here and visit my Online Store.


Happy Crafting


Vicki Boucher


Product List:

Cardstock: Early Espresso and Vellum

Ink: Early Espresso and Celestial Copper Deliocatta Ink

Stamp: Itty Bitty Christmas

Dies: Christmas Layers and Stitched Labels

Colouring Tools: Copper Stampin’ Emboss Powder, Pattern Party Decorative Masks, Palette Knives, Heat Tool, White Embossing Paste, Embossing Buddy, Versamark and Sponge Dauber


25 September 2019

Stampin' Up! 2019 Holiday Catalogue Art With Heart Team Blog Hop Week 6


Hello and welcome,

It's week 6 of the Heart of Christmas 2019 blog hop, showcasing Stampin' Up! products to create Christmas creations. I've chosen the Perfectly Plaid Bundle with Crumb Cake and Pretty Peacock for my card this week.


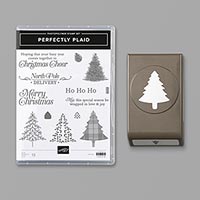
I've used the tree stamp from the Perfectly Plaid Stamp set and stamped the images in Pretty Peacock Ink onto coordinating Cardstock. Punched them out with the Pine Tree Punch and the third image I've used the gingham In Color 2019-2021 6"x 6" Designer Series Paper in Pretty Peacock.

                                                         
To make the three Christmas Trees pop I've used Crumb Cake Cardstock and die cut using the Stitched Rectangles Dies, adding another layer in Pretty Peacock and the third layer in gingham Pretty Peacock DSP. I just love the stitching on the cardstock it gives you that quilted look. The base of the card is also in Pretty Peacock.


The greeting is from the Itty Bitty Christmas Stamp Set and it fits perfectly inside the smallest Stitched Rectangle Die. I've cut the Pretty Peacock Scalloped Linen Ribbon in half, so just the edging of the scallops is only showing and layered onto the card with Stampin' Dimensionals.


I found this card nice and quick to complete. You could also change up the colours by using any of the New In Colors for 2019-2021, using the DSP and Scalloped Ribbon.

Thank you for visiting my blog today and I hope you'll visit all the other ladies blogs by clicking on the link here at Judy May's Blog.

If you would like to purchase any of the products that I've used in today's card, please click on my Online Store click here.

I will be back tomorrow with another blog with the ladies from The Art With Heart Team for more inspiration.

Happy Crafting,

Vicki Boucher

Product List

Stamps: Perfectly Plaid and Itty Bitty Christmas
Punch: Pine Tree
Dies: Stitched Rectangle
Ink: Pretty Peacock
Cardstock/Paper: Pretty Peacock, Crumb Cake and 2019-2021 In Color 6"x 6" DSP
Ribbon: 1/2" Scalloped Linen Ribbon


18 September 2019

Stampin' Up! 2019 Holiday Catalogue Art With Heart Team Blog Hop Week 5

Hello and welcome,

This is week 5 with the Art With Heart Team blog hop. The Stampin' Up! products that I've used is from the Itty Bitty Bundle combined with Black, White, Silver and a touch of sparkle. I wanted an elegant card using these colours and mediums.


Itty Bitty Christmas Bundle
Itty Bitty Christmas 
?dbwsdemoid=4013366
Perfectly Plaid


I haven't used the White Embossing Paste with the Pattern Party Decorative Masks for awhile now and for my card, I've used the Diamond shape mask. Once the Paste has been applied to a piece of Whisper White Cardstock and I quickly sprinkled the Stampin' Glitter in Dazzling Diamonds onto the paste. You can either wait until it dries or heat set with the Heat Tool. 


The next layer I've used is a piece of Black Foil Sheet and the star Die from Christmas Layers Dies. I just love the Black Foil Sheets it can make your card shine like a black diamond. To continue with the Black Foil I punched out a Christmas Tree using the Pine Tree Punch and before adding the tree to the card, I've placed Silver Metallic Thread underneath it.


To finish off my card I've used the greeting from the Itty Bitty Christmas Stamp Set which coordinates with the Christmas Layers Dies. The Season's Greetings has been inked up in Versamark Ink, adding Black Stampin' Emboss Powder and heat set with the Heat Tool. The sentiment is layered over the tree with Stampin' Dimensionals.


Thank you for visiting my blog today now it's time to visit Claire Dayl's blog and everyone from The Art With Heart Team. 

If you would like to purchase any of the Stampin' Up! products please click on my online store here.

Product List:

Stamp Set: Itty Bitty 
Dies: Christmas Layers Dies
Colouring Tools: Embossing Paste, Palette Knives, Pattern Party Decorative Masks, Dazzling Diamonds Stampin' Glitter, Versamark, Black Stampiun' Emboss Powder, Embossing Buddy and Heat Tool.
Cardstock/ Papers: Black Foil Sheets and Whisper White in Thick and Standard
Other Stampin' Up! products: Pine Tree Punch, Silver Metallic Thread and Big Shot (retired)


28 August 2019

Stampin' Up! 2019 Holiday Catalogue Art With Heart Team Blog Hop Week 2


Hello and welcome,

We will be showcasing products from the new Holiday Catalogue from the lovely ladies at the Art with Heart Team blog hop.
I like having cards sometimes with minimum colour with card I decided to use only white, silver and a twinkle of red from the gorgeous Red Rhinestones.


The gorgeous Silver and White striped DSP is from the Feels Like Frost 6” x 6” Specialty Designer Series Paper. I used the other side of this DSP in last week’s card. I just love the beautiful soft colours on one side and silver foil on the other side.

I've used the Deer from Detailed Deer Dies which is available to purchase now from the Annual Catalogue. I’ve coordinated the Deer in Silver Foil to complement the DSP.

The sentiment is from a new stamp set called Itty Bitty Christmas and it comes in a bundle with Christmas Layers Dies. You are going to love this stamp set as it has 18 greetings to choose from and you will also save 10% off when it’s purchased in a bundle.

I’ve stamped the sentiment in Versamark Ink on a strip of Whisper White Cardstock Embossed it with Silver Stampin’ Emboss Powder and heat set it with the Heat Tool. The strip of the Silver Metallic Edge Ribbon is peaking just under the Cardstock.

The leafy foliage is from the Christmas Layers Dies using Whisper White Cardstock and die cut out. I’ve placed the Red Rhinestones to add some colour and bling.

I’ve used Whisper White Cardstock to die cut out with the second largest Stitched Nested Labels Dies, layered it under the Silver Metallic Thread before adding the Deer and white foliage. The card base is Thick Whisper White Cardstock.

Thank you for visiting my blog today.

You can see the rest of this week’s Christmas creations over at Claire Daly’s blog.

Live in Australia? I would be happy to send you a current Stampin’ Up! Annual Catalogue and the new 2019 Holiday Catalogue out to you. Just send me a message here with your details here.

To shop with me please click here to visit my Online Store.

Product List

Stamps: Itty Bitty Christmas

Dies: Christmas Layers Dies, Detailed Deer and Stitched Nested Labels

Cardstock/Papers: Whisper White Thick & Basic Cardstock, Silver Foil Sheets and Feels Like Frost 6” x 6” Specialty DSP

Ribbon: Silver Metallic Edge Ribbon and Silver Metallic Thread

Other Stampin’ Up! Products: Red Rhinestone Basic Jewels, Retired Big Shot, Dimensionals, Tear and Tape