Showing posts with label Vellum. Show all posts

13 March 2022

Stamping Sunday Blog Hop - Ribbon


 Hello and welcome,

It's Stamping 2nd Sunday latest blog hop for March, hosted by Sara Levin and for this month the design team will be showcasing the theme 'Ribbon' in our projects. The list of participants will be at the end of this blog.

Stampin' Up! have a variety of different types of beautiful ribbons in different array of sizes, textures and patterns. My favourite and go to would be Baker's Twine and Linen Thread, but I wanted to use a mix of different types of ribbons for my projects. I have always wanted to try out the "Tammy bow" which is from Tammy Wilson  @stampspaperscissors her creations are amazing and I love her bows!


I've created two cards using the "Tammy bow" technique and I've used most of the products from the Heart & Home Suite which is in the Stampin' Up! Jan to June 2022 Mini Catalogue. Both the Blessings in Home bundle and Honeybee Home Bundle are amazing! The stamped images are perfect to watercolour in and the die-cut images add lots of interest to your projects.

To create the bow you'll need at least two or more ribbons, cutting the ribbon in half vertically and looping the ribbons with your fingers and then tying to secure the bow. Add your bow to your finished project with a couple of Glue Dots. It took me awhile to get the bow in place, but once I finally had it. It was a wow factor for my projects. I highly recommend trying it out. 


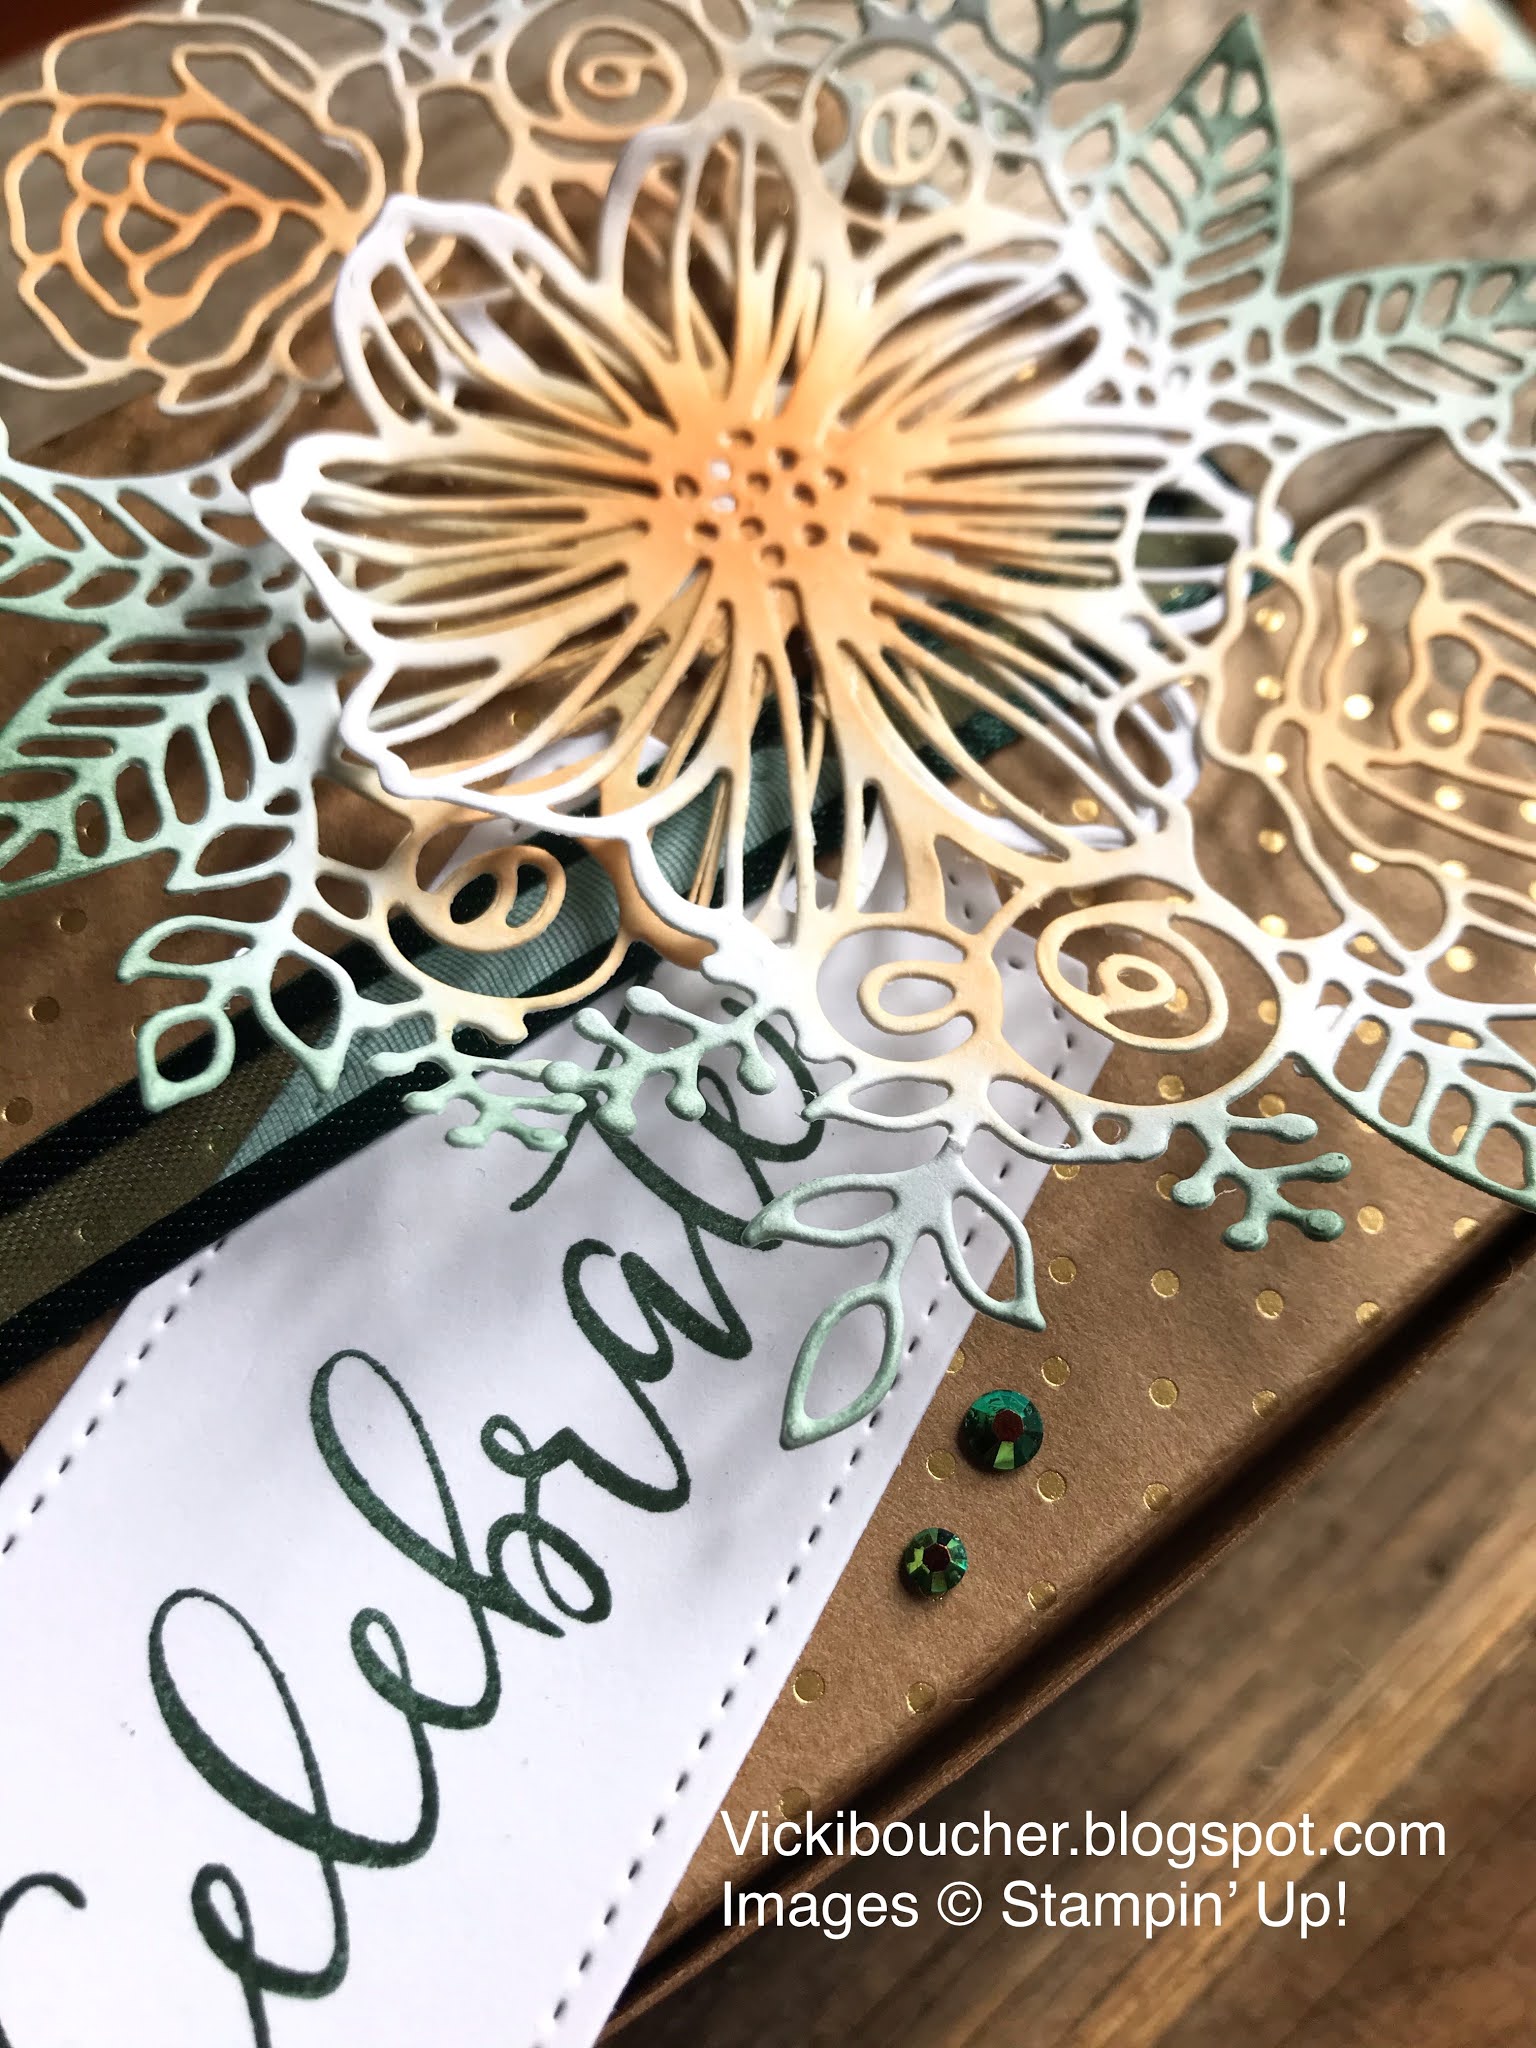
Honeybee Home bundle card


The ribbons I've used for this card are Gray Granite Shimmer Ribbon and Pale Papaya Open Weave Ribbon. The stamped images are watercoloured using Black Stazon Ink onto White Shimmery Cardstock and coloured in using Pale Papaya and Basic Gray Ink. I've used Vellum for the die-cut images and placed over Basic Gray Heart & Home Doily.


I've been using Vellum a lot in my projects lately and I thought using the Hive 3D Embossing Folder would look amazing in Vellum. I added Pale Papaya Ink with the Blending Brush for a subtle look.


I love the Heart & Home 12" x 12" Designer Series Paper, I especially like the Basic Gray wood paper and it's perfect for the base panel of my card layered over Basic Gray Cardstock. I added a few of the Iridescent Rhinestones to finish off the card.


Blessings of Home bundle card


The ribbons I've used for this card are Black Glittered Organdy Ribbon, Pale Papaya Open Weave Ribbon and Silver Elegant Trim. The stamped images are in Black Stazon Ink onto White Shimmery Cardstock and watercoloured in using Pale Papaya and Basic Gray Ink. I used White Shimmery Cardstock for the die-cut pieces and layered them over Square Vellum Doily. 


To add contrast to the card, I used Basic Black Cardstock and dried embossed using the Hive 3D Embossing Folder and I ruffed up the edges by scraping the edges of the Cardstock with the mini spatula end of Your Take Your Pick tool.


The black and white Vellum from the Layering Designs paper is perfect for your card making or scrapbooking. I've used the black script writing and layered it over thick Basic White Cardstock. I added a little bling to the card using the Basic Jewels Rhinestones.


 Thank you for visiting my blog today, I would so love hear your thoughts on my project by leaving a comment below.

To see all of the amazing projects by the Stamping Sunday Design Team please click on their names below.


1. Sara Levin  
2. Tami Hewlett  
3. Su Mohr  
4. Vicki Boucher 
5. Anne Marie Hile  


If you would like a copy of the new Stampin' Up! Mini January to June 2022 Catalogue and Annual Catalogue 2021 - 2022 please contact me here

If you live in Australia and don't have a demonstrator, you can purchase any of the Stampin' Up! products by shopping with me at my online store here.


Happy Stamping

Vicki Boucher


06 October 2021

Colour Creations Blog Hop - Week 19 Gorgeous Grape


 Hello and welcome

Tonight I'll be sharing with you Week 19 of Colour Creations Blog Hop with the Art With Heart Team in Australia. 

Each week there will be a Colour Creations blog hop showcasing Stampin' Up! Colors with a selection of members from the Art With Heart Team who will be joining in. I'm looking forward to seeing their beautiful projects using the Stampin' Up! Colors. You'll be able to hop around by clicking on the next link at the end of my blog.


The colour for tonight is Gorgeous Grape which is part of the Brights Collection and comes in a number of different mediums such as Ink, Cardstock, DSP etc....I've used Gorgeous Grape with Fresh Freesia, Highland Heather and White for my hand made birthday card.


I've created a fun background technique which involves using the Stampin' Blends, Vellum Cardstock, pure alcohol, paint brush and ear syringe. Starting with the Stampin' Blends I applied the brush tip to the Vellum and then I added a little of the pure alcohol with the paint brush. The next step you have to act quickly before the alcohol dries, use the ear syringe and puff air over the alcohol to move it around. With this technique you always get a different outcome.


Gorgeous Grape comes in the Ombre Specialty Paper and it sparkles too! So it was perfect for the butterfly die-cut image from the Brilliant Wings Dies. As the butterfly is delicate I like to use the Adhesive Sheets instead of Multipurpose Liquid Glue which is usually my go to for adhesive.


The layer under the Vellum is Basic White Cardstock, I've applied Liquid Glue with a Sponge Dauber and lightly added the glue. 


I've used a panel of Fresh Freesia Shimmer Vellum Specialty Paper under Basic White Cardstock and then adhered to the card base of Gorgeous Grape. To finish off the card I've used the sentiment from Art Gallery Stamp Set in Gorgeous Grape Ink onto Basic White Cardstock with an added thin strip of Fresh Freesia Vellum Specialty Paper.

Thank you for visiting my blog today, I would so love hear your thoughts on my project by leaving a comment below.


Now it's time to hop along and visit the lovely Rachel Palmieri to see her project please click on the link below


If at any time you find a broken link, please head to the blog of this week’s host of the AWH Colour Creations Blog Hop, CatherineProctor, and she will have the list of all participants.

If you live in Australia and don't have a demonstrator, you can purchase any of the above Stampin' Up! products by shopping with me at my online store here.


Happy Stamping

Vicki Boucher


24 May 2021

Global Design Project Color Challenge #GDP293

 Hello and welcome,

I'm so excited to share with you the latest Global Design Project Color Challenge #GDP293 as guest designer for this weeks challenge, I was given three of the 2021 - 2023 In Colors - Pale Papaya, Soft Succulent and Evening Evergreen. 


I've created two projects using the challenge colours using the Artistically Inked Bundle with  the Create With Friends Stamp Set both items can be found in the new 2021 - 2022 Stampin' Up! Annual Catalogue. 


First up is the Stampin' Blends alcohol background technique on vellum, which I've been wanting to create for sometime now. Starting with Soft Succulent and Evening Evergreen Stampin' Blends using the brush tip to apply the colour onto the sheet of Vellum. 


You need pure alcohol to make it work as it needs to be more than 90% I've used Isopropyl alcohol with a pant brush and ear syringe to help blow the alcohol around the vellum. This was a fun technique and I highly recommend you give it a try. Let me know how you go.


The Artistically Inked Stamp Set is unique and I love the images. I've layered the flowers with the leaves  on top of the sentiment stamped in Soft Succulent onto Basic White Cardstock and die cut out using the Tailor Made Tags Dies.


To finish off the card I've added Soft Succulent Jewels and Pale Papaya Ribbon.


Next is the 3D Scalloped Kraft Treat Box which is a new product from Stampin' Up! in the Annual Catalogue, you get 8 boxes each has a lid with a base and they are food safe.


Using the large flowers and leaves die from the Artistic Dies, I've die cut out the image twice using Basic White Cardstock and applied the challenge colours with the Blending Brushes. Layering the die images onto the lid and box with Tombow Mono Liquid Glue. 


The Evening Evergreen Ribbon is stunning against the Kraft Box, I've added some Evening Evergreen Jewels and gift tag with the sentiment stamped in Evening Evergreen. It's a stunning color and it's so beautiful to work with. 


To join in on the latest Global Design Project Color Challenge #GDP293 click here and you might be the next guest designer. Good Luck!


Thank you for visiting my blog today, I would so love hear your thoughts on my project by leaving a comment below.

If you live in Australia, you can purchase any of the Stampin' Up! products by shopping with me at my online store here.


You can request the Stampin' Up! 2021 - 2022 Annual Catalogue here

Happy Stamping

Vicki x


20 June 2020

Social Stamping Blog Host - Thinking of You


Welcome to this weeks Social Stamping Bog Host, we are sharing our creations with the theme Thinking of You. Thank you once again to Kelly Kent for organizing another amazing blog hop and with all of these amazing women. Make sure you check out everyone’s blog to see their creations.


When someone is feeling down or has lost someone, sending a Thinking of You card is a lovely idea to write a warm and caring message to brighten up their day. Sending a card can make a big difference and it just might be the thing someone needs to get through their tough day. Showing kindness is the key to making our lives feel so much better.

Peony Garden Suite


The beautiful Peony Garden Suite is perfect for a Thinking of You card and Stampin' Up! sure know how to showcase a stunning suite. It's in the latest 2020-2021 Annual Catalogue with beautiful blooms of Peonies, it's very sophisticated and the colours are gorgeous. All of the products from this suite was on my whish list.


The Peony die cut image is from the Peony Dies, I've used Watercolor Paper, applied ink with the new Water Painters using Petal Pink for the Peony and Soft Sea Foam and Pear Pizzazz for the leaves. There are a number of pieces, but they can easily be put together with lining the pieces up at the same point and apply Multipurpose Liquid Glue works well. 


The layers for the card are Gray Granite for the card base, Peony Garden Designer Series Paper, I've used two layers one in Petal Pink and the other in Gray Granite. I just love the different designs. 

I applied Petal Pink Ink with the wide bristle brush onto a piece of Shimmery Cardstock and flicked ink using the Petal Pink Stampin' Blend onto the Cardstock. To achieve the look use the brush tip and flick against the inside of the lid.  


The sweet Square Vellum Doilies adds a soft elegance to the card and I added the Gray Granite Shimmer Ribbon over a strip of Petal Pink DSP. The Peony is layered with lots of Stampin' Dimensionals to finish off my project.

Make sure you see everyone’s creative projects with the Thinking of You theme in our latest Social Stamping Blog Host.

You can click here to see the list of names or click on the next button below to see Lou Kitzelman gorgeous project.


Product List

Ink: Petal Pink, Soft Sea Foam, Pear Pizzazz and Gray Granite
Cardstock/Paper: Gray Granite, Shimmery White, Fluid 100 Watercolor Paper, Sqaure Vellum Dollies and Peony Garden DSP
Stamps: Prized Peony
Dies: Peony Dies
Ribbon: Gray Granite Shimmer Ribbon
Other Stampin' Up! products: Water Painters and Stampin' Blends: Petal Pink


30 May 2020

Social Stamping Blog Host - Hearts


Welcome to the latest Social Stamping Blog Host, today we will be sharing our creations with the theme Hearts. Thank you to Kelly Kent for organizing another amazing blog hop with these wonderful women. 

When I think of hearts, I think of all the love we share when making a card to someone and showing them just how much they mean to us. Expect to see lots of love in our creations.


The products for my card that I have used today, some are retiring and some are brand new! I really like how I've put the greys with pinks and white together.

To start off with the tiny stitched hearts, I've mixed Rococo Rose Ink and Frost White Shimmer Paint together on a acrylic block, this gives a really nice pearl look to the coloured ink. I brushed the ink onto a strip of Shimmery White Cardstock and die cut out the stitched hearts. 


The panel for the card is the In Good Taste Designer Series Paper and it's just stunning! I especially like the greys. I ran the DSP through my die cutting machine with the Tasteful Textile 3D Embossing Folder. I added a strip of Rococo Rose In Color 6"x 6" gingham DSP (retiring) under the Gray Granite Textured Weave Ribbon (retiring).


The Vellum swirl adds a different shade of grey and layer to the card. I've stamped the large heart image in Rococo Rose and punch it out with the coordinating punch. For the grey heart I've used the DSP and Heat Embossed White Stampin' Emboss Powder and punched out the with the Heart Punch.

I've added a few of the Clear Epoxy Droplets to finish off the card.

Make sure you see everyone’s amazing creations with the Hearts theme in our latest Social Stamping Blog Host.

You can click here to see the list of names or click on the next button below to see Julia Quinn's gorgeous project.  


Thank you for stopping by today!

Until next time, happy stamping

Vicki Boucher


02 October 2019

Stampin' Up! 2019 Holiday Catalogue Art With Heart Team Blog Hop Week 7


Hello and welcome,


Today I will be sharing my creation with the team from the Art With Heart and it’s week 7. We will be showcasing Christmas projects using products from the 2019 Holiday Catalogue and 2019-2020 Annual Catalogue. 


I just love the Itty Bitty Stamp Set you get 18 Cling Stamps of Christmas and Holiday greetings and it comes in a bundle with the gorgeous Christmas Layers Dies with 10% off now that’s a great saving! I’ve paired them with the Stitched Labels Dies. The detail of the stitched dies makes any project a wow factor about them.


I’ve used Celestial Copper Deliocatta Ink, lightly sponged on the larger Stitched Die and on the Vellum branches. This gave the branches different shades of Copper the more ink I put on the vellum the stronger the colour. This gave the card a softer look with the creamy/coffee coloured Vellum.


The greeting is stamped in Versamark Ink, heat embossed with Copper Stampin’ Emboss Powder and finished off using the Heat Tool.


For the background I’ve used Early Espresso Ink and mixed it with White Embossing Paste. I applied the paste over the Brick - Pattern Party Decorative Mask, sprinkled Copper Stampin’ Emboss Powder before the Paste dries and heat set with the Heat Tool. I’ve created a card with this technique a couple of years and I just loved how it turned out.


I used my Paper Snips and ran the blade along the Early Espresso Cardstock edges. Giving it a different finish to my card.  When layering the pieces on the Copper Embossed brick wall I’ve used Stampin’ Dimensionals and Multipurpose Liquid Glue.


Thank you so much for visiting my blog today.


To see everyone’s creations, please visit Claire Daly’s blog. They are amazing and I hope we have inspired you to start creating Christmas projects too. 


To purchase any of the products that I’ve used please click here and visit my Online Store.


Happy Crafting


Vicki Boucher


Product List:

Cardstock: Early Espresso and Vellum

Ink: Early Espresso and Celestial Copper Deliocatta Ink

Stamp: Itty Bitty Christmas

Dies: Christmas Layers and Stitched Labels

Colouring Tools: Copper Stampin’ Emboss Powder, Pattern Party Decorative Masks, Palette Knives, Heat Tool, White Embossing Paste, Embossing Buddy, Versamark and Sponge Dauber