Showing posts with label Christmas Layers Dies. Show all posts

12 December 2019

Art With Heart December Blog Hop Add A Little Sparkle


The Art With Heart Team are back with our last Blog Hop for 2019. Getting in the spirit of Christmas and New Year celebrations, this month our theme is ‘Add A Little Sparkle’. We have a huge range of sparkly  projects to share with you featuring products such as Glimmer paper, Rhinestones, Delicata Ink, Shimmery White cardstock and much more. All of these products are available from Stampin’ Up! and any of these lovely ladies would be happy to assist you.


I was so excited to hear about this theme for our latest blog hop, anything that is made out of glitter is my kind of thing and I’m so happy to be sharing with you my latest Christmas Card using Stampin’ Up! products. Plus I’m using a brand new product that is available for customers in January 2020.


Glitter is so much fun to play with when it comes to using it in your papercraft, cards or scrapbooking. The colour choice for my card I've chosen is Whisper White, Silver (all different types of mediums) and Blushing Bride (a beautiful shade of pink).


I started off with a piece of Silver Foil, run it through with the Corrugated 3D Embossing Folder and the Die Cutting Machine. Then I die cut the embossed Silver Foil paper with the medium size Stitched Rectangle Dies to give the card a nice finished look. I wanted to give the Silver Foil some sparkle so I ran my Versamark Ink Pad along the raised bumps, added Stampin’ Glitter and heat set with the Heat Tool.


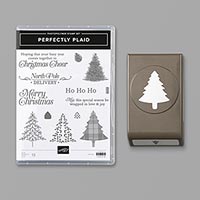
I’ve used the Beautiful Boughs Dies for the labels and the Perfectly Plaid Stamp Set for the greetings. Using Silver Stampin’ Emboss Powder to coordinate the colours throughout the card.


The gorgeous snowflakes and leaf foliage are from the Christmas Layers Dies. I’ve die cut them out using Blushing Bride Cardstock and Silver Glimmer paper which is just stunning to use.


The Blushing Bride leaf foliage needed some added sparkle so I used the Shimmery Crystal Effects and sprinkled Stampin’ Glitter on top, wait for it to dry before adding to your papercraft. The snow flakes add a nice touch to the card too.


The card base is Thick Whisper White Cardstock and I’ve randomly stamped the words in Blushing Bride Ink, but I like to stamp off before stamping onto the card. I’ve added Silver Metallic Thread under the top label.


Now for the new product which is available in January 2020 in the Mini Catalogue they are pretty embellishments called From My Heart Faceted Gems. They add some pretty pink sparkle to the card. What do you think?


The next demonstrator to share their sparkly projects with you is the delightful….. Rebecca Jacovou


Rebecca


If you have a broken link or have come to this blog hop midway, you can view all the participants below:


Tina Gillespie

Rachel Woollard

Catherine Proctor

Vicki Boucher

Rebecca Jacovou

Andrea Sargent

Kathryn Ruddick

Caroline Manwaring


To purchase any of these products I’ve used today you can click on my direct links above or visit my Online Store here.


If you would like a catalogue from me please send me a message here.


Thanks for stopping by today!


Happy Crafting 


Vicki Boucher


Product List


Stamps: Perfectly Plaid

Dies: Stitched Rectangle Dies, Christmas Layers Dies and Beautiful Boughs Dies

Ink: Blushing Bride

Cardstock/Paper: Whisper White, Blushing Bride, Silver Glimmer Foil and Silver Foil

Embossing Folders: Corrugated 3D

Colouring Tools: Versamark, Stampin’ Glitter, Embossing Buddy, Sliver Stampin’ Emboss Powder and Heat Tool

Other Stampin’ Up! Products: Silver Metallic Thread, Shimmery Crystal Effects and From My Heart Faceted Gems


02 October 2019

Stampin' Up! 2019 Holiday Catalogue Art With Heart Team Blog Hop Week 7


Hello and welcome,


Today I will be sharing my creation with the team from the Art With Heart and it’s week 7. We will be showcasing Christmas projects using products from the 2019 Holiday Catalogue and 2019-2020 Annual Catalogue. 


I just love the Itty Bitty Stamp Set you get 18 Cling Stamps of Christmas and Holiday greetings and it comes in a bundle with the gorgeous Christmas Layers Dies with 10% off now that’s a great saving! I’ve paired them with the Stitched Labels Dies. The detail of the stitched dies makes any project a wow factor about them.


I’ve used Celestial Copper Deliocatta Ink, lightly sponged on the larger Stitched Die and on the Vellum branches. This gave the branches different shades of Copper the more ink I put on the vellum the stronger the colour. This gave the card a softer look with the creamy/coffee coloured Vellum.


The greeting is stamped in Versamark Ink, heat embossed with Copper Stampin’ Emboss Powder and finished off using the Heat Tool.


For the background I’ve used Early Espresso Ink and mixed it with White Embossing Paste. I applied the paste over the Brick - Pattern Party Decorative Mask, sprinkled Copper Stampin’ Emboss Powder before the Paste dries and heat set with the Heat Tool. I’ve created a card with this technique a couple of years and I just loved how it turned out.


I used my Paper Snips and ran the blade along the Early Espresso Cardstock edges. Giving it a different finish to my card.  When layering the pieces on the Copper Embossed brick wall I’ve used Stampin’ Dimensionals and Multipurpose Liquid Glue.


Thank you so much for visiting my blog today.


To see everyone’s creations, please visit Claire Daly’s blog. They are amazing and I hope we have inspired you to start creating Christmas projects too. 


To purchase any of the products that I’ve used please click here and visit my Online Store.


Happy Crafting


Vicki Boucher


Product List:

Cardstock: Early Espresso and Vellum

Ink: Early Espresso and Celestial Copper Deliocatta Ink

Stamp: Itty Bitty Christmas

Dies: Christmas Layers and Stitched Labels

Colouring Tools: Copper Stampin’ Emboss Powder, Pattern Party Decorative Masks, Palette Knives, Heat Tool, White Embossing Paste, Embossing Buddy, Versamark and Sponge Dauber


18 September 2019

Stampin' Up! 2019 Holiday Catalogue Art With Heart Team Blog Hop Week 5

Hello and welcome,

This is week 5 with the Art With Heart Team blog hop. The Stampin' Up! products that I've used is from the Itty Bitty Bundle combined with Black, White, Silver and a touch of sparkle. I wanted an elegant card using these colours and mediums.


Itty Bitty Christmas Bundle
Itty Bitty Christmas 
?dbwsdemoid=4013366
Perfectly Plaid


I haven't used the White Embossing Paste with the Pattern Party Decorative Masks for awhile now and for my card, I've used the Diamond shape mask. Once the Paste has been applied to a piece of Whisper White Cardstock and I quickly sprinkled the Stampin' Glitter in Dazzling Diamonds onto the paste. You can either wait until it dries or heat set with the Heat Tool. 


The next layer I've used is a piece of Black Foil Sheet and the star Die from Christmas Layers Dies. I just love the Black Foil Sheets it can make your card shine like a black diamond. To continue with the Black Foil I punched out a Christmas Tree using the Pine Tree Punch and before adding the tree to the card, I've placed Silver Metallic Thread underneath it.


To finish off my card I've used the greeting from the Itty Bitty Christmas Stamp Set which coordinates with the Christmas Layers Dies. The Season's Greetings has been inked up in Versamark Ink, adding Black Stampin' Emboss Powder and heat set with the Heat Tool. The sentiment is layered over the tree with Stampin' Dimensionals.


Thank you for visiting my blog today now it's time to visit Claire Dayl's blog and everyone from The Art With Heart Team. 

If you would like to purchase any of the Stampin' Up! products please click on my online store here.

Product List:

Stamp Set: Itty Bitty 
Dies: Christmas Layers Dies
Colouring Tools: Embossing Paste, Palette Knives, Pattern Party Decorative Masks, Dazzling Diamonds Stampin' Glitter, Versamark, Black Stampiun' Emboss Powder, Embossing Buddy and Heat Tool.
Cardstock/ Papers: Black Foil Sheets and Whisper White in Thick and Standard
Other Stampin' Up! products: Pine Tree Punch, Silver Metallic Thread and Big Shot (retired)


29 August 2019

Stampin' Up! Art With Heart Blog Hop - Christmas


Hello and welcome,

Tonight the Art with Heart team are sharing creative Christmas projects, many featuring products from the upcoming Holiday Catalogue which starts on the 4th of September.


If you would like a copy of the 2019 - 2020 Annual catalogue or the new Holiday catalogue, contact any of the girls on the blog hop and we will get in touch with you.


When I first had a flick through the Holiday Catalogue the first set that I couldn’t wait to purchase was the beautiful Still Scenes bundle. The bundle includes the Still Scenes Stamp Set and the coordinating Snow Globe Scenes Dies when purchased in a bundle you save 10% off. The thought of creating a Snow Globe Christmas Card was really exciting too!


I wanted to create my card by making a snow scene and shaker card using soft colours with silver, white and lots of twinkles. The Snowflake Sequins are just gorgeous they come in stars, snowflakes and round sequins in clear, iridescent, silver and white.
Before I even started to create the card, I wanted to know a way on how to put the globe part together and I found a YouTube video tutorial by Suzanne Burnett. Click on the video below to see how Suzanne created her gorgeous card.


Once I had die cut the snow globe insert (Whisper White Cardstock), trees (Silver Foil) and church pieces (Whisper White Cardstock & scrap piece of Gold Foil). To create the snow on the trees, I covered the Silver Foil in Versamark Ink, covered in White Emboss Powder, brushed some of the powder off with a brush and then heat set. I love this look and here is a close up of the trees.


The background for the snow scene is sponged in Seaside Spray, White Emboss Powder in stars and snowflakes. For the layers I’ve used Stampin’ Dimensionals for each layer. Tip (from Suzanne Burnett) with the Snow Globe Shaker Dome is to use the Stampin’ Emboss Buddy and lightly dust the globe. This helps with glitter and sequins not sticking.


I’ve used a few layers for the card – Thick Whisper White (card base), Silver Foil (2nd layer), Whisper White (3rd layer) once they all together with the Snow Globe I then finished off my card.


I’ve used Silver Foil for the Snow Globe stand, layered it with Dimensionals, the sentiment is Silver Embossed on a strip of Whisper White Cardstock, layered with a strip of Silver Foil and two silver foil snowflakes from the Christmas Layers Dies.


Thank you for visiting my blog today. Now it’s time to hop on over to our next participant, the very talented, Caroline Manwaring


Happy Crafting

Vicki Boucher

If you find a broken link or have come to this blog hop from a different entry point, you can view the participants below:


To shop with me please click here to go to my Online Store.

Product List

Stamps: Still Scenes

Dies: Snow Globe and Christmas Layers Dies

Cardstock: Thick & regular Whisper White, Silver Foil and Gold Foil

Ink: Seaside Spray

Colouring Tools: Versamark, Sponge Dauber, Embossing Buddy, Heat Tool, Stampin’ Glitter, White Stampin’ Emboss Powder and Silver Stampin’ Emboss Powder

Other Stampin’ Up! Products: Snow Globe Shaker Dome, Snowflake Sequins, Tear & Tape, Multipurpose Glue, Stampin’ Dimensionals and retired Big Shot

28 August 2019

Stampin' Up! 2019 Holiday Catalogue Art With Heart Team Blog Hop Week 2


Hello and welcome,

We will be showcasing products from the new Holiday Catalogue from the lovely ladies at the Art with Heart Team blog hop.
I like having cards sometimes with minimum colour with card I decided to use only white, silver and a twinkle of red from the gorgeous Red Rhinestones.


The gorgeous Silver and White striped DSP is from the Feels Like Frost 6” x 6” Specialty Designer Series Paper. I used the other side of this DSP in last week’s card. I just love the beautiful soft colours on one side and silver foil on the other side.

I've used the Deer from Detailed Deer Dies which is available to purchase now from the Annual Catalogue. I’ve coordinated the Deer in Silver Foil to complement the DSP.

The sentiment is from a new stamp set called Itty Bitty Christmas and it comes in a bundle with Christmas Layers Dies. You are going to love this stamp set as it has 18 greetings to choose from and you will also save 10% off when it’s purchased in a bundle.

I’ve stamped the sentiment in Versamark Ink on a strip of Whisper White Cardstock Embossed it with Silver Stampin’ Emboss Powder and heat set it with the Heat Tool. The strip of the Silver Metallic Edge Ribbon is peaking just under the Cardstock.

The leafy foliage is from the Christmas Layers Dies using Whisper White Cardstock and die cut out. I’ve placed the Red Rhinestones to add some colour and bling.

I’ve used Whisper White Cardstock to die cut out with the second largest Stitched Nested Labels Dies, layered it under the Silver Metallic Thread before adding the Deer and white foliage. The card base is Thick Whisper White Cardstock.

Thank you for visiting my blog today.

You can see the rest of this week’s Christmas creations over at Claire Daly’s blog.

Live in Australia? I would be happy to send you a current Stampin’ Up! Annual Catalogue and the new 2019 Holiday Catalogue out to you. Just send me a message here with your details here.

To shop with me please click here to visit my Online Store.

Product List

Stamps: Itty Bitty Christmas

Dies: Christmas Layers Dies, Detailed Deer and Stitched Nested Labels

Cardstock/Papers: Whisper White Thick & Basic Cardstock, Silver Foil Sheets and Feels Like Frost 6” x 6” Specialty DSP

Ribbon: Silver Metallic Edge Ribbon and Silver Metallic Thread

Other Stampin’ Up! Products: Red Rhinestone Basic Jewels, Retired Big Shot, Dimensionals, Tear and Tape