29 August 2022

Artisan Design Team - Decorated with Happiness


 Hello and welcome,

My name is Vicki Boucher and I'm from Melbourne, Australia. Today I'll be sharing three projects using the Decorated with Happiness Bundle, turning them into two Christmas cards and Christmas treat box.


The Artisan Design Team are featuring the Decorated with Happiness Bundle on Stampin' Up! Facebook and Instagram page where you'll sure to be inspired by everyone's creations, I'll add the link at the end of my blog. 


Decorated with Happiness Bundle (159711)


The Decorated with Happiness Bundle (159711) 10% Bundle Savings is located on page 27 of the Stampin' Up! July - Dec 2022 Mini Catalogue. The bundle includes Decorated with Happiness Stamp Set (159704) and coordinates Decorated Pine Dies (159710). I just love the modern style with scripted fonts and hand-drawn images. The Decorated Pine Dies has 21 dies and jam packed with pine boughs, baubles, bows, bells and more....


Christmas Greetings Slimline Card

I always love creating a slimline card for my projects, here I used Fluid 100 Watercolor Paper as the starting point for my card. The colours I've used are Starry Sky, Pacific Point and Polished Pink for the colour palette. I love these colours together. 


I applied water onto the watercolor paper first using the large flat brush next I added Pacific Point and Polished Pink ink to the paper. I like to have a tissue or kitchen paper handy to help dry off any excess ink that may run or you can use the Heat Tool to help speed up the drying of the ink.

Using the small pine boughs image, I stamped a number of times in Starry Sky and Pacific Point ink. I also heat embossed the pine branch and baubles in Versamark, White Stampin' Emboss Powder and heat set with the Heat Tool.


My tip for when it comes to watercolouring stamped images and using the emboss resist technique, I like to colour outside of the lines. This works well with White Emboss Powder, Water Painters and with any Stampin' Up! colors. 

I've die-cut out a couple of the pine boughs from the Decorated Pine Dies in Fluid 100 Watercolor Paper and applied Polished Pink ink with the Water Painter, let it dry then adhered to the panel with Multipurpose Liquid Glue. 


The sentiment is heat embossed using White Stampin' Powder onto Starry Sky Cardstock and then die-cut out using the large label from the Stylish Shapes Dies. To make a straight edge for your label, die-cut the cardstock across using the stitched die to create a cute, stitched look.

To finish off the card I always like to add some bling, especially for Christmas. Here I've used Sparkle and Shine Sequins with tiny drops of liquid glue.


Boughs of Holly Christmas Card

To create my second Christmas card using the same colours as the slimline card and watercolour background panel using Fluid 100 Watercolor Paper. I also the snow stamp image onto the watercolor paper and heat embossed the images using White Stampin' Emboss Powder.


I added the additional pine boughs both using the stamp image and die-cut in Fluid 100 Watercolor Paper. The stamped image is heat embossed with White Stampin' Emboss Powder and embossed resist using Pacific Point and Starry Sky. The pine boughs die-cut pieces are a watercolor wash using the same colours. 


The pink ornaments are heat embossed using White Stampin' Emboss Powder, watercoloured using Polished Pink and watercolour paper. Then die-cut out using the coordinating dies.


To create the sentiment, I stamped the greeting in Versamark ink onto Polished Pink Cardstock, added White Stampin' Emboss Powder and heat set with the Heat Tool. I used the smallest stitched circle from the Stylish Shapes Dies and die-cut out creating a cute, stitched ornament to hang on the branch.

To finish off the card, I layered the watercolour panel over Poplished Pink Cardstock and Starry Sky Cardstock for the card base. I added the Iridescent Pearls Basic Jewels.


Christmas Treat Box

This cute little Christmas treat box was a last-minute addition to match with the cards. As I already had a few left-over pine boughs and an ornament, I decided to use a white Envelope Treat Box which you can find on page 83 of the Mini Catalogue.


There are 10 boxes with 20 gold foil stickers to use and food safe. They are easy to fold with the Bone Folder, but before I fold the box, I added Starry Sky and Pacific Point ink to the outside of the box with the Blending Brush.


Adding glitter to the box I wrapped around the Glittered Organdy Ribbon and tied into a bow. Plus, I splattered Clear Wink of Stella for more sparkle and used the Iridescent Pearls Basic Jewels.


Thank you for visiting my blog today, I would so love to hear your thoughts on my project by leaving a comment below. Make sure you pop over onto Stampin' Up! Facebook page for lots of inspiration using the Decorated with Happiness Bundle.

If you would like a copy of the Stampin' Up! July - December 2022 Mini or the Annual Catalogue 2022 - 2023 please contact me here

If you live in Australia and don't have a demonstrator, you can purchase any of the Stampin' Up! products by shopping with me at my online store here.


Happy Stamping

Vicki Boucher


26 August 2022

Global Design Project - Colour Challenge #GDP357


Hello and welcome,

My name is Vicki Boucher and I am from Melbourne, Australia. I always love to enter into the Global Design Project #GDP357 and it's a Colour Challenge. I just couldn't resist these pretty colours they've chosen.


Today's project I've used the Celebrate with Tags bundle (159867) which includes Celebrate with Tags Stamp Set (159974) and Celebrations Tag Dies (159866). I also used Snowflake 12" x 12" Specialty Vellum (159832) for the gift tag and snowflakes. I just love the white vellum snowflakes. All of the products I've used today, can be found in the Mini July - December 2022 Stampin' Up Catalogue.


I thought these challenge colours would be perfect for a wintery Christmas card and of course I always love to add lots of layers. The gift tag die is so cute, here I actually cut the tag in half in Basic White Cardstock and Snowflake Specialty Vellum. 


Blending Brushes are my go to when it comes to soft colours and it creates an easy soft background panel. Pool Party and Tahitian Tide blend well together. I've stamped the sentiment onto the background in Tahitian Tide and splattered ink using the Stampin' Write Marker.

To create a soft look for the mittens apply Flirty Flamingo ink with a Blending Brush and add to the mitten stamp. Then stamp the image onto Basic White Cardstock. I just love all of the different die-cut images that come with the Celebrations Tag Dies especially the stitched hearts are so cute.  


Thank you for visiting my blog today, I would so love hear your thoughts on my project by leaving a comment below.


Please email me if you would like a copy of the 2022-2023 Annual Catalogue and the July-Dec 2022 Mini Catalogue, July-August Saleabration Catalogue please contact me here

If you live in Australia and don't have a demonstrator, you can purchase any of the Stampin' Up! products by shopping with me at my online store here.

Make sure you follow me on social media via Facebook, Instagram and Pinterest.


Happy Stamping

Vicki Boucher


24 August 2022

Colour INKspiration Challenge #CI128


Hello and welcome,

My name is Vicki Boucher and I am from Melbourne, Australia. Tonight, it's the latest Colour INKspiration Challenge #CI128 and this photo was chosen by Lou Kitzelman. I love the soft pastel colours and this photo reminds me of summer. 


The colour combination for #CI128 is So Saffron, Petal Pink, Blushing Bride and Tahitian Tide. As well as the chosen colours you may also add Basic White, Very Vanilla, Basic Black, Crumb Cake, Sahara Sand and metallics to your project. We also allow 'Ivory' and 'Bronze' in the Stampin' Blends. If you don't have all the colour palette, feel free to use the closest SU substitute (ie: Balmy Blue instead of Tahitian Tide .... you get the drift).

The challenge will run for almost 3 weeks until 7pm (AEST) on Monday 12th September 2022 details to follow at the end of my blog.


Today's card is using the Leaves of Holly bundle (159608) which includes Leaves of Holly Stamp Set and Holly Berry Dies and I also used Snowflake 12" x 12" Specialty Vellum (159832) for the background panel. I just love the white vellum snowflakes. All of the products I've used in today's project can be found in the Mini July - December 2022 Stampin' Up Catalogue.


Leaves of Holly bundle (159608)


I decided to use the colour palette and go for a non-traditional Christmas card. Starting with the card base in Tahitian Tide Cardstock and layered over with the Snowflake Specialty Vellum. This gives Tahitian Tide a softer look.


My next layer is a smaller panel of Basic White Cardstock, applied with the other three challenge colours and the Blending Brushes. 

I love the Holly Berry Dies as you can do so much with them by keeping it simple or stepping it up with lots of layers. The berry leaves and berries are die-cut out in Basic White Cardstock. I then used the Blending Brushes to apply Blushing Bride, Petal Pink ink for the leaves and So Saffron ink for the berries.


There are two label dies from the Holly Berry Dies the larger one I lightly added Tahitian Tide ink with the Blending Brush. The smaller label I used for the sentiment, stamped in Tahitian Tide ink onto Basic White Cardstock. 

To finish off the card I added a few of the Iridescent Rhinestone Basic Jewels and Tahitian Tide Baker's Twine.


I hope I've inspired you with the latest challenge and I do hope you'll join in. We so look forward to seeing a variety of projects using the challenge colours. Please ensure that your project is new and made specifically for this challenge.

Upload only one picture per entry straight to the discussion wall and not in an album

Colour INKspiration Challenge #CI128 will run until 7pm (ADET) on Monday 12th September 2022.

To get your creative ideas flowing, make sure you check out the Crew's Project in the CI128 Album.

Please click on the link here to join the challenge.


Thank you for visiting my blog today, I would so love hear your thoughts on my project by leaving a comment below.


Please email me if you would like a copy of the 2022-2023 Annual Catalogue and the July-Dec 2022 Mini Catalogue, July-August Saleabration Catalogue please contact me here

If you live in Australia and don't have a demonstrator, you can purchase any of the Stampin' Up! products by shopping with me at my online store here.

Make sure you follow me on social media via Facebook, Instagram and Pinterest.


Happy Stamping

Vicki Boucher


10 August 2022

Colour INKspiration Challenge #CI127


 Hello and welcome,

My name is Vicki Boucher and I am from Melbourne, Australia. Tonight, it's the latest Colour INKspiration Challenge #CI127 and this photo was chosen by Bronwyn Eastley. Gorgeous combination of colours and it certainly feels like spring from the photo.


The colour combination for #CI127 is Daffodil Delight, Orchid Oasis and Pear Pizzazz. As well as the chosen colours you may also add Basic White, Very Vanilla, Basic Black, Crumb Cake, Sahara Sand and metallics to your project. We also allow 'Ivory' and 'Bronze' in the Stampin' Blends. If you don't have all the colour palette, feel free to use the closest SU substitute (ie: Granny Apple Green instead of Pear Pizzazz .... you get the drift).

The challenge will run for almost 2 weeks until 7pm (AEST) on Monday 22nd August 2022 details to follow at the end of my blog.


Today's card is using the Blessings of Home bundle (157939) which includes Blessings of Home Stamp Set and Flowers of Home Dies and I also used Honeybee Home bundle (157952) for the bee image. All of the products I've used in today's project can be found in the Annual Stampin' Up 2022 - 2023 Catalogue.

I would have to say that Orchid Oasis would have to be one of my favourite of the new In Colors and I wanted to use it as the main focal point. I just love the richness of the colour so I embossed it using the Hive 3D Embossing Folder and added Orchid Oasis ink with the Blending Brush.


I used Shimmery White Cardstock Stazon Ink for the flower and bee. I used the fine tip brush from the Water Painters to colour in the images. The water colour wash background is Daffodil Delight and I like to use the large flat brush tip for a quick block of colour.


The sentiment is from the Blessings of Home Stamp Set, I've heat embossed it using Versamark, Basic Black Cardstock, White Stampin' Emboss Powder and heat set with the Heat Tool. Orchid Oasis comes in a variety of Stampin' Up! products and I really like it in the Baker's Twine and Matte Decorative Dots. 


I hope I've inspired you with the latest challenge and I do hope you'll join in. We so look forward to seeing a variety of projects using the challenge colours. Please ensure that your project is new and made specifically for this challenge.

Upload only one picture per entry straight to the discussion wall and not in an album

Colour INKspiration Challenge #CI127 will run until 7pm (ADET) on Monday 22nd August 2022.

To get your creative ideas flowing, make sure you check out the Crew's Project in the CI127 Album.

Please click on the link here to join the challenge.


Thank you for visiting my blog today, I would so love hear your thoughts on my project by leaving a comment below.


Please email me if you would like a copy of the 2022-2023 Annual Catalogue and the July-Dec 2022 Mini Catalogue, July-August Saleabration Catalogue please contact me here

If you live in Australia and don't have a demonstrator, you can purchase any of the Stampin' Up! products by shopping with me at my online store here.

Make sure you follow me on social media via Facebook, Instagram and Pinterest.


Happy Stamping

Vicki Boucher


07 August 2022

Creation Station Blog Hop - Embossing


Hello and welcome

My name is Vicki Boucher and I am from Melbourne, Australia. This is the latest hop with the design team at Creation Station, if you have come from Sara Nell Langland or you may of started with me. Please make sure you hop around and see everyone's amazing projects. I'll pop a link at the end of my blog to hop around....

The design team at Creation Station are presenting their projects with the theme "Anything Embossing" which can be heat or dry embossing which I've done both and I'll have a few tips and tricks to show you. 


I think heat embossing is amazing! It really gives you the wow factor for your paper craft. I just love it! I especially love White Stampin' Emboss Powder on Basic Black Cardstock it really makes the sentiments pop. Dry embossing is great for when you want texture added for your projects.


Embossing Additions Tool Kit (159971)


My favourite tool would have to be the new Embossing Additions Tool Kit (159971) you can find it on page 49 of the Stampin' Up! Mini July - Dec 2022 Catalogue. It comes with Embossing Buddy, Powder Pal, Crafting Tweezers great for holding tiny pieces of cardstock and Crafting Brush. The tray keeps your work space clean and tidy and the loose embossing powder can be placed back into the jar.


Kindest Gnomes Bundle (159626)


The Kindest Gnomes stamp set and Gnomes Dies are my favourite at the moment, they are perfect for a wintery snow scene and for Christmas. They are just so cute! Here I've used the stamp set and dies for all three cards. You can find the bundle on page 43 of the Stampin' Up! Mini July - Dec 2022 Catalogue. 

Dry Emboss Christmas Card

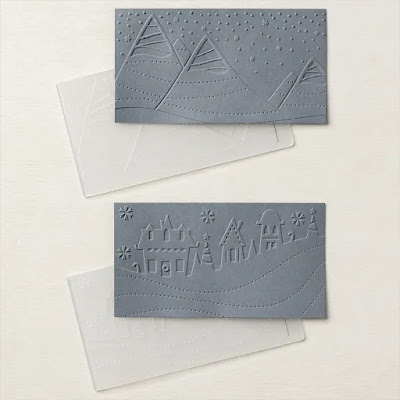
I've created a whimsical Christmas village using the Charming Landscapes Embossing Fold and Fluid 100 Watercolor Paper. 


I used a whole sheet of watercolor paper for two projects, first I added lots of water using the Stampin' Spritzer and then I added ink in the following colours Orchid Oasis, Pale Papaya and Polished Pink. I like to use the Heat Tool to create interesting movement with the ink and sometimes I would add more ink and water. Once it's completely dry, I'll emboss it with the embossing folder.


The Orchid Oasis background panel is dry embossed using Painted Texture 3D Embossing Folder and I also added Orchid Oasis Ink with the Blending Brush for more depth.


The sentiment is from the Kindest Gnomes Stamp Set and is heat set. First use the Embossing Buddy to remove any static from the Cardstock then stamp your image using Versamark ink, add White Stampin' Emboss Powder, remove any excess by tapping the back of the Cardstock and very carefully use the brush to remove any unwanted powder. 


The Stampin' Up! Heat Tool has two settings and I usually always use the higher setting to heat the powder.


Christmas Greetings Sliver Emboss with White Craft Ink

I've used the other half of the Fluid 100 Watercolor Paper for my next card and dry embossed it using the snowy mountain tops embossing folder from the Charming Landscapes Embossing Folder. 


Here I've used the Paper Snips and roughed up the edges with the blade. Then embossed the edges with a Sponge Dauber, White Craft Ink, Sliver Embossing Powder and heat set with the Heat Tool. Craft ink holds the powder better and thicker.


I also did this with the Gnomes beard and toadstools, but this time I used the fine Water Painter Brush and make sure the brush tip is dry. I like to add the White Craft Ink onto the Clear Block and use as a palette. 


One of my favourite embossing folders would have to be Timeworn Type 3D Embossing Folder, I just love the texture and I usually rough up the edges with the Paper Snips.


The sentiment is from Trees for Sale Stamp Set (159785), heat embossed again using White Emboss Powder on Basic Black Cardstock. 


Emboss Resist You Light up the Season Card

Emboss resist is always a fun way to use White Emboss Powder and heat set over blended coloured Cardstock. 


This was a last minute creation as I wanted to use this technique by using the trees from the Trees for Sale Stamp Set and Saleabration item Tree Lot Dies (159938). 


Using Basic White Cardstock I lightly applied Pale Papaya ink with the Blending Brush, then Polished Pink and Orchid Oasis. Stamping three of the different size trees, snow flakes in Versamark ink onto the cardstock add White Stampin' Emboss Powder, heat set with the Heat Tool. 


For extra dimension, I embossed the larger tree stamp on Basic White Cardstock and lightly added Orchid Oasis ink with the Blending Brush and die-cut out using Tree Lot Dies.


The sentiment is from Trees for Sale Stamp Set (159785), heat embossed again using White Emboss Powder on Basic Black Cardstock. 


Thank you for visiting my blog today, I would so love hear your thoughts on my project by leaving a comment below. Make sure you pop over to Mikaela Titheridge for lots of inspiration using embossing.


Please email me if you would like a copy of the 2022-2023 Annual Catalogue and the July-Dec 2022 Mini Catalogue, July-August Saleabration Catalogue please contact me here

If you live in Australia and don't have a demonstrator, you can purchase any of the Stampin' Up! products by shopping with me at my online store here.

Make sure you follow me on social media via Facebook, Instagram and Pinterest.


Happy Stamping

Vicki Boucher


03 August 2022

Bron's B'day Blog Hop - Fancy Fold


Hello and welcome,

My name is Vicki Boucher and I'm from Melbourne, Australia. Tonight, I'll be blog hopping along with other stamping friends that are celebrating Bron's 60th Birthday in 2022 with six blog hops, over six months with six different themes. This month is all about Fancy Folds.


Bronwyn Eastley of Addinktive  Designs creates the most amazing 3D projects and has set up this blog hop for her birthday. I'm so excited to see everyone's amazing Fancy Folds projects and I'm so glad I could join in the fun with everyone. Whether you just came from Leonie Stuart's blog or are just starting here, be sure to continue on through the rest of the blog hop by clicking the navigation buttons at the end of this post. I'll pop the next link at the end of my blog.


Tree Lot Dies (159938)


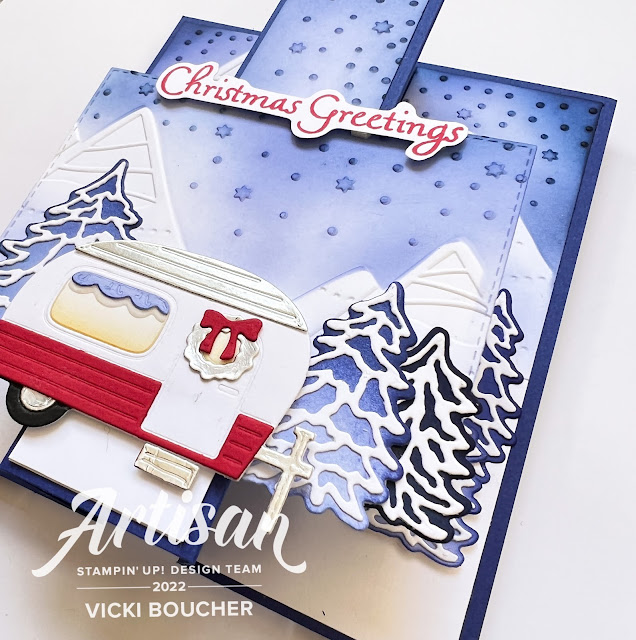
Tonight's Fancy Fold is a fun fold card using the very cute, FREE! Saleabration item, Tree Lot Dies (159938) which is on page 12 of the Sale-A-Bration Catalogue. The dies coordinates with the Trees for Sale Stamp Set (159785) which is on page 39 of the July - Dec Mini Stampin' Up! Catalogue. You can earn the dies for FREE with a qualifying purchase of $180 AUD from now until 31st August 2022 or until while supplies last. I've seen some amazing creations using both the dies and stamp set, so be quick before they go!


Trees for Sale Stamp Set (159785)


Another Stampin' Up! item I've used is the Charming Landscapes Embossing Folders (159593) which can be found in the Mini Catalogue on page 17. I thought this would be great to use for my 3D project, I've used the snowy mountain tops, creating an outdoorsy type of landscape with the caravan. 


Charming Landscapes Embossing Folders (159593)


The fun fold can open and close and fits inside a normal size envelope. Dimensions for cutting and scoring are listed below. This fun fold I've used a number of times and it stands up really well.

Measurements: 

 Starry Sky Card Base 

- Cut at 21cm x 14.9cm

- Score and fold at 5.5cm, 8.5cm, 12.5 and 15.5cm


Basic White Cardstock 

- Cut two Basic White at 14.4cm x 5cm each

- Cut one middle piece Basic White at 14.4cm x 3.5cm

Emboss all three panels using the snowy landscape embossing folder from Charming Landscapes Embossing Folders.


Main front panel

Stitched Rectangle Die - Use 10.4 x 6.9cm in Basic White 

Emboss die-cut piece using the snowy landscape embossing folder from Charming Landscapes Embossing Folders.


To create the illusion of a midnight sky and blue mountains for the embossed panels and stitched die-cut front panel. I embossed another piece of Basic White Cardstock and the snowy landscape embossing folder and fussy cut around the mountains. 


Holding the cut embossed piece over the panel to create a mask, use Blending Brush and apply using different shades of inks. I used Orchid Oasis, Starry Sky and Night of Navy Classic Stampin' Pad. I also used the mountain top to keep white and coloured in the mountain with the Blending Brush.


I wanted to create different shades of blues for the trees and also to keep with the theme of blue. I used coloured cardstock in Night of Navy and Orchid Oasis, using the Blending Brush to add more depth with the same colour to the tree. Then using Basic White cardstock and the detailed die to create snowy trees.


I always love red, white and blue together so I just had to use Real Red as part of my caravan and silver makes it look even more special. Shiny too! I used Vellum Cardstock for one of the layers for the curtains and the other is Basic White, coloured in with Starry Sky ink.


I hardly did any stamping for tonight's card which is not like me at all. I used the Trees for Sale Stamp Set for the sentiment and the cute "Trees for Sale" sign in Real Red ink.


Please click on the below button to see the amazing Sharni Haines, I always love seeing her Fancy Fold creativity. 


Thank you for visiting my blog today, I would so love hear your thoughts on my project by leaving a comment below.


Please email me if you would like a copy of the 2022-2023 Annual Catalogue and the July-Dec 2022 Mini Catalogue, July-August Saleabration Catalogue please contact me here

If you live in Australia and don't have a demonstrator, you can purchase any of the Stampin' Up! products by shopping with me at my online store here.

Make sure you follow me on social media via Facebook, Instagram and Pinterest.


Happy Stamping

Vicki Boucher