26 March 2023

Artisan Design Team - Fragrant Flowers Bundle


 Hello and welcome,

My name is Vicki Boucher and I'm from Melbourne, Australia. Today, I'll be sharing with you two projects I created for the March Monthly Artisan Assignment using the Fragrant Flowers Bundle which was shared earlier this month (March) through Stampin' Up! socials.


I wanted to share a few ideas on how I created these cards and this bundle is gorgeous to create with I just love the large flower images. The bold sentiments are perfect for a simple hello or thanks. Hope you like my shabby chic creations.
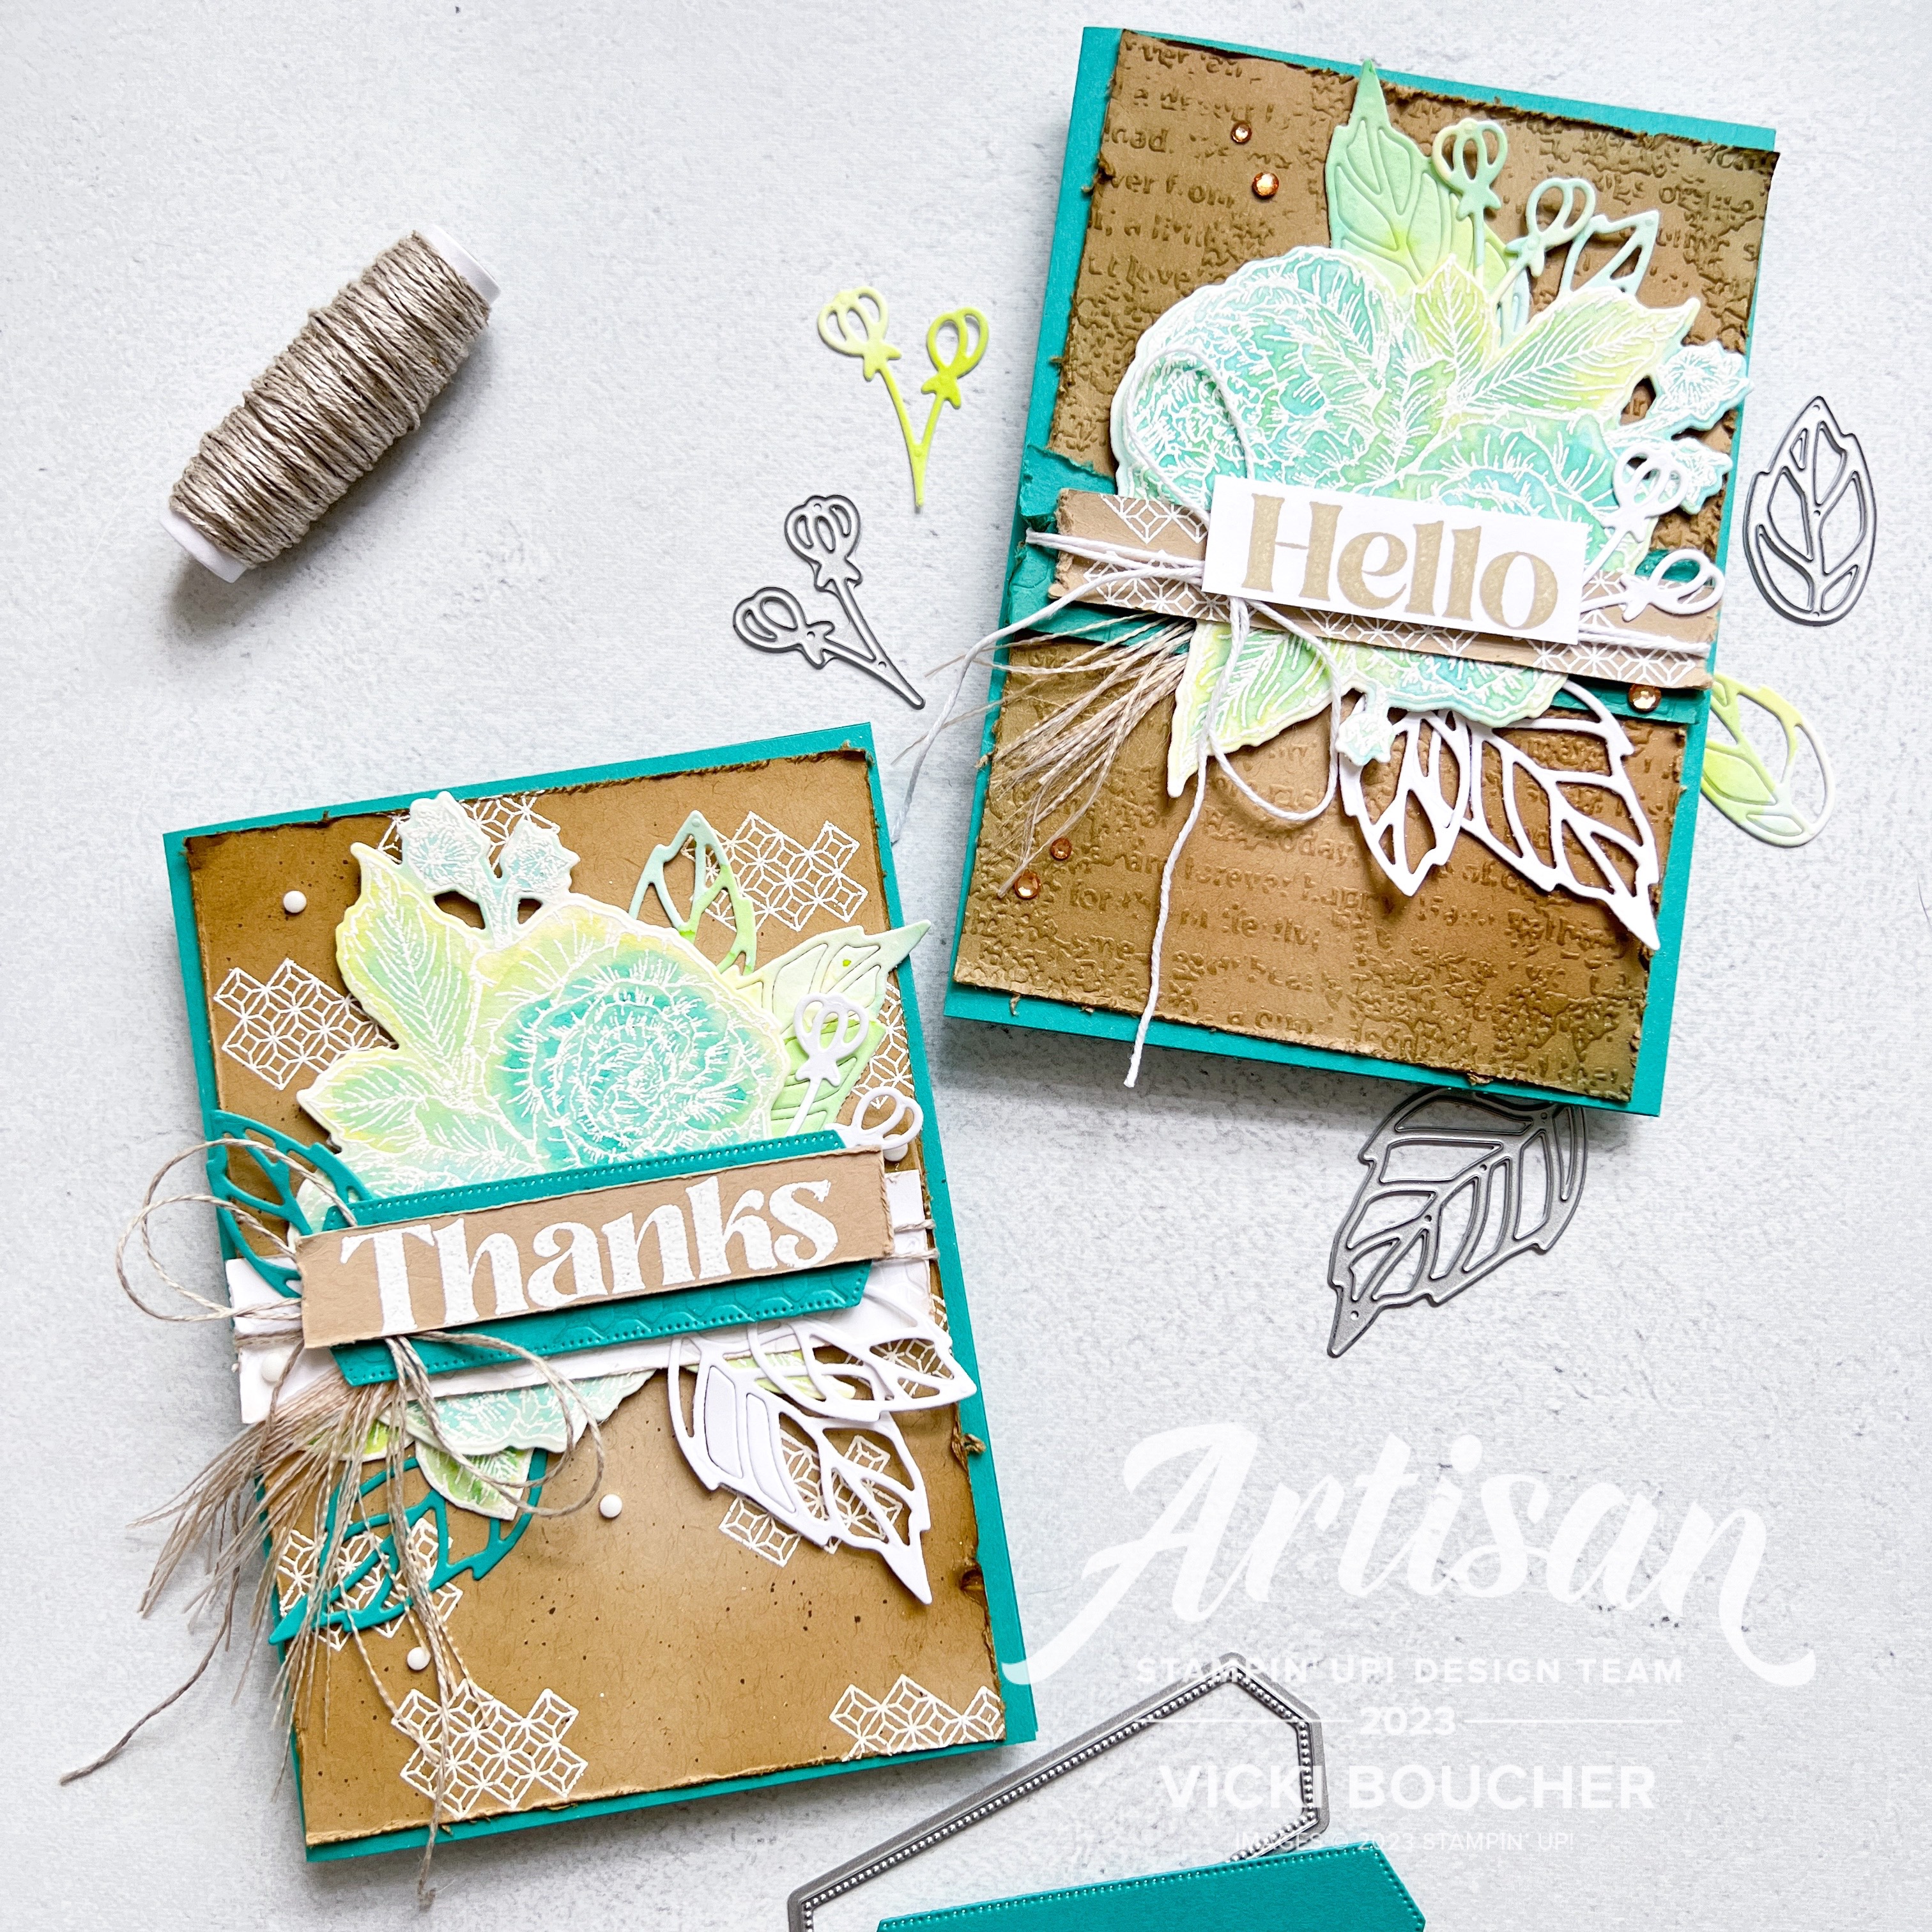
Hello Card

For my first card I used the emboss resist technique and watercolour for the flowers. Use Fluid Flow 100 Watercolor Paper for best results when applying lots of ink. I used a mix of colours Bermuda Bay, Shaded Spruce and Parakeet Party. I like to use the large flat brush tip from the Water Painters, have a bowl of water and paper towel to soak up excess water when needed. The detailed die images are a watercolour wash using the same colors and watercolor paper. Once dry I then die-cut them out with the Stampin' Cut Emboss Machine.


The background panel is dried embossed using Timeworn Type 3D Embossing Folder in Crumb Cake cardstock and I applied Soft Suede ink with the Blending Brush. To create the edges, I used the blade of the Paper Snips and run along the edges of the cardstock. 


When it comes to creating my paper craft, I do love to add lots of layers, embellishments and twine. I always love to see if I can unravel different types of ribbon and add them to my projects. Here I've used White Baker's Twine, Natural Finish Ribbon and Champagne Rhinestones.


Thanks Card

For my second card I used the same techniques for the flowers I like to blend the colours together and see what I'll get. The white embossing of the flowers coordinates well with the colours I've used.


I always love stitching on any dies and this stitched label die in Bermuda Bay cardstock added the perfect layer to my card. It makes the sentiment pop! I've heat embossed the sentiment using White Emboss Powder onto Crumb Cake cardstock.


I added Soft Suede ink with the Blending Bruch around the edges to the Crumb Cake Cardstock panel, then with the Soft Suede Stampin' Write Marker, I flicked the brush tip against the lid to create lots of tiny splatters. It's a fun way to create splatter, but just be careful with your markers when do this trick. The white images on the panel are heat embossed using Versamark, White Emboss Powder and heat set with the Heat Tool.


To finish off this card I used White Classic Matte Dots, Linen Thread and Burlap Ribbon.


Thank you for visiting my blog today, I would so love to hear your thoughts on my projects by leaving a comment below. Make sure you pop over onto Stampin' Up! Facebook page or Stampin' Up! Instagram page for lots of inspiration using the Fragrant Flowers Bundle. You will just need to go back a couple of weeks to view their projects.


If you would like a copy of the Stampin' Up! Jan - April 2023 Mini, or the Annual Catalogue 2022 - 2023 please contact me here

If you live in Australia and don't have a demonstrator, you can purchase any of the Stampin' Up! products by shopping with me at my online store here.


Happy Stamping

Vicki Boucher


08 March 2023

Colour INKspiration Challenge #CI139


Hello and welcome,

My name is Vicki Boucher, and I am from Melbourne, Australia. Tonight, is the latest Colour INKspiration Challenge #CI139 this photo was chosen by me! I just love this photo and the colours.


The chosen colour combination for #CI139 is Melon Mambo, Pool Party, Coastal Cabana and Pacific Point. As well as the chosen colours you may also like to add Basic White, Very Vanilla, Basic Black, Crumb Cake, Sahara Sand and metallics to your project. We also allow 'Ivory', 'Bronze' and 'Natural Tones' in the Stampin' Blends. If you don't have all the colour palette, feel free to use the closest SU substitute (ie: Polished Pink instead of Melon Mambo .... you get the drift).

The challenge will run for almost 2 weeks until 7pm (AEST) on Monday 20th March 2023 details to follow at the end of my blog.


The Stampin' Up! products I've used are Hydrangea Haven Stamp Set and Hydrangea Dies. I felt like using a stamp set that I haven't used in a while and I thought the sentiment was perfect for the card, as its International Women's Day today.

Starting off with the water colour background panel using Shimmery White Cardstock and large Water Painter start with the lightest colour Pool Party apply with brush in different areas and then go on to Coastal Cabana and Pacific Point. I like to leave some white areas on the cardstock. 


The next layer is the stitched circle, by die-cutting Shimmery White Cardstock with the largest circle die from Stylish Shapes Dies. Apply a water wash using Pacific Point ink with the large Water Painter brush. 


Sometimes I find Melon Mambo to be very bright and following with the water colour theme, I heat embossed the main flower image from Hydrangea Haven Stamp Set. Then I created soft tones using Melon Mambo ink for the flowers, Pool Party and Costal Cabana for the leaves.


I hope I've inspired you with the latest challenge and I do hope you'll join in. We so look forward to seeing a variety of projects using the challenge colours. Please ensure that your project is new and made specifically for this challenge.


Upload only one picture per entry straight to the discussion wall and not in an album

Colour INKspiration Challenge #CI139 will run until 7pm (ADET) on Monday 20th March 2023.

To get your creative ideas flowing, make sure you check out the Crew's Project in the CI139 Album.

Please click on the link here to join the challenge.


Thank you for visiting my blog today, I would so love to hear your thoughts on my project by leaving a comment below.

Please email me if you would like a copy of the 2022-2023 Annual Catalogue and the January - April 2023 Mini Catalogue email me here

If you live in Australia and don't have a demonstrator, you can purchase any of the Stampin' Up! products by shopping with me at my Stampin' Up! online store here.

Make sure you follow me on social media via Facebook, Instagram and Pinterest.


Happy Stamping

Vicki Boucher


06 March 2023

Creation Station Blog Hop - Ink Blending


Hello and welcome,

My name is Vicki Boucher, and I am from Melbourne, Australia. This is the latest hop with the design team at Creation Station, if you have come from Sara Langland or you may have started with me. Please make sure you hop around and see everyone's amazing projects. I'll pop a link at the end of my blog to hop around....

The design team at Creation Station are presenting their projects with the theme "Ink Blending" this would have to be one of my favourite ways to use inks and trying out different techniques.


The Stampin' Up! products I've used for both cards are Artistically Inked Stamp Set, Artistic Dies, True Beauty Stamp Set and Organic Beauty Dies. The colours are shades of blues and purples which I just love and trying out different combinations is always fun!

To create these images, use the Stamparatus with Basic White Cardstock, ink pads and Blending Brushes. First use the ink pad in a lighter colour this way you can add more colours to the stamp as you go. Then with the Blending Brush add another colour and when you just want a little bit of colour I used the Mini Blending Brushes. You have more control. 


Here I've used Tahitian Tide, Orchid Oasis and a little of Starry Sky Inks for the top images and Fresh Freesia, Gorgeous Grape and Orchid Oasis Inks for the bottom row.

Now for the inked-up background panel this is something I haven't done before, but I was reading a tutorial from Tami Hewlett where she created this background layer using Basic White Cardstock, ink with Blending Brushes and splatter water droplets onto the cardstock. I've only ever used Shimmery White Cardstock and I was so surprised that it worked! I just love it and I created two panels. 


The colours I used for the blue slimline card are Tahitian Tide, Pacific Point, Orchid Oasis, Starry Sky and Night of Navy. I started with the lighter colour and worked my way through until I blended all of the colours together. Then I dipped my fingers into a bowl of water and flicked the water onto the inked-up panel. I really like how it worked against the darker colours. The higher you flick the water the smaller the droplets will be. 

For the leaves both stamped and delicate die-cut leaves I used Coastal Cabana and Bermuda Bay. The sentiment is heat embossed and I added Pastel Sequins in Balmy Blue.


The colours for the second card background panel are Tahitian Tide, Fresh Freesia, Orchid Oasis, Gorgeous Grape and Starry Sky. I used the same technique again with the water droplets and flicked the water onto the inked-up Cardstock. I also used the Heat Tool to dry them up quickly.

The colours for the detailed die-cut piece under the flowers are Night of Navy, Starry Sky, Orchid Oasis, Pacific Point and Tahitian Tide. I added the colours using the Blending Brush and applied the inks onto Basic White Cardstock and then die-cut the image out. For the leaves I used the Stamparatus and applied Orchid Oasis and Starry Sky with the Blending Brush to create a soft colour.

I added Pastel Sequins in Petal Pink and for some of them I coloured them in using Fresh Freesia Stampin' Blend.

Thank you for visiting my blog today, I would so love to hear your thoughts on my project by leaving a comment below. Make sure you pop over to Elizabeth Price for lots of inspiration using something Ink Blending in her projects.


Please email me if you would like a copy of the 2022-2023 Annual Catalogue and the January - April 2023 Mini Catalogue please send me an email here

If you live in Australia and don't have a demonstrator, you can purchase any of the Stampin' Up! products by shopping with me at my Stampin' Up! online store here.

Make sure you follow me on social media via Facebook, Instagram and Pinterest.


Happy Stamping

Vicki Boucher