26 July 2023

Colour INKspiration Challenge #CI148


  Hello and welcome, 

My name is Vicki Boucher, and I am from Melbourne, Australia. Tonight, is the latest Colour INKspiration Challenge #CI148 this photo was chosen by Brenton Golley.


The chosen colour combination for #CI148 is Daffodil Delight, Cajun Craze, Pebbled Path and Basic Black. As well as the chosen colours you may also like to add Basic White, Very Vanilla, Crumb Cake and metallics to your project. We also allow 'Ivory', 'Bronze' and 'Natural Tones' in the Stampin' Blends. If you don't have all the colour palette, feel free to use the closest SU substitute (ie: Basic Gray instead of Pebbled Path .... you get the drift).

The challenge will run for almost 2 weeks until 7pm (AEST) on Monday 7th August 2023 details to follow at the end of my blog.


I was inspired by the Bullfinch bird in the challenge photo and I've been meaning to use the Seasonal Branches bundle for some time now. I used the mirror image technique for the bird as I wanted a male and female Bullfinch bird. 

To do this stamp the image onto the Silicone Mat using Black Memento ink and position Basic White Cardstock over the image. Then use a clear block and press down onto the image which is on the silicone mat. This should pick up the ink. Then use the Basic Black Stampin' Write Marker and go over the image with the fine tip end. I used Stampin' Blends to colour in the birds. I also used a little of Crumb Cake Stampin' Blend for the female bird. As I didn't have Pebbled Path Stampin' Blend in my stash, so instead I used a Blender Pen and ink from the Pebbled Path ink pad.


I used two different embossing folders for the card. First, I used the Stripes 3D Embossing Folder for the Cajun Craze background panel and added Pebbled Path ink with the Blending Brush to give some depth. The other one is Exposed Brick 3D Embossing Folder for the two Basic Black Country Corners die-cut images. This formed a great base for the Pebbled Path Textured Ribbon, stamped images, leaves and branches. To finish off the card I used the sentiment from the Seasonal Branches Stamp Set by heat embossing the stamped image onto Basic Black Cardstock, add White Stampin' Powder and set with the Heat Tool. 


I hope I've inspired you with the latest challenge and I do hope you'll join in. We so look forward to seeing a variety of projects using the challenge colours. Please ensure that your project is new and made specifically for this challenge.


Upload only one picture per entry straight to the discussion wall and not in an album

Colour INKspiration Challenge #CI148 will run until 7pm (ADET) on Monday 7th August 2023.

To get your creative ideas flowing, make sure you check out the Crew's Project in the CI148 Album.

Please click on the link here to join the challenge.


Thank you for visiting my blog today, I would so love to hear your thoughts on my project by leaving a comment below.


Please email me if you would like a copy of the 2023-2024 Stampin' Up! Annual Catalogue send an email to me here

If you live in Australia and don't have a demonstrator, you can purchase any of the Stampin' Up! products by shopping with me at my Stampin' Up! online store here.

Make sure you follow me on social media via Facebook, Instagram and Pinterest.


Happy Stamping

Vicki Boucher

23 July 2023

Artisan Design Team - Layering for a Vintage Look


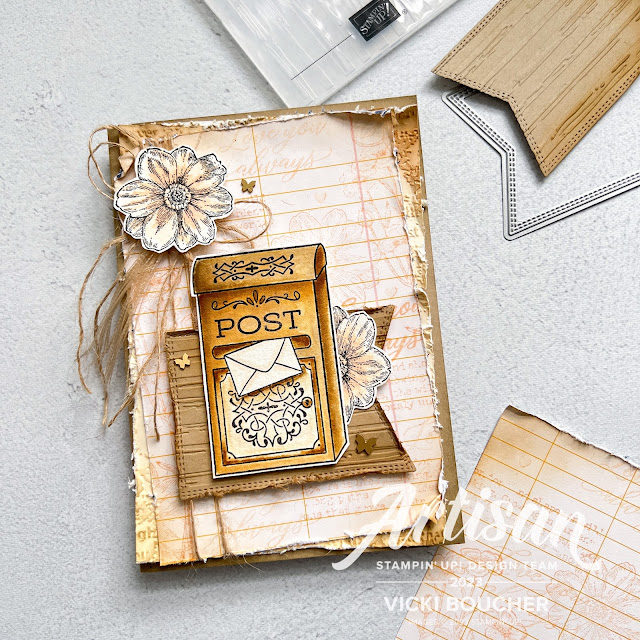
My name is Vicki Boucher and I'm from Melbourne, Australia. Today I'll be sharing with you how to layer a card using the vintage look. This is something I like to do when it comes to paper crafting and what a better way to show you how.


Some of the elements I like to use are different types of paper, stamped images, texture such as dry embossing, embellishments, ribbon etc... Very Vanilla Cardstock works well with Pecan Pie and Crumb Cake ink. I've used a mix of different stamp sets for this card they are Quiet Meadow and Stamped With Love I just love the postbox image from the set. 


To create this technique first, emboss Very Vanilla Cardstock with any embossing folder I've used Timeworn Type 3D Embossing Folder and add Pecan Pie ink using the Blending Brush. Use the Paper Snips blade to distress the edges of the cardstock. I also did this same technique with the Stripes 3D Embossing Folder in Crumb Cake Cardstock and die-cut out the image using the Nested Essentials Dies.


Next, using multiple images, stamp off on scrap paper, then stamp directly on the Delightfully Electric Designer Series Paper. I've used Petal Pink ink for the images.


To achieve variation in colour for your watercolour images, start by adding a lighter colour, allow the image to dry, then continue to use more colour. Here, I've used Petal Pink, Crumb Cake and Pecan Pie inks.


Lastly, add interest and texture by using the Paper Snips to cut ribbon along one side; then loosen the threads and use the Take Your Pick tool to break down the Silver-Threaded Twine fibers.


Thank you for visiting my blog today, I would so love to hear your thoughts on my projects by leaving a comment below.

Please email me if you would like a copy of the new 2023-2024 Annual Catalogue, please contact me here

If you live in Australia and don't have a demonstrator, you can purchase any of the Stampin' Up! products by shopping with me at my online store here

Make sure you follow me on social media via Facebook, Instagram and Pinterest.


Happy Stamping

Vicki Boucher

16 July 2023

Stamping Sunday Blog Hop - Bish, Bash, Bosh


 Hello and welcome,

My name is Vicki Boucher and I'm from Melbourne, Australia. Today is the Stamping Sunday blog hop for the month of July and it's all about showing you some tips on techniques. It's the 3rd Sunday of the month and gee time is flying by so quickly! I'm looking forward to seeing everyone's projects and you'll be able to see them by clicking on the links which will be at the end of my blog.


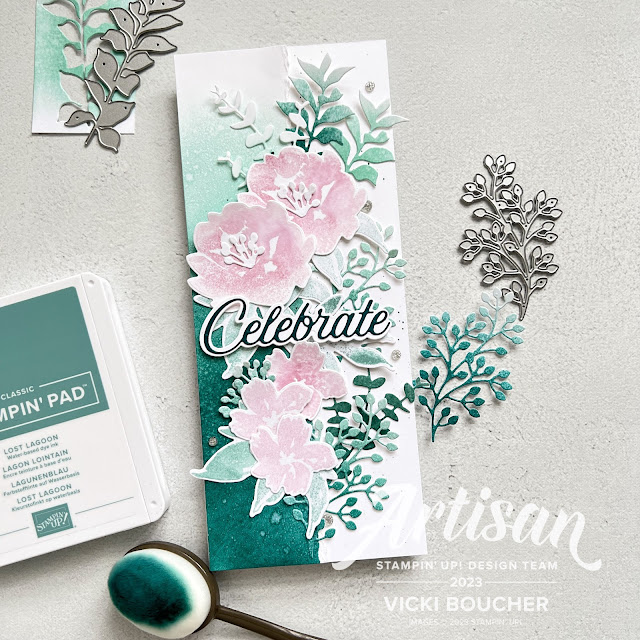
Today's project was also created for an event which was held in Melbourne yesterday to help celebrate Stampin' Up! 35th Birthday #stampinup35years #35for35 and this slimline card was one of the many cards I have created using the Textured Floral Bundle. I added the additional Wanted to Say Dies for this particular card.

I'll show you a fun way to create unique paper with Blending Brushes, inks and Stampin' Spritzer. Starting with the background strip of Basic White Thick Cardstock measured at 5cm x 21.5cm start by adding the lighter colour using the Blending Brush I've used Pool Party, Lost Lagoon and Pretty Peacock.


To create fine water droplets, spritz water using the Stampin' Spritzer and spritz onto the inked up cardstock. When finished, use a Heat Tool to thoroughly dry the cardstock.


To add interest and texture to your panel, tear the edge of the cardstock by using your fingers leaving the white of the cardstock facing up to you.


Next, use the above inked up technique for your detailed foliage dies which is from the Textured Floral Dies. Die-cut out the elements using your Stampin' Cut Emboss Machine and then add the layers to your card. 


Then stamp your images using Bubble Bath ink for the flowers and Pool Party with Lost Lagoon for the foliage. To finish off the card use Pretty Peacock and Basic White Cardstock for the sentiment by using the dies from the Wanted to Say Dies. Then place silver Sparkle Gems onto the card.


Thank you for visiting my blog today, I would so love to hear your thoughts on my projects by leaving a comment below.

Please email me if you would like a copy of the new 2023-2024 Annual Catalogue, please contact me here

If you live in Australia and don't have a demonstrator, you can purchase any of the Stampin' Up! products by shopping with me at my online store here

Make sure you follow me on social media via Facebook, Instagram and Pinterest.


Happy Stamping

Vicki Boucher

To see all of the amazing projects by the Stamping Sunday Design Team please click on their names below. 


15 July 2023

Artisan Design Team - Textured Floral


 Hello and welcome,

My name is Vicki Boucher and I'm from Melbourne, Australia. Today, I'll be sharing with you two projects I created for Stampin' Up! earlier this month for my Monthly Artisan Assignment using the Textured Floral Bundle which was shared on Stampin' Up! socials. The design team did such an amazing job on their projects so make sure you check out their creations. I'll have the link at the bottom on my blog.


Textured Floral Bundle (161232)


The Textured Floral Bundle (161232) is in the Stampin' Up! 2023-24 Annual Catalogue and is located on page 65 of the catalogue. The bundle includes Textured Floral stamp set (161229) and Textured Floral Dies (161232). I just love this bundle and I was so happy I could share with you this beautiful bundle and turn them into two projects.

Here are my two projects that I have created using the Textured Floral Bundle.


Birthday Blooms Pretty Peacock Card

To create my first card, I went for soft greens with a mix of brown tones and glimmer. I have used this layout before and it's becoming one of my favourite ways to use this layout. The card base is Pretty Peacock which is a stunning colour and it works beautifully with Lost Lagoon and Pool Party. I've created a distressed look for the cardstock panels by tearing the cardstock using my fingers and then placing them under the stamped images.


To create the larger flowers, I have stamped them in Lost Lagoon ink then stamped off once onto grid paper and then with a Sponge Dauber add Pretty Peacock ink to the center of the flower. Then I used the Stampin' Spritzer and spritz water onto the stamp, then I stamped the image onto Basic White Cardstock. This technique is lots of fun and not every same image will look the same. 

Other combination of colours used for the flowers are the following: Crumb Cake stamped off once then add Pecan Pie with the Sponge Dauber then spritz etc. Gray Granite and Pebbled Path was another combination. I also tried out Pecan Pie ink stamped off once and then add Pecan Pie ink with the Sponge Dauber. The smaller flower images are in Pool Party. 


I like to try out different combinations of colours and see how they turn out. I find if you start with one image and work your way through all of them and then die-cut the images out and place them onto your card to see how they will work together.


Some of the other elements to my card is the delicate die-cut pieces from the Textured Floral Dies I used the More Dazzle Specialty Paper in Champagne for some glimmer. Along with inked up Basic White Cardstock in Pretty Peacock by using the Blending Brush.

To finish off the card I added Black & White Gingham Ribbon, Sparkle Gems and heat embossed the sentiment. 


Birthday Blooms Soft Pastels Card

I just love the softness of these colours combined together and the shades of pinks gives a softer feminine look. To create my second card, I used the same technique with the stamped images as the first card. The following combination of colours are as follows: Bubble Bath and Moody Mauve for the smaller flowers. Bubble Bath for the main focal flower stamped off and then sponged with Bubble Bath ink. I also added Bubble Bath ink with the Blending Brush to the main flower.


Other colour combinations are Pool Party and Lost Lagoon for the stamped images of the leaves and also some leaves using Pretty Peacock on it's own. Gray Granite and Pebbled Path inks for the other flowers.


The background panel is Basic White Cardstock with lots of different stamped images in the above mentioned colours and technique. I also added ink to the cardstock using Blending Brushes such as Bubble Bath ink where the stamped flower images are on the background. 


I've left some white space on the background panel for the sentiment stamped in Pretty Peacock and the card base is in Pretty Peacock. To finish off the card I added a Linen Thread bow and Iridescent Rhinestone Basic Jewels.

Thank you for visiting my blog today, I would so love to hear your thoughts on my project by leaving a comment below.


Make sure you pop over onto Stampin' Up! Facebook page or Stampin' Up! Instagram page for lots of inspiration using the Textured Floral Bundle. You will just need to go back to the last weekend of July 2023 to view our projects.

Please email me if you would like a copy of the 2023-2024 Stampin' Up! Annual Catalogue send an email to me here

If you live in Australia and don't have a demonstrator, you can purchase any of the Stampin' Up! products by shopping with me at my Stampin' Up! online store here.

Make sure you follow me on social media via Facebook, Instagram and Pinterest.

Happy Crafting

Vicki Boucher


13 July 2023

#TGIFC428 Color Challenge Textured Floral


 Hello and welcome,

My name is Vicki Boucher and I'm from Melbourne, Australia. Today, I'll be sharing with you a card I've made for TGIF Challenge #TGIFC428 and the challenge is "Colour Challenge" Make sure you check out the design team and see their amazing projects. The colours are Sweet Sorbet, Lemon Lolly and Basic Black.


Here's my take on these gorgeous colours it certainly isn't something I would normally use when it comes to card making, but I'm always up for a challenge.


I've used the Textured Floral bundle and it's been my go-to the bundle is from the Stampin' Up! 2023-24 Annual Catalogue. The reason why is because I've been creating a display board for The Create, Share and Play demonstrator team event called "35 for 35" it's a global event to help celebrate the 35th Anniversary of Stampin' Up! It's on this weekend and we have a very special guest flying in from Utah, Sara Douglass our amazing Stampin' Up! CEO. I can't wait!!


Now for my card I created a water colour wash using Fluid 100 Watercolor Paper and a Water Painter I used the large flat brush tip. I started with Lemon Lolly ink and then Sweet Sorbet. I like to add lots of water and play around with the two inks. I also use the Heat Tool to push the ink around on the paper.


To create the three larger flowers, I stamped them in Sweet Sorbet ink and then stamped off twice onto the grid paper. Then using the Stampin' Spritzer spritz water onto the stamp and then stamp onto Basic White Cardstock. I also did this with the smaller Lemon Lolly flowers. Then die-cut out the flowers.


The elements of Basic Black are flower centers and foliage die-cuts from the Textured Floral Dies in Basic Black Cardstock. The sentiment is heat embossed using White Stampin' Powder with Basic Black Cardstock. Basic Black Cardstock for the card base and my go to favourite ribbon is the Black & White Gingham Ribbon. Oh, and I added a few of the Lemon Lolly Solid Gems to finish off the card. 


Thank you for visiting my blog today, I would so love to hear your thoughts on my project by leaving a comment below.


Please email me if you would like a copy of the 2023-2024 Stampin' Up! Annual Catalogue send an email to me here

If you live in Australia and don't have a demonstrator, you can purchase any of the Stampin' Up! products by shopping with me at my Stampin' Up! online store here.

Make sure you follow me on social media via Facebook, Instagram and Pinterest.


Happy Stamping

Vicki Boucher

12 July 2023

Colour INKspiration Challenge #CI147


 Hello and welcome, 

My name is Vicki Boucher, and I am from Melbourne, Australia. Tonight, is the latest Colour INKspiration Challenge #CI147 this photo was chosen by Nikki Spencer.


The chosen colour combination for #CI147 is Very Vanilla, Copper Clay, Pool Party and Lost Lagoon. As well as the chosen colours you may also like to add Basic White, Basic Black, Crumb Cake and metallics to your project. We also allow 'Ivory', 'Bronze' and 'Natural Tones' in the Stampin' Blends. If you don't have all the colour palette, feel free to use the closest SU substitute (ie: Pecan Pie instead of Copper Clay .... you get the drift).

The challenge will run for almost 2 weeks until 7pm (AEST) on Monday 24th July 2023 details to follow at the end of my blog.


The challenge colours are just gorgeous together and I couldn't wait to start playing with them. I just love Lost Lagoon and I'm so glad Stampin' Up! decided to have this colour return as one of the core colours. It goes really well with Pool Party too.

Today's card is a vintage style card using the Paper Florist Dies, Textured Floral Dies and stamp set for the sentiment. I had fun creating this card with more details below.


I started with the flower dies from the Paper Florist Dies and die-cut out a number of different images in Very Vanilla Cardstock. Then I like to add some interest by dry embossing them with the Timeworn Type 3D Embossing Folder. Using either a Blending Brush or Sponge Dauber I added the challenge colours to each of the flowers. These colours are great for that vintage feel. I also spritz water onto the flowers with the Stampin' Spritzer.


As this was so much fun to create using this vintage technique for the flowers, I decided to create a panel as well. Using Very Vanilla Cardstock dried embossed using the Timeworn Type Embossing Folder and adding the challenge colours to the embossed cardstock with a Blending Brush. Spritz water onto the cardstock and then I scrunched up the inked-up cardstock. Then carefully unscrunch the cardstock and let it dry.


Next, I also did this with the Pool Party Cardstock by spritzing water using the Stampin' Spritzer front and back of the cardstock. Then scrunch and unscrunch the cardstock then let it dry. I also did this same technique to the smaller embossed Lost Lagoon panel. 


As you probably know I love to add layers to my cards, so I decided to use the cute fringe die from the Paper Florist Dies to create an interesting layer. Then I added strands from the Jute Trim in Copper Clay. To finish off the card I added the bronze Brushed Metallic Dots.

I hope I've inspired you with the latest challenge and I do hope you'll join in. We so look forward to seeing a variety of projects using the challenge colours. Please ensure that your project is new and made specifically for this challenge.


Upload only one picture per entry straight to the discussion wall and not in an album

Colour INKspiration Challenge #CI147 will run until 7pm (ADET) on Monday 24th July 2023.

To get your creative ideas flowing, make sure you check out the Crew's Project in the CI147 Album.

Please click on the link here to join the challenge.


Thank you for visiting my blog today, I would so love to hear your thoughts on my project by leaving a comment below.


Please email me if you would like a copy of the 2023-2024 Stampin' Up! Annual Catalogue send an email to me here

If you live in Australia and don't have a demonstrator, you can purchase any of the Stampin' Up! products by shopping with me at my Stampin' Up! online store here.

Make sure you follow me on social media via Facebook, Instagram and Pinterest.


Happy Stamping

Vicki Boucher