25 September 2024

Colour INKspiration Challenge #CI174


Hello and welcome,

My name is Vicki Boucher, and I am from Melbourne, Australia. Tonight, is the latest Colour INKspiration Challenge #CI174 this photo was chosen by Colour INKspiration Crew Member, which just happens to be me!


The chosen colour combination for #CI174 is Pool Party, Bubble Bath, Highland Heather and Gorgeous Grape. As well as the chosen colours you may also like to add Basic White, Basic Black, Very Vanilla, Basic Beige, Crumb Cake and metallics to your project. We also allow 'Ivory', 'Bronze' and 'Natural Tones' in the Stampin' Blends. If you don't have all the colour palette, feel free to use the closest SU substitute (ie: Pretty in Pink instead of Bubble Bath .... for example).

The challenge will run for almost 2 weeks until 7pm (AEST) on Monday 7th October 2024 details to follow at the end of my blog.


Today's card is a very special card because I've made this for my mum who'll be turning 80 next year and the challenge colours were perfect for her birthday card. I wanted to go all out and make something special with lots of sparkle, embellishments ribbon and lots of different elements made into a Z-Fold card. 


I love the large magnolias from the online exclusive Magnolia Mood bundle, stamped in Gorgeous Grape and coloured in with the Stampin' Blends in the following colours Highland Heather, Bubble Bath and Pool Party. I used the brush tip for most of the colouring in and I also used the Color Lifter to blend in some of the colour. 


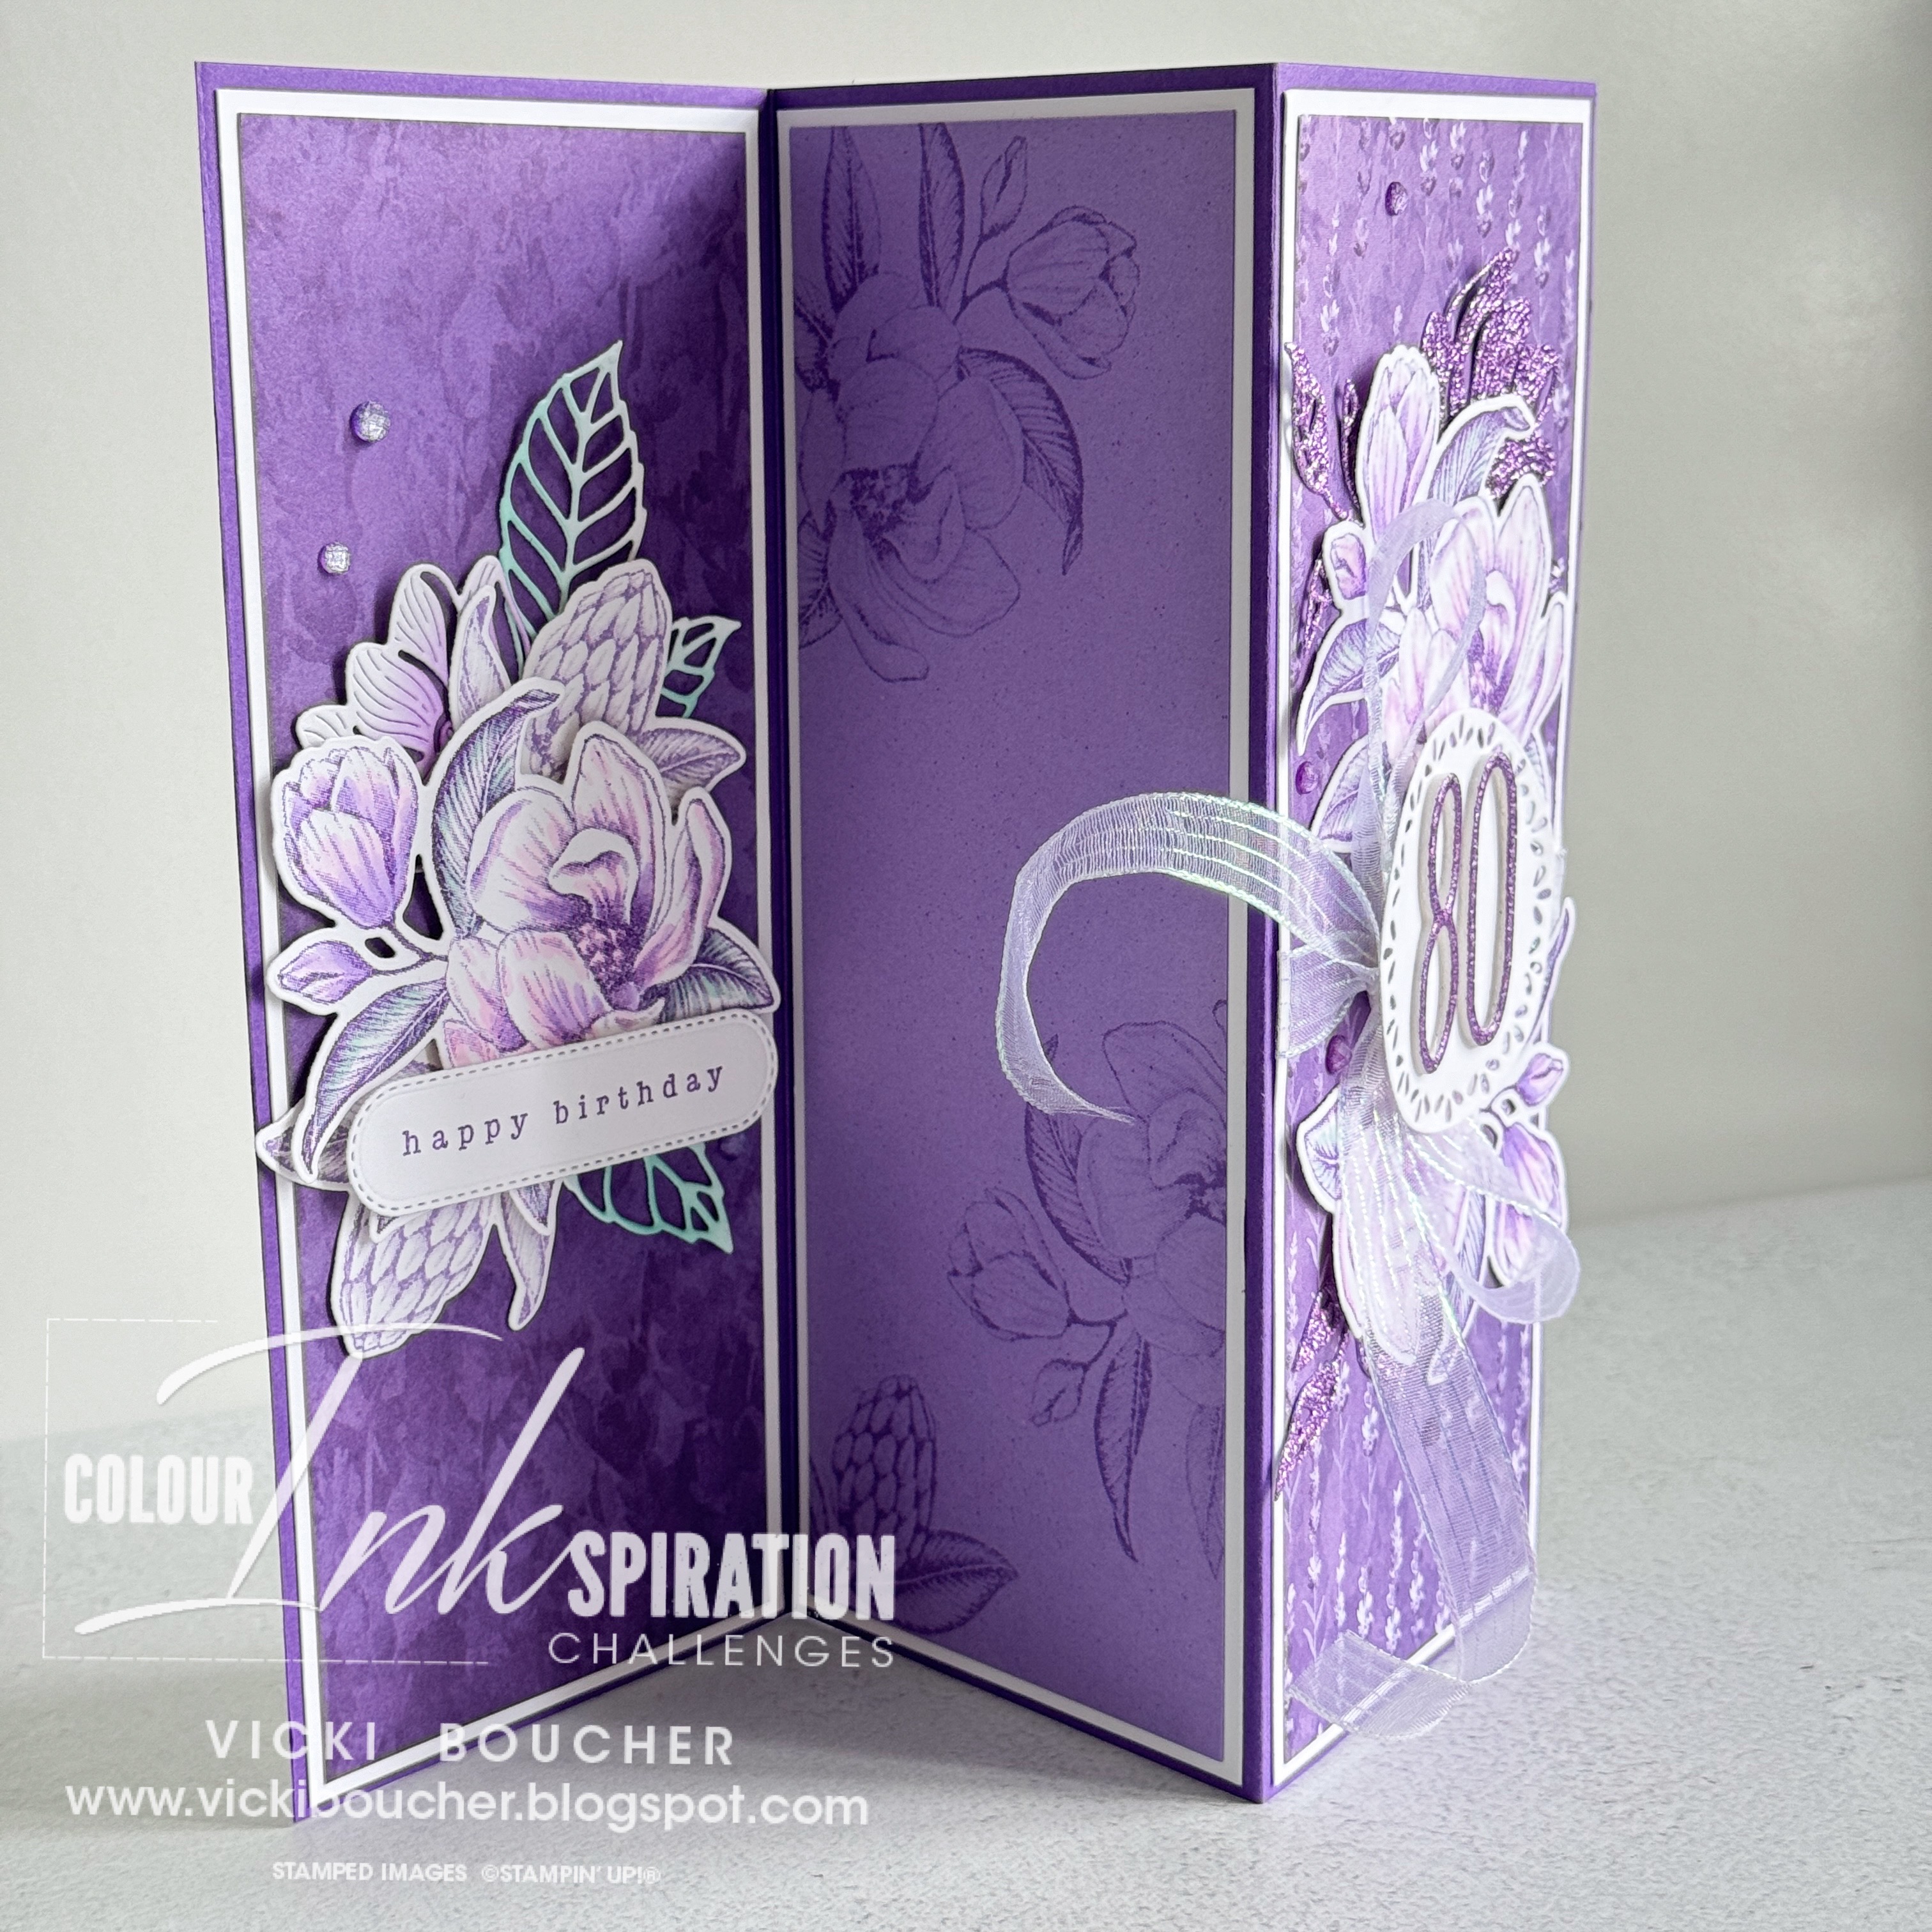
The card base is a sheet of Gorgeous Grape cardstock cut at 27cm x 21cm, scored at 9cm and 18cm and then folded into a Z-fold. I added Basic White cardstock for each of the panels cut at 20.6cm x 8.5cm and then layered another piece of paper on top cut at 20.1cm x 8cm. I used the Perennial Lavender Designer Series Paper, Country Lace Designer Series Paper and Highland Heather cardstock. 


I used the Highland Heather glimmer paper which is from Three Color Glimmer Specialty Paper (162813) for the Alphabet A La Mode Dies and for the detailed images from the Magnolia Mood Dies. 


For the large bow at the front of the card I used the Iridescent Striped Trim Ribbon it picks up colour from the light and it's easy to tie into a bow for your projects.


The sentiment is from the Country Birdhouse stamp set, stamped in Gorgeous Grape onto Basic White cardstock and die-cut out using the long-stitched label die from the Changing Leaves Dies. 


Too add more interest, I used the two detailed leaves dies die-cut out in Basic White cardstock and added colour using Pool Party ink with the Blending Brush.


I kept the inside of the card simple with just some stamping using the magnolias stamps and paper from the Country Lace Designer Series Paper.


This is how the card looks when standing up from the inside. I have left space for me to write a message on the basic white cardstock panel. 


Other elements used on the card are Purple Fine Shimmer Gems (162611) and Spotlight on Nature Dies.

Here is how the card looks when folded up and can be placed inside a slimline envelope. 


I hope I've inspired you with the latest challenge and I do hope you'll join in. We so look forward to seeing a variety of projects using the challenge colours. Please ensure that your project is new and made specifically for this challenge.

Challenge guidelines:

  • Create a NEW project made specifically for this challenge.
  • Use all of the challenge colours (or close substitutions) unless stated.
  • Upload only ONE picture per entry straight to the discussion wall and NOT in an album.

Colour INKspiration Challenge #CI174 will run until 7pm (ADET) on Monday 7th October 2024.

To get your creative ideas flowing, make sure you check out the Crew's Project in the CI174 Album.

Please click on the link here to join the challenge.


Thank you for visiting my blog today, I would so love to hear your thoughts on my project by leaving a comment below.

Please email me if you would like a copy of the 2024-2025 Stampin' Up! Annual Catalogue send an email to me here


If you live in Australia and don't have a demonstrator, you can purchase any of the Stampin' Up! products by shopping with me at my Stampin' Up! online store here.

Make sure you follow me on social media via Facebook, Instagram and Pinterest.


Happy Stamping

Vicki Boucher


23 September 2024

Heart of Christmas Blog Hop - Week 8


Hello and welcome my friends,

My name is Vicki Boucher and I'm from Melbourne, Australia. Today, I'll be sharing with you a Christmas card I've made for the latest blog hop with the team from Art With Heart in Australia and we are now onto week 8.

The Heart of Christmas blog hop will be on Monday at 8pm each week until November 25th. I'm looking forward to seeing everyone's beautiful creations, so make sure you visit everyone's blog. The link for the next person will be at the end of my blog.


Here's my card for tonight's blog hop I used the Decorative Trees bundle (164085) which is located on page 42 of the Stampin' Up! Mini Catalogue. I created a whimsical Christmas card using soft tones from the three colours I used and made a magical watercolour wash background.


Starting with the three Christmas trees I heat embossed them using white Stampin' Emboss Powder and used the emboss resist technique. The colours I used for the trees are Summer Splash, Blueberry Bushel and Fresh Freesia all three colours are beautiful when used for a colour combination. I applied the inks using a Blending Brush for each of the colours and keeping it soft for a pretty look.


I used the same colours for the watercolour wash background using lots of water with the inks to dilute the colours when applied to the watercolour paper. Tip; I like to use the wide brush tip Water Painter and a bowl of water this gives me more control when adding water to the coloured inks. I use the Heat Tool to speed up the drying process and then add more colour to the watercolour paper. 

Afterwards I added lots of splattered ink to the background using the same Water Painter. I also mixed together white Kraft ink diluted with a little water in a bowl. Then tap the brush against a pair of scissors or a pencil to achieve the splattered look. Make sure it's dry before adding your next layer (I found out the hard way that kraft ink takes a lot longer to dry out on watercolour paper than normal cardstock).


As you can see, I used the Iridescent Striped Ribbon it is so pretty and it complements the three colours so well together. Using the ribbon, I made a faux bow to be placed under the trees. I placed Stampin' Dimensionals under the trees for some added dimension. 

The sentiment is from the Decorative Trees stamp set and is stamped in Fresh Freesia ink onto Basic White cardstock. The stitched label die from the Cheerful Daisies dies fits the greeting perfectly and finishes the card off nicely. I used white Iridescent adhesive-backed discs for a little sparkle! They blend in well with the other colours used.


Thank you for visiting my blog today, I would so love to hear your thoughts on my project by leaving a comment below.


Now it's time to visit Judy May's blog, I can't wait to see her beautiful Christmas project.


If the link is broken Sharon is our host for the Heart of Christmas blog hop with all of the list of the participants, click on Sharon Davern's name to see the list.


Please email me if you would like a copy of the 2024-2025 Stampin' Up! Annual Catalogue or Mini 2024 Catalogue send an email to me here


Stampin' Up! 2024 Mini Catalogue


If you live in Australia and don't have a demonstrator, you can purchase any of the Stampin' Up! products by shopping with me at my Stampin' Up! online store here.

Make sure you follow me on social media via Facebook, Instagram and Pinterest.


Happy Stamping

Vicki Boucher


15 September 2024

Stamping Sunday Blog Hop - Unfold Funfolds


Hello and welcome,

My name is Vicki Boucher and I'm from Melbourne, Australia. Today is Stamping Sunday blog hop for the month of September and for this month's theme is "Unfold Funfolds" which means anything like a Fancy Fold or Fun Fold in our projects. It's the 3rd Sunday of the month. I'm looking forward to seeing everyone's projects and you'll be able to see them by clicking on their names at the end of my blog.


I haven't made a fun fold card in a long time, so it was fun to try something different when it comes to card making. I made a Twist and Pop Card back in July 2020 and there is a You Tube video on how to make this type of card, I'll add it at the end of this post.


For today's project a made a Christmas pop & twist card using products from both the Mini and Annual Stampin' Up! Catalogues. I used the Decorative Trees Bundle (164085) which is located on page 42 of the Mini Catalogue and also the Peaceful Season Bundle (164021) which is located on page 25. 

The card looks simple from the outside, but once opened the inside pops out! There is a 4 panel, pop up element inside. You don't need an engineering degree either to make one of these. You'll just need Cardstock and strong adhesive; I've used Stampin' Seal and Multipurpose Liquid Glue which has worked for my project. I used Thick Basic White cardstock for the card base and everything else is either Basic White cardstock or specialty paper.


Let's have a look inside the card, I used the Brushed Gold Cards & Envelopes (162177) and used one of the cards for the 4 panels. This was my starting point to how I was going to make my card. 


I just love gold and white together it's so sophisticated and a classic for Christmas cards. I used different types of Christmas trees dies from the Decorative Trees Dies to form the Christmas trees.


The greeting inside the card is from the Decorative Trees stamp set and is heat embossed using Versamark ink, adding Gold Embossing Powder and heat set with the Heat Tool. 


Now for the outside of the card which I made lots of different layers starting with the three Christmas Trees; two of them are die-cut out using Basic White Cardstock and the top Christmas tree is heat embossed using Gold Embossing Powder. 


The three trees are layered over a sheet of white & gold paper from the Nature's Sweetness Specialty Paper (162616), there's an embossed panel in white cardstock using the Forever Plaid 3D Embossing Folder (164049) which is gorgeous to use and then underneath that is a panel of Gold Foil (132622) I 'am so happy it's back!


I used the Peaceful Season Dies for the sentiment, die-cut out using gold foil and basic white cardstock and heat embossed the 'Merry' with gold embossing powder. To finish off the card I added a gold foil star for the tree and gold Blooming Pearls for the embellishments. 


Here is the link for the You Tube tutorial on how to make this Twist & Pop Fancy Fold card.


Thank you for visiting my blog today, I would so love to hear your thoughts on my project by leaving a comment below.

Please email me if you would like a copy of the 2024-2025 Stampin' Up! Annual Catalogue or Mini 2024 Catalogue send an email to me here

If you live in Australia and don't have a demonstrator, you can purchase any of the Stampin' Up! products by shopping with me at my Stampin' Up! online store here.

Make sure you follow me on social media via Facebook, Instagram and Pinterest.


Happy Stamping

Vicki Boucher


To see all of the amazing projects by the Stamping Sunday Design Team please click on their names below. 


11 September 2024

Colour INKspiration Challenge #CI173


 Hello and welcome, 

My name is Vicki Boucher, and I am from Melbourne, Australia. Tonight, is the latest Colour INKspiration Challenge #CI173 this photo was chosen by Colour INKspiration Crew Member, Bronwyn Eastley (Colour INKspiration founder).


The chosen colour combination for #CI173 is Very Vanilla, Shy Shamrock and Cherry Cobbler. As well as the chosen colours you may also like to add Basic White, Basic Black, Very Vanilla, Basic Beige, Crumb Cake and metallics to your project. We also allow 'Ivory', 'Bronze' and 'Natural Tones' in the Stampin' Blends. If you don't have all the colour palette, feel free to use the closest SU substitute (ie: Real Red instead of Cherry Cobbler .... for example).

The challenge will run for almost 2 weeks until 7pm (AEST) on Monday 23rd September 2024 details to follow at the end of my blog.


Today's card is a Christmas card using the Snowy Wonder bundle (164125) it's from the Snowy Scenes Suite Collection and it's located on page 33 of the Stampin' Up! 2024 Mini Catalogue. I instantly fell in love with the cute penguin from the stamp set and I just had to get it. He's so cute!

I stamped the images using the challenge colours onto Basic White cardstock and the penguin using Tuxedo Black Memento ink. Then I used the coordinating Snowy Wonder Dies to die-cut out the images.


There are two different types of dies to make a snow globe where you could make a shaker card, but I went with a simpler way by using Very Vanilla cardstock die-cut out the snow globe and then add the different elements to the snow globe.

I made a background water colour wash using Fluid 100 Watercolor Paper and Shy Shamrock ink. To create this effect, I first add water with the Water Painter to the watercolor paper, next I add diluted ink to the paper and push it around with the Heat Tool until the ink dries out. I like to go back and add more ink to the paper to achieve a deeper colour.

I added some embellishments to the card using Very Vanilla Earth Tones Shimmer Gems (164070) and Textural Elements (159966).


I hope I've inspired you with the latest challenge and I do hope you'll join in. We so look forward to seeing a variety of projects using the challenge colours. Please ensure that your project is new and made specifically for this challenge.

Challenge guidelines:

  • Create a NEW project made specifically for this challenge.
  • Use all of the challenge colours (or close substitutions) unless stated.
  • Upload only ONE picture per entry straight to the discussion wall and NOT in an album.

Colour INKspiration Challenge #CI173 will run until 7pm (ADET) on Monday 23rd September 2024.

To get your creative ideas flowing, make sure you check out the Crew's Project in the CI173 Album.

Please click on the link here to join the challenge.


Thank you for visiting my blog today, I would so love to hear your thoughts on my project by leaving a comment below.

Please email me if you would like a copy of the 2024-2025 Stampin' Up! Annual Catalogue send an email to me here


If you live in Australia and don't have a demonstrator, you can purchase any of the Stampin' Up! products by shopping with me at my Stampin' Up! online store here.

Make sure you follow me on social media via Facebook, Instagram and Pinterest.


Happy Stamping

Vicki Boucher


09 September 2024

Heart of Christmas Blog Hop - Week 6


Hello and welcome my friends,

My name is Vicki Boucher and I'm from Melbourne, Australia. Today, I'll be sharing with you a Christmas card I've made for the latest blog hop with the team from Art With Heart in Australia and we are now onto week 6.

The Heart of Christmas blog hop will be on Monday at 8pm each week until November 25th. I'm looking forward to seeing everyone's beautiful creations, so make sure you visit everyone's blog. The link for the next person will be at the end of my blog.


Here's my card for tonight's hop, I've used the Reindeer Fun Bundle (164044) which is located on page 27 of the Stampin' Up! Mini Catalogue and it's part of the Reindeer Days Suite Collection. I went in another direction with this bundle and went with Nordic style using white and neutral colours. I just love the paper from the Country Woods Designer Series Paper (163393) and the Oxidized Copper Specialty Designer Series Paper (162190) for some of the elements.

Using a panel of wood paper selected from the Country Woods DSP I like to tear the paper by using my fingers and to create an organic look. I like how it exposes some of the white part from the printed paper. The sentiment is from the Reindeer Fun Stamp Set, stamped in VersaMark ink adding white powder and heat embossed the sentiment using the heat tool.


The deer is stamped in Early Espresso and coloured in using Stampin' Blends in the following colours SU500, SU800, light & dark Pecan Pie and Color Lifter. I like to leave some white space around the face, throat, tail and just near their feet (hooves). I used the coordinating Reindeer Fun Dies to die-cut out the deer. 


To make the presents I used the two present dies from the Reindeer Fun Dies, die-cut two in Basic White Cardstock and one in Oxidized Copper Specialty DSP. I also used the cute bow die for the top of the presents. I used thin strips of white cardstock and copper paper to match the bows for the presents. Tip; use Adhesive Sheets (152334) and attach to the backing of cardstock or DSP to make your own stickers this makes it easier to apply to your card making.


To make the Christmas lights I used the detailed lights die and die-cut out two in Basic White and two in Oxidized Copper. Next, using paper snips scissors I snipped off the light bulb in copper and added them to the white Christmas lights. I also used adhesive sheets for the backing of the Christmas lights.

The stamped images on the white background panel are stamped in Crumb Cake ink and then I added the peekaboo window using the circular open tree die using Basic White Cardstock and layered it over the stamped panel.


Thank you for visiting my blog today, I would so love to hear your thoughts on my project by leaving a comment below.


Now it's time to visit Rosa Leyden's blog, I can't wait to see her beautiful Christmas project.


If the link is broken Sharon is our host for the Heart of Christmas blog hop with all of the list of the participants, click on Sharon Davern's name to see the list.


Please email me if you would like a copy of the 2024-2025 Stampin' Up! Annual Catalogue or Mini 2024 Catalogue send an email to me here


Stampin' Up! 2024 Mini Catalogue


If you live in Australia and don't have a demonstrator, you can purchase any of the Stampin' Up! products by shopping with me at my Stampin' Up! online store here.

Make sure you follow me on social media via Facebook, Instagram and Pinterest.


Happy Stamping

Vicki Boucher


01 September 2024

Creation Station Blog Hop - Stampin' Blends


 Hello and welcome,

My name is Vicki Boucher, and I am from Melbourne, Australia. This is the latest hop with the design team at Creation Station, if you have come from Yvonne's blog or you may have started with me. Please make sure you hop around and see everyone's amazing projects. I'll pop a link at the end of my blog.

The design team at Creation Station are presenting their projects with the theme Stampin' Blends. Stampin' Up! have a huge range of alcohol coloured markers and they are perfect for adding colour to line art images of people, nature and more. Plus there's a range of natural colours as well as Bronze and Ivory. Blending light and dark to give you depth and you can also remove colour by using the Colour Lifter.


Today's project I've made a Christmas card using the Reindeer Fun bundle (164044) which is located on page 27 of the Stampin' Up! 2024 Sept - Dec Mini Catalogue. I know I'm going to love this bundle. I've only used some of the images from the stamp set and the two reindeers together are so adorable. There's a variety of different dies from the Reindeer Fun Dies to use to decorate your Christmas cards, paper crafts and even scrapbooking. 


For the images of the reindeer, I used Basic Gray ink and stamped onto Basic White Cardstock, Basic Gray is a lot softer than Black ink and it blends in well with Smokey Slate Stampin' Blends. A helpful tip when colouring in the deer is to leave some white space such as the face and use the Colour Lifter to remove some of the gray, especially near the face and ears.


I coloured in the background panel under the white frame die-cut using Pool Party Stampin' Blends both light and dark. Then I added white snowflakes by stamping the images a number of times using Versamark ink, adding White Stampin' Emboss Powder and heat set with the Heat Tool. 


The torn strips of Basic White Cardstock are layered over one another and I added Stampin' Blend Pool Party to create a shadow to the snow.

I die-cut out the holly using Basic White cardstock and then coloured the holly using Pool Party and Petal Pink Stampin' Blends.


Thank you for visiting my blog today, I would so love to hear your thoughts on my project by leaving a comment below. Make sure you pop over to see Barb Pfeffer's Blog for lots of inspiration with her projects.


Make sure you follow me on social media via Facebook, Instagram and Pinterest for more inspiration.

Please email me if you would like a copy of the new Stampin' Up! 2024-2025 Annual Catalogue or Mini Catalogue, please contact me here.


Stampin' Up! 2024 Mini Catalogue coming soon.


If you live in Australia and don't have a demonstrator, you can purchase any of the Stampin' Up! products by shopping with me at my Stampin' Up! online store here.


Happy Stamping

Vicki Boucher