Showing posts with label Rainbows. Show all posts

12 April 2024

Colour INKspiration Challenge #CI163


 Hello and welcome, 

My name is Vicki Boucher, and I am from Melbourne, Australia. Tonight, is the latest Colour INKspiration Challenge #CI163 this photo was chosen by Colour INKspiration Crew Member, Monica. What an awesome colour palette to work with and so very different. 


The chosen colour combination for #CI163 is Crushed Curry, Poppy Parade, Coastal Cabana, Gorgeous Grape and Starry Sky. As well as the chosen colours you may also like to add Basic White, Very Vanilla, Basic Beige, Crumb Cake, Basic Black and metallics to your project. We also allow 'Ivory', 'Bronze' and 'Natural Tones' in the Stampin' Blends. If you don't have all the colour palette, feel free to use the closest SU substitute (ie: Night of Navy instead of Starry Sky.... for example).

The challenge will run for almost 2 weeks until 7pm (AEST) on Monday 22nd April 2024 details to follow at the end of my blog.


When I first saw these colours I wasn't too sure on how I was going to use them as it's not my normal go to mix of colours and then I realised they are the colours of the rainbow! Especially when you start blending them together for example Crushed Curry with Poppy Parade makes orange, Starry Sky with Gorgeous Grape makes a violet or indigo and so on. This was so much fun and I like to play with colour.


I used a sheet of Basic White Cardstock and started adding ink onto the cardstock with the Blending Brush and then I would add a colour to see how it would blend in together. Once the ink dried, I then added splatter of water droplets using my fingers and I created lots of water droplets. I used the two small maple leaves dies from the Autumn Leaves Dies and die-cut out lots of maple leaves to form a rainbow wreath.


I created a large ring by die-cutting the two largest circle dies from the Stylish Shapes Dies this would form the base for my wreath and then I would start to add the leaves one by one using Multi Tombow Mono Liquid Glue.


I wanted the wreath to pop out from the card and so I used the new Basic Beige Cardstock for the background panel for some added texture I embossed it with the Timber 3D Embossing Folder and scored 2cm lines to create wood panels. Then I added some Crumb Cake ink using the Blending Brush and applied to the embossed panel this gives it some added interest to the embossed impressions. 


I also added another coloured layer underneath the Basic Beige embossed panel and it's just enough to peak through by curling the corner using your fingers. 


To finish off the card I heat embossed the sentiment which is from the new Simply Said Stamp Set which is in the new Stampin' Up! Annual Catalogue for 2024 to 2025.


I hope I've inspired you with the latest challenge and I do hope you'll join in. We so look forward to seeing a variety of projects using the challenge colours. Please ensure that your project is new and made specifically for this challenge.

Upload only one picture per entry straight to the discussion wall and not in an album

Colour INKspiration Challenge #CI163 will run until 7pm (ADET) on Monday 22nd April 2024.

To get your creative ideas flowing, make sure you check out the Crew's Project in the CI163 Album.

Please click on the link here to join the challenge.


Thank you for visiting my blog today, I would so love to hear your thoughts on my project by leaving a comment below.

Please email me if you would like a copy of the 2024-2025 Stampin' Up! Annual or Mini Catalogue send an email to me here. 

If you live in Australia and don't have a demonstrator, you can purchase any of the Stampin' Up! products by shopping with me at my Stampin' Up! online store here.

Make sure you follow me on social media via Facebook, Instagram and Pinterest.


Happy Stamping

Vicki Boucher


07 March 2022

Creation Station blog hop - Rainbow Rearrange


Hello and welcome it's Sunday or should I say a very early start to Monday morning here in Melbourne, Australia. This is the latest hop with the design team at Creation Station, if you have come from Dani Dziama who is from America or you may of started with me. Please make sure you hop around and see everyone's amazing projects. I'll pop a link at the end of my blog....

The design team at Creation Station are presenting their projects with the theme "Rainbow Rearrange" the challenge is all about rethinking, reimagining, flipping, or recoloring the traditional rainbow. I went for something a little bit different and decided on a pink rainbow with a twist.


I've used the Brilliant Rainbow Dies which is part of the Rainbow of Happiness bundle in the Stampin' Up! January to June 2022 Mini Catalogue. I haven't used the larger Rainbow die and I thought the Stampin' Blends alcohol technique would be perfect with this image.

I've used one of my favourite Stampin' Up! colors Polished Pink, I just love the bright happy colour and it's perfect with black and white. If you haven't tried the Stampin' Blends alcohol technique here's a few tips on how to do it.


You'll need Vellum Cardstock, Stampin' Blends (brighter the better), Isopropyl alcohol, ear syringe, a shot glass or bowl and a painters brush. This is such a fun technique to try out. I used both the light and dark brush end of the Polished Pink Stampin' Blends and added ink to the sheet of Vellum. Then with the painters brush I added the alcohol to the Vellum and used the ear syringe to puff air and move the alcohol around the Vellum. 

Once the Polished Pink Rainbow was die-cut out, I then also die-cut out a Basic White Rainbow and layered it under the pink rainbow. This makes the rainbow stronger when adding the pieces to the Basic White panel.


I also used the mini Rainbow boarder die for a pretty soft pink to go under the Basic White panel. To achieve a soft pink I first coloured a strip of Basic White Cardstock with Polished Pink Ink and the Blending Brush. Then I die-cut out two pieces using the mini Rainbow boarder. 


To go with the different shades of pinks I went with the Black and White paper from the Pattern Party Designer Series Paper which is in the hostess section of the Annual Catlogue and there's 48 sheets of this amazing paper. I used the Cloud Punch and punched out two spotty clouds to layer over the Rainbow. 


I needed a birthday card so I used the sentiment from the Artistically Inked Stamp Set and heat embossed White Stampin' Emboss Powder onto Basic Black Cardstock. To finish off I added Black/White Baker's Twine and Polished Pink Jewels to the card.

Now it's time to visit the very creative Barb Pfeffer to visit her blog. I'm looking forward to reading all about her creations. Just click on the next link below.


I would so love hear your thoughts on my project by leaving a comment below.

If you would like a copy of the new Stampin' Up! Mini January to June 2022 Catalogue and Annual Catalogue 2021 - 2022 please contact me here. 

If you live in Australia and don't have a demonstrator, you can purchase any of the Stampin' Up! products by shopping with me at my online store here.

Happy Stamping

Vicki Boucher


. 

30 January 2022

Artisan Design Team - Rainbow of Happiness Bundle


 Hello and welcome,

I'm so excited to be sharing with you my first assignment with the Artisan Design Team for 2022! Over the next 12 months I'll be sharing with you my creative designs using Stampin' Up! products. Make sure you visit Stampin' Up! Facebook page for lots of inspiration, techniques and tips. 


I'm on a team of five creative Artisan's from around the world and we were asked to create using the Rainbow of Happiness Bundle. This bundle includes Rainbow of Happiness Stamp Set and Brilliant Rainbow Dies they are in the new Mini Catalogue January to June 2022. I love the sentiments from the stamp set and they are perfect to brighten up someone's day! 


Rainbow of Happiness Bundle #157727 bundle savings $77.25


For my projects I've created a slimline card and three mini note cards using bright happy colours. The smaller rainbow die-cuts are the perfect size for the note cards, I'll be popping them in my daughter's lunch box for when she's at school. 

Slimline Card

The Brilliant Rainbow Dies have a variety of different sizes of Rainbows die-cut images and I've used the larger image. I was playing around with the different watercolour wash die-cut pieces and then an image popped into my head. My daughter was given a shooting star necklace trinket for Christmas and I thought why not try this same look with the larger image of the rainbow. 


The watercolour wash is a mix of colours on Shimmery White Cardstock, Water Painter I like to use the large flat brush tip and water in a bowl. The combination of colours are So Saffron and Mango Melody for the yellows, Polished Pink and Magenta Madness for the pinks, Balmy Blue and Pacific Point for blues and Fresh Freesia and Gorgeous Grape for the purples. 

I like to use a good size of Shimmery White Cardstock for my watercolour wash, cut a sheet at 10cm x 21cm for each colour this will create enough for all four cards in today's projects. Then spritz water using the Stampin' Spritzer or apply water using the Water Painter to the Shimmery paper. I always start with the lighter colour and then add more colour with the darker shade of ink. Playing around with colour is so much fun and it can change on how much ink you use.


The cloud background panel is using the faux masking technique by punching out the cloud image from the Cloud Punch and applying ink with the Blending Brush. I've used a mix of Polished Pink, Gorgeous Grape and Pacific Point to the background.

I wanted a shooting star look so I added four of the stitched stars which fits perfectly at the end of the rainbow panel. The stars are from the Give it a Whirl Dies and I just love the stitched look. The sentiment fits perfectly on the Gorgeous Grape rainbow. 

I added the additional smaller rainbow, coloured using Sponge Daubers and placed it amongst the clouds. To finish off the card I've placed a few Fresh Freesia iridescent gems and splatter of Clear Wink of Stella.


3 Mini Note Cards


The Rainbow of Happiness bundle is perfect for creating three adorable fun note cards and I just couldn't go past without making them for my daughter. I know she'll be so happy to receive them in her lunch box while at school.

Using the same colours as the above mentioned watercolour wash on Shimmery White Cardstock as I did for the slimline card and die-cut out using the medium size rainbow for the three cards. 

The measurements for the cards are - Card base 16cm x 8cm, score at 8cm and Shimmery White Panel 7.5cm x 7.5cm.


The Pacific Point card is my favourite out of the three I just love the watercolour wash background using the Balmy Blue and Pacific Point. I've added White Baker's Twine and layered the sentiment over the rainbow.


The Mango Melody card is bright and I added Gold Gilded Leafing to the card for the idea of a pot of gold at the end of the rainbow. The watercolour wash panel is a mix of So Saffron and Mango Melody. The stitched heart and star are from the Give it a Whirl Dies. I left out the greeting, as I think the card looks perfect without one.


The Fresh Freesia card has a bright pink background wash using Polished Pink and Magenta Madness inks. To create the purple rainbow I've used Gorgeous Grape and Fresh Freesia by adding ink onto the Clear Block and mix with water. Apply coloured ink to Shimmery White Cardstock and move the ink around using the Heat Tool for a fun splattered look. 


I just love the greeting on this card "you make me happy" it's a fun positive message! I've added a couple of the stitched stars to the greeting and finished off with Polished Pink iridescent rhinestones for pink raindrops.


Thank you for stopping by today and I hope you've enjoyed my projects featuring the Rainbow of Happiness Bundle. Now click on over to the Stampin' Up! Facebook page for more ideas on this bundle.

I would so love hear your thoughts on my project by leaving a comment below.

If you would like a copy of the new Stampin' Up! Mini January to June 2022 Catalogue and Annual Catalogue 2021 - 2022 please contact me here. 

If you live in Australia and don't have a demonstrator, you can purchase any of the Stampin' Up! products by shopping with me at my online store here.


Happy Stamping

Vicki Boucher


Meet the Artisan Design Team for 2022

ANN ALEXANDER
Instagram @bellestampinwithann

BERDIEN WEIDEVELD
Instagram @berdien_weideveld

BRENDA NELSON
Instagram @stampwithbrenda

BRIGITTE KEILING 
Instagram @stempelfantasie

CHARLET MALLETT
Instagram @i.heart.stamps

CHELSEY CHRISTENSEN
Instagram @creativechelsey

HÉLÈNE LEGRAND
Instagram @stamp2linotte

KAREN HADLER
Instagram @karenhadlerstampingbees

KARINE LISON
Instagram @karinelison73choupinette

KIM FEE
Instagram @simplyfairies_kimfee

LEAH FEDYNAK
Instagram @ellefedynak


MADELEINE MROTZEK
Instagram @stempelschick

MARTIN STONE
Instagram @martinmayhem

MELODIE VILJOEN
Instagram @stampingwithmelodie

SANDRA HERZOG
Instagram @herzerlskreativecke

SILVIA BERGER-FRÖHLICH
Instagram @silvie.creates

STESHA BLOODHART
Instagram @stampinhoot

TAMI HEWLETT
Instagram @tamilhewlett

VICKI BOUCHER
Instagram @vickiboucher

YVONNE SPIKMANS-VAN BRUGGEN
Instagram @thecreativeteacup


16 January 2022

Global Design Project #GDP325 Colour Challenge


Hello and welcome,

I just had to enter into the latest Global Design Project #GDP325 and it's a Colour Challenge. I just couldn't resist these pretty colours they've chosen, it's like cotton candy!

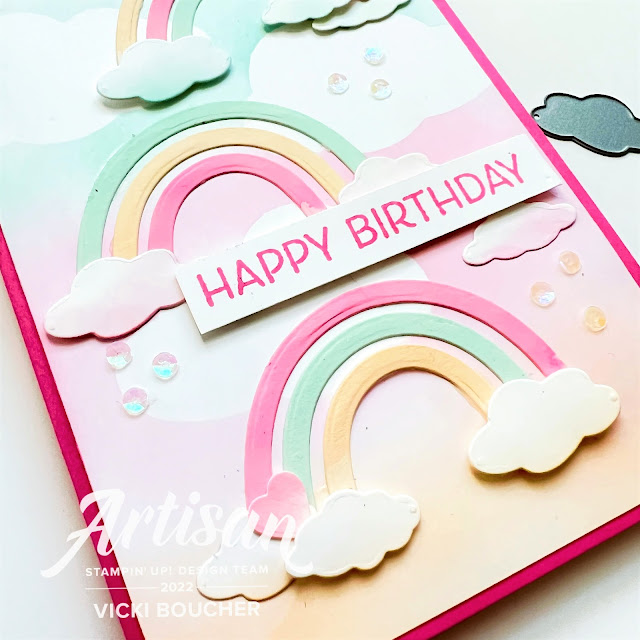
I'm really loving rainbows at the moment and the Rainbow of Happiness bundle is perfect for Polished Pink, Pale Papaya and Pool Party. That's a lot of PP's!


To create the background cloud panel, I've used the Cloud Punch and punched out a cloud to create a faux masking technique with Blending Brushes. Starting with Pool Party then onto Polished Pink and Pale Papaya. 

The rainbows are a watercolour wash using Shimmery White Cardstock, the challenge colours and Water Painters I like to use the wide brush tip. This gives the rainbows a softer look. I've used the Brilliant Rainbow Dies to die-cut out three rainbows.


All rainbows need soft clouds with a little colour and a couple of hearts. I've used the Sparkle & Shine Sequins to create raindrops and a little sparkle. To finish off the card I've stamped the sentiment in Polished Pink and adhered the cloud/rainbow panel to the card base.


Thank you for visiting my blog today, I would so love hear your thoughts on my project by leaving a comment below.

If you would like a copy of the new Stampin' Up! Mini January to June 2022 Catalogue and Annual Catalogue 2021 - 2022 please contact me here. 

If you live in Australia and don't have a demonstrator, you can purchase any of the Stampin' Up! products by shopping with me at my online store here.


Happy Stamping

Vicki Boucher

12 January 2022

Colour Creations Blog Hop - Week 31 Night of Navy


 Hello and welcome

Tonight I'll be sharing with you Week 31 of Colour Creations Blog Hop with the Art With Heart Team in Australia. It's been awhile since my last Colour Creation and I'm so excited to be joining the team for this weeks hop!

Each week there will be a Colour Creations blog hop showcasing Stampin' Up! Colors with a selection of members from the Art With Heart Team who will be joining in. I'm looking forward to seeing their beautiful projects using the Stampin' Up! Colors. You'll be able to hop around by clicking on the next link at the end of my blog.

The colour for tonight is Night of Navy which is part of the Neutrals Collection and comes in a number of different mediums such as Ink, Cardstock, DSP etc....I've used Night of Navy with Mango Melody and Gold for my hand made Rainbow card.


Today's card was inspired by the lovely Lou Kitzelman, she made a Christmas card last year using the Stitched Stars Dies and I was lucky enough to receive in the mail. I've used the new Rainbow of Happiness Bundle, it's on page 18 of the new Stampin' Up! Jan - June 2022 Mini Catalogue the bundle consists of the Rainbow of happiness Stamp Set and Brilliant Rainbow Dies. This was a must have when I first saw the catalogue.


I've paired the Rainbow bundle with the Abstract Beauty 4"x 6" Specialty Designer Series Paper. Did you notice the difference in measurements? Something a little bit different from Stampin' Up! You get 48 sheets, 4 each of 12 double-sided designs. This paper is right up my alley! The creative designs of artsy swooshes, splotches, brushstrokes and patterns are all ready for your projects. My favourite is the Night of Navy and Gold splotches sheet and it's perfect for my Night of Navy card. I've also added a couple of the floral DSP strips and layered them under the greeting and Gold Simply Elegant Trim.


To create the Mango Melody Rainbow wash I've used the negative from the Rainbow die-cut piece and then die-cut using the Layering Circle Dies. I added Gold Gilded Leafing on small amounts of dried up Multipurpose Liquid Glue to the Rainbow and then layered over the DSP with Dimensionals.


The Night of Navy ombre stitched clouds are from the Give it a Whirl Dies, I've added Night of Navy Ink to the clouds by using the Blending Brush. 


To create the sentiment from a Rainbow into a straight line, I've stretched the Photopolymer stamp and by placing it on the block with a little of Stampin' Seal Plus. Stamp the image in Versamark Ink onto a strip of Night of Navy Cardstock, sprinkle Gold Emboss Powder and heat set with the Heat Tool. 


Thank you for visiting my blog today, I would so love hear your thoughts on my project by leaving a comment below.


Now it's time to hop along and visit the lovely Rosa Leyden to see her project please click on the link below


If at any time you find a broken link, please head to the blog of this week’s host of the AWH Colour Creations Blog Hop, Catherine Proctor and she will have the list of all participants.

If you live in Australia and don't have a demonstrator, you can purchase any of the above Stampin' Up! products by shopping with me at my online store here.


Happy Stamping

Vicki Boucher


13 August 2020

Art With Heart Team Creative Showcase August - Rainbows


With all that’s happening worldwide at the moment the Art With Heart Team are here with a Rainbow theme Creative Showcase to brighten your day.

Every month the talented ladies share their inspirational ideas in a monthly Showcase and this month our projects are inspired by Rainbows.


When I heard the theme was Rainbows, I just couldn't wait to get into my craft room and start playing with lots of ink and have fun! I mean who doesn't like Rainbows! They certainly put a smile on my face.


For my Rainbow project, I've created a wreath card using the Forever Flourishing Dies, coloured Inks and Watercolor Paper.

I started with preparing the coloured Inks and adding a little ink onto the two acrylic blocks. I've used Magenta Madness, Gorgeous Grape, Pacific Point, Coastal Cabana, Mango Melody and Poppy Parade. 


Using a sheet of the Fluid 100 Watercolor Paper, I've spritzed water using the Stampin' Spritzer onto the paper. I've used the large flat brush tip of the Water Painters, adding colour to the paper and also mixing the colours together on the block. You can add more colour as you go. 


Once the Watercolor Paper is completely dry, I've die cut all of the pieces using the Forever Flourish Dies. I've added score lines to the larger/wider leaves for more detail.


To arrange the wreath as a guidance, I've punched out a circle using Whisper White Cardstock and the 2 1/4" Circle Punch.


I've used a lot of Glue Dots to the back of the leaves, starting with the larger leaves around the circle and finishing off with the smaller leaves.

As the Rainbow wreath is the main feature of the card, I've used Thick Whisper White Cardstock for the card base and the greeting in Memento Black Ink and fussy cut out. 


I hope I've inspired you with my Rainbow card  and I'm looking forward to seeing everyone else's Rainbow creation. 

The next team member to share their Rainbow inspired project is Sharon Davern


If you have a broken link or have come to this blog hop midway, you can view all the participants below:


Rachel Woollard

Tina Gillespie

Vicki Boucher

Sharon Davern

Ros Davidson

Catherine Proctor

Caroline Manwaring

Michele Taylor


11 April 2020

Social Stamping Blog Host - Rainbows


Hello and welcome,

Today, from the Social Stampers we are sharing our creations with the theme “Rainbows” for this week. I just love Rainbows! They bring a smile to my face and the colours are just gorgeous together. When my family and I go out for walks around our neighborhood, I've seen lots of hand drawn Rainbows in the windows of houses or on the footpath. Children have been drawing them and displaying their creations which makes everyone's day that little bit happier.


I feel that Rainbows bring us magic and that’s why I’ve used the unicorn stamp from the Leave A Little Sparkle Stamp Set. I think the two go nicely together. What do you think? I’ve used the embossed resist technique with White Stampin’ Emboss Powder onto Fluid 100 Watercolor Paper and heat set with the Heat Tool.


I spritzed water with the Stampin’ Spritzer onto the watercolor paper and then I added the colours to the paper. The colours I’ve used are Poppy Parade, Mango Melody, Pineapple Punch, Call Me Clover, Blueberry Bushel, Gorgeous Grape and Highland Heather. I've used three clear blocks for the ink and I added like colours together on the block. The yellows together, blue & green together and purples together. I used the Aqua Painter, applied the ink to the watercolor paper and blending the colours until I was happy.


I’ve added some sequins to the card using the rainbow colours, the sentiment is in White Stampin’  Emboss Powder and heat set onto Basic Black Cardstock.


You’ll want to see everyone’s amazing creations who have taken part in the latest Social Stamping Blog Host. You can click here to see the list of names or please click on the next button to see Chloe Evans gorgeous project.

 Chloe


Thanks for stopping by today!

Happy Crafting

Vicki Boucher
Product List

Ink: Poppy Parade, Mango Melody, Pineapple Punch, Call Me Clover, Blueberry Bushel, Gorgeous Grape and Highland Heather
Cardstock: Whisper White, Basic Black and Fluid 100 Watercolor Paper
Stamps: Leave A Little Sparkle
Colouring Tools: Aqua Painter, Stampin’ Spritzer, White Stampin’ Emboss Powder, Versamark, Heat Tool and Embossing Buddy
Embellishments: Iridescent Sequins Assortment and Woven Threads Sequin Assortment
Other Stampin’ Up! Products: 3 clear blocks and Whisper White Solid Baker’s Twine