25 October 2023

Colour INKspiration Challenge #C154


Hello and welcome, 

My name is Vicki Boucher, and I am from Melbourne, Australia. Tonight, is the latest Colour INKspiration Challenge #CI154 this photo was chosen by Rose Packer. 


The chosen colour combination for #CI154 is Berry Burst, Poppy Parade, Pool Party and Crumb Cake. As well as the chosen colours you may also like to add Basic White, Basic Black, Very Vanilla and metallics to your project. We also allow 'Ivory', 'Bronze' and 'Natural Tones' in the Stampin' Blends. If you don't have all the colour palette, feel free to use the closest SU substitute (ie: Real Red instead of Poppy Parade .... you get the drift).

The challenge will run for almost 2 weeks until 7pm (AEST) on Monday 6th November 2023 details to follow at the end of my blog.


This is a stunning photo and I love the colours for this challenge, but I did struggle to use Poppy Parade with the other colours for the challenge. I did use it but only for the sequins by colouring some of them in with Light Poppy Parade Stampin' Blend.


I recently received a new Stampin' Up! order and in it came the Joy of Noel bundle (161967), so I just had to use it for my project. I really love the Noel sentiment which is a stamp and coordinating die for each of the letters. I heat embossed the sentiment using White Emboss Powder onto Crumb Cake Cardstock and then die-cut out the word. To make the sentiment pop out from the wreath use the Foam Adhesive Sheets (152815).


To make the wreath I used the detailed pine die from the Joy of Noel Dies and die-cut out a number of times using Basic White Cardstock. Then add colour by using Berry Burst and Pool Party with a Blending Brush, leave some white space at the top of the foliage. When I make wreaths, I like to have a guide, so I use the two larger circle dies from the Stylish Shapes Dies to form a wring and then I add the foliage with adhesive. 


The background white panel is dried embossed using the Christmas Tidings Embossing Folder (162115) and layered over Crumb Cake card base.


I hope I've inspired you with the latest challenge and I do hope you'll join in. We so look forward to seeing a variety of projects using the challenge colours. Please ensure that your project is new and made specifically for this challenge.

Upload only one picture per entry straight to the discussion wall and not in an album

Colour INKspiration Challenge #CI154 will run until 7pm (ADET) on Monday 6th November 2023.

To get your creative ideas flowing, make sure you check out the Crew's Project in the CI154 Album.

Please click on the link here to join the challenge.


Thank you for visiting my blog today, I would so love to hear your thoughts on my project by leaving a comment below.

Please email me if you would like a copy of the 2023-2024 Stampin' Up! Annual or Mini Catalogue send an email to me here

If you live in Australia and don't have a demonstrator, you can purchase any of the Stampin' Up! products by shopping with me at my Stampin' Up! online store here.

Make sure you follow me on social media via Facebook, Instagram and Pinterest.


Happy Stamping

Vicki Boucher


22 October 2023

Artisan Design Team - All About Autumn Suite


 Hello and welcome,

My name is Vicki Boucher and I'm from Melbourne, Australia. Today, I'll be sharing with you three projects I created for Stampin' Up! for the month of October 2023. The Artisan assignment we got to use the All About Autumn Suite which was shared on Stampin' Up! socials. The design team did such an amazing job on their projects so make sure you check out their creations. I'll have the link at the bottom of my blog.


All About Autumn Suite (162193)

The All About Autumn Suite (162193) is in the Stampin' Up! Sept - Dec 2023 Mini Catalogue and is located on page 42-44 of the catalogue. The suite includes the following: Autmn Leaves Bundle (162186), Adhesive-Backed Speckled Dots (162191), Copper & Natural Ribbon Combo Pack (162192), Distressed Tile #D Embossing Folder (162189), Oxidized Copper 12"x 12" Specialty Designer Series Paper (162190) and All About Autumn 6"x 6" Specialty Designer Series Paper (162178).


Here are my three projects using this gorgeous suite I've used rich colours and I also went outside the box by using non-traditional colours by using shades of blues for my mini gift box. I just love the images from the Autumn Leaves Dies and the stunning oxidized specialty paper. 


Grateful Heart Envelope Treat Box & Gift Tag

I wanted to create a blue tone & metallic mini gift box by using the Envelope Treat Box (159788) plus a belly band and gift tag. The colours I've used are Night of Navy, Misty Moonlight and Boho Blue. I used a mix of metallics such as Gold Gilded Leafing for the belly band, Copper Stampin' Powder for the heat embossed gift tag and Oxidized Copper Specialty DSP for the leaf veins.


The gift tag is a combination of Oxidized Copper Specialty DSP adding Night of Navy ink to colour in specialty paper with a Blending Brush and Night of Navy Cardstock for the smaller gift tag. I added metallic copper strands to tie the two gift tags together.


For the blue die-cut leaves, I added Night of Navy, Misty Moonlight & Boho Blue ink to the Boho Blue Cardstock by using a Blending Brush.


The belly band is embossed using the Distressed Tile 3D Embossing Folder in Boho Blue Cardstock and then adding the above-mentioned inks to the cardstock.


I'm Thankful Pretty Peacock Distressed Card

For my second project I wanted to focus on the Distressed Tile 3D Embossing Folder and use it for the main panel background. 


My favourite colour would have to be Pretty Peacock and it goes beautifully with the Oxidized Copper Specialty DSP.


I stamped the various leaf images in Pretty Peacock onto the Pretty Peacock Cardstock and embossed it with the embossing folder. 


I do like to tear cardstock at the moment and it gives you another layer to play with, so I added a layer in Copper from the Oxidized Copper Specialty DSP.


Adding different elements to the card by layering different textures such as a strip of the Natural Ribbon, embossed strip of cardstock and using detailed dies to add interest.


Grateful Heart Paper Leaf Wreath Card

When I saw the Maple leaf die from the Autumn Leaf Dies, I just knew I had to create a paper leaf wreath and the background wood panel DSP would work well against the wreath. Yes, there was lots of die-cutting involved but it was so worth it!


Using Basic White Cardstock for the leaves I added a range of different colours to make the leaves and I also used the Oxidized Copper Specialty DSP for some contrast. 


The colours are the following Cajun Craze, Wild Wheat, Crushed Curry, Copper Clay, Pretty Peacock and Pecan Pie. I used a Blending Brush to blend in the colours together and then die-cut out the images to form the wreath. 


The Metallic Copper Ribbon balanced the wreath out and the sentiment layered over the wreath to finish the card off.


Thank you for visiting my blog today, I would so love to hear your thoughts on my project by leaving a comment below.


Make sure you pop over onto Stampin' Up! Facebook page or Stampin' Up! Instagram page for lots of inspiration using the All About Autumn Suite.

Please email me if you would like a copy of the 2023-2024 Stampin' Up! Annual or Mini Catalogue send an email to me here

If you live in Australia and don't have a demonstrator, you can purchase any of the Stampin' Up! products by shopping with me at my Stampin' Up! online store here.

Make sure you follow me on social media via Facebook, Instagram and Pinterest.


Happy Stamping

Vicki Boucher


15 October 2023

Stamping Sunday Blog Hop - Celebrating Good Times


 Hello and welcome,

My name is Vicki Boucher and I'm from Melbourne, Australia. Today is the Stamping Sunday blog hop for the month of October and for this month's theme is "Celebrating Good Times". It's the 3rd Sunday of the month and can you believe it we are not too far away until the end of the year! I'm looking forward to seeing everyone's projects and you'll be able to see them by clicking on their names which will be at the end of my blog.

For my theme I actually went with something different as my oldest daughter has just finished her last day of school and then she'll have her exams over the next month. I wanted to make her something special for her graduation next month, so I made two projects a card and a mini gift box to give to her.    


When I was thinking about my project, I knew I wanted to use the Wanted to Say Dies and use the Celebrate die for both projects. I also wanted to keep the colours soft tones and add sparkle for some of the elements.


Let's Celebrate You! Card

I just love Pecan Pie and would one of my favourite Stampin' Up! color! I like to tone it down when using it with Basic White and Very Vanilla Cardstock. Adding ink with the Blending Brush to the embossed cardstock using the very popular Distressed Tile 3D Embossing Folder and then rip along the edges of the cardstock.


I've added a number of different layers to the card starting with Oxidized Copper Specialty Designer Series Paper, Burlap Ribbon I just love the white stitching on the ribbon and Very Vanilla Baker's Twine.


For a soft pretty look I added a couple of Petal Pink daisies by using the daisies masks from the Abundant Beauty Decorative Masks and then fussy cut them out.


I've used the Celebrate with Tags Stamp Set for the sentiment and the Celebrate die using the Oxidized Copper Specialty Designer Series Paper.


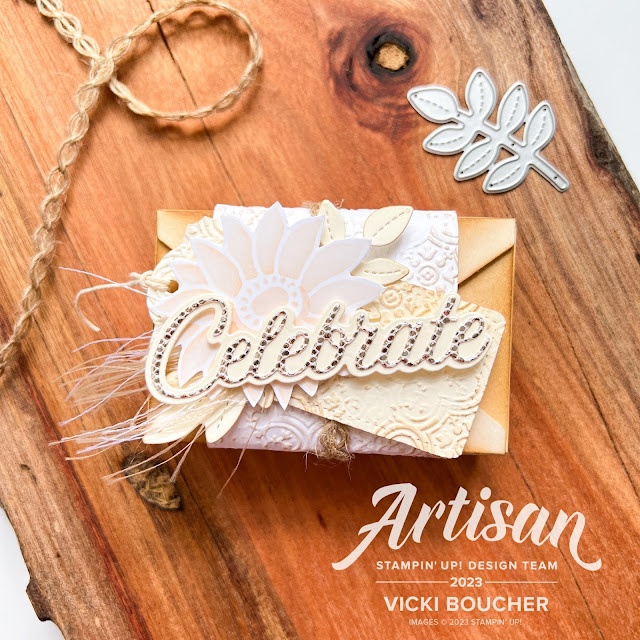
Celebrate Envelope Treat Box

Have you seen the cute Envelope Treat Boxes? They are on page 126 of the Stampin' Up! Annual Catalogue and they make the perfect gift for someone special. They are white but you can stamp on them or add colour to the boxes. I used Pecan Pie ink and applied it with the Blending Brush.


I added a belly band to the box and decorated it. Starting with a strip of Basic White Cardstock and embossed it using the Distressed Tile 3D Embossing Folder. Using the same embossing folder, I embossed the Very Vanilla gift tag and added Pecan Pie ink with the Blending Brush.


I like the idea of mixing up Very Vanilla and Basic White together it gives you a fresh clean look and added a soft subtle colour like Petal Pink gives it a wow look! For the Celebrate I die-cut the image out using the Champagne paper from the More Dazzle Specialty Paper. 


Other elements used are Natural Wavy Trim and I unraveled the Burlap Ribbon to form lots of strands.


Thank you for visiting my blog today, I would so love to hear your thoughts on my projects by leaving a comment below.

Please email me if you would like a copy of the new 2023-2024 Annual and Mini Sep-Dec 2023 Catalogue, please contact me here

If you live in Australia and don't have a demonstrator, you can purchase any of the Stampin' Up! products by shopping with me at my online store here

Make sure you follow me on social media via Facebook, Instagram and Pinterest.


Happy Stamping

Vicki Boucher

To see all of the amazing projects by the Stamping Sunday Design Team please click on their names below. 


11 October 2023

Colour INKspiration Challenge #CI153


 Hello and welcome, 

My name is Vicki Boucher, and I am from Melbourne, Australia. Tonight, is the latest Colour INKspiration Challenge #CI153 this photo was chosen by me! I really liked the books and flowers together in the photo. 


The chosen colour combination for #CI153 is Lemon Lolly, Petal Pink, Moody Mauve, Coastal Cabana and Lost Lagoon. As well as the chosen colours you may also like to add Basic White, Basic Black, Very Vanilla, Crumb Cake and metallics to your project. We also allow 'Ivory', 'Bronze' and 'Natural Tones' in the Stampin' Blends. If you don't have all the colour palette, feel free to use the closest SU substitute (ie: Daffodil Delight instead of Lemon Lolly .... you get the drift).

The challenge will run for almost 2 weeks until 7pm (AEST) on Monday 23rdth October 2023 details to follow at the end of my blog.


I just love the layout of the flowers in the photo and that's where I got my inspiration from to use the white heat embossed images from the Cheerful Daisies Stamp Set. I used all of the colours for the flowers by applying ink with the Blending Brush. To add a darker shade of colour for each of the daisies, I used the Sponge Dauber to intensify the colour. Then I die-cut the images out using the Cheerful Daisies Dies.


I used Crumb Cake Cardstock for the background panel and dried embossed it by using the Distressed Tile 3D Embossing Folder. Then, I applied Crumb Cake and Lost Lagoon inks to parts of the panel with the Blending Brush.


The sentiment is from Sending Smiles stamp set and dies in Coastal Cabana Cardstock and Ink with Basic White Cardstock. To finish off the card, I added a few of the Moody Mauve Speckled Dots to the panel.


I hope I've inspired you with the latest challenge and I do hope you'll join in. We so look forward to seeing a variety of projects using the challenge colours. Please ensure that your project is new and made specifically for this challenge.

Upload only one picture per entry straight to the discussion wall and not in an album

Colour INKspiration Challenge #CI153 will run until 7pm (ADET) on Monday 23rd October 2023.

To get your creative ideas flowing, make sure you check out the Crew's Project in the CI153 Album.

Please click on the link here to join the challenge.


Thank you for visiting my blog today, I would so love to hear your thoughts on my project by leaving a comment below.

Please email me if you would like a copy of the 2023-2024 Stampin' Up! Annual or Mini Catalogue send an email to me here

If you live in Australia and don't have a demonstrator, you can purchase any of the Stampin' Up! products by shopping with me at my Stampin' Up! online store here.

Make sure you follow me on social media via Facebook, Instagram and Pinterest.


Happy Stamping

Vicki Boucher


07 October 2023

Artisan Design Team - Creative Project - Merriest Trees Bundle


Hello! My name is Vicki Boucher, and I am from Melbourne, Australia. Today I'm sharing two Christmas slimline card ideas using the lovely and versatile Merriest Trees Bundle and other Stampin' Up! products.

When it comes to creating my projects, I love to show a variety of different techniques and add lots of layers. Playing with different colour palettes is always fun! Slimline cards can add another dimension to your paper craft when using Stampin' Up! products.


Here are two magical Christmas cards made using non-traditional colours. I love to create and mix colours together using different tools. I'll add the product details at the end of my blog. 


Spirit of the Season Slimline Christmas Card

For my first card I wanted to create a whimsical watercolour Christmas trees using Fluid 100 Watercolor Paper and have fun mixing inks together.


Create unique watercolour trees by mixing ink with water, then apply sections of colour to Watercolor Paper using a large, flat, brush tip Water Painter. The colors I used are Boho Blue, Orchid Oasis and Blueberry Bushel. Move the ink around on the paper with the Heat Tool until dry. Use the Merriest Trees Dies to die cut several different tree sizes. 


To add interest to the trees, use a Sponge Dauber and apply VersaMark Ink to the edges of the branches. Then, add white Stampin' Emboss Powder, brush off the excess with a brush, and heat set using the Heat Tool. I like to use the Stampin' Up! tweezers to hold onto smaller pieces of images, so I don't heat my fingers with the Heat Tool.

To decorate the trees, I used Soft Shimmer Paper in Bubble Bath, placed Adhesive Sheet to the back of the paper and then die-cut out the tree decorations and stars. 

To add layers to the card, create background snow by tearing up two layers using Basic White Cardstock and add Boho Blue and Orchid Oasis ink using the Blending Brush.


Stamp the stars a number of times to the background panel using VersaMark Ink, add white Stampin' Emboss Powder and heat set with the Heat Tool. Then apply lightly using Boho Blue and Orchid Oasis Ink with the Blending Brush to the background panel. 


Merry Christmas Slimline Card

For my second card I went for a nighttime scene using darker cardstock and inks. This created a totally different look to my first card. 


Create two snow layers for the background by tearing up Basic White Cardstock with your fingers. Next, using a Blending Brush to create contrast and leaving some white space between each of the layers. This helps create a snow effect for your layers. The colours used are Orchid Oasis and Starry Sky inks.


Apply colour to the trees using a Sponge Dauber for smaller sections and Blending Brushes for larger areas. I used Orchid Oasis and Starry Sky inks. Leave some white space to create snow for each of the layers. Then, add water droplets to the trees by tapping the medium tip Water Painter against Paper Snips and set them with the Heat Tool.

To create the background trees, use Starry Sky ink and stamp two of the trees directly onto Orchid Oasis Cardstock slimline panel. The third tree stamp onto a scrap piece of Orchid Oasis Cardstock and then die-cut out using the second largest tree die from the Merriest Tree Dies. 


To finish off the card, heat embossed the sentiment using VersaMark Ink, onto Orchid Oasis Cardstock, add white Stampin' Emboss Powder tap off excess and heat set with Heat Tool. Die-cut out tree using second largest tree die.


Here are the products you will need:

Merriest Trees Bundle (162048)
Starry Sky Cardstock (159263)
Orchid Oasis Cardstock (159267)
Basic White Cardstock (159276)
Fluid 100 Watercolor Paper (149612)
Soft Shimmer Specialty Paper (161750)
Starry Sky Classic Stampin' Pad (159212)
Orchid Oasis Classic Stampin' Pad (159214)
Boho Blue Classic Stampin' Pad (161650)
Blueberry Bushel Classic Stampin' Pad (147138)
Iridescent Adhesive-Backed Discs (161954)
Basics Stampin' Emboss Powders (155554)
Heat Tool (129053)
Embossing Additions Tool Kit (159971)
VersaMark Pad (102283)
Blending Brushes (153611)
Small Blending Brushes (160518)
Water Painters (151298)
Sponge Daubers (133773)
Wink of Stella Glitter Brush (141897)
Adhesive Sheets (152334)
Mini Stampin' Dimensionals (144108)
Multipurpose Glue (110755)
Paper Snips Scissors (103579)


Thank you for visiting my blog today, I would so love to hear your thoughts on my project by leaving a comment below.

Please email me if you would like a copy of the 2023-2024 Stampin' Up! Annual or Mini Catalogue send an email to me here

If you live in Australia and don't have a demonstrator, you can purchase any of the Stampin' Up! products by shopping with me at my Stampin' Up! online store here.

Make sure you follow me on social media via Facebook, Instagram and Pinterest.


Happy Stamping

Vicki Boucher