Showing posts with label Mother's Day Card. Show all posts

10 April 2022

Stamping Sunday Blog Hop - Last Chance


 Hello and welcome,

It's Stamping 2nd Sunday latest blog hop for April, hosted by Sara Levin and for this month the design team will be showcasing the theme 'Last Chance products' in our projects. The list of participants will be at the end of this blog.

It's that time of the year where we say goodbye to retiring Stampin' Up! products from the 2021 to 2022 Annual Catalogue. I will certainly miss Misty Moonlight one of the five In Colors for 2020 to 2022, it's such a pretty blue and I've used it with Basic White in my projects.


For my first card I've created a slimline card using Misty Moonlight Cardstock for the card base and followed with a slimline dry embossed panel using the Tasteful Textile 3D Embossing Folder. I added Misty Moonlight Ink with the Blending Brush for more depth of colour on the cardstock.


I've CASED the slimline card from Kaitlyn's stunning card, she created for Stamping Through the Catalog over on their Instagram page awhile ago they did a live and I wanted to try out the layout. 


I stamped the images in Misty Moonlight Ink using the Love of Leaves Stamp Set onto Basic White Cardstock and die-cut out using the Stitched Leaves Dies. I love the leaves in different shades of blue.


I ripped one side of the In Good Taste Designer Series Paper and layered over the leaves. To finish off the card I used the sentiment from the Sweet Ice Cream Stamp Set and stamped it in Misty Moonlight Ink. I also added a few of the circle Clear Epoxy Essentials around the sentiment.


For my second card I've created a Mother's Day card using Misty Moonlight and Basic White. Starting with Misty Moonlight Cardstock for the card base and followed with a dry embossed panel using the Tasteful Textile 3D Embossing Folder. I added Misty Moonlight Ink to the embossed panel with the Blending Brush.


The flowers are from the Pierced Blooms Dies they've been die-cut out using Basic White and Misty Moonlight Cardstock. To add interest and depth to the flowers either use the Sponge Dauber for more control or the Blending Brush. I like to layer them using different shades of blues for the flowers, plus Basic White too.


I used the large die from the Stitched So Sweetly Dies for the base of the flowers and adding Misty Moonlight Ink to the die-cut piece with the Blending Brush.


As Mother's Day is coming up in May for Australia, I thought this card was perfect for this occasion,so I used the sentiment from the Dressed to Impress Stamp Set and stamped in Misty Moonlight Ink. The label die is from the Pierced Blooms Dies.


To finish off the card I added the Misty Moonlight Silver Baker's Twine which is from the Flowers of Every Season Ribbon combo pack. The Balmy Blue and Night of Navy Gems add the finishing touch to the card.


Thank you for visiting my blog today, I would so love hear your thoughts on my project by leaving a comment below.

To see all of the amazing projects by the Stamping Sunday Design Team please click on their names below.

1. 

Sara Levin  

2. 

Su Mohr-Aromas And Art  

3. 

Mikaela Titheridge  

4. 

Vicki Boucher  

5. 

Anne Marie Hile  

6. 

Jay Soriano  


If you would like a copy of the new Stampin' Up! Mini January to June 2022 Catalogue and Annual Catalogue 2022 - 2023 please contact me here

If you live in Australia and don't have a demonstrator, you can purchase any of the Stampin' Up! products by shopping with me at my online store here.


Happy Stamping

Vicki Boucher


04 March 2022

Artisan Design Team - Flowering Rain Boots Bundle


 Hello and welcome, Today I'll be sharing with you my latest project for Stampin' Up! as part of the Artisan Design Team we were asked to create cards using the Flowering Rain Boots Bundle. This bundle includes the Flowering Rain Boots Stamp Set and Rain Boots Dies creating with this set is sure to brighten up anyone's day.


I love the stamped images it gives you a water colour look without water colouring and you can either add more colour with many colouring tools or leave the white space on your stamped images. I also loved the idea of placing the flowers at the top of the boots as another option.


Flowering Rain Boots Bundle


Purple Rain Boots Card

Starting with the purple rain boots ombre card, for the background panel I've used Blending Brushes with Gorgeous Grape and Highland Heather Ink to create the ombre look which In applied to Highland Heather Cardstock. The boots are stamped in Fresh Freesia, the flowers are in So Saffron and Mango Melody Ink. 


To colour in your stamped images, use the mini spatula end of your Take Your Pick Tool and scrape a little of the Soft pastel onto a Clear Block. Colour in the image with a Sponge Dauber. Here I've used Granny Apple Green Soft Pastel with Old Olive Ink for the stamp image.


I've used the Circle Dies in Basic White Cardstock and Gold Foil to add some dimension to the card. I also used the gardening tool die and die-cut in Gold Foil. The lattice die is die-cut out in Basic White Cardstock and I added Balmy Blue Ink with the Blending Brush. 

The sentiment is stamped in Gorgeous Grape Ink and I used my Paper Snips to break up the greeting. To finish off the card I placed a few of the Iridescent Rhinestones to the card.


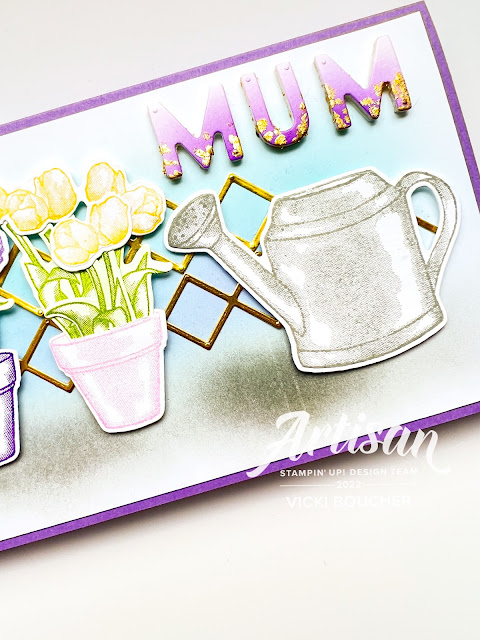
Three pots slimline card

The slimline card is using the same colours as the previous card, but this time I've used the watering can stamped image in Smoky Slate and die-cut out using the coordinating watering can die.

For the background panel, I've created a mix of blues and mauves for the sky and Smoky Slate for the ground and shadows. I used Gold Foil using the lattice die and die-cut out a number of pieces to add interest to the background. 

The pots are stamped in Highland Heather, Gorgeous Grape and Fresh Freesia Ink. I used the tulips stamp and stamped them in Mango Melody, Gorgeous Grape and So Saffron Ink. 


I wanted a card for my Mum for Mother's Day, so I used the Playful Alphabet Dies for the greeting. To create the ombre look I added Gorgeous Grape Ink with the Blending Brush to a strip of Basic White Cardstock. I start by applying ink lightly with the brush and then add more as I go. I just had to add a little of the Gold Gilded Leafing to the letters by adding tiny drops of Multipurpose Glue and wait for it to dry before adding the Gilded Leafing.


Thank you for visiting my blog today, I would so love hear your thoughts on my project by leaving a comment below. Make sure you pop over onto Stampin' Up! Facebook page for lots of inspiration using this bundle.

If you would like a copy of the new Stampin' Up! Mini January to June 2022 Catalogue and Annual Catalogue 2021 - 2022 please contact me here

If you live in Australia and don't have a demonstrator, you can purchase any of the Stampin' Up! products by shopping with me at my online store here.


Happy Stamping

Vicki Boucher


08 April 2021

Art With Heart Showcase - Mother's Day


 Hello and welcome,

I'm so excited to share with you three projects I have created for the latest Art With Heart Team Creative Showcase hosted by Rachel Woollard, I'll post the link to her page at the end of my blog. 


We are sharing our creativity with the theme Mother's Day in our projects. Mother's Day is celebrated the second Sunday of May in Australia. It's a very special time of year for me by showing my appreciation to my mum with spending the day together, plus of course presenting a card and other nice things to her.  


I've created a Mother's Day card, bookmark and gift tag using the Pierced Blooms Dies with the True Love Designer Series Paper. The colours are bright and happy plus the additional black and white throughout. 


To create the coloured flowers I've used Basic White Cardstock, adding colour to the Cardstock with the Blending Brushes in the following Stampin' Up! Colors. Magenta Madness, So Saffron, Highland Heather, Gorgeous Grape and Granny Apple Green. Then using a number of different flowers and leaves from the Pierced Blooms Dies and die cut out using the Stampin' Cut & Emboss Machine.


Before layering all of the die cut pieces I started on the base of the card with a half sheet of Basic Black Cardstock folded in half and then a panel of Basic White Cardstock. I've sponged Granny Apple Green Ink with the Blending Brush in a circular motion to add some colour to the white panel.


I thought I would do something a little bit different with the black & white polka dot DSP by cutting the piece on an angel with the Paper Trimmer. It's almost a triangle the top side measures at 10.5cm and the bottom is at 9cm. I made sure all the dots lined up straight when cutting the DSP.


Now the fun part with mixing and matching the different die cut pieces together to make the card, plus I had left over so I decided to make a book mark and gift tag.


The sentiment is from the Timeless Tulips Stamp Set and fits perfectly inside the frame which is from the Pierced Blooms Dies. I've embossed the greeting using White Embossing Powder and heat set with the Heat Tool. I've added a few of the In Color Enamel Dots in Magenta Madness and Bumblebee.


The book mark and gift tag is similar to the card so I can give as a set. I've used the Delightful Tag Topper and added the Black & White Baker's Twine.


Well that's it for my blog, now it's time to visit Rachel Woollard and all the other participants from the Art With Heart Team. I'm so looking forward to seeing their beautiful projects.

Thank you for visiting my blog today. You can purchase any of the above mentioned products by visiting my online store here or send me a direct message.

Happy Stamping

Vicki Boucher


09 May 2020

Social Stamping Blog Host - Family


Hi there, I’m so glad I had the chance to take part in the latest Social Stampers blog host.

Today, from the Social Stampers we are sharing our creations with the theme “Family” for this week.


As it’s Mother’s Day tomorrow I thought I would share just some of my cards that I have been creating for our little family business at YV Hampers. We source the best produce of the Yarra Valley and showcasing them into premium gourmet hampers. They are just perfect for a Mother’s Day gift and we love to support our local community. Below is just one of our many hampers and a Mother's Day card that I have created.


Spending time together with the family is very important, but unfortunately with COVID-19 this has made it very difficult as I would so love to see my parents who live in the country. I hope this day will come soon, but for now it will be a phone call or maybe a Zoom meeting.

The cards I have made is featuring the beautiful Perennial Essence Designer Series Paper which is from the 2019-2020 Stampin’ Up! Annual Catalogue. I just love the hand-painted impressionistic imagery in rich colours and I’ve used the colours by using Cardstock and Ink.


I’ve used the Stitched So Sweetly Dies for the Mother’s Day greeting and coloured Cardstock. These Dies have various shapes and sizes which makes card making creative. They are also caring over into the new 2020 – 2021 Stampin’ Up! Annual Catalogue which I’m very happy they are staying on.


This card I’ve used Night of Navy for the Cardstock and Ink.


This card I’ve used Mossy Meadow for the Cardstock and ink.


This card I’ve used Blackberry Bliss for the Cardstock and Ink.


This card I’ve used Blackberry Bliss for the Cardstock and Ink.


The final card I’ve used Gorgeous Grape for the Cardstock and Ink.  

You’ll want to see everyone’s amazing creations who have taken part in the latest Social Stamping Blog Host.

You can click here to see the list of names or click on the next button below to see Catherine Creer’s gorgeous project.

 Catherine

Thanks for stopping by today!

Happy Crafting and Happy Mother’s Day to all the Mums out there!

Vicki Boucher


16 April 2020

Art With Heart April Creative Showcase - Mother's Day


Welcome to the Art With Heart Stampin’ Up! Team Monthly Creative Showcase. The theme for this month’s showcase is Mother’s Day. Under the current conditions Mother’s Day this year is going to be completely different to any other Mother’s Day celebrations. 

I would so love to see my Mum on Mother’s Day, but with the current conditions of this Pandemic with COVID-19 I will have to wait until it’s safe to see her. I am looking forward to spending the day with my two beautiful girls and hubby in our little bubble. I’m looking forward to breakfast in bed and a sleep-in would be great too.

The Art With Heart Team are hoping to share a little Mother’s Day love and inspiration with you tonight. Here’s my creation using the gorgeous Dressed To Impress Bundle and other Stampin’ Up! products from the 2020 Mini Catalogue.


The stamped images are in Basic Gray Ink this gives the images a lovely subtle look and blends in well with the other colours. Using a Sponge Dauber, lightly sponge Melon Mambo Ink onto the Parfum bottle and flowers. Also add Grapefruit Grove Ink to the flowers, I think the two colours blend well together and I must use this colour more often in my projects.


The Dressed To Impress Stamp Set has a Mother’s Day stamp included in the set and the greeting fits perfectly with the label die from the All Dressed Up Dies.


Using scraps of Silver Foil, die cut the images out with Painted Labels Dies. The large Stitched Swirl looks perfect under the Parfum bottle and I’ve placed the smaller swirls under the greeting.


Using the two largest dies from the Stitched So Sweetly Dies the first is in Whisper White Cardstock and sponge Grapefruit Grove Ink onto the Cardstock. The other Stitched So Sweetly Dies is in Petal Pink DSP using the print of the script side.


The card base is in Petal Pink Cardstock, adding a layer of Whisper White Cardstock and I gave the panel a subtle vintage look. To achieve this look sponge Petal Pink Ink onto the Cardstock with the Sponge Dauber and run it through with the Subtle 3D Embossing Folder with the die-cutting and embossing machine. Lightly run the blade of the Paper Snips along the edges and curl the edges with the Bone Folder. I’ve used Multipurpose Glue as my main adhesive and Stampin’ Dimensionals under the Sliver Foil.


The next demonstrator to share her Mother’s Day project is the amazingly talented Rachel Woollard.

 Rachel

If you have a broken link or have come to this blog hop midway, you can view all the participants below:


Wishing all the Mum's a very Happy Mother's Day!

Thanks for stopping by today!


Happy Crafting

Vicki Boucher

Product List

Ink: Melon Mambo, Grapefruit Grove, Petal Pink and Basic Gray
Cardstock/Paper: Petal Pink, Whisper White, Sliver Foil and 6”x6” DSP Subtles
Stamps: Dressed To Impress
Dies: Stitched So Sweetly, All Dressed Up and Painted Labels
Embossing Folders: Subtle 3D
Colouring Tools: Sponge Daubers


11 March 2020

Colour INKspiration #73 Challenge


Tonight, is the latest Colour INKspiration Challenge #73 and this beautiful photo is our inspiration. The colours for the challenge are Highland Heather, So Saffron and Mossy Meadow. How stunning is the field of lavender and sunset in the photo? You can also add Basic Black, Whisper White, Very Vanilla and metallics.


The challenge runs for almost 2 weeks and will end at 7pm (AEST) on 23rd March 2020. I hope you’ll enter into the Colour INKspiration Challenge we would love to see your creation. 


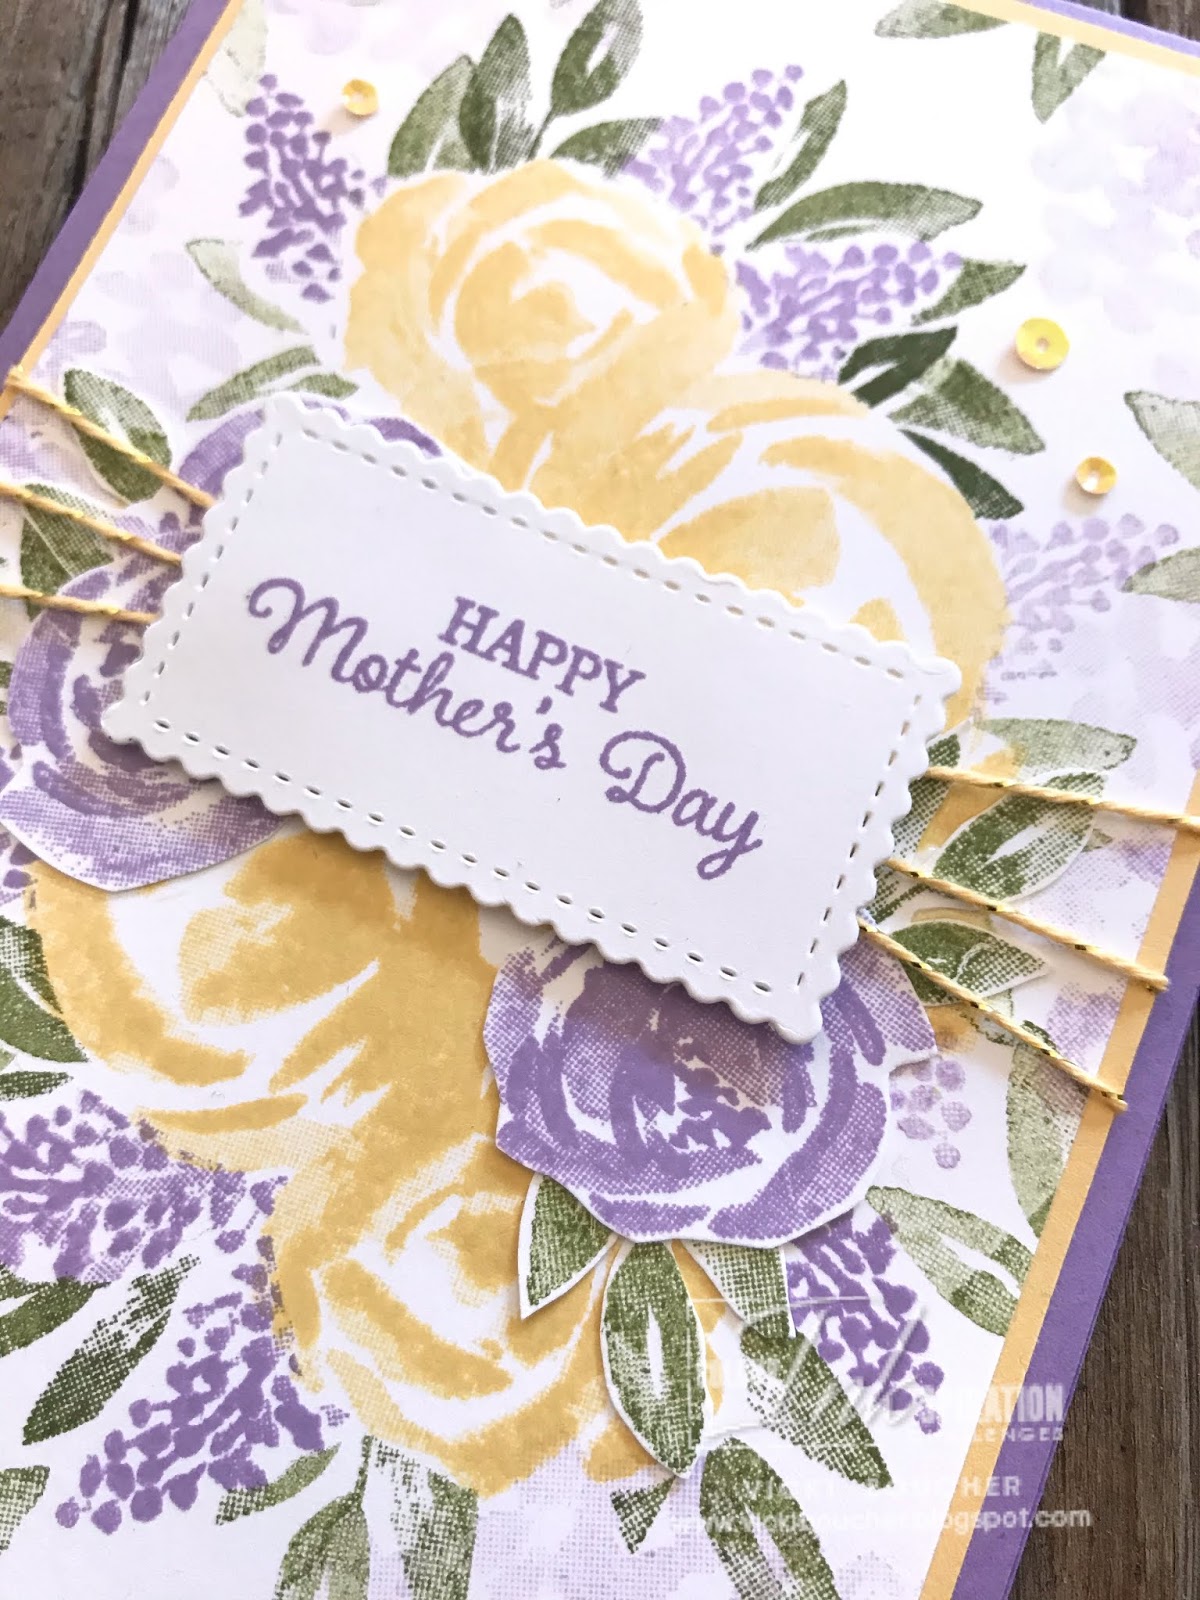
Now for my card I’ve created which is a Mother’s Day Card and I’ve used the Beautiful Friendship Stamp Set. I’ve only recently purchased this set and I now know why everyone loves it so much. It’s a Distinktive stamp set which means less ink on your ink pad and stamp the better the image will look. 


I’ve used a panel of Whisper White Cardstock, stamped the larger floral images first and I’ve covered up the roses by using the Masking technique with sticky notes. I would then add the smaller Highland Heather flower image and the Mossy Meadow leaves. This gives you the impression that some of the images are behind others. The Hydrangeas are first stamped off in Highland Heather and stamped on each of the four corners and sides. I’ve also added stamped off leaf images in Mossy Meadow where needed. I added a few of the smaller Highland Heather Rose images, by stamping on an extra piece of Whisper White Cardstock and fussy cut out the images. As well as a few more leaf images. 


The So Saffron Metallic Baker’s Twine is a freebie from the Saleabration Catalogue, when you purchase $90 worth of Stampin’ Up! products. There is also Bermuda Bay Twine and coordinating Sequins in the Combo Pack. I’ve wrapped the Twine around the floral panel and So Saffron panel, adding a little sparkle. 


The sentiment is from the Timeless Tulips Stamp Set, stamped in Highland Heather and die cut out using the Stitched So Sweetly Dies. I’ve added a few of the So Saffron Iridescent Sequins to the card and the card base is Highland Heather which finishes off the card nicely. 


Do you have this stamp set? I’m so glad I have it now and I can’t wait to try out other colours with the set.


Make sure you visit our Facebook group to enter the competition, we would love to see how you would use this latest colour challenge.


Click here at Colour INKSpiration Facebook group to take part and upload the photo of your creation. You don’t need a blog to enter either. Share with your crafty friends, so they can join in with the challenges too.


Hope to see you there!


Thank you for stopping by today.


Happy Crafting


Vicki Boucher


To purchase any of these products that I’ve  used today, you can click on my direct links above or visit my Online Store here.


Product List

Ink: Highland Heather, So Saffron and Mossy Meadow

Cardstock: Highland Heather, So Saffron and Whisper White

Stamp Set: Beautiful Friendship and Timeless Tulips

Dies: Stitched So Sweetly

Other Stampin’ Up! Products: Iridescent Sequin Assortment and Metallic Baker’s Twine