Showing posts with label Stampin' Up! Independent Demonstrator. Show all posts

19 June 2022

Artisan Design Team - Sweetest Christmas Suite


Hello and welcome,

My name is Vicki Boucher and I'm from Melbourne, Australia. Today I'll be sharing six projects using the Sweetest Christmas Suite which is available for purchase from July to December in the new Stampin' Up! July to December 2022 Mini Catalogue.


I was asked by Stampin' Up! to present the Sweetest Christmas Suite for a presentation Demonstrator only first ever virtual event called Creativity Now. I was so excited to be given the opportunity to create and present to Demonstrators in Australia, New Zealand and the UK.


Sweetest Christmas Suite


The Sweetest Christmas Suite includes the Sweet Candy Canes Stamp Set, Candy Canes Dies (which you can purchase in a bundle with 10% saving), Real Red & Garden Green Ribbon Combo Pack, Adhesive Backed Seasonal Sequins, Real Red & White 6" x 6" Glimmer Paper and Sweetest Christmas 12" x 12' Designer Series Paper. You can find this suite on pages 8 - 10 in the Mini Catalogue. This suite is amazing, I especially love the Glimmer Paper and the striped background die there are so many possibilities with this die.


Trio of Candy Canes Christmas Card

For my first card I used Pool Party Cardstock for the card base, then layered with a panel of Basic White Cardstock measured at 10.5 x 13.6cm, to create an ombre look I used Pool Party ink and with the Blending Brush to the white panel. Using the sentiment 'Whishing you lots of love, joy & happiness this Christmas season and always" I stamped off in Pool Party ink and then randomly stamped on the ombre panel.


Next I layered the die-cut striped panel in White Glimmer Paper measured at 10.6 x 13.8cm to cover over the Pool Party ombre panel. I used the candy canes from the Sweetest Christmas DSP and die-cut them out using the Candy Cane Dies.

I used the Tailor Made Tags Dies one in the White Glimmer Paper and the smaller one for the sentiment stamped in Real Red onto Basic White Cardstock. I added a few of the white Seasonal Sequins, Pool Party Sheer Ribbon and White Bakers Twine to the card.


Vintage Christmas Card, Treat Bag and Gift Tag

Now for my second card, I used Real Red Cardstock for the card base, then layered with a panel of Sweetest Christmas DSP measured at 10 x 14.5cm, I used the red and white stripes DSP which is my favourite. To create a vintage feel use Sahara Sand ink and apply the ink with a Blending Brush, then run Paper Snips along the edge of the Designer Series Paper to distress it. 


To create the next panel, cut Basic White Cardstock to measure at 9.5 x 13.9cm, add Sahara Sand ink with the Blending Brush and stamp off the images in Sahara Sand ink before stamping onto the panel. Then run Paper Snips along the edge of the Cardstock to distress it.

Using the same sheet of DSP from the Sweetest Christmas Designer Series Paper, die-cut out two Candy Canes using the Candy Cane Dies. Use a Sponge Dauber, sponge Sahara Sand ink on the edge of the Candy Canes.

To finish off the card I used Garden Green Cardstock for the mistletoe and sponge Garden Green ink with the Sponge Dauber. For the berries I added Real Red Stampin' Blend to the Sweet Sorbet Sequins. The sentiment is layered over Sahara Sand Cardstock die-cut out using the label die from the Stylish Shapes Dies.


The vintage gift bag and gift tag is similar to the card. I used the white Peekaboo Treat bag and Sahara Sand ink. The Tailor Made Tag Dies are perfect for the gift tag, using the same sheet of DSP from the Sweetest Christmas Designer Series Paper, Real Red Ribbon and Linen Thread.


Sweet Sorbet and White Candy Cane Card

To create this cute Candy Cane card, I wanted to use the stripe background die and turn it into a stencil by die cutting it in Thick Basic White Cardstock for a strong stencil. Place the stencil over Basic White Cardstock measured at 11 x 11cm and make sure you use some Washi Tape so both the panel and stencil don't move. Use Sweet Sorbet ink and a Blending Brush, apply ink so it goes in the same direction as the stripes. I wanted a ombre look, so add more ink at the bottom of the panel. 


Then lift the stencil up and change direction of the stencil, so the stripes will go in a different direction and then apply more ink to the panel. Make sure you hold down the panel with your other hand and Washi Tape when applying to the panel. Once finished cut down to 9.5 x 9.5cm.

The Sweet Sorbet Cardstock is cut at 21 x 10.5cm, layered with Basic White Cardstock cut at 10 x 10cm and then add the inked up Sweet Sorbet panel to the card. Next I used the largest Square die from the Stylish Shapes Dies and die-cut it in Vellum to add a softer look to the card.


I used a sheet of White Glimmer Paper for the Candy Canes and applied Sweet Sorbet ink with the Blending Brush, this gives it a pretty pink look. To finish off the card I added Sweet Sorbet and White Seasonal Sequins to the pink Candy Canes. I added White Glittered Organdy Ribbon thread it through the label die-cut piece and tied a cute bow using the Sweet Sorbet Baker's Twine. This card fits inside a standard size envelope.


It's the Most Wonderful Time of Year Christmas Card

This next card is the same size as the above Sweet Sorbet and white Christmas card, so it fits perfectly inside a standard size envelope. The card base is Real Red Cardstock cut at 21 x 10.5cm, Basic White panel cut at 10 x 10cm and cut the Candy Cane DSP at 9.5 x 9.5cm.


I used the two mistletoe dies and die-cut out x 7 White and x 7 Real Red Glimmer paper and turn them into a Christmas wreath. I used a circle die, die-cut out in Basic White Cardstock and layered on the card to guide me with the placing of the mistletoes. 

I really love the sentiment so much I was singing the song while creating this card. I thought this is really getting into the Christmas spirit even though it was early May when I created this card.


Real Red and Garden Green Candy Cane 3D Gift 

I used the circle dies from the Stylish Shapes Dies and label die from the Candy Canes Dies to hold the Candy Cane. As this suite coordinates so well together I used Real Red Cardstock for the larger circle die and the Real Red and White Sweetest Christmas DSP for the smaller circle. 


I also added Real Red Ribbon, so you can hang the gift on the Christmas Tree. The candy cane fits through the holes of the label die and use strong adhesive such as Stampin' Seal plus to adhere to the 3D gift. 

To create the Garden Green Candy Cane gift, use Garden Green Cardstock, Garden Green Ribbon and Garden Green and White Sweetest Christmas DSP and ink up the sentiment in Garden Green ink.


Sweet Candy Canes Stamp Set (159560), Candy Canes Dies (159569), Sweet Candy Canes Bundle (161052), Real Red & Garden Green Ribbon Combo Pack (159577), Adhesive-Backed Seasonal Sequins (159964), Real Red & White 6" x 6" Glimmer Paper (159578) and Sweetest Christmas 12" x 12" Designer Series Paper (159559)


Thank you for visiting my blog today, I would so love hear your thoughts on my projects by leaving a comment below. 

If you would like a copy of the new July - December 2022 Mini Catalogue, Saleabration Catalogue and Annual Catalogue 2022 - 2023 please contact me here

If you live in Australia and don't have a demonstrator, you can purchase any of the Stampin' Up! products by shopping with me at my online store here


Happy Stamping

Vicki Boucher


08 June 2022

Colour INKspiration Challenge #CI123


   Hello and welcome,

My name is Vicki Boucher and I am from Melbourne, Australia. Tonight, it's the latest Colour INKspiration Challenge #CI123 and this photo was chosen by Lou Kitzelman. I love the colours in this photo. I just love green and pink together when it comes to paper craft.  

The colour combination for #CI123 is Blushing Bride, Soft Succulent, Shaded Spruce and Evening Evergreen. As well as the chosen colours you may also add Basic White, Very Vanilla, Basic Black, Crumb Cake, Sahara Sand and metallics to your project. We also allow 'Ivory' and 'Bronze' in the Stampin' Blends. If you don't have all the colour palette, feel free to use the closest SU substitute (ie: Mint Macaron instead of Soft Succulent .... you get the drift).


 The challenge will run for almost 2 weeks until 7pm (AEST) on Monday 20th June 2022 details to follow at the end of my blog.

Today's card is using the Cottage Rose Stamp Set and Cottage Flowers Dies which is on page 57 of the  2022-2023 Annual Stampin' Up! Catalogue. I just recently purchased it and i just couldn't wait to try it out. I love the large flower and foliage stamp the most.


Cottage Rose Bundle #159048 $93.50AUD


I've stamped the images using Versmark Ink onto Shimmery White Cardstock adding Gold Stampin' Emboss Powder and heat set with the Heat Tool. Then I got out my Water Painters and challenge colours ink pads to do some water colouring. Blushing Bride for the roses, Soft Succulent and Evening Evergreen for the leaves, It's such a pretty colour combination. 


Next I had to use Shaded Spruce for the challenge, so I used my Blending Brush and lightly added Shaded Spruce ink onto Basic White Cardstock. I also stamped lightly using the leaf image a number of times onto the panel. In each of the corner of the Basic White panel, I added Blushing Bride ink with the Blending Brush to give it some warmth.


To finish off the card, I used Blushing Bride Cardstock for the card base, I splattered Shaded Spruce ink using the Stampin' Blend and also Blushing Bride Write Marker. The greeting is from the Cottage Rose Stamp Set and stamped in Shaded Spruce ink. I also added Linen Thread and Polished Dots to the card.


I hope I've inspired you with the latest challenge and I do hope you'll join in. We so look forward to seeing a variety of projects using the challenge colours. Please ensure that your project is new and made specifically for this challenge.

Use all of the challenge colours (or close substitutions) unless stated.

Upload only one picture per entry straight to the discussion wall and not in an album

Colour INKspiration Challenge #CI123 will run until 7pm (ADET) on Monday 20th June 2022.

To get your creative ideas flowing, make sure you check out the Crew's Project in the CI123 Album.

Please click on the link here to join the challenge.


Thank you for visiting my blog today, I would so love hear your thoughts on my project by leaving a comment below.


Please email me if you would like a copy of the new 2022-2023 Annual Catalogue and the upcoming July-Dec 2022 Mini Catalogue, July-August Saleabration Catalogue please contact me here

If you live in Australia and don't have a demonstrator, you can purchase any of the Stampin' Up! products by shopping with me at my online store here.

Make sure you follow me on social media via Facebook, Instagram and Pinterest.


Happy Stamping

Vicki Boucher


12 September 2021

Global Design Project #308 Case the Designer


Hello and welcome

I've entered into the latest Global Design Project #GDP308 Case The Designer - Wilma de Korte who is an amazing designer from the team. I've CASED her card by using the layout and I just love all of those stamped images against the white background.


Today's card is shades of purples/mauves and using the Delicate Dahlias Stamp Set. I've used the faux masking technique with Blending Brushes and Grid Paper. This is a fun technique to create white space on your card front. I've ripped the Grid Paper and layered over the Basic White panel with Washi Tape, this will help to keep your Cardstock from moving.

I've started with Fresh Freesia Ink, then a little of Magenta Madness and followed by Gorgeous Grape Ink for the faux masking technique. Keeping the Grid Paper on the Cardstock, I then stamped the small flower image from Delicate Dahlias Stamp Set in Fresh Freesia Ink and followed by Gorgeous Grape Ink, but I stamped off on a piece of scrap paper. This gives you a lighter purple.


The Biggest Wish Stamp Set was used for the greeting, it has to be my favourite stamp set in the Stampin' Up! Annual Catalogue. I just love to combined the bold and delicate font together.  

Thank you for visiting my blog today, I would so love hear your thoughts on my project by leaving a comment below.

If you would like a copy of the new Stampin' Up! Mini August to December 2021 and Saleabration Catalogue please contact me here

If you live in Australia and don't have a demonstrator, you can purchase any of the Stampin' Up! products by shopping with me at my online store here.


Happy Stamping

Vicki Boucher

Stamping Sunday Blog Hop Celebrate


Hello and welcome,

It's Stamping 2nd Sunday latest blog hop for September, hosted by Sara Levin and for this month the design team will be showcasing the theme 'Celebrate' in our projects. The list of participants will be at the end of this blog.

Today's projects are two handmade cards using Stampin' Up! products from the Stampin' Up! Sale-a-bration August - September 2021 and Annual 2021 - 2022 Catalogues. I've created a casual card and avid card using the Delicate Dahlias Stamp Set which is a Saleabration product and is available until the end of this month or unless sold out.


Casual Crafter

I've used Create with Friends Stamp Set, the elegant font has many possibilities for sentiments and combined with the Delicate Dahlias Stamp Set is the perfect match for my casual card.


I've started with Basic White Cardstock for the background panel, stamping the smaller flower multiple times in Magenta Madness and Mango Melody Ink.


I also stamped the flower and leaves images onto Basic White Cardstock and fussy cut out to arrange on the panel. Before I layered the pieces down I added Magenta Madness ombre ribbon, using White Faux Linen Ribbon and applied ink with the Blending Brush. I cased this idea off Tami Hewlett, she made a beautiful Night of Navy ombre ribbon awhile ago and I loved this idea.


The greeting is layered over the stamped images using Stampin' Dimensionals and the card base is Magenta Madness Cardstock.


Avid Crafter

For my second card I've used the Delicate Dahlias Stamp Set with a number of different products. The large Dahlia is stamped in Mango Melody Ink this was my starting point and I wanted it to pop against the other colours and papers.


I've stamped the smaller flower stamp in Mango Melody a number times onto Basic White Cardstock panel and I've lightly added ink in the same colour using the Blending Brush. 

I've used a strip of the Harvest Meadow DSP in Bumblebee and a strip of Black & White Gingham paper from the Pattern Party DSP


The yellow polka dot embossed tag die adds more texture and I just had to add the Black & White Gingham Ribbon to the tag. 


The sentiment is from Celebrate Sunflowers Stamp Set using White Emboss Powder on Basic Black Cardstock and fussy cut out. I always love to add lots layers and different elements when it comes to card making.


Thank you for visiting my blog today, I would so love hear your thoughts on my project by leaving a comment below.


Thank you for visiting my blog today. To see all of the amazing projects by the Stamping Sunday Design Team please click on their names below.

1. Sara Levin  
2. Su Mohr  
3. Mikaela Titheridge  
4. Tami Hewlett  
5. Anne Marie Hile  
6. Jay Soriano  
7. Cheryll Miller  
8. Vicki Boucher


If you would like a copy of the new Stampin' Up! Mini August to December 2021 and Saleabration Catalogue please contact me here

If you live in Australia and don't have a demonstrator, you can purchase any of the Stampin' Up! products by shopping with me at my online store here.


Happy Stamping

Vicki Boucher

29 August 2021

Global Design Project #GDP306 Sketch Challenge


Hello and welcome,

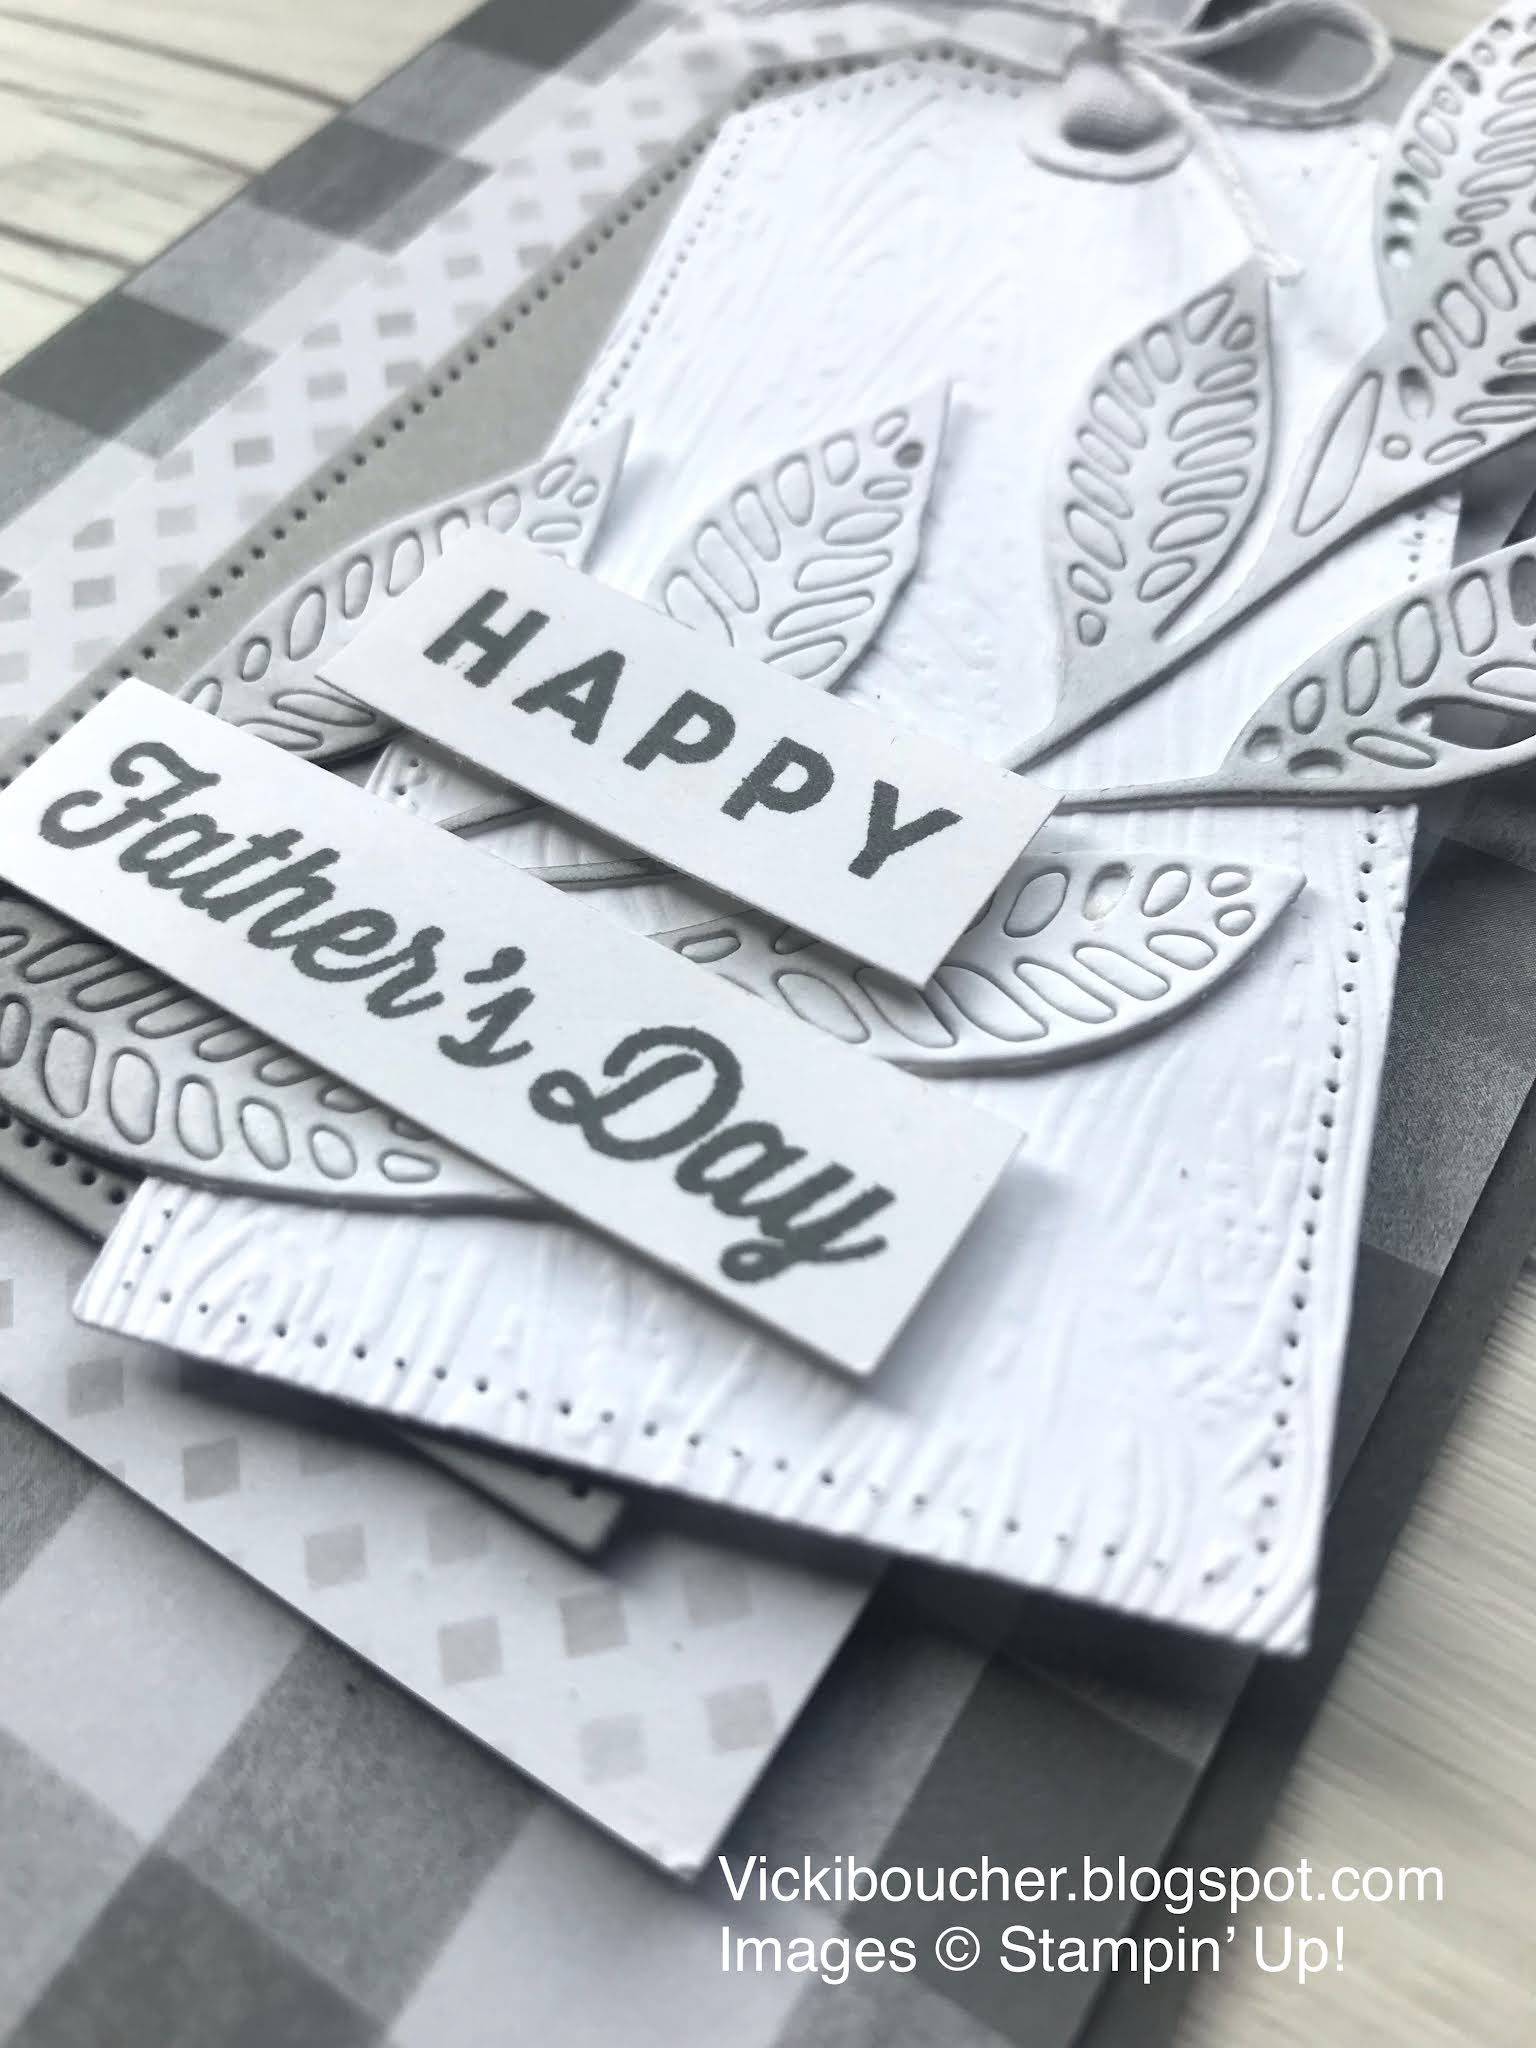
I've entered this handmade card in the latest Global Design Project #GDP306 and it's a sketch challenge. This fun sketch challenge is almost over and I had to create a Father's Day card for my Dad, as it's celebrated here in Australia next weekend. 


I've used the Peaceful Place Designer Series Paper which is in the Stampin' Up! Mini Catalogue, it's more than just Christmas paper and I love the shades of grays in the DSP. It's perfect for a masculine card.


Starting with Basic Gray Cardstock for the card base, then layered with the plaid panel and diamond panel from the Designer Series Paper. The Tailor Made Tags Dies add more depth to the card bottom layer in Smoky Slate Cardstock and top layer in Basic White embossed using the Timber 3D Embossing Folder.


Using the leaf die from the Artistic Dies die-cut out in Basic White Cardstock and applied Basic Gray Ink with the Blending Brush. The greeting is from the Stampin' Up! Card Kit - For The Guys which has masculine sentiments for card making. 


Thank you for visiting my blog today, I would so love hear your thoughts on my project by leaving a comment below.

If you would like a copy of the new Stampin' Up! Mini August to December 2021 Catalogue and Saleabration Catalogue please contact me here

If you live in Australia and don't have a demonstrator, you can purchase any of the Stampin' Up! products by shopping with me at my online store here.


Happy Stamping

Vicki Boucher


25 July 2021

Global Design Project #GDP301 Colour Challenge


 Hello and welcome,

I've entered my latest handmade card in a colour challenge for the latest Global Design Project #GDP301.

The colours are Night of Navy, Coastal Cabana and Polished Pink for the challenge. I love this colour palette!

I've used new products from the new Stampin' Up! Mini Catalogue July - December 2021, as a demonstrator we can pre-order from the catalogue and also from the Saleabration Catalogue too.


The Welcoming Woods Stamp Set is so beautiful, I was drawn to the wintery tree images and the sentiments which come in different fonts. 


Starting with the Basic White panel I've added Coastal Cabana Ink using the Blending Brush to the Cardstock and then applied Polished Pink Ink. I've used Night of Navy Ink for the trees and snowflakes.

The Night of Navy panel is dry embossed using the Timeworn Type 3D Embossing Folder, adding Night of Navy Ink to the edges with the Blending Brush and I ruffed up the edges with the paper snips.


The greeting is heat embossed using Versamark Ink stamped on Night of Navy Cardstock, sprinkled White Stampin' Emboss Powder and heat set with the Heat Tool. Adding White Baker's Twine to finish off the card. 


Thank you for visiting my blog today, I would so love hear your thoughts on my project by leaving a comment below.

If you would like a copy of the new Stampin' Up! Mini August to December 2021 and Saleabration Catalogue please contact me here

If you live in Australia and don't have a demonstrator, you can purchase any of the Stampin' Up! products by shopping with me at my online store here.


Happy Stamping

Vicki Boucher


23 June 2021

Colour INKspiration Challenge #102


 Hello and welcome,

It's the latest Colour INKspiration Challenge #102 and this beautiful photo was chosen by Lou Kitzelman one of the Design Crew Members. This colour combo is a beautiful palette and there's one of the new In Colors in this latest colour challenge!


The colour combination for #102 is Polished Pink, Smokey Slate and Basic Gray. As well as the chosen colours you may also add Basic White, Basic Black, Very Vanilla, Crumb Cake, Sahara Sand and metallics to your project. We also allow 'Ivory' and 'Bronze' in the Stampin' Blends. If you don't have all the colour palette, feel free to use the closest SU substitute (ie: Melon Mambo instead of Polished Pink .... you get the drift). 

The challenge will run for almost 3 weeks until 7pm on the 12th July 2021 details to follow at the end of my blog.


Today's card I've used the Hydrangea Haven Stamp set and coordinating Hydrangea Dies which are available from the Stampin' Up! 2021 - 2022 Annual Catalogue. I decided to do a little bit of sewing on my card and gave it a vintage look with the torn DSP, ruffing up the edges of the Cardstock and many layers to the card.


The watercolour Hydrangea's are in shades of Polished Pink Ink, Smoky Slate and Clear Wink of Stella with lots of sparkle. I've also added Polished Pink Shimmer Vellum using the Hydrangea petals Dies and Expressions in Ink Sequins.


The layers of ripped DSP are Polished Pink In Color 2021 - 2023 6" x 6" DSP and In Good Taste 12" x 12" DSP. I added Basic Gray Ink with the Blending Brush to give it a darker shade of gray. 


Now for the fun part of the card! Using a panel of Basic Gray Cardstock, I've embossed it with the Tasteful Textile 3D Emboss Folder and adding Basic Gray Ink with the Blending Brush for a darker look. Then I decided to get out my old sewing machine which I've had since I was 21 years old and sew a light grey cotton thread around the panel. It was so much fun! I should do more sewing in the future. 


The sentiment is from the stamp set which is part of the Sentimental Rose Card Kit all of the stamp images are very handy for card making. The 'best wishes' image fits perfectly inside the stitched Hydrangea Die. I've heat embossed the sentiment with Versamark Ink, White Stampin' Emboss Powder and heat set with the Heat Tool. 


I hope you can participate in this latest round and as we so look forward to seeing a variety of projects using the challenge colours. Please ensure that your project is new and made specially for this challenge.

Colour INKspiration Challenge CI#102 will run until 7pm (ADET) on Monday 12th July 2021.

Please click on the link here to join the challenge.

Just a reminder to upload your challenge pics straight to the discussion wall and not in an album.

Thank you for visiting my blog today, I would so love hear your thoughts on my project by leaving a comment below.

If you live in Australia, you can purchase any of the Stampin' Up! products by shopping with me at my online store here.


Happy Stamping

Vicki Boucher


09 July 2020

Colour INKspiration Challenge #81 - Life Is Beautiful Stamp Set


Hello and welcome to our latest Colour INKspiration Challenge #81 and this gorgeous photo is our inspiration for our projects. The colours for this challenge are Cinnamon Cider, Real Red, Whisper White and Crumb Cake. I just love the combination of these colours together. You can also add Very Vanilla, Basic Black and metallics.


The challenge runs for almost 2 weeks and will end at 7pm (AEST) on 20th July 2020. I hope you’ll enter into the Colour INKspiration Challenge we would so love to see your creation. More details below.


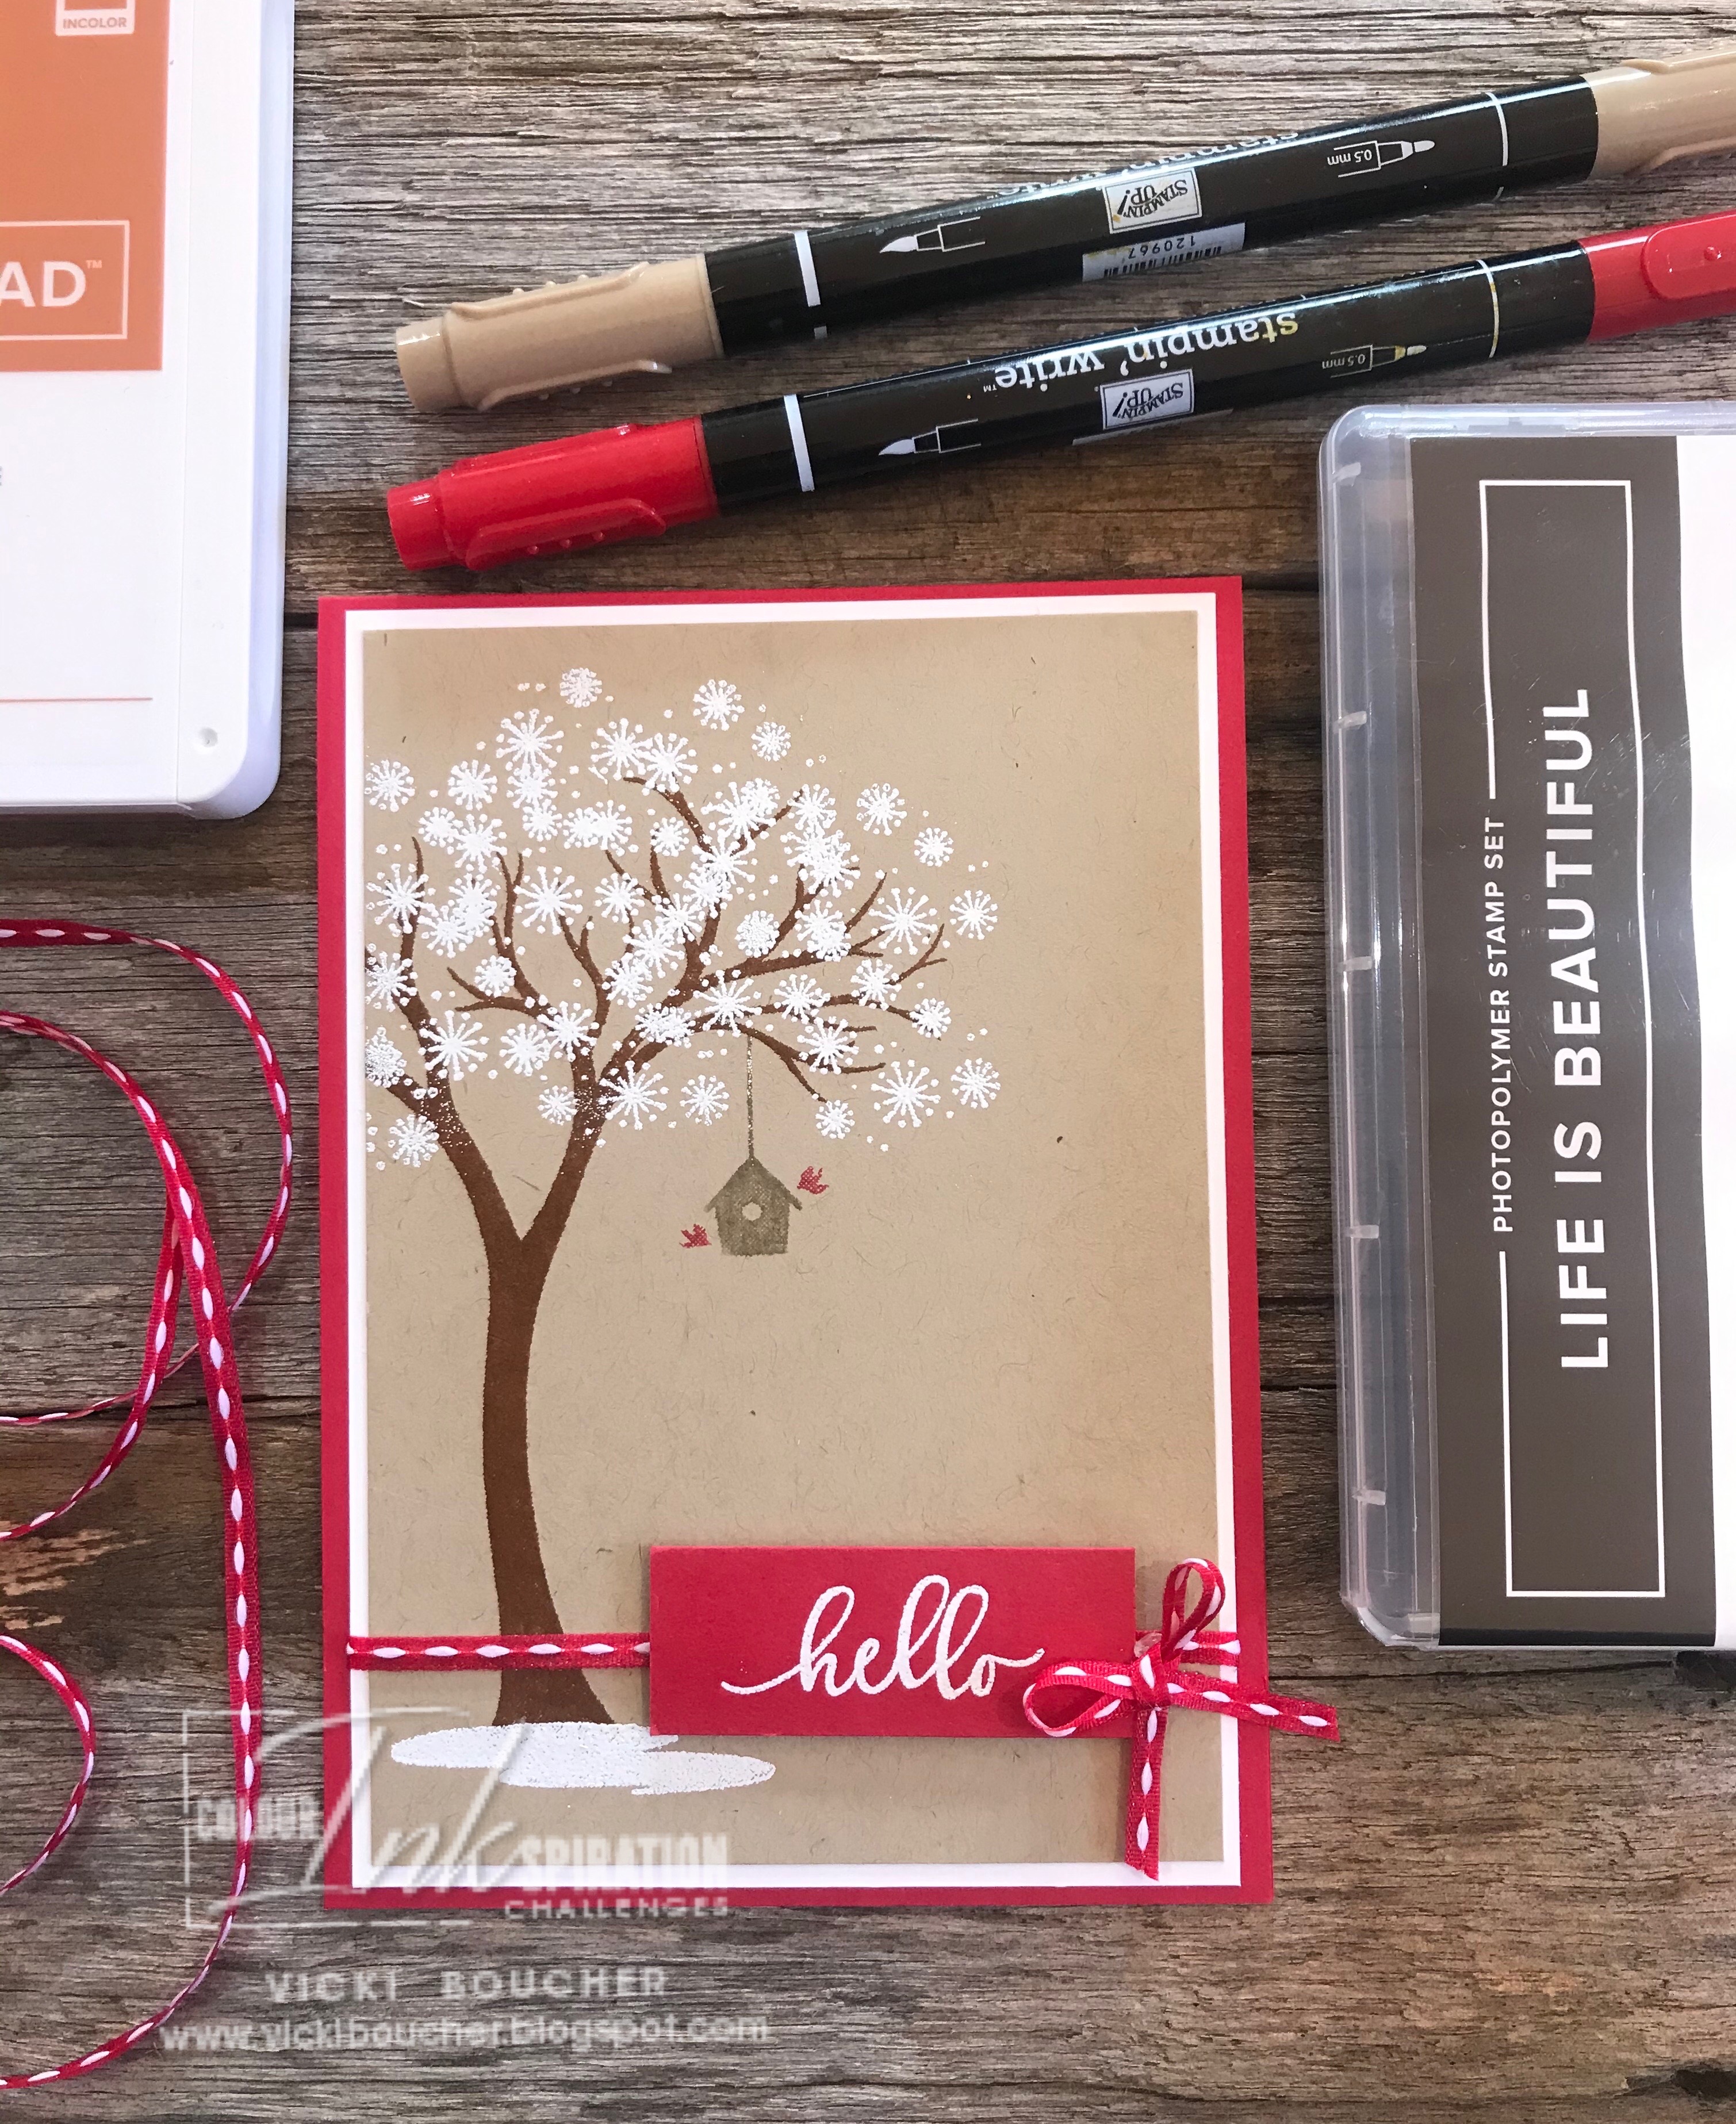
I've used the new Life Is Beautiful Stamp Set it's from the Stampin' Up! August - December 2020 Mini Catalogue and for Demonstrators we can pre-order new items from the Catalogue. Which is so exciting! 


I love the big tree stamp from the stamp set, I've stamped it off to one side of the Crumb Cake panel in Cinnamon Cider. There is a cute stamp with a bird box and two birds, which I've coloured in with Crumb Cake & Real Red Stampin' Write Markers.


The white snow flakes on the tree is White Stampin' Powder which has been heat embossed with the Heat Tool. The white really stands out well against the Crumb Cake Cardstock. 


I just love the Real Red Stitched Grosgrain Ribbon wrapped around the Crumb Cake and Whisper White Cardstock. I like to tie a bow and then add it to the card with Glue Dots. 


The sentiment is from the Life Is Beautiful Stamp Set, I've used White Stampin' Emboss' Powder onto Real Red Cardstock and heat set with the Heat Tool. Using a couple of Stampin' Dimensionals to raise the greeting off the card.

Make sure you come and visit our Facebook group to enter the competition, we would so love to see how you would use these colours.

Click here at Colour INKspiration Facebook group to take part and upload the photo of your creation. You don’t need a blog to enter either. Share with your crafty friends, so they can join in with the challenges too.

Hope to see you there!

Happy Crafting

Vicki Boucher