14 March 2021

Stamping Sunday March Blog Hop - Easter Parade


 Hello and welcome,

It's Stamping 2nd Sunday latest blog hop for March and the theme is Easter Parade for the Design Team. I love this time of year with Easter not too far away and with all the yummy chocolate goodies to treat ourselves or give to someone we love. 


For my projects today I was thinking what do I already have in my crafty stash that I could come up with for my Slimline Card and 3D Project. Well for one thing I couldn't go past is the Springtime Joy Stamp Set which is available in the Mini 2021 January to June Catalogue. There is a bunny (which is so adorable), chicken and lamb plus cute little flowers, butterfly and sentiments. 


Slimline Card:

Starting with the card base using Thick Whisper/Basic White Cardstock cut at 21cm x 21cm, score at 10.5cm. Cut a panel of Basic White Cardstock at 10cm x 20.5cm this will be the base for the background of the bunny scene. To create the grass I've used a stencil of scrap Cardstock and created a curve in the cardstock with the Paper Snips. 


Using Pear Pizzazz Ink I lightly added Ink with the Blending Brush to the Cardstock and then I added Balmy Blue Ink for the sky lightly fading out to the top.

As it's not Spring in the Southern Hemisphere and I didn't have any other Stamp Sets that said Happy Easter, so I used Playful Alphabet Dies and created an Ombre effect using Cinnamon Cider Ink, a strip of Basic White Cardstock and Blending Brush. I used the Foam Adhesive Sheets to add more depth to the card.


The three bunnies are stamped in Memento Ink onto Basic White Cardstock and coloured in with the Stampin' Blends using - Crumb Cake, Smoky Slate, Flirty Flamingo, Purple Posy, Daffodil Delight, Balmy Blue, Granny Apple Green and blending in with the Color Lifter.

I've fussy cut out the bunnies, butterflies and flowers sorry no Dies with the Springtime Joy Stamp Set. 

The pot plants images are from the Simply Succulents Stamp Set they are stamped in Memento Ink onto Basic White Cardstock and coloured in with the Stampin' Blends using - Purple Posy, Highland Heather, Flirty Flamingo, Smoky Slate and Balmy Blue. Then I fussy cut out the pot plants. There is a Die for the pot plant but it didn't take too long for me to cut them out. 


I've placed the bunnies inside the plant pots and added the flowers and butterflies. I like how I've made them peaky out from the pot plants. It looks like they are up to mischief! 


3D Project

To create my Daisy and bunny treat bag, I've used the All Dressed Up Dies and Basic White Cardstock. Using the bag die to cut out two pieces for the treat bag. I've added coloured ink to the dies cut pieces as I did with the Slimline Card. 
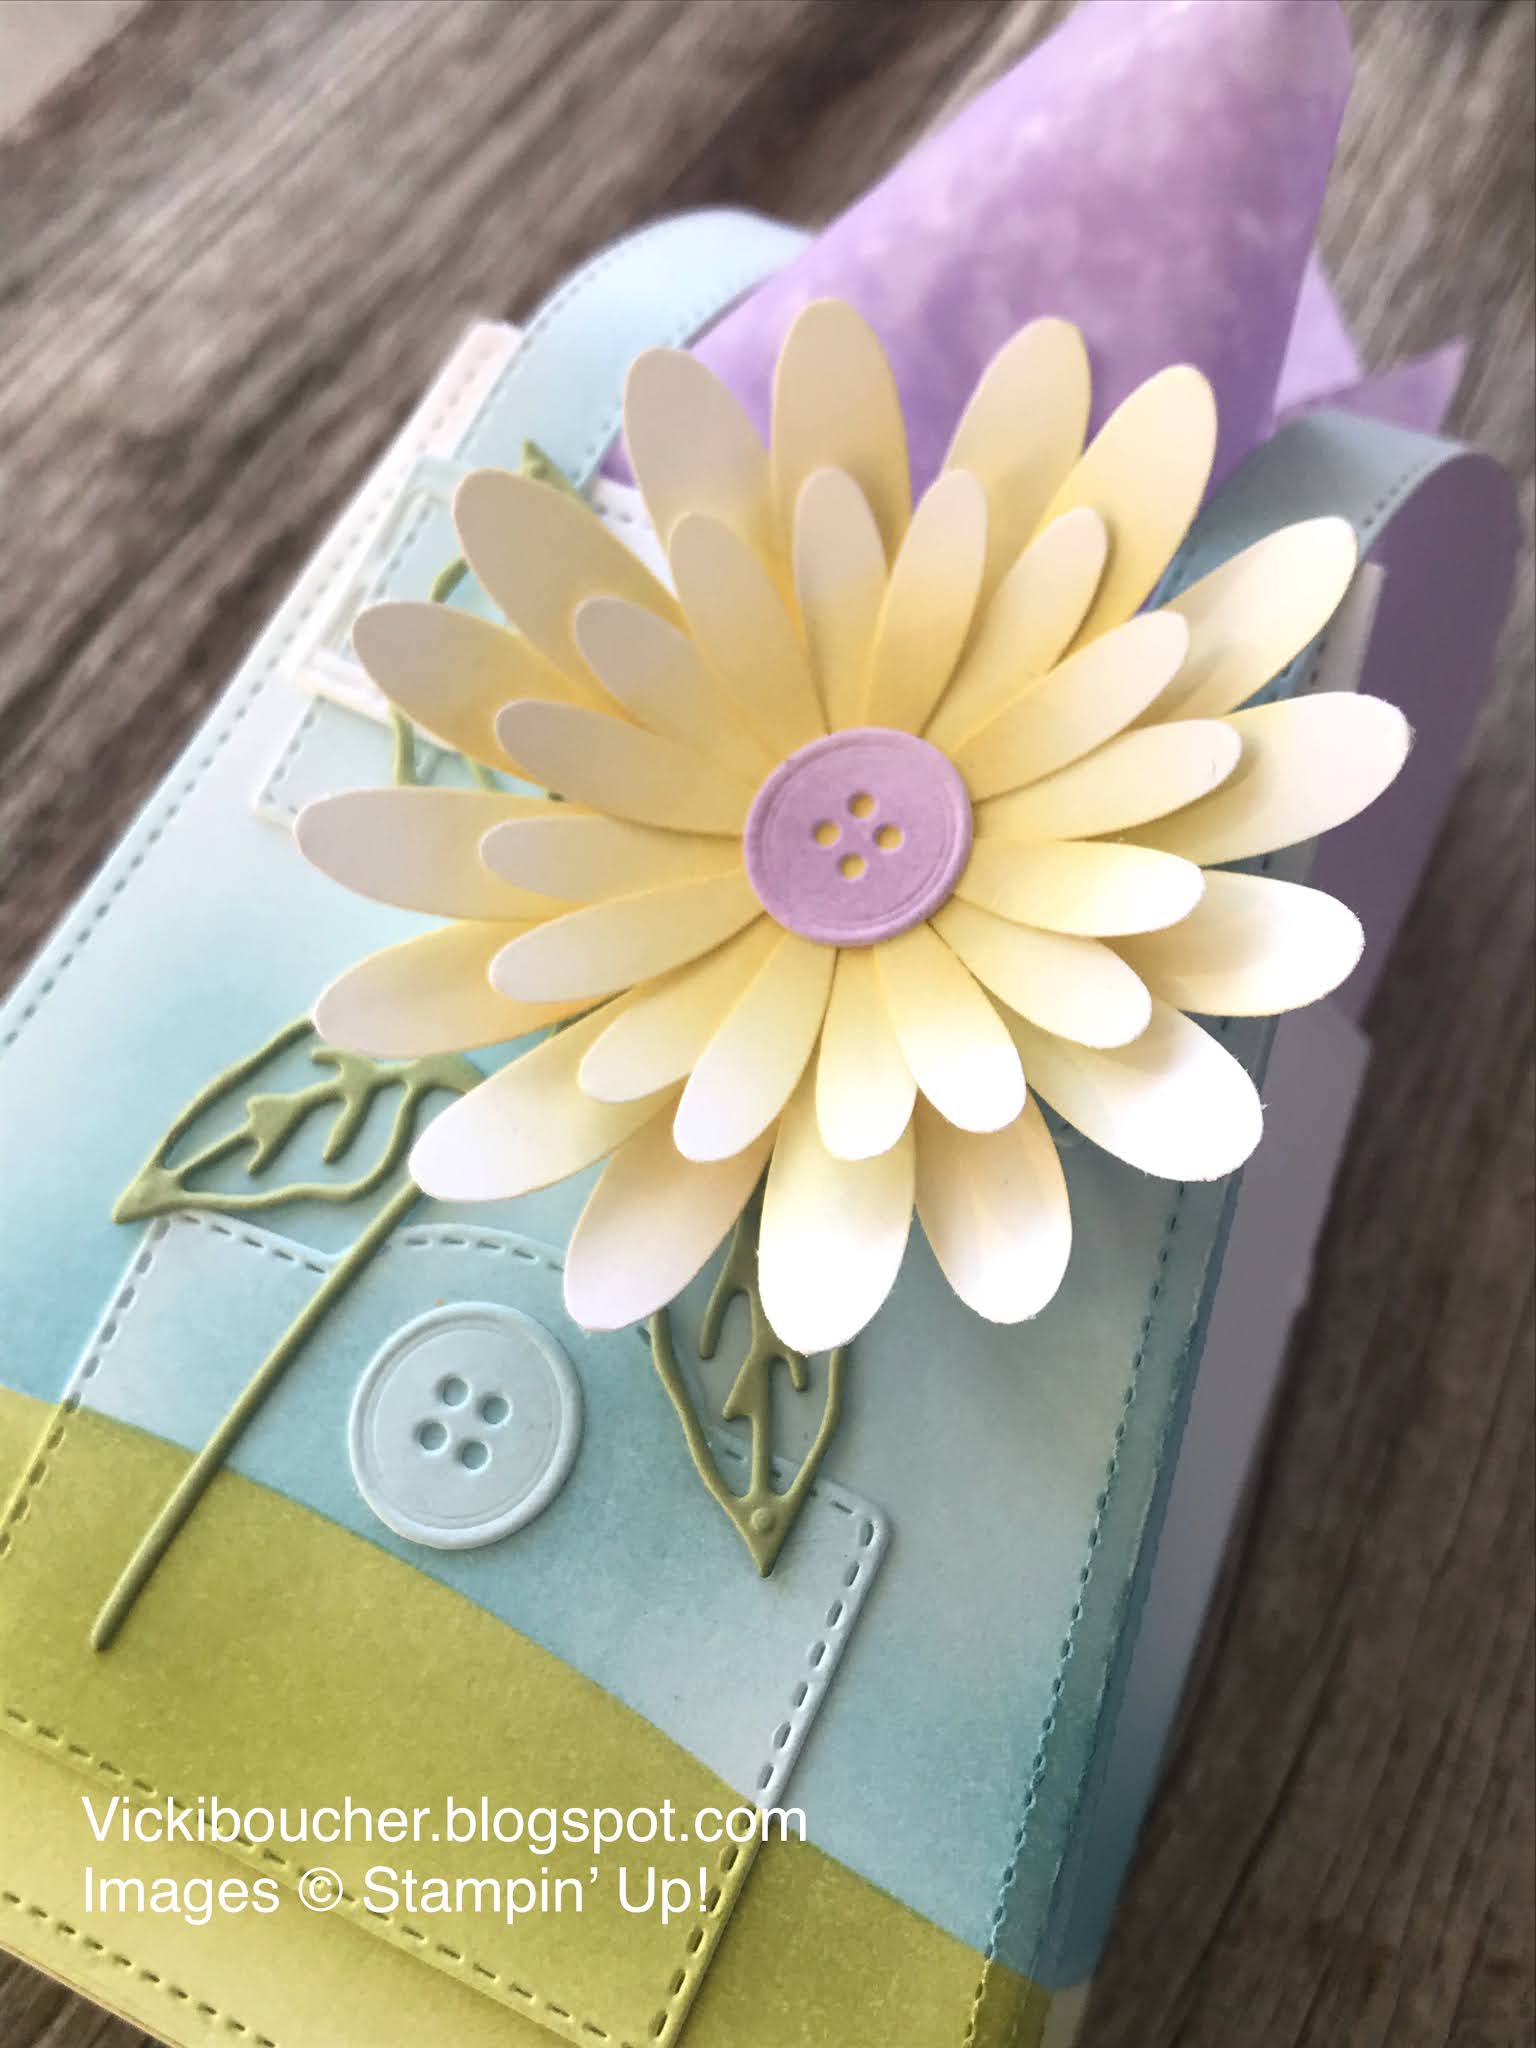


To create the Daisy I've punch out two of the Medium Daisies and two of the larger Daisies in Basic White Cardstock and added Daffodil Delight Ink with the Blending Brush. The Highland Heather center piece is a button which is from the All Dressed Up Dies and it fits perfectly in the center. The Pear Pizzazz leaf is from the Hydrangea Dies.


On the other side is the stamped images of the bunny, basket and flower all the same as the bunnies on the Slimline Card.


Thank you for visiting my blog today.To see all of the amazing projects by the Stamping Sunday Design Team please click on their names below.

1. Sara Levin  
2. Su Mohr  
3. Tami Hewlett  
4. Jay Soriano  
5. Vicki Boucher


To purchase any of the above mentioned Stampin' Up! products, please visit my online store here.

Happy Stamping

Vicki Boucher


10 March 2021

Colour INKspiration Challenge #95


Hello and welcome,

It's the latest Colour INKspiration challenge #CI95 and this stunning photo was chosen by Jacque Williams one of the Design Crew Members. This colour combo it's so rich and I just love addition of gold.


The colours for #95 challenge are Balmy Blue, Highland Heather, Gorgeous Grape, Blackberry Bliss and Gold. As well as the chosen colours you may also add Basic White, Basic Black, Very Vanilla and metallics to your project. We also allow 'Ivory' and 'Bronze' in the Stampin' Blends. If you don't have all the colour palette, feel free to use the closest SU substitute (ie: Seaside Spray instead of Balmy Blue .... you get the drift). 

The challenge will run for almost 2 weeks until 7pm on the 22nd March 2021 details to follow at the end of my blog.


For today's project I've used a number of different Stampin' Up! products which are from the Annual 2020 to 2021 Catalogue and the Mini Jan to June 2021 Catalogue. Plus the up and coming 2021 - 2022 Annual Catalogue which I've used the detailed butterflies Dies from the Butterfly Brilliance Collection.

I've created lots of layers for my project and the Ombre blending technique using the Blending Brushes creating a mix of the challenge colours together. 


The smaller butterfly is a mix of Balmy Blue, Highland Heather and Gorgeous Grape Ink onto White Cardstock. The medium size butterfly is a mix of Highland Heather and Blackberry Bliss Ink. In between the coloured butterflies I've die cut Gold Foil butterflies. 


The blend of purples and Balmy Blue makes up for the Stitched label die cut and is from the Floral Heart Dies. This gives you an added layer to the card and shows off the larger Gold Foil Butterfly.


To create the Ombre embossed panel, using Shimmery White Cardstock I started with Balmy Blue Ink around the edges but also leaving the corners almost white. Then I added Highland Heather Ink and in the center Gorgeous Grape Ink.


The Ombre panel is embossed using the elegant Parisian Flourish 3D Embossing Folder and I've added the Gold Gilded Leafing. The Gold highlights the beautiful detail of the embossing and gives it a lovely finish.


The layer underneath is Gorgeous Grape Cardstock embossed using the Tasteful Textile 3D Embossing Folder and more Gold Gilded Leafing was added to this panel. The card base is a half sheet of Gorgeous Grape.


The other elements to the card are Gold Trim tied in a bow adhere to the tiny gift tag from the Hydrangea Dies and the sentiment is also from this bundle stamped in Gorgeous Grape. Also from the bundle are the small flowers die cut in Whisper White and I added Gold Gilded Gems for the center. The delicate Gold Laser-Cut Specialty Paper is also added to finish off my project.


We hope you can participate in this latest round and as we so look forward to seeing a variety of projects using the challenge colours. Please ensure that your project is new and made specially for this challenge.

#CI95 will run until 7pm (ADET) on Monday 22nd March 2021.

Please click on the link here to join the challenge.

Just a reminder to upload your challenge pics straight to the discussion wall and not in an album.

Thank you for visiting my blog today, I would so love hear your thoughts on my project by leaving a comment below.

You can purchase any of the Stampin' Up! products by shopping with me at my online store here.

Happy Stamping!

Vicki Boucher

24 February 2021

Colour INKspiration Challenge #94


Hello and welcome,

It's the latest Colour INKspiration challenge #CI94 and this beautiful photo was chosen by Rachel Lewsley one of the Design Crew Members who recently joined our team late last year. I love this colour combo.


The colours for #94 challenge are Seaside Spray, Mango Melody, Crumb Cake, Very Vanilla and Misty Moonlight. As well as the chosen colours you may also add Basic White, Basic Black and metallics to your project. We also allow 'Ivory' and 'Bronze' in the Stampin' Blends. If you don't have all the colour palette, feel free to use the closest SU substitute (ie: Night of Navy instead of Misty Moonlight .... you get the drift). 

The challenge will run for almost 2 weeks until 7pm on the 8th March 2021 details to follow at the end of my blog.


For today's project I've used a number of different Stampin' Up! products which are from the Annual 2020 to 2021 Catalogue and the Mini Jan to June 2021 Catalogue. 

The flowers are from the True Love Designer Series Paper fussy cut out and coloured in using the Stampin' Blends. I've used light & dark Seaside Spray, light Misty Moonlight, light & dark Mango Melody and light & dark Crumb Cake. I love to colour in it's so therapeutic.


The card base is a half sheet of Misty Moonlight Cardstock, I've added Misty Moonlight Ink to the card base with the Blender Brush. The next two layers are a panel of Very Vanilla embossed using the Tasteful Textile 3D Embossing Folder and Misty Moonlight embossed using Script 3D Embossing Folder. I also added Misty Moonlight Ink with the Blender Brush to give it more depth and show off the embossed writing. The two panels are ruffed up along the edges with the Paper Snips.


Adding the next layer is Seaside Spray Cardstock die cut out using the largest Stitched Circle Die and embossed with the Tasteful Textile 3D Embossing Folder. I've added Misty Moonlight Ink to the outer of the Stitched Circle with the Blender Brush.


I've used one of the smaller butterflies from the Butterfly Brilliance Bundle which will be available for customers on 2nd March 2021 until 3rd May 2021. Using the Stampin' Blends in Mango Melody, Seaside Spray and Misty Moonlight.


The tiny flowers and little note tag are from Hydrangea Haven Bundle which is on page 20 of the Mini Catalogue. They are die cut out in Seaside Spray Cardstock and sponged Ink in Misty Moonlight. The two blues go so nicely together. I added a bow using Linen Thread and adhere it with a Glue Dot to the little tag.


We hope you can participate in this latest round and as we so look forward to seeing a variety of projects using the challenge colours. Please ensure that your project is new and made specially for this challenge.

#CI94 will run until 7pm (ADET) on Monday 8th March 2021.

Please click on the link here to join the challenge.

Just a reminder to upload your challenge pics straight to the discussion wall and not in an album.

Thank you for visiting my blog today, I would so love hear your thoughts on my project by leaving a comment below.

You can purchase any of the Stampin' Up! products by shopping with me at my online store here.

Happy Stamping!

Vicki Boucher


14 February 2021

Stamping Sunday February Blog Hop - My Mini Catalogue Favourite


Hello and welcome, it's the latest Stamping Sunday blog hop and we are sharing our favourite products from the Stampin' Up! January to June 2021 Mini Catalogue. The list of designers are at the end of my blog, so make sure you click on their names and see there creations.


Stampin' Up! have so many amazing products in the Mini Catalogue and it was hard to chose which one was my favourite. On my wish list was the stunning 'Pretty Perennials Bundle' item 156234 and the 'Blending Brushes' item 153611. 


The Pretty Perennials Stamp Set (154435) is inspired by Million Sales Achiever Dena Rekow, I love the watercolor look of the stamps and the greetings are fun and happy! The Perennial Petals Dies (154321) have flowers, leaves and so much more to create beautiful cards, scrapbooking and 3D gifts etc....


The Blending Brushes item 153611 come in a pack of 3 for $21. The bristles are like soft velvet and work really well when using on large or small scale of paper. Adding and blending colour just got easy when creating your projects, they will be done in no time.


Today I've created a handmade card and 3D Mini Pizza Box for my projects.


Starting with the card I've used the following colours Poppy Parade, Balmy Blue, Bumblebee and Old Olive. I've added Balmy Blue Ink with the Blending Brush to the Whisper White panel and stamped the small flower image directly onto the panel. Before adding the panel to the Poppy Parade card base I used the Paper Snips and ruffed up the edges of the Cardstock.


Using both the stamped images of the flowers and combined them with the die cuts you can pretty much make any type of combination for your flowers. I did use ink to paper with the Blending Brushes to give more depth and shades of colour for the die cuts. Such as the Old Olive for the leaves, Poppy Parade and Bumblebee for the flower dies. 


The Balmy Blue DSP strips have been ripped on either side to show off the white in the paper. I added the script and the wood print DSP to the card.

To finish off the card I add a few different Embellishments starting with the Gold Hoop, In Good Taste Elements and the Artistry Blooms Sequins. 


The Gold Mini Pizza Box matches the card as a lovely gift. Using different types of ribbon in colours of yellow and gold to match the box. I've wrapped together the Bumblebee Gingham Ribbon with the Gold Fine Art Ribbon around the box and adding the Gold Forever Greenery Trim and tied it in a knot.


Added Whisper White panel is the same as the card, plus the flowers and leaves. I've stamped off the flower image in Poppy Parade which gives the flower a much lighter colour. The sentiment is stamped in Poppy Parade.


Thank you for visiting my blog today.To see all of the amazing projects by the Stamping Sunday Design Team please click on their names below.


1. Sara Levin  
2. Su Mohr  
3. Jay Soriano  
4. Anne Marie Hile  
5. Cheryll Miller  
6. Mikaela Titheridge  
7. Vicki Boucher  


To purchase any of the above mentioned Stampin' Up! products, please visit my online store here.

Happy Stamping

Vicki Boucher


11 February 2021

Art With Heart Team Creative Showcase February - Love and Valentine's Day


Hello and welcome,

I'm so excited to share with you two projects I have created for the latest Art With Heart Team Creative Showcase hosted by Rachel Woollard, I'll post the link to her page at the end of my blog. 


We are sharing our creativity with the theme Love and Valentine's Day. I can smell Love is in the air with Valentine's Day coming up on the 14th February and I thought I would make something special for my hubby. 


I've made a card and a 3D project using the Always in My Heart Bundle and the Gilded Leafing Embellishment which you can find in the latest Stampin' Up! January to June 2021 Mini Catalogue. Oh and also the Blender Brushes, I just love them so much!

My favourite colour at the moment would have to be Pacific Point, I just love the richness of this colour I've combine it with Night of Navy Ink and the Gilded Leafing.


To create the card I've started with a panel of Whisper/Basic White Cardstock to create the Ombre effect I've used the Blender Brush and Pacific Point Ink using circler motions across the panel adding more ink as I go. I wanted a deeper blue at the bottom so I added Night of Navy Ink. 


For the detailed floral Ombre heart I've used Pacific Point Ink with the Blender Brush and applied ink onto a piece of Whisper/Basic White Cardstock leaving some white on the outer edge of the Cardstock. This also applies to heart for the 3D Mini Gold Pizza Box.


For the "LOVE" & "YOU" I've created the Ombre look by using Whisper White Cardstock, Pacific Point Ink, Blender Brushes, the Playful Alphabet Dies for the letters "LOVE" & "YOU" and Foam Adhesive Sheets. 


I wanted to add the Gilded Leafing to my project gold and blue is such a lovely combination. Gilded Leafing is the same as the powder embossing still using Versamark Ink which I've added the Ink with a Sponge Dauber and also with the edge of the Versamark Ink Pad to the Cardstock. Add the Heat & Stick Powder, heat set with the Heat Tool and then apply the Gilded Leafing. I remove any excess of gold with a Stamping Sponge. 


The Gold Mini Pizza Box is the same as the card, except for the Fine Art Gold Ribbon which is tied around the gold box. 


Well that's it for my blog, now it's time to visit Rachel Woollard and all the other participants from the Art With Heart Team. I'm so looking forward to seeing their beautiful projects.

Thank you for visiting my blog today. You can purchase any of the above mentioned products by visiting my online store here or send me a direct message.

Happy Stamping

Vicki Boucher


10 February 2021

Colour INKspiration Challenge #93


Hello and welcome,

It's the latest Colour INKspiration challenge #CI93 and this stunning photo was chosen by Monica Formosa one of the Design Crew Members who recently joined our team late last year. This colour combo is amazing! 


The colours for #93 challenge are Sahara Sand, Granny Apple Green and Pacific Point. As well as the chosen colours you may also add Basic White, Very Vanilla, Crumb Cake, Basic Black and metallics to your project. We also allow 'Ivory' and 'Bronze' in the Stampin' Blends. If you don't have all the colour palette, feel free to use the closest SU substitute (ie: Night of Navy instead of Pacific Point .... you get the drift). 


The challenge will run for almost 2 weeks until 7pm on the 22nd Feb 2021 details to follow at the end of my blog.


For my project I've used the Friends Are Like Seashells Bundle which is on page 42 of the Stampin' Up! January to June 2021 Mini Catalogue. This bundle was on the top of my wish list when I first saw the Mini Catalogue. I just knew I had to have it in my crafty stash! I love the Seashells 3D Embossing Folder which coordinates with the large die from the Seaside Seashells Dies.


Using Basic White for the large embossed image I've added colour by using the Blender Brushes. One for Pacific Point and the other for Granny Apple Green slowly adding colour to the image and mixing the two colours together. This brings out some amazing colours and such a time saver too.


To create the Pacific Point Ombre panel underneath is Shimmery White Cardstock, Pacific Point Ink and a Blender Brush. I use circle motions with the brush and making sure I go off the edges too. I really like the contrast between the brightness of Granny Apple Green against Pacific Point.

I've used Stampin' Dimensionals for the layers to give it more depth and even though it's hard to see I did add Clear Wink of Stella to the embossed seashell panel for a little sparkle The card base is a half sheet of Sahara Sand.


Adding a few more layers by using strips of the script DSP in Granny Apple Green and Pacific Point by tearing along one side. I stamped the starfish and seashell in Sahara Sand and with a Sponge Dauber I added colour. 

The sentiment is from the Pretty Perennials Stamp Set, using Versmark Ink, White Stampin' Emboss Powder and heat set with the Heat Tool. The sentiment happy has been fussy cut out.


We hope you can participate in this latest round and as we so look forward to seeing a variety of projects using the challenge colours. Please ensure that your project is new and made specially for this challenge.

#CI93 will run until 7pm (ADET) on Monday 22nd February.

Please click on the link here to join the challenge.

Just a reminder to upload your challenge pics straight to the discussion wall and not in an album.

Thank you for visiting my blog today, I would so love hear your thoughts on my project by leaving a comment below.

You can purchase any of the Stampin' Up! products by shopping with me at my online store here.

Happy Stamping!

Vicki Boucher