Showing posts with label Easter Cards. Show all posts

16 April 2022

Artisan Design Team - Easter Friends and Baby Cards


Hello and welcome,

My name is Vicki Boucher and I'm from Melbourne, Australia. Today I'll be sharing four projects using the Easter Friends and Happy Heartfelt Stamp Sets, turning them into Easter and baby cards and gifts tags.

I love beautiful, coordinating, vintage style cards and gift tags in soft, subtle colors with lots of layers. I'll add the list of products used at the end of my blog.


Rabbit vintage style card

This cute bunny is perfect for your Easter craft projects. For a soft, stamped image use Smoky Slate Classic Stampin' Pad and stamp the rabbit on Basic White Cardstock. Color the image with Stampin' Blends in soft pastel colors using Petal Pink, Pale Papaya, and Flirty Flamingo. Blend in the colors with the Stampin' Blend Color Lifter. Fussy cut the rabbit with Paper Snips.


To create a soft, subtle look, color your die-cut pieces using a Blending Brush and Petal Pink Ink. Lightly apply ink to the Eden Dies border. Cut the colored border die with a Paper Trimmer or Paper Snips and adhere it to the largest Tailor Made Tags die-cut piece in Basic White Cardstock and Heart & Home Designer Series Paper.


To add interest to your panels of cardstock, I used the Timeworn Type 3D Embossing Folder and dried embossed using Vellum and Petal Pink Cardstock. Use your Paper Snips along the edges of the cardstock to distress.

To finish off the card I like to add a few embellishments using the Pearl Basic Jewells. The sentiment is stamped in Basic Gray Ink to coordinate with the Heart & Home Designer Series Paper.


Baby duckling card

I just love this duckling, stamped in Smoky Slate Classic Stampin' Pad onto Basic White Cardstock. Color the image with Stampin' Blends using So Saffron and Daffodil Delight, blend the colors together. Fussy cut the duckling out with Paper Snips. 


I added Balmy Blue and Pear Pizzazz Ink with the Blending Brush to the Basic White gift tag and placed under the duckling.

It is easy to make lots of thin strands from the White 3/4" (1.9cm) Frayed Ribbon by pulling apart the wide ribbon. Once it is frayed, thread it through the gift tag hole and hold it in place.


To create a fun background, stamp your images in the same color as the cardstock. Here I've used So Saffron Cardstock and So Saffron Classic Stampin' Pad. Stamp the duckling and sentiment three times each. For the greeting I've used the "Hello baby!" sentiment from the Happy Heartfelt Stamp Set to create baby card. Stamp the sentiment in Basic Gray Ink on a strip of Basic White Cardstock.


Thank you for visiting my blog today, I would so love hear your thoughts on my projects by leaving a comment below. 

If you would like a copy of the Stampin' Up! Mini January to June 2022 Catalogue and the new Annual Catalogue 2022 - 2023 please contact me here

If you live in Australia and don't have a demonstrator, you can purchase any of the Stampin' Up! products by shopping with me at my online store here.


Happy Stamping

Vicki Boucher


List of Stampin' Up! products used

Easter Friends Stamp Set (157737)
Happy & Heartfelt Stamp Set (158005)
Tailor Made Tags Dies (155563)
Eden Dies (157831)
Basic White Cardstock (159276)
Petal Pink Cardstock (146985)
So Saffron Cardstock (105118)
Vellum Cardstock (101856)
Vellum Layering Designs (157764)
Heart & Home Designer Series Paper (157928)
Pear Pizzazz Classic Stampin’ Pad (147104)
Balmy Blue Classic Stampin’ Pad (147105)
Petal Pink Classic Stampin’ Pad (147108)
Smoky Slate Classic Stampin’ Pad (147113)
So Saffron Classic Stampin’ Pad (147109)
Basic Gray Classic Stampin’ Pad (149165)
Stampin’ Blends Color Lifter (144608)
Stampin’ Blends Petal Pink (154893)
Stampin’ Blends Pale Papaya (155519)
Stampin’ Blends Flirty Flamingo (154884)
Stampin’ Blends Calypso Coral (154881)
Stampin’ Blends So Saffron (154905)
Stampin’ Blends Daffodil Delight (154883)
Timeworn Type 3D Embossing Folder (156505)
Baker’s Twine Essentials Pack (155475)
Cotton Ribbon Combo Pack (158140)
White 3/4" (1.9 cm) Frayed Ribbon (158138)
Pearl Basic Jewels (144219)
Blending Brushes (153611)
Tear & Tape Adhesive (138955)
Mini Stampin’ Dimensionals (144108)


Comments

14 March 2021

Stamping Sunday March Blog Hop - Easter Parade


 Hello and welcome,

It's Stamping 2nd Sunday latest blog hop for March and the theme is Easter Parade for the Design Team. I love this time of year with Easter not too far away and with all the yummy chocolate goodies to treat ourselves or give to someone we love. 


For my projects today I was thinking what do I already have in my crafty stash that I could come up with for my Slimline Card and 3D Project. Well for one thing I couldn't go past is the Springtime Joy Stamp Set which is available in the Mini 2021 January to June Catalogue. There is a bunny (which is so adorable), chicken and lamb plus cute little flowers, butterfly and sentiments. 


Slimline Card:

Starting with the card base using Thick Whisper/Basic White Cardstock cut at 21cm x 21cm, score at 10.5cm. Cut a panel of Basic White Cardstock at 10cm x 20.5cm this will be the base for the background of the bunny scene. To create the grass I've used a stencil of scrap Cardstock and created a curve in the cardstock with the Paper Snips. 


Using Pear Pizzazz Ink I lightly added Ink with the Blending Brush to the Cardstock and then I added Balmy Blue Ink for the sky lightly fading out to the top.

As it's not Spring in the Southern Hemisphere and I didn't have any other Stamp Sets that said Happy Easter, so I used Playful Alphabet Dies and created an Ombre effect using Cinnamon Cider Ink, a strip of Basic White Cardstock and Blending Brush. I used the Foam Adhesive Sheets to add more depth to the card.


The three bunnies are stamped in Memento Ink onto Basic White Cardstock and coloured in with the Stampin' Blends using - Crumb Cake, Smoky Slate, Flirty Flamingo, Purple Posy, Daffodil Delight, Balmy Blue, Granny Apple Green and blending in with the Color Lifter.

I've fussy cut out the bunnies, butterflies and flowers sorry no Dies with the Springtime Joy Stamp Set. 

The pot plants images are from the Simply Succulents Stamp Set they are stamped in Memento Ink onto Basic White Cardstock and coloured in with the Stampin' Blends using - Purple Posy, Highland Heather, Flirty Flamingo, Smoky Slate and Balmy Blue. Then I fussy cut out the pot plants. There is a Die for the pot plant but it didn't take too long for me to cut them out. 


I've placed the bunnies inside the plant pots and added the flowers and butterflies. I like how I've made them peaky out from the pot plants. It looks like they are up to mischief! 


3D Project

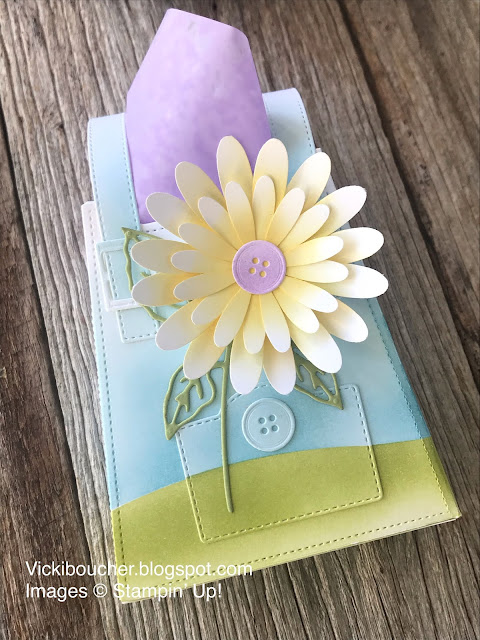
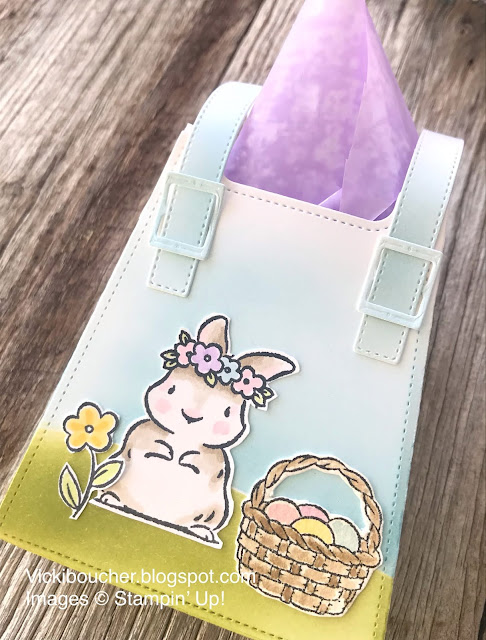
To create my Daisy and bunny treat bag, I've used the All Dressed Up Dies and Basic White Cardstock. Using the bag die to cut out two pieces for the treat bag. I've added coloured ink to the dies cut pieces as I did with the Slimline Card. 


To create the Daisy I've punch out two of the Medium Daisies and two of the larger Daisies in Basic White Cardstock and added Daffodil Delight Ink with the Blending Brush. The Highland Heather center piece is a button which is from the All Dressed Up Dies and it fits perfectly in the center. The Pear Pizzazz leaf is from the Hydrangea Dies.


On the other side is the stamped images of the bunny, basket and flower all the same as the bunnies on the Slimline Card.


Thank you for visiting my blog today.To see all of the amazing projects by the Stamping Sunday Design Team please click on their names below.

1. Sara Levin  
2. Su Mohr  
3. Tami Hewlett  
4. Jay Soriano  
5. Vicki Boucher


To purchase any of the above mentioned Stampin' Up! products, please visit my online store here.

Happy Stamping

Vicki Boucher


31 March 2020

Just Add Ink #498 ....... Just Add E


Hello and welcome,


It’s the latest Just Add Ink ‘Just Add E’ Challenge #498 and I recently created these three Easter cards for a friend of mine. She wanted two in pink and one in blue. I just couldn’t wait to start making the cards.

The three cards are the same layout, but using different colours, Dies and DSP.


The blue bunny card I’ve used Seaside Spray Ink and Cardstock. Sponging ink onto the Cardstock and I’ve water coloured the bunny. The DSP is from the Woven Threads DSP and die cut out using the Stitched Rectangles Dies.


The pink bunny with the Rococo Rose gingham card is using Rococo Rose Ink and Cardstock. 


Using the same technique as with the previous card and use the In color 6”x 6” 2019 – 2021 in Rococo Rose and the Stitched So Sweetly Dies. The roses are from the Dressed To Impress Stamp Set and light sponged with the Sponged Dauber.


The second pink bunny card, I’ve used Blushing Bride Cardstock and Rococo Rose Ink for the sponging. The DSP is from the Best Dressed 6”x6” DSP and die cut with the Stitched So Sweetly Dies.

I’m so glad I got to create these cards and I hope you enjoy seeing them too.


Thank you for visiting my blog today.

To view all of the amazing creations from the Just Add Ink crew please click on the link here.

Happy Crafting

Vicki Boucher