Showing posts with label Mini Catalog. Show all posts

30 April 2023

Artisan Design Team - By The Bay Suite


Hello and welcome,

My name is Vicki Boucher and I'm from Melbourne, Australia. Today, I'll be sharing with you three projects I created for Stampin' Up! earlier this month for my Monthly Artisan Assignment using the By The Bay Suite which was shared on Stampin' Up! socials. The design team did such an amazing job on their projects so make sure you check out their creations. I'll have the link at the bottom on my blog.


By The Bay Suite Collection 160450


The By the Bay Suite is in the Mini Jan - April Catalogue 2023 and is only available until supplies last or until the 1st of May 2023. The Seaside Bay Stamp Set 160436, Seaside Bay Dies 160444, Balmy Blue & White Variegated Ribbon 160448 and Flat Adhesive Backed Pearls 160449 will all be carrying over into the Stampin' Up! 2023 - 24 Annual Catalogue. The only item retiring will be the gorgeous By The Bay 6" x 6" Specialty Designer Series Paper 160434 I'm so glad I have this DSP in my stash! I'll certainly will be using it for future cards and gift tags. 


Now for my projects I created a slimline card, standard size card and gift tag using all of the products from the suite. I just love anything blue so that was my go-to when deciding which colours to use.


For the slimline card I created a under the sea blended background using Basic White cardstock, Blending Brushes and the following colours - Balmy Blue, Nighth of Navy, Starry Sky, Orchid Oasis, Pool Party and Coastal Cabana. I like to leave a corner of white cardstock as well as create light and dark with the different shades of blues. Then my go to at the moment is using my fingers and flicking water onto the ink blended background. This is so much fun!


To create the different layers of seashells, grass, crab I used inked up watercolor paper, stamped images and DSP. I also like to add color using either a Sponge Dauber or Blending Brush to the images. Adding different ribbons and accessories adds texture and sparkle to your project.


I used a lot of By The Bay Specialty Designer Series Paper for the standard size card to create layers and elements to the card. The addition of rippled ribbon layered under the strip of DSP and Gold Elegant Trim tied in a bow.


I used the Stampin' Write Markers to colour in the birds and stamp the images onto Basic White Cardstock and die-cut the birds out using the Seaside Bay Dies. Then using the By The Bay Specialty Designer Series Paper and Balmy Blue Cardstock to die-cut out using Stylish Shapes Dies for the gift tag.  


Thank you for visiting my blog today, I would so love to hear your thoughts on my projects by leaving a comment below. Make sure you pop over onto Stampin' Up! Facebook page or Stampin' Up! Instagram page for lots of inspiration using the By The Bay Suite Collection. You will just need to go back a couple of weeks to view their projects.


If you would like a copy of the Stampin' Up! Annual Catalogue 2023 - 2024 please contact me here

If you live in Australia and don't have a demonstrator, you can purchase any of the Stampin' Up! products by shopping with me at my online store here.


Happy Stamping

Vicki Boucher


11 January 2023

Adorable Owls - Saleabration


Hello and welcome,

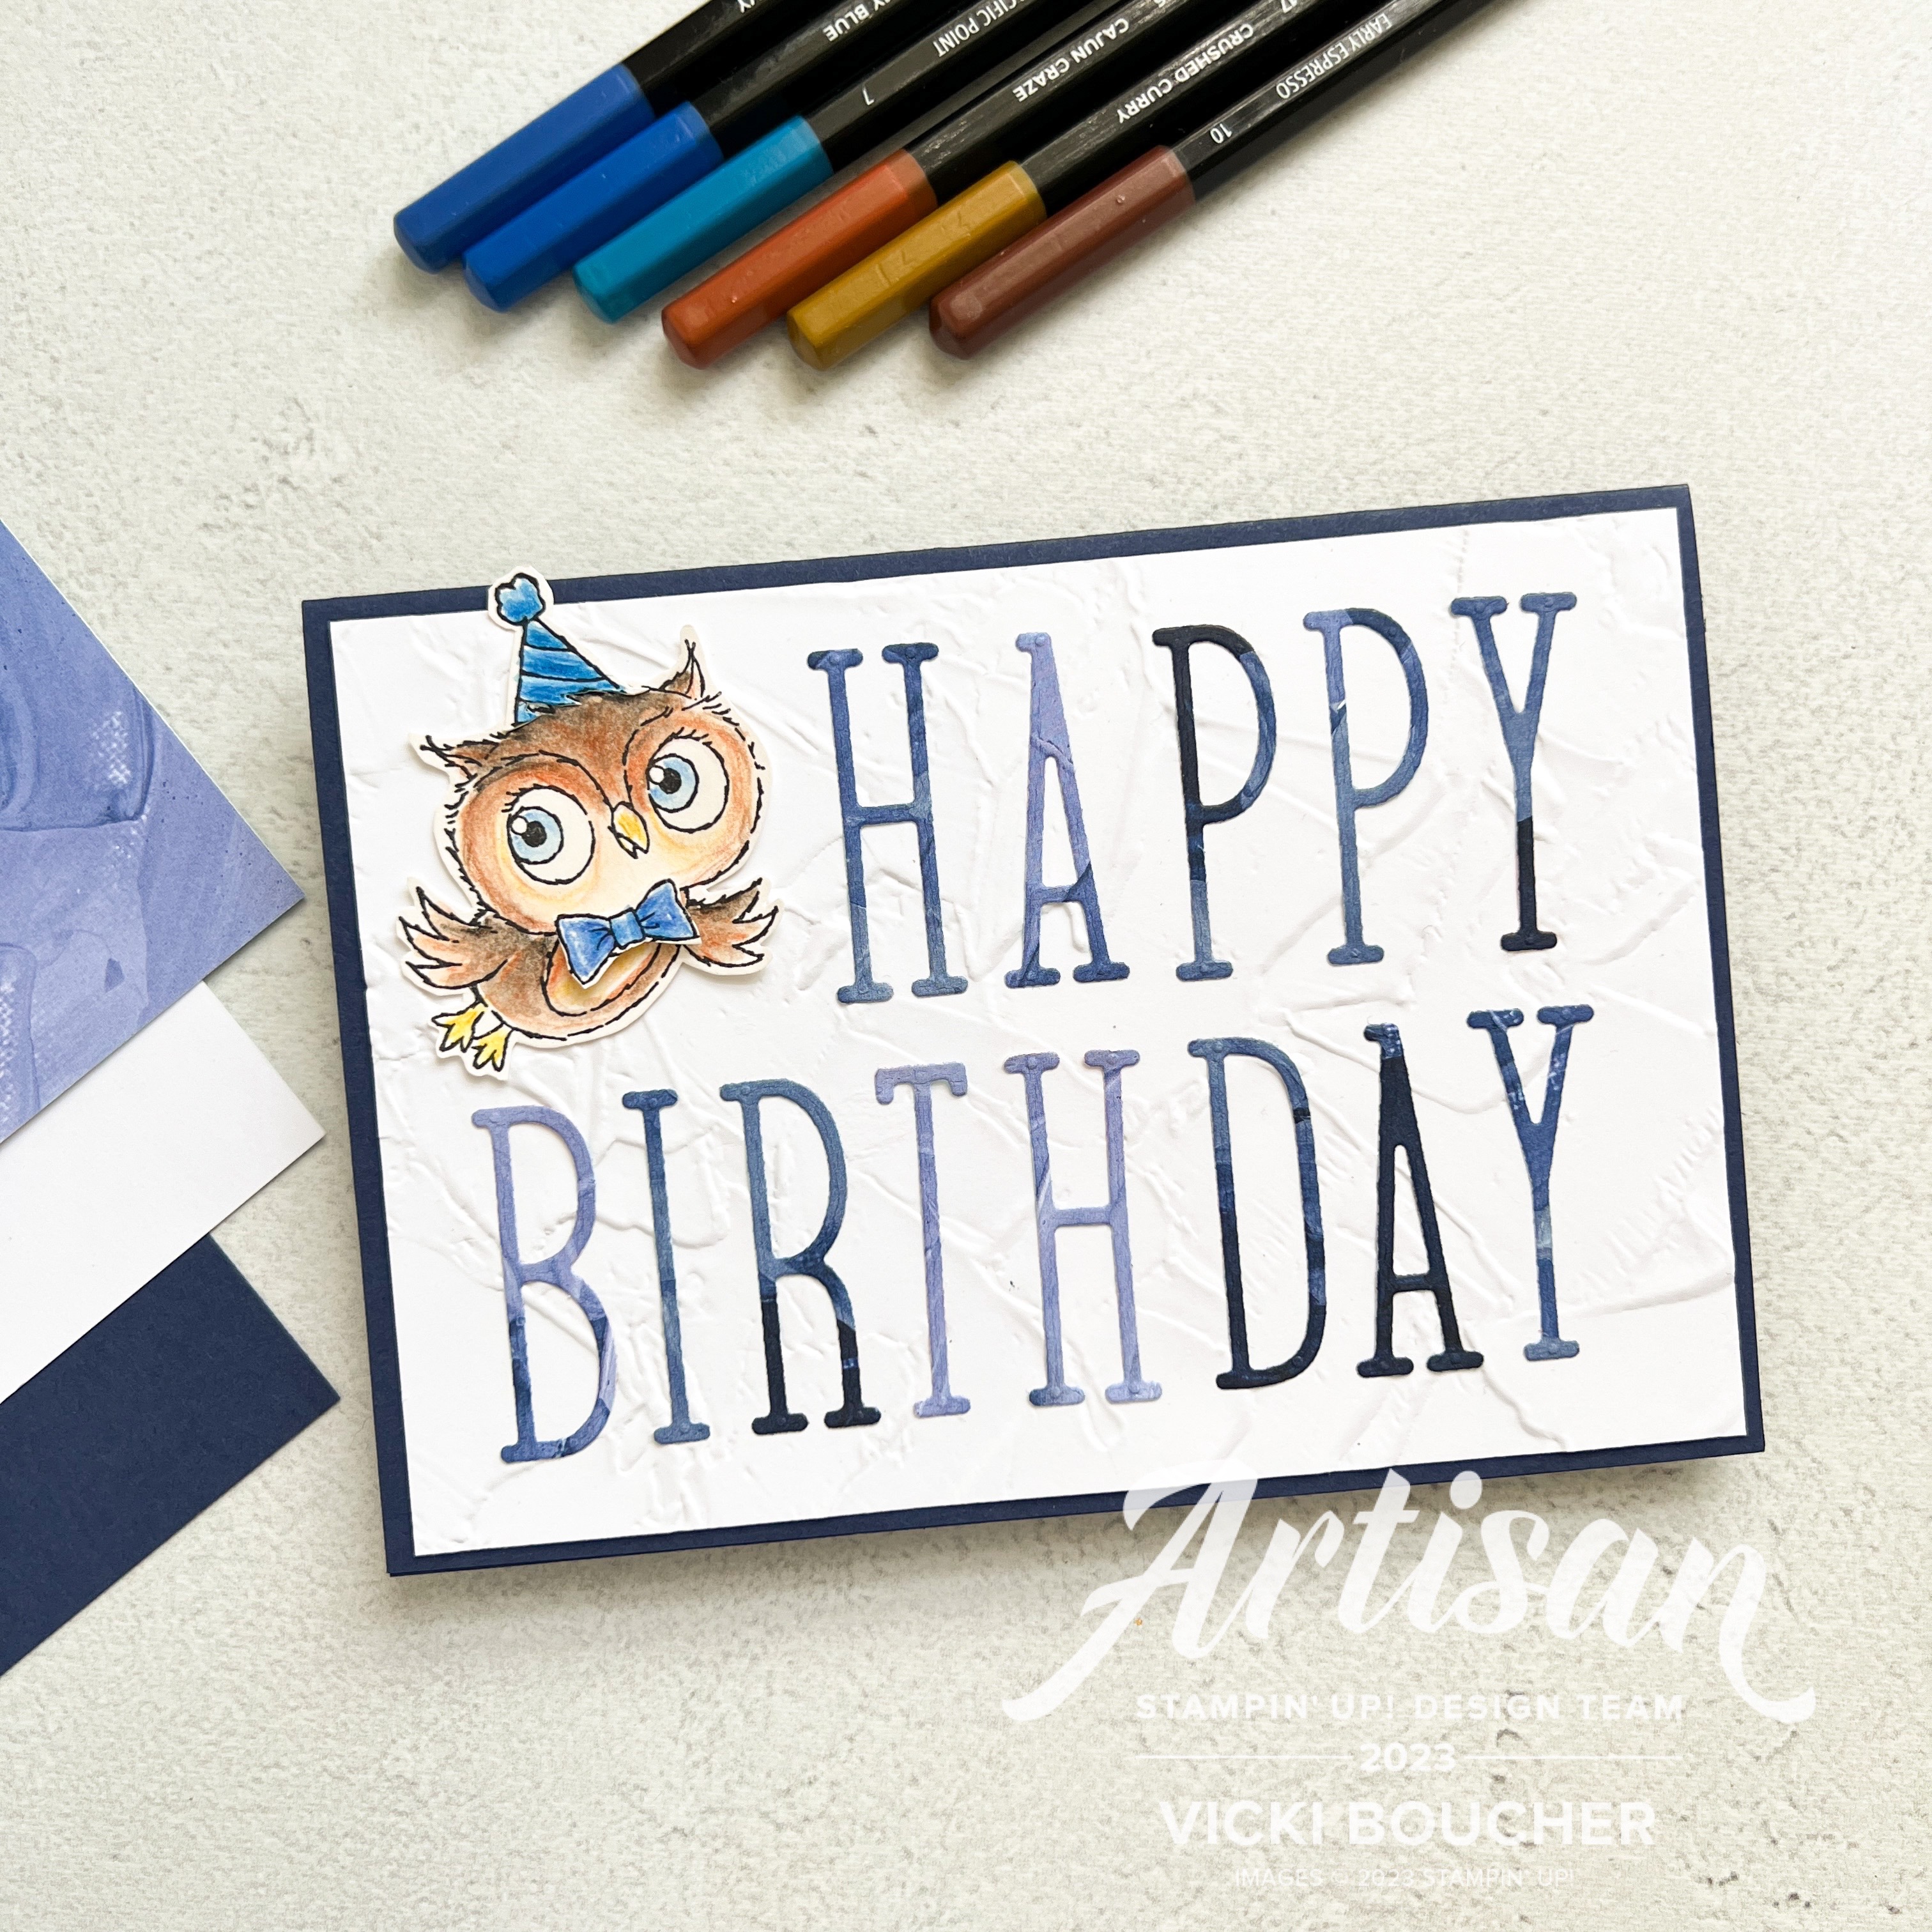
My name is Vicki Boucher and I'm from Melbourne, Australia. Today I'll be sharing with you a cute masculine card using the FREE Saleabration item Adorable Owls Stamp Set (160269) which is available until supplies last or at the end of February 2023. Purchase $90AUD worth of Stampin' Up! products and then select this adorable stamp set as your FREE item. 


Adorable Owls Stamp Set (160269)


I just love the Adorable Owls stamp set you get three different owls and some cute fun sentiments too. I've used Watercolor Pencils and coloured the owl in with them and then used the fine tip Water Painter and went over the coloured area. I wanted the flying owl to have a party hat and bow tie so I fussy cut out the accessories from the other two owls.


For the sentiment I've used the Fancy Flora 6" x 6" Designer Series Paper using the painted Night of Navy paper and die-cut the letters from the Alphabet A La Mode Dies (160750). A great tip is to use the Adhesive Sheets (152334) or Foam Adhesive Sheets (152815) when die-cutting detailed Dies this makes it easier rather than using Multipurpose Glue. Then you won't get sticky fingers.


Fancy Flora 6" x 6" Designer Series Paper (160413)


Alphabet A La Mode Dies (160750)


I layered the die-cut letters over Basic White Cardstock which was dried embossed using the Painted Texture 3D Embossing Folder (154317) and layered over the Night of Navy card base.

Thank you for visiting my blog today, I would so love to hear your thoughts on my project by leaving a comment below.

Just a reminder SALE-A-BRATION is only available until the end of February 2023. For every $90AUD and $180AUD you spend, you'll earn an exclusive Saleabration item for free! Depending on the amount you spend, you'll be able to mix and match the Saleabration items you earn. Stampin' Up! have a variety of stunning stamp sets and Designer Series Paper for you to choose from take a look! Now until 28th February.


$90 AUD SALEABRATION ITEMS


$180 AUD SALEABRATION ITEMS


Please email me if you would like a copy of the 2022-2023 Annual Catalogue, the Jan - April 2023 Mini Catalogue and the Saleabration Catalogue please contact me here

If you live in Australia and don't have a demonstrator, you can purchase any of the Stampin' Up! products by shopping with me at my online store here.

Make sure you follow me on social media via Facebook, Instagram and Pinterest.


Happy Stamping

Vicki Boucher

24 April 2022

Artisan Design Team - Artfully Composed Suite Collection


Hello and welcome,

My name is Vicki Boucher and I'm from Melbourne, Australia. Today I'll be sharing three projects using the Artfully Composed Suite Collection, turning them into a slimline card, standard card, gift bag and gift tag.


The Artisan Design Team are featuring the Artfully Composed Suite Collection on Stampin' Up! Facebook page where you'll sure to be inspired by everyone's creations, I'll add the link at the end of my blog.


The Artfully Composed Suite (157765) is located on page 32 to 34 of the Stampin' Up! Jan - June Mini Catalogue. This beautiful suite consists of Artfully Layered Stamp Set (157752), Tropical Layered Dies (1457760), White 3/4" Frayed Ribbon (158138), Faux Sea Grass Shapes (158139), Vellum 12" x 12" Layering Designs (157764) and Artfully Composed 12" x 12" Designer Series Paper (157750). I just love how it all works together and the beautiful lush tropical images. 


Hey There Slimline Card

To create my slimline card, start with Crumb Cake Cardstock measured at 8.5cm x 21cm, lightly adding Crumb Cake Ink with the Blending Brush to the edges of the cardstock and also a little of Evening Evergreen Ink.


Stamp the larger images first to the panel using Evening Evergreen and Calypso Coral Ink for the lush tropical images. The script writing is stamped in Versamark Ink giving a tone on tone effect. Using a Blending Brush add Calypso Coral Ink to the stamped images in Calypso Coral.


I love all of the images from the Tropical Layers Dies they add so much more detail to your creations. I added Soft Suede and Old Olive Ink using a Blending Brush to the Vellum Layering Designs and then die-cut the images out using the Tropical Layered Dies. 


On one side of the Artfully Composed Designer Series Paper has hand painted tropical designs and on the other has small print patterns such as stripes, polka dots and scripty writing. I used the small print designs like the Calypso Coral Designer Series Paper, die-cut out using the detailed leaf die to add different elements to my project.


To finish off my card I coloured in the White Frayed Ribbon using Evening Evergreen Stampin' Blend. I also added a few of the Old Olive Faux Sea Grass Shapes to my card.


Happiest Birthday Whishes Card

My next card is a standard size card, starting with Sahara Sand Cardstock for the panel, to create the background use the solid palm leaf die-cut image, with your Blending Brush and Evening Evergreen Ink to create a faux masking technique.


I've used the Artfully Composed Designer Series Paper and die-cut out using the Tropical Layers Dies for lots of interest and layers to the card. 


The palm leaf stamp image from the Artfully Layered Stamp Set would have to be my favourite out of all of the images in the set. I've stamped the image in Crumb Cake Ink onto Crumb Cake Cardstock and Evening Evergreen Ink onto Evening Evergreen Cardstock, then die-cut out using the Tropical Layers Dies. 


This time for the White Frayed Ribbon, I coloured it in using Crumb Cake Stampin' Blend. The other elements are a strip of Calypso Coral Cardstock die-cut out using the stitched pinking edge die and for a natural look I just couldn't go past the Linen Thread, tied it in a bow.

The sentiment is stamped in Versamark Ink onto Basic Black Cardstock, White Stampin' Emboss Powder and heat set with the Heat Tool. Then fussy cut out using the Paper Snips. I coloured in the Faux Sea Grass Shapes using Evening Evergreen Stampin' Blend.


Ombre Gift Bag and Thank You Tag

My last project is a quick simple gift bag with a fancy gift tag, using the soon to be retired Ombre Gift Bag (155479) in Evening Evergreen and all I did was stamp the large leaf image in Evening Evergreen Ink onto the gift bag. 


To create the fancy gift tag, use the Tailor Made Tags (155563) which I just love to mix and match adding different sizes/shapes to your projects. I've die-cut out using the Artfully Composed Designer Series Paper in Calypso Coral and Evening Evergreen. 


Layering on top of the tags is a range of stamped and die-cut images, the palm leaf in Sahara Sand, Evening Evergreen, Calypso Coral and Vellum Layering Designs inked up using Soft Suede Ink with the Blending Brush.


Using the White Frayed Ribbon, I coloured it in using light Calypso Coral Stampin' Blend. To create thin strands from the Calypso Coral Frayed Ribbon by pulling apart the wide ribbon. Once it is frayed, thread it through the gift tag hole and hold it in place. I added a few of the Faux Sea Glass and coloured the clear ones using Crumb Cake Stampin' Blend.


Thank you for visiting my blog today, I would so love hear your thoughts on my project by leaving a comment below. Make sure you pop over onto Stampin' Up! Facebook page for lots of inspiration using the Artfully Composed Suite Collection.

If you would like a copy of the Stampin' Up! Mini January to June 2022 Catalogue and the new Annual Catalogue 2022 - 2023 please contact me here

If you live in Australia and don't have a demonstrator, you can purchase any of the Stampin' Up! products by shopping with me at my online store here.


Happy Stamping

Vicki Boucher


16 April 2022

Artisan Design Team - Easter Friends and Baby Cards


Hello and welcome,

My name is Vicki Boucher and I'm from Melbourne, Australia. Today I'll be sharing four projects using the Easter Friends and Happy Heartfelt Stamp Sets, turning them into Easter and baby cards and gifts tags.

I love beautiful, coordinating, vintage style cards and gift tags in soft, subtle colors with lots of layers. I'll add the list of products used at the end of my blog.


Rabbit vintage style card

This cute bunny is perfect for your Easter craft projects. For a soft, stamped image use Smoky Slate Classic Stampin' Pad and stamp the rabbit on Basic White Cardstock. Color the image with Stampin' Blends in soft pastel colors using Petal Pink, Pale Papaya, and Flirty Flamingo. Blend in the colors with the Stampin' Blend Color Lifter. Fussy cut the rabbit with Paper Snips.


To create a soft, subtle look, color your die-cut pieces using a Blending Brush and Petal Pink Ink. Lightly apply ink to the Eden Dies border. Cut the colored border die with a Paper Trimmer or Paper Snips and adhere it to the largest Tailor Made Tags die-cut piece in Basic White Cardstock and Heart & Home Designer Series Paper.


To add interest to your panels of cardstock, I used the Timeworn Type 3D Embossing Folder and dried embossed using Vellum and Petal Pink Cardstock. Use your Paper Snips along the edges of the cardstock to distress.

To finish off the card I like to add a few embellishments using the Pearl Basic Jewells. The sentiment is stamped in Basic Gray Ink to coordinate with the Heart & Home Designer Series Paper.


Baby duckling card

I just love this duckling, stamped in Smoky Slate Classic Stampin' Pad onto Basic White Cardstock. Color the image with Stampin' Blends using So Saffron and Daffodil Delight, blend the colors together. Fussy cut the duckling out with Paper Snips. 


I added Balmy Blue and Pear Pizzazz Ink with the Blending Brush to the Basic White gift tag and placed under the duckling.

It is easy to make lots of thin strands from the White 3/4" (1.9cm) Frayed Ribbon by pulling apart the wide ribbon. Once it is frayed, thread it through the gift tag hole and hold it in place.


To create a fun background, stamp your images in the same color as the cardstock. Here I've used So Saffron Cardstock and So Saffron Classic Stampin' Pad. Stamp the duckling and sentiment three times each. For the greeting I've used the "Hello baby!" sentiment from the Happy Heartfelt Stamp Set to create baby card. Stamp the sentiment in Basic Gray Ink on a strip of Basic White Cardstock.


Thank you for visiting my blog today, I would so love hear your thoughts on my projects by leaving a comment below. 

If you would like a copy of the Stampin' Up! Mini January to June 2022 Catalogue and the new Annual Catalogue 2022 - 2023 please contact me here

If you live in Australia and don't have a demonstrator, you can purchase any of the Stampin' Up! products by shopping with me at my online store here.


Happy Stamping

Vicki Boucher


List of Stampin' Up! products used

Easter Friends Stamp Set (157737)
Happy & Heartfelt Stamp Set (158005)
Tailor Made Tags Dies (155563)
Eden Dies (157831)
Basic White Cardstock (159276)
Petal Pink Cardstock (146985)
So Saffron Cardstock (105118)
Vellum Cardstock (101856)
Vellum Layering Designs (157764)
Heart & Home Designer Series Paper (157928)
Pear Pizzazz Classic Stampin’ Pad (147104)
Balmy Blue Classic Stampin’ Pad (147105)
Petal Pink Classic Stampin’ Pad (147108)
Smoky Slate Classic Stampin’ Pad (147113)
So Saffron Classic Stampin’ Pad (147109)
Basic Gray Classic Stampin’ Pad (149165)
Stampin’ Blends Color Lifter (144608)
Stampin’ Blends Petal Pink (154893)
Stampin’ Blends Pale Papaya (155519)
Stampin’ Blends Flirty Flamingo (154884)
Stampin’ Blends Calypso Coral (154881)
Stampin’ Blends So Saffron (154905)
Stampin’ Blends Daffodil Delight (154883)
Timeworn Type 3D Embossing Folder (156505)
Baker’s Twine Essentials Pack (155475)
Cotton Ribbon Combo Pack (158140)
White 3/4" (1.9 cm) Frayed Ribbon (158138)
Pearl Basic Jewels (144219)
Blending Brushes (153611)
Tear & Tape Adhesive (138955)
Mini Stampin’ Dimensionals (144108)


Comments

03 April 2022

Artisan Design Team - Seas the Day


Hello and welcome, Today I'll be sharing with you my latest project for Stampin' Up! as part of the Artisan Design Team my group was asked to create projects using the Seas the Day Bundle. This bundle is in the Mini Jan - June 2022 Catalogue and is on page 38, which includes the Seas the Day Stamp Set and Sea Dies


This bundle was so much fun to use, I love the under the sea creates in the stamp set especially the octopus. The stamp images have a watercolour look and the Sea Dies die-cut out the fish, jellyfish, starfish, crab and the octopus. There are also under the sea intricate die-cut pieces, plus a large peekaboo die which fits perfectly on a card front.


Seas The Day Bundle # 157858 


Slimline Under the Sea Card

My first project is a slimline card which has become a favourite of mine lately, I've used the seaweed image stamping it a number of times on the panel of Basic White Cardstock. 


I've used the following colours Bermuda Bay being the darkest colour, then I also added Coastal Cabana and Pool Party Inks. I would also keep on stamping on the panel to get more variation of the colour and depth.

Giving the card more dimension I used Stampin' Dimensionals under the Calypso Coral octopus and crab,  Pale Papaya starfish and Bermuda Bay for the fish.

I've used the seaweed die and die-cut out a number of times in Basic White Cardstock and lightly coloured in with the Blending Brush. and Coastal Cabana Ink. The coral is from the larger die, I've just snipped it off and added Bermuda Bay Ink with the Blending Brush.


To finish off the card I've stamped the sentiment in Bermuda Bay onto Basic White Cardstock, added a white Baker's Twine bow and Coastal Cabana Artistry Blooms Sequins.


Octopus Ocean Floor Dimensional card

Going with the same colour scheme for my second card this time I went for an ombre look using Calypso Coral and Pale Papaya for the background Shimmery White Cardstock panel. 


I used the Foam Adhesive Strips in between the two layers for more depth. The Bermuda Bay Octopus is layered onto the Calypso Coral panel with Stampin' Dimensionals.


The next ombre layer is a combination of Bermuda Bay, Coastal Cabana and Pool Party Inks onto a panel of Shimmery White Cardstock with the Blending Brush and then die-cut out with the large die from the Sea Dies. 


To create the ocean floor by using Shimmery White Embossing Paste with Bermuda Bay Ink then apply to the panel with the Palette Knife and add sequins while still wet. I used the Sparkle and Shine Sequins which is in the Mini Jan- June 2022 Catalogue, they are perfect for an under the sea scene. 


I like to add interest and contrast with the colours by balancing them out and overlapping the stamped images and detailed die-cut pieces using the different tones of blue/greens against the oranges. To finish off the card I added the sentiment using Versamark Ink onto Bermuda Bay Cardstock, adding White Stampin Emboss Powder and heat set with the Heat Tool. The Artistry Blooms Sequins are in Coastal Cabana and Calypso Coral.


Jellyfish Gift Tag

Using monochromatic tones of Bermuda Bay, I started off with the die-cut piece using the largest die from the Tailor Made Tag Dies in Bermuda Bay Cardstock. 


I stamped the seaweed stamp image onto the gift tag and layered by adding detailed dies and the stamped image of the jellyfish. 


The sentiment is fussy cut out using the Paper Snips Scissors and I added a few of the Artistry Blooms Sequins and White Baker's Twine to the gift tag. 


Thank you for visiting my blog today, I would so love hear your thoughts on my project by leaving a comment below. Make sure you pop over onto Stampin' Up! Facebook page for lots of inspiration using this bundle.

If you would like a copy of the Stampin' Up! Mini January to June 2022 Catalogue and the new Annual Catalogue 2022 - 2023 please contact me here

If you live in Australia and don't have a demonstrator, you can purchase any of the Stampin' Up! products by shopping with me at my online store here.


Happy Stamping

Vicki Boucher


24 March 2022

Colour INKspiration Challenge #CI118


 Hello and welcome,

It's the latest Colour INKspiration Challenge #CI118 and this photo was chosen by Bronwyn Eastley. I love succulents and the range of greens in this photo I just knew which stamp set I wanted to use.

The colour combination for #CI118 is Very Vanilla, Soft Succulent, Garden Green and Basic Gray. As well as the chosen colours you may also add Basic White, Basic Black, Crumb Cake and metallics to your project. We also allow 'Ivory' and 'Bronze' in the Stampin' Blends. If you don't have all the colour palette, feel free to use the closest SU substitute (ie: Mint Macaron instead of Soft Succulent .... you get the drift). 


The challenge will run for almost 3 weeks until 7pm (AEST) on Monday 11th April 2022 details to follow at the end of my blog.


Today's card is a vintage slimline card using a number of different stamp sets but mainly focusing on Flowing Flowers stamp set which is in the Stampin' Up! Jan to June 2022 Mini Catalogue. I've used all three flower images and stamped them on a 8.5cm x 21cm Shimmery White Cardstock. I didn't do any water colouring on the panel I just like the colour of the paper and how it blends in nicely with the Very Vanilla Thick Cardstock for the card base.


I've stamped the images in full strength ink and also stamping off the images for a subtle look. I added flicks of ink from the Stampin' Markers using the brush tip and I flicked ink from the lid onto the panel.


The other two stamp sets are Artfully Layered and Eden's Garden stamping images in Basic Gray. I really like the fine script stamp from the Artfully Layered Stamp Set and it's perfect for a vintage style card. 


Adding to the card is two of the flowers from Flowing Flowers Stamp Set, I've used the emboss resist technique by stamping the images in Versamark Ink onto Shimmery White Cardstock, add Stampin' White Emboss Powder and heat set with the Heat Tool. Then I used the Water Painter with Soft Succulent and Garden Green Ink for a water colour wash. Once dried I then fussy cut out the images. I added a couple of the stamped leaves in Garden Green and Soft Succulent Ink and fussy cut them out.


To finish off the card I added the sentiment by stamping it in Basic Gray Ink onto Very Vanilla Cardstock and fussy cut out. The bow which is a #Tammybow I've used Soft Succulent Weave Ribbon and Silver Simply Elegant Trim. Place the bow to the card with a couple of Glue Dots.

I hope I've inspired you with the latest challenge and I do hope you'll join in. We so look forward to seeing a variety of projects using the challenge colours. Please ensure that your project is new and made specifically for this challenge.

Use all of the challenge colours (or close substitutions) unless stated.

Upload only one picture per entry straight to the discussion wall and not in an album

Colour INKspiration Challenge #CI118 will run until 7pm (ADET) on Monday 11th April 2022.

To get your creative ideas flowing, make sure you check out the Crew's Project in the CI118 Album.

Please click on the link here to join the challenge.


Thank you for visiting my blog today, I would so love hear your thoughts on my project by leaving a comment below.

If you would like a copy of the new Stampin' Up! Mini January to June 2022 Catalogue and Annual Catalogue 2021 - 2022 please contact me here

If you live in Australia and don't have a demonstrator, you can purchase any of the Stampin' Up! products by shopping with me at my online store here.


Happy Stamping

Vicki Boucher