26 October 2022

Colour INKspiration Challenge #CI132


 Hello and welcome,

My name is Vicki Boucher, and I am from Melbourne, Australia. Tonight, it's the latest Colour INKspiration Challenge #CI132 and this photo was chosen by Cathy Pinchbeck. I just love this tropical photo; it makes me want to go on a holiday and preferably where it's not raining! 


The colour combination for #CI132 is Tahitian Tide, Orchid Oasis, Starry Sky and Old Olive. As well as the chosen colours you may also add Basic White, Very Vanilla, Basic Black, Crumb Cake, Sahara Sand and metallics to your project. We also allow 'Ivory' and 'Bronze' in the Stampin' Blends. If you don't have all the colour palette, feel free to use the closest SU substitute (ie: Pear Pizzazz instead of Old Olive .... you get the drift).

The challenge will run for almost 2 weeks until 7pm (AEST) on Monday 7th November 2022 details to follow at the end of my blog.


Today's card is a slimline birthday card using the True Beauty bundle (158984) (visit my Stampin' Up! store to purchase) which can be located on page 67 in the Stampin' Up! 2022-23 Annual Catalogue. I just love the soft watercolour look of the floral images and this stamp set is perfect for lots of stamping in the challenge colours.

Starting with a sheet of Basic White cardstock measured at 8.5cm x 21cm. I always start with the largest image then work my way around the cardstock with the different images and colours. I finish off by using the Blending Brush and add ink in Orchid Oasis and Starry Sky ink. This way I don't leave any white space around the edges. I also like to splatter ink by using the Stampin' Write markers in the challenge colours.


Next, I added a few torn strips of Starry Sky 2022-2024 In Color 6"x 6" DSP to the stamped panel. I used the Organic Beauty and Forever Flourishing Dies to die-cut out some of the images and layered them under the sentiment.


A fun way to use the Old Olive Twill Ribbon is to unravel the threads of the ribbon and you'll end up with lots of fine strands. 


To finish off the card I used the sentiment from Artistically Inked stamp set and stamped in Starry Sky ink. I added a few of the In Color 2022 - 24 Matte Decorative Dots to the card.


I hope I've inspired you with the latest challenge and I do hope you'll join in. We so look forward to seeing a variety of projects using the challenge colours. Please ensure that your project is new and made specifically for this challenge.


Upload only one picture per entry straight to the discussion wall and not in an album

Colour INKspiration Challenge #CI132 will run until 7pm (ADET) on Monday 7th November 2022.

To get your creative ideas flowing, make sure you check out the Crew's Project in the CI132 Album.

Please click on the link here to join the challenge.


Thank you for visiting my blog today, I would so love to hear your thoughts on my project by leaving a comment below.


Please email me if you would like a copy of the 2022-2023 Annual Catalogue and the July-Dec 2022 Mini Catalogue Catalogue please send me an email here

If you live in Australia and don't have a demonstrator, you can purchase any of the Stampin' Up! products by shopping with me at my Stampin' Up! online store here.

Make sure you follow me on social media via Facebook, Instagram and Pinterest.


Happy Stamping

Vicki Boucher


13 October 2022

Artisan Design Team - A Secret Santa Case


 Hello and welcome,

My name is Vicki Boucher and I'm from Melbourne, Australia. Today I'll be sharing with you a Christmas card which I've CASED from another Artisan member from the Design Team. We are all doing a secret Santa over on Instagram where each of us will be casing another Artisan. This is so fun, and I can't wait to see who has cased me!! I'll have the link to my Instagram account at the end of this blog.


My CASE of the Secret Santa Case


Here's the card I've created, and my secret Santa is Melodie from @stampingwithmelodie her card is shown here below it has lots of layers and good use of Designer Series Paper. I love her card it's so bright and joyful! Make sure you follow her over on her Instagram account.


Melodie's card Instagram @stampingwithmelodie


I've used the Leaves of Holly bundle and combined it with the Storybook Gnomes Designer Series Paper all of these products can be found in the Stampin' Up! July - December 2022 Mini Catalogue. 


I have taken the colours from the Designer Series Paper and used Pacific Point and Balmy Blue. I like how Melodie splattered the White craft ink onto the card base, it's a fun technique.


I've used three different sheets of DSP from the Storybook Gnomes Desginer Series Paper they combine well together. Under the holly and berries is a snowflake from the Wonderful Snowflakes, they have a nice shimmer shine to them. 


I've stamped the berries in Pacific Point ink onto Balmy Blue cardstock and die-cut them out. The different pieces of holly are die-cut out and I added ink to the die-cut pieces using the Blending Brush.


To finish off the card, I've stamped the sentiment in Pacific Point ink onto Basic White cardstock and die-cut out using the label die. The embellishments are Fine Sparkle Gems, they are so pretty and have a nice sparkle to them.

Make sure you head over to my Instagram page @vickiboucher to view the list of participants

Thank you for visiting my blog today, I would so love to hear your thoughts on my project by leaving a comment below.


Please email me if you would like a copy of the 2022-2023 Annual Catalogue and the July-Dec 2022 Mini Catalogue Catalogue, send me an email here

If you live in Australia and don't have a demonstrator, you can purchase any of the Stampin' Up! products by shopping with me at my Stampin' Up! online store here.

Make sure you follow me on social media via Facebook, Instagram and Pinterest.


Happy Stamping

Vicki Boucher


12 October 2022

Colour INKspiration Challenge #CI131


 Hello and welcome,

My name is Vicki Boucher, and I am from Melbourne, Australia. Tonight, it's the latest Colour INKspiration Challenge #CI131 and this photo was chosen by Bronwyn Eastley. This is such an adorable photo and I just love the colour palette.


The colour combination for #CI131 is Sweet Sorbet, Cherry Cobbler, Crumb Cake and Early Espresso. As well as the chosen colours you may also add Basic White, Very Vanilla, Basic Black, Sahara Sand and metallics to your project. We also allow 'Ivory' and 'Bronze' in the Stampin' Blends. If you don't have all the colour palette, feel free to use the closest SU substitute (ie: Poppy Parade instead of Sweet Sorbet .... you get the drift).

The challenge will run for almost 2 weeks until 7pm (AEST) on Monday 24th October 2022 details to follow at the end of my blog.

Today's card is a Christmas card using the Christmas Banners bundle (159993) (visit my Stampin' Up! store to purchase) which can be located on page 11 in the Stampin' Up! July - December 2022 Mini Catalogue. There is a variety of traditional greetings for your Christmas or holiday cards. There are different types of greenery images for both stamp images and dies.  


Christmas Banners Bundle (159993)


I really love today's colour challenge and I wanted to create a rustic vintage style card. For the background Crumb Cake panel, I've used the Timber 3D embossing folder and embossed it. Then I scored the panel every half an inch using the Paper Trimmer, this gives you a timber board look. I added Crumb Cake and Early Espresso ink to the panel using the Blending Brush. 


Next, I created a stitched hoop using the two largest stitched circles dies from the Stylish Shapes Dies and die-cut out using Cherry Cobbler Cardstock. To create the different elements of pine and leafy sprigs, I die-cut out a number of different shapes in Crumb Cake cardstock and added either Crumb Cake or Early Espresso ink with a Sponge Dauber to the images. 


The boughs of holly and berries are stamped in Sweet Sorbet ink onto Crumb Cake cardstock. I wanted some dimension for the berries, so I used Foam Adhesive Sheets, die-cut them out and added Crumb Cake Stampin' Blender Pen to the sides of the foam.


To finish off the card I heat embossed the banner and sentiment using White Stampin' Powder onto Basic Black cardstock, then die-cut using the banner die. It sits nicely over the arrangement of the hoop and leafy sprigs. I've combined three different types of ribbons and tied them into a bow, I especially love the Black & White Gingham Ribbon the most. 


I hope I've inspired you with the latest challenge and I do hope you'll join in. We so look forward to seeing a variety of projects using the challenge colours. Please ensure that your project is new and made specifically for this challenge.


Upload only one picture per entry straight to the discussion wall and not in an album

Colour INKspiration Challenge #CI131 will run until 7pm (ADET) on Monday 24th October 2022.

To get your creative ideas flowing, make sure you check out the Crew's Project in the CI131 Album.

Please click on the link here to join the challenge.


Thank you for visiting my blog today, I would so love to hear your thoughts on my project by leaving a comment below.


Please email me if you would like a copy of the 2022-2023 Annual Catalogue and the July-Dec 2022 Mini Catalogue Catalogue please send me an email here

If you live in Australia and don't have a demonstrator, you can purchase any of the Stampin' Up! products by shopping with me at my Stampin' Up! online store here.

Make sure you follow me on social media via Facebook, Instagram and Pinterest.


Happy Stamping

Vicki Boucher


09 October 2022

Stamping Sunday Blog Hop - Treats Not Tricks


Hello and welcome,

It's Stamping 2nd Sunday latest blog hop for October and for this month the design team will be showcasing the theme 'Treats Not Tricks' in our projects. The list of participants will be at the end of this blog. Did you see follow Artisan, Tami Hewlett's amazing projects? I just love her creations!

Today, I'll be sharing with two projects and turning them into 3D gifts for a special occasion such as a birthday, anniversary, engagement, wedding etc...


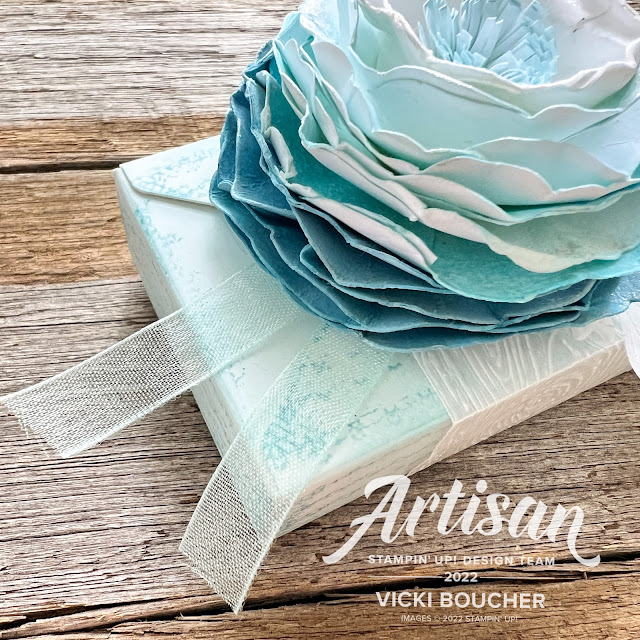
I've used the Ranunculus Romance Stamp Set and coordinating Ranunculus Dies which can be found in the Stampin' Up! Annual 2022-23 Catalogue. I haven't really used this stamp set and dies much in my projects, so this was the perfect opportunity to use them. I've also used the adorable Envelope Treat Boxes they came in a pack of 10 in white, they are easy to fold and ensemble. I've stamped images and added ink with a Blending Brush onto the box. I love the scripty stamp image, it's very vintage. 

I have to give a shout out to Charlet Mallett who is an amazing paper crafter and is also on the Artisan Design Team for 2022. She created a beautiful 3D paper flower back in March 2022 and I've CASED her flower but changed up the colours.


Blushing Bride 3D Paper Flower and Box

I think Blushing Bride is my go-to colour at the moment and it's a pretty colour to use. To make the 3D paper flower you'll need to die-cut out about 12 outline flower shapes using the flower die. You will need about 5 in Blushing Bride and 7 in Basic White Cardstock. I added Blushing Bride ink with the Blending Brush to the edges of the Basic White die-cut flowers and left one white. 


Here comes the fun part! You'll need a Bone Folder and Stampin' Spritzer filled with water. One layer at a time lightly spritz, then with the Bone Folder curve the edges inwards and crinkle the edges using your fingers. As you get closer to the center piece, cut a slit towards the middle of the flower layer and use adhesive such as Multi-Purpose Glue. You may want to cut up to four slits on the finale layer.


To assemble the flower, start at the bottom layer, add Multi-Purpose Glue as you go with each layer. To create the final center piece, I used a strip of Basic white Cardstock, coloured the edges using the Blending Brush and Blushing Bride ink. Then with Paper Snips snip all the way along the strip, creating fine slits and then roll up into a spiral. I used Stampin' Seal + to secure the spiral. To add the center piece to the flower I used the glue gun works best.


I wanted to add some sparkle to the flower, so I've used Clear Wink of Stella to the edges of each layer. It's hard to see in the photos but in real life it looks so pretty.


To create the belly band around the box I used Vellum cut the strip at 5cm x 19.5cm. Then dry embossed the Vellum strip using the Timeworn Type 3D Embossing Fold. Once embossed score at 4cm, 6.5cm, 12.5cm and 15cm to fit around the box and adhere using Stampin' Seal +


I added White Glittered Organdy Ribbon, two Vellum leaves and the sentiment stamped in Blushing Bride onto Basic White Cardstock and die-cut out using the Tailored Made Tag Dies.


Balmy Blue 3D Paper Flower and Box

I've used Balmy Blue for the second treat box and flower. Using the same technique as above. You'll need about 5 in Balmy Blue and 7 in Basic White Cardstock. I added Balmy Blue ink with the Blending Brush to the edges of the Basic White die-cut flowers and left one white. Then create your 3D flower as above directions.


To create the final center piece, I used a strip of Basic white Cardstock, coloured the edges using the Blending Brush and Balmy Blue ink. Then as above cut tiny slits all the way along the strip and roll up into a spiral. Adhere the center piece to the flower with a heat gun.


To create the belly band around the box I used Vellum cut the strip at 5cm x 19.5cm. Then dry embossed the Vellum strip using the Timber 3D Embossing Fold. Once embossed score at 4cm, 6.5cm, 12.5cm and 15cm to fit around the box and adhere using Stampin' Seal +


I added Pool Party 3/8" Sheer Ribbon, two Vellum leaves and the sentiment stamped in Balmy Blue onto Basic White Cardstock and die-cut out using the Tailored Made Tag Dies.


Thank you for visiting my blog today, I would so love to hear your thoughts on my project by leaving a comment below.

Please email me if you would like a copy of the 2022-2023 Annual Catalogue and the July-Dec 2022 Mini Catalogue, please contact me here

If you live in Australia and don't have a demonstrator, you can purchase any of the Stampin' Up! products by shopping with me at my online store here.

Make sure you follow me on social media via Facebook, Instagram and Pinterest.


Happy Stamping

Vicki Boucher


To see all of the amazing projects by the Stamping Sunday Design Team please click on their names below. Next up is the fabulous creative Mikaela Titheridge from the UK.


03 October 2022

Creation Station Blog Hop - Tweets & Treats


  Hello and welcome

My name is Vicki Boucher, and I am from Melbourne, Australia. This is the latest hop with the design team at Creation Station, if you have come from Martin Stone or you may have started with me. Please make sure you hop around and see everyone's amazing projects. I'll pop a link at the end of my blog to hop around....

The design team at Creation Station are presenting their projects with the theme "Tweets or Treats" anything 3D.


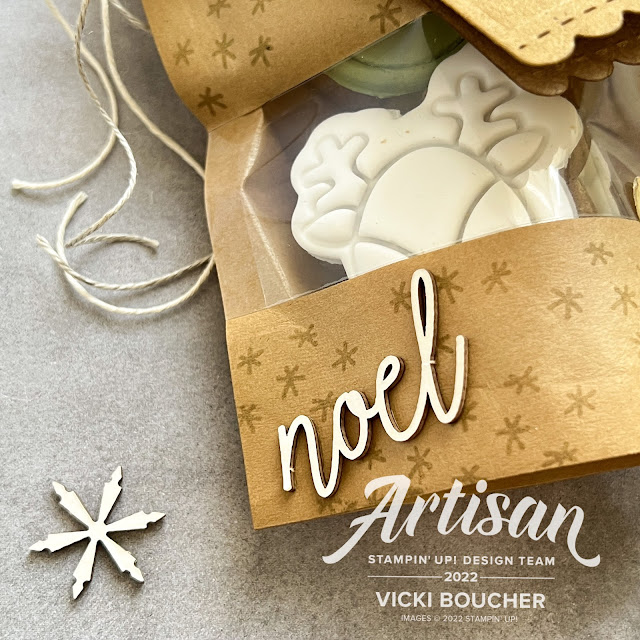
Today's project I've created two Christmas gift packages using the Peekaboo Treat Bags (159252) and other Stampin' Up! products which are located in either the Annual Stampin' Up 2022 - 2023 Catalogue and the Mini July - Dec 2022 Catalogue. I love the treat bags they come in Kraft and White and they are food safe. I've placed a couple of gingerbread biscuits inside them for show. 


Noel Kraft Peekaboo Treat Bag


For my first treat bag I've used the natural Kraft package, using the cluster of stars stamp which is from Spruced Up Stamp Set and stamped it in Crumb Cake ink. I added different types of ribbon and baker's twine for a natural look. 


My go to at the moment is the Celebration Tag Dies which I just love so much! The cute gift tag is die-cut out in Kraft Paper, then I added Soft Suede ink with a Blending Brush and I used the Celebrate with Tags Stamp Set for the To: and From: in Soft Suede ink. The stitched heart & snowflake are die-cut out using Very Vanilla Cardstock and sponged using Crumb Cake ink.


The cute natural wood elements are from the Santa Express Memories & More card pack (159595) there are a variety of different words for Christmas and other occasions, plus stars as well. I use the Fine Tip Glue Pen for these elements.


Made with Love White Peekaboo Treat Bag


Next is a traditional red and white treat bag, this could be for Christmas or any occasion. I love the sentiment from the Celebrate with Tags Stamp Set, I've heat embossed it by stamping the image in Versamark onto Real Red Cardstock, add White Stampin' Emboss Powder and heat set with the Heat Tool. There is a label die to die-cut out the sentiment and I just used the paper snips scissors to cut out the word "with".


I used the same tag die from the Celebrations Tag Dies, die-cut out three tags one in Real Red Cardstock, Snowflake Specialty Vellum and layered over in Basic White Cardstock. The snow flake is die-cut out the same sheet of  Snowflake Specialty Vellum. The cute winter gloves are stamped in Real Red ink onto Basic White Cardstock and die-cut out. To finish off the tag I added White Glittered Organdy Ribbon and White Baker's Twine.


To add some love to the white treat bag, I used the cluster of hearts stamp and stamped the image in Real Red ink. Plus two stitched Real Red hearts.


Thank you for visiting my blog today, I would so love to hear your thoughts on my project by leaving a comment below. Make sure you pop over to Julie Mercer Beltramo for lots of inspiration using Tweets or Treats.


Please email me if you would like a copy of the 2022-2023 Annual Catalogue and the July-Dec 2022 Mini Catalogue, please contact me here

If you live in Australia and don't have a demonstrator, you can purchase any of the Stampin' Up! products by shopping with me at my online store here.

Make sure you follow me on social media via Facebook, Instagram and Pinterest.


Happy Stamping

Vicki Boucher


02 October 2022

Global Design Project #GDP362 Sketch Challenge

 Hello and welcome,

Today I'll be sharing with you the latest sketch challenge #GDP362 for Global Design Project make sure you check out their designs using the sketch below.


I've created a fun non-traditional Christmas card for the challenge using Blushing Bride with black & white elements. Have you seen the Stars Treat Bags (159833) in the Stampin' Up! Mini 2022 Catalogue? They are so adorable for gift packaging, but how about for a card front as well! I love the star cut outs. It really makes your card pop, by using Stampin' Dimensionals and layered over the card front.


Here I've used the Paper Snips Scissors and cut along the side of the Treat Bag. I used the Paper Trimmer to trim up the edges even and then run the blade along the edges to rough them up. I added Blushing Bride ink with the Blending Brush to Treat Bag panel.


The sentiment is from Celebrate with Tags Stamp Set, heat embossed using White Stampin' Emboss Powder and Basic Black Cardstock. I used the large label die from the Stylish Shapes Dies to die-cut the sentiment. 


My favourite combination of ribbons together would have to be the Black & White Gingham Ribbon and White Glittered Organdy Ribbon. I've snipped the ribbons in half and tied them in a bow together. The embellishments are Petal Pink Solid Faceted Gems which works well against Blushing Bride.


Thank you for visiting my blog today, I would so love to hear your thoughts on my project by leaving a comment below.


If you would like a copy of the Stampin' Up! Mini January to June 2022 Catalogue and Annual Catalogue 2022 - 2023 please contact me here

If you live in Australia and don't have a demonstrator, you can purchase any of the Stampin' Up! products by shopping with me at my online store here.


Happy Stamping

Vicki Boucher