27 March 2022

Artisan Design Team - Waves of the Ocean Collection


 Hello and welcome,

I'm so happy to share with you my latest project using the Waves of Ocean Collection for Stampin' Up! which you can find on their Facebook page and Instagram account. I'll pop the link at the end of this blog post. 


This collection is amazing! Included in the collection are the following - Waves of Inspiration Stamp Set, Waves Dies, Waves of the Ocean 12" x 12" Designer Series Paper, Blue Foils 12" x 12" Specialty Paper and Rhinestone Waves Basic Jewels. You can purchase all of it in one go by using #161797 for $140 AUD or individually. The Waves of Inspiration Stamp Set and Waves Dies will be carrying over into the new Stampin' Up! Annual Catalogue for 2022 to 2023, but the rest is only available while supplies last.


Slimline Card

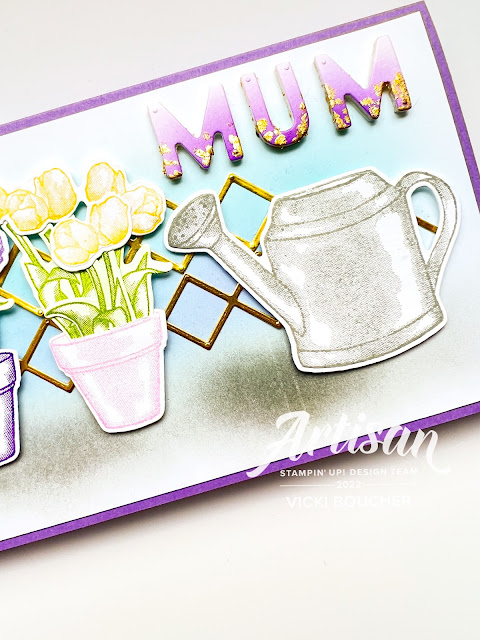
When I was thinking about creating my card I knew it was going to be a slimline card and I just love the shades of blues in the Designer Series Paper. The Basic white panel was my starting point for the background of the three die-cut circles. I started with Night of Navy Ink, applied to the bottom of the panel and slowly worked my way up going lighter with the Night of Navy. Then I applied a little of Misty Moonlight Ink. The ombre look is one of my favourite ways to use colour.


Starting with the top circle I've used the wave stamp image and used the emboss resist technique using Versamark Ink, White Emboss Powder and heat set with the Heat Tool. I applied Pacific Point Ink with the Blending Brush to the wave and removed any excess of ink with a baby wipe. I used the second largest Circle Die to cut out the wave. 


I've used the beautiful Waves of the Ocean Designer Series Paper for the middle circle and die-cut out using the second largest Circle Die. I also used the Waves of Ocean DSP for the third circle and this time I layered over the DSP using the two waves dies. To finish off the circles I used the stunning Night of Navy Specialty Foil Paper by die cutting the paper with two of the circle dies. To do this you use the largest circle die with the second largest circle die and I recommend it's best to use a little Washi Tape so they don't move around on your Stampin' Cut & Emboss Machine.


The stamped images of the pelican, pillars and sentiment are all in Night of Navy Ink. I used the smaller stitched label for the sentiment and tied White Bakers Twine on each end. I just had to add a couple of the Night of Navy Rhinestones to finish off the card.

Two stitched gift tags

I created two gift tags using different items from the Waves of the Ocean Collection and Tailor Made Tags Dies.


Using the largest stitched tag die, I die-cut out the Waves of the Ocean DSP in the pretty blue paper and layered it over a another tag die-cut piece in Basic White Cardstock. As before with the card I used the wave stamp image and stamped it in Versmark Ink onto Basic White Cardstock, added white emboss powder and heat set with the Heat Tool. I used Pacific Point Ink for both tags, the darker one I just applied more ink.


I like to match the greeting with the colour of the waves so for the pale blue gift tag, I stamped off first in Pacific Point Ink before applying to the cardstock. I also used the lighter shade of blue in the Rhinestones. The seagulls are die-cut out in Basic White Cardstock. 


I used the Night of Navy Foil for the seagulls, Night of Navy Ink for the sentiment and Night of Navy Rhinestones for the darker blue gift tag. I used the blue Denim Ribbon and frayed the ribbon to create long thin strands to tie the gift tags together. For the other gift tag I used the White Faux Linen Ribbon and to create long thin strands.


Thank you for visiting my blog today, I would so love hear your thoughts on my project by leaving a comment below. Make sure you pop over onto Stampin' Up! Facebook page for lots of inspiration from the Artisan Design Team using this collection.

If you would like a copy of the new Stampin' Up! Mini January to June 2022 Catalogue and the brand new Stampin' Up! Annual Catalogue 2022 - 2023 please contact me here

If you live in Australia and don't have a demonstrator, you can purchase any of the Stampin' Up! products by shopping with me at my online store here.


Happy Stamping

Vicki Boucher


24 March 2022

Colour INKspiration Challenge #CI118


 Hello and welcome,

It's the latest Colour INKspiration Challenge #CI118 and this photo was chosen by Bronwyn Eastley. I love succulents and the range of greens in this photo I just knew which stamp set I wanted to use.

The colour combination for #CI118 is Very Vanilla, Soft Succulent, Garden Green and Basic Gray. As well as the chosen colours you may also add Basic White, Basic Black, Crumb Cake and metallics to your project. We also allow 'Ivory' and 'Bronze' in the Stampin' Blends. If you don't have all the colour palette, feel free to use the closest SU substitute (ie: Mint Macaron instead of Soft Succulent .... you get the drift). 


The challenge will run for almost 3 weeks until 7pm (AEST) on Monday 11th April 2022 details to follow at the end of my blog.


Today's card is a vintage slimline card using a number of different stamp sets but mainly focusing on Flowing Flowers stamp set which is in the Stampin' Up! Jan to June 2022 Mini Catalogue. I've used all three flower images and stamped them on a 8.5cm x 21cm Shimmery White Cardstock. I didn't do any water colouring on the panel I just like the colour of the paper and how it blends in nicely with the Very Vanilla Thick Cardstock for the card base.


I've stamped the images in full strength ink and also stamping off the images for a subtle look. I added flicks of ink from the Stampin' Markers using the brush tip and I flicked ink from the lid onto the panel.


The other two stamp sets are Artfully Layered and Eden's Garden stamping images in Basic Gray. I really like the fine script stamp from the Artfully Layered Stamp Set and it's perfect for a vintage style card. 


Adding to the card is two of the flowers from Flowing Flowers Stamp Set, I've used the emboss resist technique by stamping the images in Versamark Ink onto Shimmery White Cardstock, add Stampin' White Emboss Powder and heat set with the Heat Tool. Then I used the Water Painter with Soft Succulent and Garden Green Ink for a water colour wash. Once dried I then fussy cut out the images. I added a couple of the stamped leaves in Garden Green and Soft Succulent Ink and fussy cut them out.


To finish off the card I added the sentiment by stamping it in Basic Gray Ink onto Very Vanilla Cardstock and fussy cut out. The bow which is a #Tammybow I've used Soft Succulent Weave Ribbon and Silver Simply Elegant Trim. Place the bow to the card with a couple of Glue Dots.

I hope I've inspired you with the latest challenge and I do hope you'll join in. We so look forward to seeing a variety of projects using the challenge colours. Please ensure that your project is new and made specifically for this challenge.

Use all of the challenge colours (or close substitutions) unless stated.

Upload only one picture per entry straight to the discussion wall and not in an album

Colour INKspiration Challenge #CI118 will run until 7pm (ADET) on Monday 11th April 2022.

To get your creative ideas flowing, make sure you check out the Crew's Project in the CI118 Album.

Please click on the link here to join the challenge.


Thank you for visiting my blog today, I would so love hear your thoughts on my project by leaving a comment below.

If you would like a copy of the new Stampin' Up! Mini January to June 2022 Catalogue and Annual Catalogue 2021 - 2022 please contact me here

If you live in Australia and don't have a demonstrator, you can purchase any of the Stampin' Up! products by shopping with me at my online store here.


Happy Stamping

Vicki Boucher


13 March 2022

Stamping Sunday Blog Hop - Ribbon


 Hello and welcome,

It's Stamping 2nd Sunday latest blog hop for March, hosted by Sara Levin and for this month the design team will be showcasing the theme 'Ribbon' in our projects. The list of participants will be at the end of this blog.

Stampin' Up! have a variety of different types of beautiful ribbons in different array of sizes, textures and patterns. My favourite and go to would be Baker's Twine and Linen Thread, but I wanted to use a mix of different types of ribbons for my projects. I have always wanted to try out the "Tammy bow" which is from Tammy Wilson  @stampspaperscissors her creations are amazing and I love her bows!


I've created two cards using the "Tammy bow" technique and I've used most of the products from the Heart & Home Suite which is in the Stampin' Up! Jan to June 2022 Mini Catalogue. Both the Blessings in Home bundle and Honeybee Home Bundle are amazing! The stamped images are perfect to watercolour in and the die-cut images add lots of interest to your projects.

To create the bow you'll need at least two or more ribbons, cutting the ribbon in half vertically and looping the ribbons with your fingers and then tying to secure the bow. Add your bow to your finished project with a couple of Glue Dots. It took me awhile to get the bow in place, but once I finally had it. It was a wow factor for my projects. I highly recommend trying it out. 


Honeybee Home bundle card


The ribbons I've used for this card are Gray Granite Shimmer Ribbon and Pale Papaya Open Weave Ribbon. The stamped images are watercoloured using Black Stazon Ink onto White Shimmery Cardstock and coloured in using Pale Papaya and Basic Gray Ink. I've used Vellum for the die-cut images and placed over Basic Gray Heart & Home Doily.


I've been using Vellum a lot in my projects lately and I thought using the Hive 3D Embossing Folder would look amazing in Vellum. I added Pale Papaya Ink with the Blending Brush for a subtle look.


I love the Heart & Home 12" x 12" Designer Series Paper, I especially like the Basic Gray wood paper and it's perfect for the base panel of my card layered over Basic Gray Cardstock. I added a few of the Iridescent Rhinestones to finish off the card.


Blessings of Home bundle card


The ribbons I've used for this card are Black Glittered Organdy Ribbon, Pale Papaya Open Weave Ribbon and Silver Elegant Trim. The stamped images are in Black Stazon Ink onto White Shimmery Cardstock and watercoloured in using Pale Papaya and Basic Gray Ink. I used White Shimmery Cardstock for the die-cut pieces and layered them over Square Vellum Doily. 


To add contrast to the card, I used Basic Black Cardstock and dried embossed using the Hive 3D Embossing Folder and I ruffed up the edges by scraping the edges of the Cardstock with the mini spatula end of Your Take Your Pick tool.


The black and white Vellum from the Layering Designs paper is perfect for your card making or scrapbooking. I've used the black script writing and layered it over thick Basic White Cardstock. I added a little bling to the card using the Basic Jewels Rhinestones.


 Thank you for visiting my blog today, I would so love hear your thoughts on my project by leaving a comment below.

To see all of the amazing projects by the Stamping Sunday Design Team please click on their names below.


1. Sara Levin  
2. Tami Hewlett  
3. Su Mohr  
4. Vicki Boucher 
5. Anne Marie Hile  


If you would like a copy of the new Stampin' Up! Mini January to June 2022 Catalogue and Annual Catalogue 2021 - 2022 please contact me here

If you live in Australia and don't have a demonstrator, you can purchase any of the Stampin' Up! products by shopping with me at my online store here.


Happy Stamping

Vicki Boucher


09 March 2022

Colour INKspiration Challenge #CI117


 Hello and welcome,

It's the latest Colour INKspiration Challenge #CI117 and this photo was chosen by Michele Miller. Gorgeous photo of the birds for our challenge. These colours are not my usual pick for a combination but I do love a challenge! 

The colour combination for #CI117 is Crushed Curry, Real Red, Bermuda Bay and Basic Black. As well as the chosen colours you may also add Basic White, Very Vanilla, Crumb Cake and metallics to your project. We also allow 'Ivory' and 'Bronze' in the Stampin' Blends. If you don't have all the colour palette, feel free to use the closest SU substitute (ie: Bumblebee instead of Crushed Curry .... you get the drift). 


The challenge will run for almost 2 weeks until 7pm (AEST) on Monday 21st March 2022 details to follow at the end of my blog.

Today's card is a fun fold card which I've created this same fun fold a number of times over the last year. I recently purchased the Hello Ladybug bundle 157699 $56.50 AUD (10% bundle savings) which is from the Stampin' Up! Jan - June 2022 Mini Catalogue. This bundle consists of Hello Ladybug Stamp Set and Ladybug Builder Punch. The stamped images of the ladybird are so sweet and I always love a punch when it comes to paper crafting.


Measurements for fun fold

Card base Real Red Cardstock cut 21cm x 14.9cm

Score and fold at 5.5cm, 8.5cm, 12.5cm and 15.5cm

Basic White Cardstock cut two at 14.4cm x 5cm and cut middle piece at 14.4cm x 3.5cm

Black and white gingham Designer Series Paper cut two at 13.9cm x 4.5cm

The black and white gingham DSP is from Pattern Party Designer Series Paper and it's from the Stampin' Up! May to April 2022 Annual Catalogue.


To create the middle panel I started with the trio of flowers and stamped them in Crushed Curry, followed by the other two images in Real Red and Bermuda Bay. 

The challenge colours are perfect for the ladybug. A great tip is when stamping sold images in Black Memento Ink and you see white cardstock coming through, colour in the image using the dark Black Stampin' Blend. 


Using the Ladybug Builder Punch for the wings in Crushed Curry and Basic White Cardstock. I stamped the top layer in Real Red and used Versamark Ink, Black Stampin' Emboss Powder and heat set using the Heat Tool for the black dots.


The daisy stamp image from the Hello Ladybug Stamp Set can be punch out using the Medium Daisy Punch, so I stamped two images onto Basic White Cardstock in Crushed Curry Ink. The large leaf is stamped in Bermuda Bay and I used my Paper Snips to fussy cut out the image. 


To finish off the card I used three different sentiments from the Hello Ladybug Stamp Set and stamped them in Versamark Ink onto a strip of Basic Black Cardstock, then I added White Stampin' Emboss Powder and heat set with the Heat Tool.


I hope I've inspired you with the latest challenge and I do hope you'll join in. We so look forward to seeing a variety of projects using the challenge colours. Please ensure that your project is new and made specifically for this challenge.

Use all of the challenge colours (or close substitutions) unless stated.

Upload only one picture per entry straight to the discussion wall and not in an album

Colour INKspiration Challenge #CI117 will run until 7pm (ADET) on Monday 21st March 2022.

To get your creative ideas flowing, make sure you check out the Crew's Project in the CI117 Album.

Please click on the link here to join the challenge.


Thank you for visiting my blog today, I would so love hear your thoughts on my project by leaving a comment below.

If you would like a copy of the new Stampin' Up! Mini January to June 2022 Catalogue and Annual Catalogue 2021 - 2022 please contact me here

If you live in Australia and don't have a demonstrator, you can purchase any of the Stampin' Up! products by shopping with me at my online store here.


Happy Stamping

Vicki Boucher


07 March 2022

Creation Station blog hop - Rainbow Rearrange


Hello and welcome it's Sunday or should I say a very early start to Monday morning here in Melbourne, Australia. This is the latest hop with the design team at Creation Station, if you have come from Dani Dziama who is from America or you may of started with me. Please make sure you hop around and see everyone's amazing projects. I'll pop a link at the end of my blog....

The design team at Creation Station are presenting their projects with the theme "Rainbow Rearrange" the challenge is all about rethinking, reimagining, flipping, or recoloring the traditional rainbow. I went for something a little bit different and decided on a pink rainbow with a twist.


I've used the Brilliant Rainbow Dies which is part of the Rainbow of Happiness bundle in the Stampin' Up! January to June 2022 Mini Catalogue. I haven't used the larger Rainbow die and I thought the Stampin' Blends alcohol technique would be perfect with this image.

I've used one of my favourite Stampin' Up! colors Polished Pink, I just love the bright happy colour and it's perfect with black and white. If you haven't tried the Stampin' Blends alcohol technique here's a few tips on how to do it.


You'll need Vellum Cardstock, Stampin' Blends (brighter the better), Isopropyl alcohol, ear syringe, a shot glass or bowl and a painters brush. This is such a fun technique to try out. I used both the light and dark brush end of the Polished Pink Stampin' Blends and added ink to the sheet of Vellum. Then with the painters brush I added the alcohol to the Vellum and used the ear syringe to puff air and move the alcohol around the Vellum. 

Once the Polished Pink Rainbow was die-cut out, I then also die-cut out a Basic White Rainbow and layered it under the pink rainbow. This makes the rainbow stronger when adding the pieces to the Basic White panel.


I also used the mini Rainbow boarder die for a pretty soft pink to go under the Basic White panel. To achieve a soft pink I first coloured a strip of Basic White Cardstock with Polished Pink Ink and the Blending Brush. Then I die-cut out two pieces using the mini Rainbow boarder. 


To go with the different shades of pinks I went with the Black and White paper from the Pattern Party Designer Series Paper which is in the hostess section of the Annual Catlogue and there's 48 sheets of this amazing paper. I used the Cloud Punch and punched out two spotty clouds to layer over the Rainbow. 


I needed a birthday card so I used the sentiment from the Artistically Inked Stamp Set and heat embossed White Stampin' Emboss Powder onto Basic Black Cardstock. To finish off I added Black/White Baker's Twine and Polished Pink Jewels to the card.

Now it's time to visit the very creative Barb Pfeffer to visit her blog. I'm looking forward to reading all about her creations. Just click on the next link below.


I would so love hear your thoughts on my project by leaving a comment below.

If you would like a copy of the new Stampin' Up! Mini January to June 2022 Catalogue and Annual Catalogue 2021 - 2022 please contact me here

If you live in Australia and don't have a demonstrator, you can purchase any of the Stampin' Up! products by shopping with me at my online store here.

Happy Stamping

Vicki Boucher


04 March 2022

Artisan Design Team - Flowering Rain Boots Bundle


 Hello and welcome, Today I'll be sharing with you my latest project for Stampin' Up! as part of the Artisan Design Team we were asked to create cards using the Flowering Rain Boots Bundle. This bundle includes the Flowering Rain Boots Stamp Set and Rain Boots Dies creating with this set is sure to brighten up anyone's day.


I love the stamped images it gives you a water colour look without water colouring and you can either add more colour with many colouring tools or leave the white space on your stamped images. I also loved the idea of placing the flowers at the top of the boots as another option.


Flowering Rain Boots Bundle


Purple Rain Boots Card

Starting with the purple rain boots ombre card, for the background panel I've used Blending Brushes with Gorgeous Grape and Highland Heather Ink to create the ombre look which In applied to Highland Heather Cardstock. The boots are stamped in Fresh Freesia, the flowers are in So Saffron and Mango Melody Ink. 


To colour in your stamped images, use the mini spatula end of your Take Your Pick Tool and scrape a little of the Soft pastel onto a Clear Block. Colour in the image with a Sponge Dauber. Here I've used Granny Apple Green Soft Pastel with Old Olive Ink for the stamp image.


I've used the Circle Dies in Basic White Cardstock and Gold Foil to add some dimension to the card. I also used the gardening tool die and die-cut in Gold Foil. The lattice die is die-cut out in Basic White Cardstock and I added Balmy Blue Ink with the Blending Brush. 

The sentiment is stamped in Gorgeous Grape Ink and I used my Paper Snips to break up the greeting. To finish off the card I placed a few of the Iridescent Rhinestones to the card.


Three pots slimline card

The slimline card is using the same colours as the previous card, but this time I've used the watering can stamped image in Smoky Slate and die-cut out using the coordinating watering can die.

For the background panel, I've created a mix of blues and mauves for the sky and Smoky Slate for the ground and shadows. I used Gold Foil using the lattice die and die-cut out a number of pieces to add interest to the background. 

The pots are stamped in Highland Heather, Gorgeous Grape and Fresh Freesia Ink. I used the tulips stamp and stamped them in Mango Melody, Gorgeous Grape and So Saffron Ink. 


I wanted a card for my Mum for Mother's Day, so I used the Playful Alphabet Dies for the greeting. To create the ombre look I added Gorgeous Grape Ink with the Blending Brush to a strip of Basic White Cardstock. I start by applying ink lightly with the brush and then add more as I go. I just had to add a little of the Gold Gilded Leafing to the letters by adding tiny drops of Multipurpose Glue and wait for it to dry before adding the Gilded Leafing.


Thank you for visiting my blog today, I would so love hear your thoughts on my project by leaving a comment below. Make sure you pop over onto Stampin' Up! Facebook page for lots of inspiration using this bundle.

If you would like a copy of the new Stampin' Up! Mini January to June 2022 Catalogue and Annual Catalogue 2021 - 2022 please contact me here

If you live in Australia and don't have a demonstrator, you can purchase any of the Stampin' Up! products by shopping with me at my online store here.


Happy Stamping

Vicki Boucher