28 October 2021

#TGIF339 Technique Challenge Christmas Card


Hello and welcome,

I've entered into the latest TGIF Challenges which is a technique challenge - Alcohol Blending using Stampin' Blends (alcohol markers), Vellum Cardstock, Isopropyl Alcohol, paint brush and ear syringe. 


I've created a few of these cards in the past and they are always lots of fun to create using this technique. The choice of Stampin' Blends I've used for this Christmas card are Night of Navy, Balmy Blue, Polished Pink, Magenta Madness and Fresh Freesia. The combination of colours mix well together and I've used some of the same colours through out the card.


You start by adding the Stampin' Blends using the brush tip onto the sheet of Vellum Cardstock, then apply tiny drops using the Isopropyl Alcohol with the brush and then puff air by using the ear syringe. This is a fun technique and I highly recommend trying it out.


To create the rest of the card I've used the Sparkle of Season Stamp Set and Seasonal Swirl Dies. I've used Basic White Cardstock for the wreath and applied ink using the Blending Brush and Sponge Daubers.


I added extra leaves using left over paper from the Wonderful Snowflakes Embellishments, I adore the iridescent look of the foil.


The bear is from the Count on Me Stamp Set and is watercolour using Fresh Freesia and Polished Pink Ink. To finish off the card I applied the Subtle Shimmer Sequins and stamped the greeting in Night of Navy Ink onto Basic White Cardstock.


Need the supplies that I've mentioned above? You can purchase all Stampin' Up! products from my online store here or send me a message and I'll be happy to help you out with your order.

Thank you for visiting my blog today, I would so love hear your thoughts on my project by leaving a comment below.

If you would like a copy of the new Stampin' Up! Mini August to December 2021 Catalogue and Annual Catalogue 2021 - 2022 please contact me here

If you live in Australia and don't have a demonstrator, you can purchase any of the Stampin' Up! products by shopping with me at my online store here.


Happy Stamping

Vicki Boucher


27 October 2021

Colour INKspiration Challenge #CI110


Hello and welcome,

It's the latest Colour INKspiration Challenge #CI110 and this photo was chosen by Colour INKspiration Crew Member, Liz Gross. It's a beautiful photo and the colours are gorgous for this latest challenge. 


The colour combination for #CI110 is Pale Papaya, Cajun Craze, Basic Black and Shaded Spruce. As well as the chosen colours you may also add Basic White, Very Vanilla, Crumb Cake, Sahara Sand and metallics to your project. We also allow 'Ivory' and 'Bronze' in the Stampin' Blends. If you don't have all the colour palette, feel free to use the closest SU substitute (ie: Evening Evergreen instead of Shaded Spruce .... you get the drift). 

The challenge will run for almost 2 weeks until 7pm (AEST) on Monday 8th November 2021 details to follow at the end of my blog.


I was inspired by the photo to create something to do with nature for my card. As I don't have any mushrooms in Stampin' Up! products, I deceided to use the Sparkle of the Season Stamp Set, Seasonal Swirls Dies and Timber 3D Embossing Folder for my project. All of the products are from the Stampin' Up! July to December 2021 Mini Catalogue.


Starting with the card base in Basic Black Cardstock and a panel of  Basic Black Cardstock embossed using the Timer 3D Embossing Folder.


The Seasonal Swirl Dies have three amazing wreaths to create with I used the autumn/fall wreath die in Pale Papaya Cardstock and I added Cajun Craze Ink with a Sponge Dauber. I also used Basic Black Cardstock for another wreath and layered it under the Pale Papaya wreath.


I also die cut out a number of leaves in the different challenge colours and added ink with a Sponge Dauber to the leaves. I have used Pale Papaya Cardstock for the two pumpkins, then sponged Pale Papaya and Cajun Craze Ink to the pumpkins. 


The greeting is from the Sparkle of the Season Stamp Set and is heat embossed using Versmark Ink, White Stampin Emboss Powder onto Basic Black Cardstock and heat set with the Heat Tool.

I hope you can participate in this latest round and as we so look forward to seeing a variety of projects using the challenge colours. Please ensure that your project is new and made specially for this challenge.

Colour INKspiration Challenge #CI110 will run until 7pm (ADET) on Monday 8th November 2021.

To get your creative ideas flowing, make sure you check out the Crew's Project in the CI110 Album.

Please click on the link here to join the challenge.

Just a reminder to upload your challenge photo straight to the discussion wall and not in an album.

Thank you for visiting my blog today, I would so love hear your thoughts on my project by leaving a comment below.

If you would like a copy of the new Stampin' Up! Mini August to December 2021 Catalogue and Annual Catalogue 2021 - 2022 please contact me here

If you live in Australia and don't have a demonstrator, you can purchase any of the Stampin' Up! products by shopping with me at my online store here.


Happy Stamping

Vicki Boucher


24 October 2021

Global Design Project #GDP314 Sketch Challenge


 Hello and welcome,

I've entered my self in the latest Global Design Project #GDP314 and it's a sketch challenge. The team have come up with a great layout, so make sure you see their beautiful creations over at Global Design Project


For my project I wanted to create a Christmas card using Sparkle of the Season Stamp Set and Seasonal Swirls Dies they are on page 58 of the Stampin' Up! Mini Catalogue. I love the different swirl dies in the set and how you can create different seasons by using this bundle.


Starting with the Basic White panel I've stamped the snow flakes in Versamark Ink, adding Stampin' White Emboss Powder and heat set with the Heat Tool. Then using the Blending Brush and Gorgeous Grape Ink I've created an Ombre look starting from the bottom of the cardstock and working my up.


The next Ombre layer using Basic White Cardstock, Blending Brush and Gorgeous Grape Ink, but this time leaving more white at the top.


I've created a three layer wreath using Vellum and Silver Foil Specialty Pack in the two lighter colours of silver. I also added lots of Clear Wink of Stella to the foil and Vellum for lots of sparkle. I also used Fresh Freesia Shimmer Vellum for the decorative dots.


The other elements to the card are the trees from the Christmas Trees Dies, Fresh Freesia Vellum Snowflake which is from the So Many Snowflakes Dies and the larger iridescent foil snowflake is from the Wonderful Snowflakes. The greeting is stamped in Gorgeous Grape Ink onto Basic White Cardstock. 


Thank you for visiting my blog today, I would so love hear your thoughts on my project by leaving a comment below.

If you live in Australia and don't have a demonstrator, you can purchase any of the Stampin' Up! products by shopping with me at my online store here.


Happy Stamping

Vicki Boucher

17 October 2021

Global Design Project #GDP313 Color Challenge


Hello and welcome,

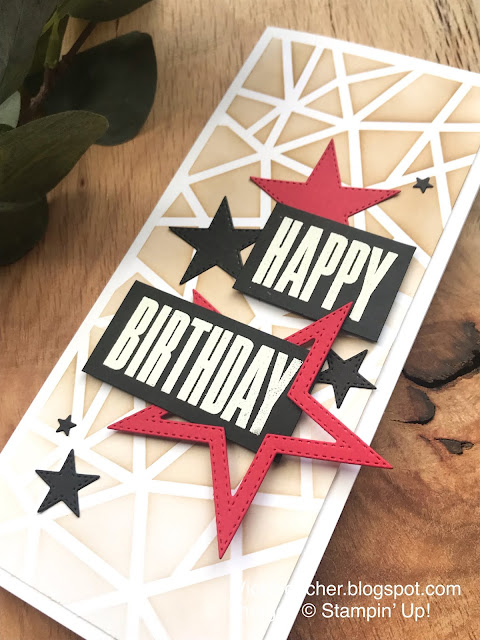
I just had to enter myself in the latest Global Design Project #GDP313 Color Challenge which ends very soon. I love the challenge colors combined together they are Real Red, Sahara Sand and Basic Black. These colors scream Christmas to me but I needed to make a masculine birthday card, so I was up for the challenge! 


I've created a slimline card for the challenge using the Stampin' Up! Decorative Masks - basic patterns there are 4 masks and you'll find them on page 128 in the Annual Catalogue for 2021 - 2022. 


To create my Ombre design I've used a panel of Basic White Cardstock applied Sahara Sand Ink with the Blending Brush and lightly added ink to the paper. As the mask is only 6" x 6" I've moved the mask up the panel and added more ink.


The Stitched Stars Dies are perfect for masculine cards, I've die-cut the stars out in different sizes using Basic Black and Real Red Cardstock. 


To finish off the card I've used the Biggest Wish Stamp Set for the sentiment I love the big bold words and they go well with the card. I've heat embossed White Stampin' Emboss Powder onto Basic Black Cardstock. 

Thank you for visiting my blog today, I would so love hear your thoughts on my project by leaving a comment below.

If you live in Australia and don't have a demonstrator, you can purchase any of the Stampin' Up! products by shopping with me at my online store here.


Happy Stamping

Vicki Boucher

14 October 2021

Colour INKspiration Challenge #CI109


 Hello and welcome,

It's the latest Colour INKspiration Challenge #CI109 and this photo was chosen by Colour INKspiration Crew Member, Lou Kitzelman. It's a stunning photo and I love the colours for this latest challenge. 


The colour combination for #CI109 is Crushed Curry, Pool Party, Cinnamon Cider and Early Espresso. As well as the chosen colours you may also add Basic White, Very Vanilla, Basic Black, Crumb Cake, Sahara Sand and metallics to your project. We also allow 'Ivory' and 'Bronze' in the Stampin' Blends. If you don't have all the colour palette, feel free to use the closest SU substitute (ie: Daffodil Delight instead of Crushed Curry .... you get the drift). 

The challenge will run for almost 2 weeks until 7pm (AEST) on Monday 25th October 2021 details to follow at the end of my blog.


For my card I've created a thank you slimline card using the Celebrate Sunflowers, Quiet Meadow and Sweet Strawberry Stamp Set. I came across a beautiful Delicate Dahlias card on Pinterest by Ruth Trice - Artful Stampin. I love her creations and how she uses images of the stamps together to make a one sheet wonder and then cut into cards. I thought this colour palette was perfect for something like this.


Starting with Basic White Cardstock for the slimline panel, I started with the largest Sunflower stamp from the Celebrate Sunflowers Stamp Set and stamped the image using Crushed Curry ink. Next I used Cinnamon Cider ink for the smaller Sunflowers and Early Espresso for the leaves.


I love the stamp images from the Quiet Meadow Stamp Set, I've used the larger single flower in Pool Party Ink and stamped over part of the Sunflower using the masking technique with a sticky posted note. This gives the impression of the Pool Party flower is behind the Sunflower.


Also in the Quiet Meadow Stamp Set there are two smaller flower images, I've stamped them in Pool Party, Crushed Curry and Cinnamon Cider Ink. I've used a flower image from the Sweet Strawberry Stamp Set and stamped in Pool Party Ink.


As you can see there are lots of fine splatter dots on the card. To create this effect I've used the brush tip from the Stampin' Write Markers in Pool Party, Early Espresso, Crushed Curry and flick ink against the lid. I also used Cinnamon Cider in the Stampin' Blends and used the same technique.


Using the Sunflower Dies for the die-cuts, I've either used Pattern Party Designer Series Paper or coloured cardstock and added ink with the Blending Brush. The black and white gingham DSP is from the Pattern Party DSP layered under the greeting which is from the Celebrate Sunflowers Stamp Set. The card base is in Crushed Curry.

I hope you can participate in this latest round and as we so look forward to seeing a variety of projects using the challenge colours. Please ensure that your project is new and made specially for this challenge.

Colour INKspiration Challenge #CI109 will run until 7pm (ADET) on Monday 25th October 2021.

To get your creative ideas flowing, make sure you check out the Crew's Project in the CI109 Album.

Please click on the link here to join the challenge.

Just a reminder to upload your challenge photo straight to the discussion wall and not in an album.

Thank you for visiting my blog today, I would so love hear your thoughts on my project by leaving a comment below.

If you would like a copy of the new Stampin' Up! Mini August to December 2021 Catalogue and Annual Catalogue 2021 - 2022 please contact me here

If you live in Australia and don't have a demonstrator, you can purchase any of the Stampin' Up! products by shopping with me at my online store here.


Happy Stamping

Vicki Boucher


10 October 2021

Stamping Sunday Blog Hop As the Season Turns


 Hello and welcome,

It's Stamping 2nd Sunday latest blog hop for October, hosted by Sara Levin and for this month the design team will be showcasing the theme 'As the Season Turns' in our projects. The list of participants will be at the end of this blog.


Today's projects are a handmade birthday card and 3D Mini Paper Pumpkin Box using Stampin' Up! products from the Stampin' Up! Annual Catalogue 2021 - 2022. I've used the beautiful Artistically Inked Bundle which is a favourite of mine and it's been awhile since I last used this bundle. I was totally inspired by the lovely Tammi Hewlett with her beautiful Artistically Inked projects which she created for the Artisan Design Team earlier this year. I just had to CASE her Mini Paper Pumpkin Box. 

The season is certainly turning here in Melbourne, Australia it's Spring now and there's so many stunning flowers in their abundance. The smell of fresh flowers brightens up my day when I go for a walk with my family. The days are getting longer too with daylight savings started last weekend for us in the Southern Hemisphere.


Fun Fold Birthday Card

I love creating this type of fun fold card, I've made a few this year and it's my daughter's birthday coming up later on this month. Her favourite colours are shades of purples and blues, so I've used Gorgeous Grape and Pacific Point with a little of Night of Navy Ink. 


Anything is possible with the stamps from the Artistically Inked Stamp Set, I just love to create with this stamp set so much! I've used the unique watercolor stamp for the background panels by stamping off so the image is light and I can always add more colour as I go. Using the Blending Brush I've lightly added ink to the panel giving it an Ombre look.


To create the flower images from the stamp set, I've used the Stamparatus and applied ink using the Blending Brush. It's best to start off light and then you can always add more ink as you go. I love this technique as you can achieve different shades with the one colour. The larger flower I've added a little of Night of Navy ink to give it more detail and depth.


For the front panel and base layer for the flowers. I've used the large scalloped stitched die from the Stitched So Sweetly Dies and added Gorgeous Grape ink with the Blending Brush.


The detailed flower die-cut image is in Basic White and sits nicely over the large blue flower. The greeting and smaller flowers finish off the card. I wanted to add some embellishments and the Pastel Pearls in shades of Gorgeous Grape and Highland Heather was perfect! Plus it's my daughter's middle name Pearl.


                                                                    Measurements

Card Base - Thick Basic White Cardstock  

Cut at 21cm x 14.9cm

Score and fold at 5.5cm, 8.5cm, 12.5 and 15.5cm


Panels - Basic White Cardstock -

Cut two at 14.4cm x 5cm each

Cut middle piece at 14.4cm x 3.5cm


3D Mini Paper Pumpkin Box

The white Mini Paper Pumpkin Boxes are perfect for gift giving and they are food safe as well. They come in a pack of ten and are easy to put together and don't need adhesive. 


Starting with the bottom layer in Gorgeous Grape Cardstock and layering a panel in Basic White Cardstock. Using Gorgeous Grape ink I've stamped the watercolor stamp multiple times and added ink with the Blending Brush. 


The images of the flowers are the same as the card, using the same technique with the Blending Brushes and Stamparatus. The larger flower has more darker blues using more Night of Navy ink. 


The detailed dies from the Artistic Dies are in Basic White Cardstock layered underneath the stamped images and White Glittered Organdy Ribbon. I've added more of the Pastel Pearls and lots of Clear Wink of Stella to create lots of shimmer to the box. 


I didn't add a greeting to the Mini Paper Pumpkin Box as I think it looks nice as a keep sake box and it will be perfect for my daughter to place her jewellery inside the box.


Thank you for visiting my blog today, I would so love hear your thoughts on my project by leaving a comment below.


Thank you for visiting my blog today. To see all of the amazing projects by the Stamping Sunday Design Team please click on their names below.

1. Sara Levin  
2. Su Mohr  
3. Tami Hewlett  
4. Cheryll Miller  
5. Mikaela Titheridge  
6. Anne Marie Hile  
7. Jay Soriano  
8. Vicki Boucher


If you live in Australia and don't have a demonstrator, you can purchase any of the Stampin' Up! products by shopping with me at my online store here.


Happy Stamping

Vicki Boucher


06 October 2021

Colour Creations Blog Hop - Week 19 Gorgeous Grape


 Hello and welcome

Tonight I'll be sharing with you Week 19 of Colour Creations Blog Hop with the Art With Heart Team in Australia. 

Each week there will be a Colour Creations blog hop showcasing Stampin' Up! Colors with a selection of members from the Art With Heart Team who will be joining in. I'm looking forward to seeing their beautiful projects using the Stampin' Up! Colors. You'll be able to hop around by clicking on the next link at the end of my blog.


The colour for tonight is Gorgeous Grape which is part of the Brights Collection and comes in a number of different mediums such as Ink, Cardstock, DSP etc....I've used Gorgeous Grape with Fresh Freesia, Highland Heather and White for my hand made birthday card.


I've created a fun background technique which involves using the Stampin' Blends, Vellum Cardstock, pure alcohol, paint brush and ear syringe. Starting with the Stampin' Blends I applied the brush tip to the Vellum and then I added a little of the pure alcohol with the paint brush. The next step you have to act quickly before the alcohol dries, use the ear syringe and puff air over the alcohol to move it around. With this technique you always get a different outcome.


Gorgeous Grape comes in the Ombre Specialty Paper and it sparkles too! So it was perfect for the butterfly die-cut image from the Brilliant Wings Dies. As the butterfly is delicate I like to use the Adhesive Sheets instead of Multipurpose Liquid Glue which is usually my go to for adhesive.


The layer under the Vellum is Basic White Cardstock, I've applied Liquid Glue with a Sponge Dauber and lightly added the glue. 


I've used a panel of Fresh Freesia Shimmer Vellum Specialty Paper under Basic White Cardstock and then adhered to the card base of Gorgeous Grape. To finish off the card I've used the sentiment from Art Gallery Stamp Set in Gorgeous Grape Ink onto Basic White Cardstock with an added thin strip of Fresh Freesia Vellum Specialty Paper.

Thank you for visiting my blog today, I would so love hear your thoughts on my project by leaving a comment below.


Now it's time to hop along and visit the lovely Rachel Palmieri to see her project please click on the link below


If at any time you find a broken link, please head to the blog of this week’s host of the AWH Colour Creations Blog Hop, CatherineProctor, and she will have the list of all participants.

If you live in Australia and don't have a demonstrator, you can purchase any of the above Stampin' Up! products by shopping with me at my online store here.


Happy Stamping

Vicki Boucher